本文主要是介绍k8s学习(八) 初始化容器 init container,希望对大家解决编程问题提供一定的参考价值,需要的开发者们随着小编来一起学习吧!
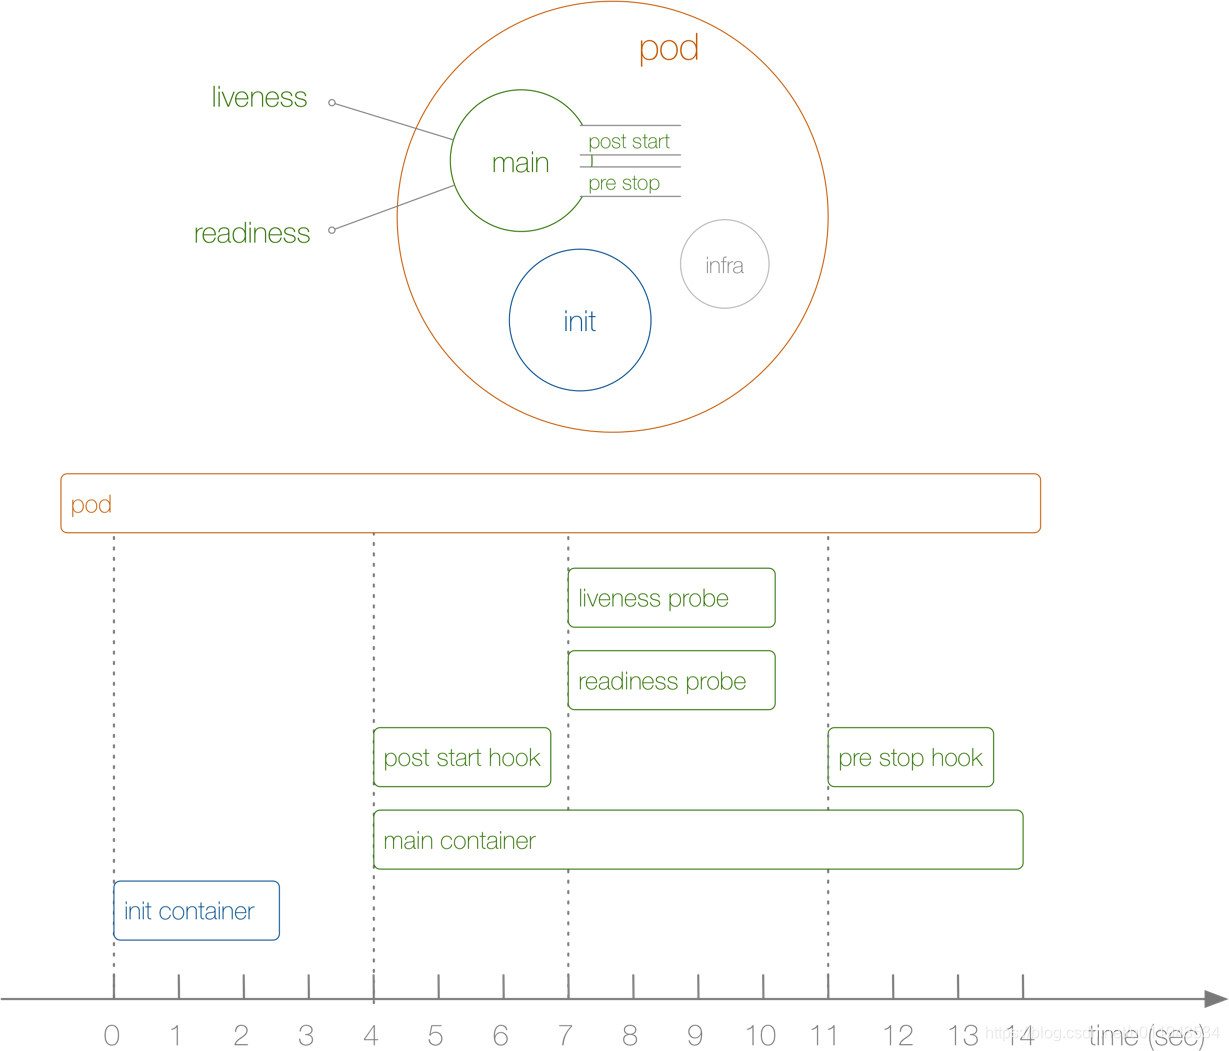
Init Container就是用来做初始化工作的容器,可以是一个或者多个,如果有多个的话,这些容器会按定义的顺序依次执行,只有所有的Init Container执行完后,主容器才会被启动。我们知道一个Pod里面的所有容器是共享数据卷和网络命名空间的,所以Init Container里面产生的数据可以被主容器使用到的。
1、创建init-demo.yaml
apiVersion: v1
kind: Pod
metadata:name: init-demo
spec:containers:- name: init-demoimage: 172.16.10.190:8008/helloworld:0.0.5ports:- containerPort: 8080volumeMounts:- name: workdirmountPath: /usr/share/nginx/htmlinitContainers:- name: installimage: 172.16.10.190:8008/helloworld:0.0.5command:- wget- "-O"- "/work-dir/index.html"- http://www.baidu.comvolumeMounts:- name: workdirmountPath: "/work-dir"volumes:- name: workdiremptyDir: {}imagePullSecrets:- name: myregistrykey6
spec.volumes指的是Pod中的卷,spec.containers.volumeMounts,是将指定的卷 mount 到容器指定的位置,相当于docker里面的-v 宿主机目录:容器目录,我们这里使用的是emptyDir{},这个就相当于一个共享卷,是一个临时的目录,生命周期等同于Pod的生命周期。
初始化容器执行完,会下载一个 html 文件映射到emptyDir{},而主容器也是和 spec.volumes 里的emptyDir{} 进行映射,所以nginx容器的/usr/share/nginx/html`目录下会映射 index.html 文件。
kubectl create -f init-demo1.yaml
2、进入容器查看下载的html
[root@k8s-node1 k8s]# kubectl exec -it init-demo -n default -- /bin/sh
/ # pwd
/
/ # ls
app.jar bin dev etc home lib linuxrc media mnt proc root run sbin srv sys tmp usr var
/ # cd /usr/share
/usr/share # ls
X11 alsa ca-certificates doc man misc nginx p11-kit
/usr/share # cd nginx/html/
/usr/share/nginx/html # ls
index.html
/usr/share/nginx/html # cat index.html
<!DOCTYPE html>
<!--STATUS OK--><html> <head><meta http-equiv=content-type content=text/html;charset=utf-8><meta http-equiv=X-UA-Compatible content=IE=Edge><meta content=always name=referrer><link rel=stylesheet type=text/css href=http://s1.bdstatic.com/r/www/cache/bdorz/baidu.min.css><title>百度一下,你就知道</title></head> <body link=#0000cc> <div id=wrapper> <div id=head> <div class=head_wrapper> <div class=s_form> <div class=s_form_wrapper> <div id=lg> <img hidefocus=true src=//www.baidu.com/img/bd_logo1.png width=270 height=129> </div> <form id=form name=f action=//www.baidu.com/s class=fm> <input type=hidden name=bdorz_come value=1> <input type=hidden name=ie value=utf-8> <input type=hidden name=f value=8> <input type=hidden name=rsv_bp value=1> <input type=hidden name=rsv_idx value=1> <input type=hidden name=tn value=baidu><span class="bg s_ipt_wr"><input id=kw name=wd class=s_ipt value maxlength=255 autocomplete=off autofocus></span><span class="bg s_btn_wr"><input type=submit id=su value=百度一下 class="bg s_btn"></span> </form> </div> </div> <div id=u1> <a href=http://news.baidu.com name=tj_trnews class=mnav>新闻</a> <a href=http://www.hao123.com name=tj_trhao123 class=mnav>hao123</a> <a href=http://map.baidu.com name=tj_trmap class=mnav>地图</a> <a href=http://v.baidu.com name=tj_trvideo class=mnav>视频</a> <a href=http://tieba.baidu.com name=tj_trtieba class=mnav>贴吧</a> <noscript> <a href=http://www.baidu.com/bdorz/login.gif?login&tpl=mn&u=http%3A%2F%2Fwww.baidu.com%2f%3fbdorz_come%3d1 name=tj_login class=lb>登录</a> </noscript> <script>document.write('<a href="http://www.baidu.com/bdorz/login.gif?login&tpl=mn&u='+ encodeURIComponent(window.location.href+ (window.location.search === "" ? "?" : "&")+ "bdorz_come=1")+ '" name="tj_login" class="lb">登录</a>');</script> <a href=//www.baidu.com/more/ name=tj_briicon class=bri style="display: block;">更多产品</a> </div> </div> </div> <div id=ftCon> <div id=ftConw> <p id=lh> <a href=http://home.baidu.com>关于百度</a> <a href=http://ir.baidu.com>About Baidu</a> </p> <p id=cp>©2017 Baidu <a href=http://www.baidu.com/duty/>使用百度前必读</a> <a href=http://jianyi.baidu.com/ class=cp-feedback>意见反馈</a> 京ICP证030173号 <img src=//www.baidu.com/img/gs.gif> </p> </div> </div> </div> </body> </html>
/usr/share/nginx/html # 3、初始化容器与钩子、健康检测的区别

这篇关于k8s学习(八) 初始化容器 init container的文章就介绍到这儿,希望我们推荐的文章对编程师们有所帮助!


