本文主要是介绍[js高手之路] html5 canvas系列教程 - 开始路径beginPath与关闭路径closePath详解,希望对大家解决编程问题提供一定的参考价值,需要的开发者们随着小编来一起学习吧!
路径在canvas绘图中,经常被用到,是一个非常重要的概念.
比如:我们要在canvas画出3条直线,要求用不同的颜色加以区分.
 1 <style>
 2 body {
 3     background: #000;
 4 }
 5 #canvas{
 6     background:white;
 7 }
 8 </style>
 9 <script>
10 window.onload = function(){
11     var oCanvas = document.querySelector( "#canvas" ),
12         oGc = oCanvas.getContext( '2d' );
13
14         oGc.strokeStyle = 'red';
15         oGc.moveTo( 50, 50 );
16         oGc.lineTo( 500, 50 );
17         oGc.stroke();
18
19         oGc.strokeStyle = 'orange';
20         oGc.moveTo( 50, 150 );
21         oGc.lineTo( 500, 150 );
22         oGc.stroke();
23
24         oGc.strokeStyle = 'yellow';
25         oGc.moveTo( 50, 250 );
26         oGc.lineTo( 500, 250 );
27         oGc.stroke();
28 }
29 </script>
30 </head>
31 <body>
32 <canvas id="canvas" width="600" height="300"></canvas>
33 </body>
在画每一条线之前,我都用storeStyle设置了线的颜色,但是,出来的结果却是3条黄色的线,并不是红、橙、黄三条颜色不同的线。为什么呢?
首先我们要搞清楚canvas渲染图形,它是基于状态的,所谓状态就是每一次用( stroke/fill )之类的API渲染图形的时候,canvas会检查整个程序定义的( strokeStyle, fillStyle, lineWidth等 )当一个状态值没有被改变时,canvas就一直用这个状态。如果被改变,这里就要注意了:
1,如果使用beginPath()开始一个新的路径,则不同路径使用当前路径的值
2,如果没有使用beginPath()开始一个新的路径,后面的会覆盖前面的.
而我们这个程序就是属于第2种情况,尽管strokeStyle被改变了,但是没有用beginPath()开启新路径,所以前面两个strokeStyle会被最后一个strokeStyle='yellow'覆盖。所以3条线都是黄色.
看完这段解释,你应该知道怎样修改了吧?
只需要把每条线设置在不同的路径中,就可以区分了
 1 <style>
 2 body {
 3     background: #000;
 4 }
 5 #canvas{
 6     background:white;
 7 }
 8 </style>
 9 <script>
10 window.onload = function(){
11     var oCanvas = document.querySelector( "#canvas" ),
12         oGc = oCanvas.getContext( '2d' );
13
14         oGc.beginPath();
15         oGc.strokeStyle = 'red';
16         oGc.moveTo( 50, 50 );
17         oGc.lineTo( 500, 50 );
18         oGc.stroke();
19
20         oGc.beginPath();
21         oGc.strokeStyle = 'orange';
22         oGc.moveTo( 50, 150 );
23         oGc.lineTo( 500, 150 );
24         oGc.stroke();
25
26         oGc.beginPath();
27         oGc.strokeStyle = 'yellow';
28         oGc.moveTo( 50, 250 );
29         oGc.lineTo( 500, 250 );
30         oGc.stroke();
31 }
32 </script>
33 </head>
34 <body>
35 <canvas id="canvas" width="600" height="300"></canvas>
36 </body>
closePath:关闭路径
所谓关闭路径就是:指的是将同一个路径中的起点与终点相连接.
比如,我们画个三角形,不使用路径的时候,我们这样做:
 1 <style>
 2 body {
 3     background: #000;
 4 }
 5 #canvas{
 6     background:white;
 7 }
 8 </style>
 9 <script>
10 window.onload = function(){
11     var oCanvas = document.querySelector( "#canvas" ),
12         oGc = oCanvas.getContext( '2d' );
13
14     oGc.moveTo( 50, 50 );
15     oGc.lineTo( 250, 50 );
16     oGc.lineTo( 250, 150 );
17     oGc.lineTo( 50, 50 );
18     oGc.stroke();
19 }
20 </script>
21 </head>
22 <body>
23 <canvas id="canvas" width="600" height="300"></canvas>
24 </body>
最后一次用lineTo( 50, 50 )连接到起点,如果我们使用closePath,就不需要这一步操作了.
 1 <style>
 2 body {
 3     background: #000;
 4 }
 5 #canvas{
 6     background:white;
 7 }
 8 </style>
 9 <script>
10 window.onload = function(){
11     var oCanvas = document.querySelector( "#canvas" ),
12         oGc = oCanvas.getContext( '2d' );
13
14     oGc.moveTo( 50, 50 );
15     oGc.lineTo( 250, 50 );
16     oGc.lineTo( 250, 150 );
17     oGc.closePath();
18     oGc.stroke();
19 }
20 </script>
21 </head>
22 <body>
23 <canvas id="canvas" width="600" height="300"></canvas>
24 </body>
在stroke之前,用closePath关闭路径,他就会把( 250, 150)这个点和起始点( 50, 50 )连接起来.
画2个三角形:
 1     var oCanvas = document.querySelector( "#canvas" ),
 2         oGc = oCanvas.getContext( '2d' );
 3
 4     oGc.moveTo( 50, 50 );
 5     oGc.lineTo( 250, 50 );
 6     oGc.lineTo( 250, 150 );
 7     oGc.closePath();
 8     oGc.stroke();
 9
10     oGc.moveTo( 50, 150 );
11     oGc.lineTo( 250, 150 );
12     oGc.lineTo( 250, 250 );
13     oGc.closePath();
14     oGc.stroke();
使用路径,绘制两个不同颜色的三角形:
 1 <style>
 2 body {
 3     background: #000;
 4 }
 5 #canvas{
 6     background:white;
 7 }
 8 </style>
 9 <script>
10 window.onload = function(){
11     var oCanvas = document.querySelector( "#canvas" ),
12         oGc = oCanvas.getContext( '2d' );
13
14     //这段oGc.beginPath可有可无,不会影响结果,但是建议加上,代码可读性比较好一点
15     oGc.beginPath();
16     oGc.strokeStyle = 'red';
17     oGc.moveTo( 50, 50 );
18     oGc.lineTo( 250, 50 );
19     oGc.lineTo( 250, 150 );
20     oGc.closePath();
21     oGc.stroke();
22
23     oGc.beginPath();
24     oGc.strokeStyle = '#09f';
25     oGc.moveTo( 50, 150 );
26     oGc.lineTo( 250, 150 );
27     oGc.lineTo( 250, 250 );
28     oGc.closePath();
29     oGc.stroke();
30 }
31 </script>
32 </head>
33 <body>
34 <canvas id="canvas" width="600" height="300"></canvas>
35 </body>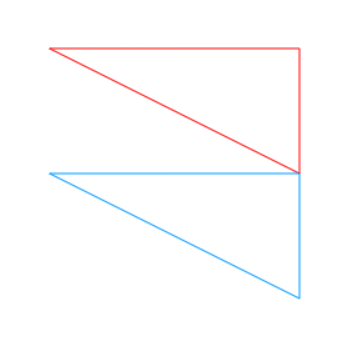
这篇关于[js高手之路] html5 canvas系列教程 - 开始路径beginPath与关闭路径closePath详解的文章就介绍到这儿,希望我们推荐的文章对编程师们有所帮助!


