本文主要是介绍WPF Prism框架搭建,希望对大家解决编程问题提供一定的参考价值,需要的开发者们随着小编来一起学习吧!
WPF Prism框架搭建
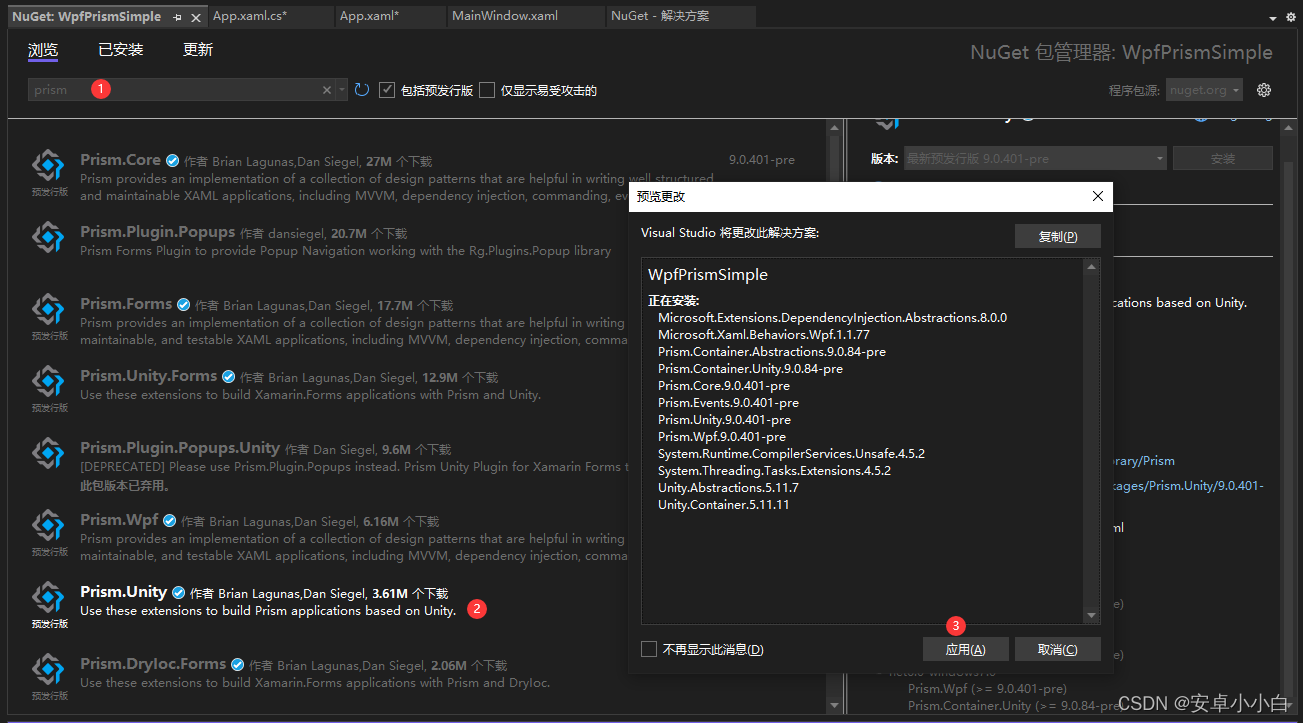
1.引入Prism框架
在Nuget包管理器中搜索Prism,并添加到项目中
2.在项目中使用prism框架
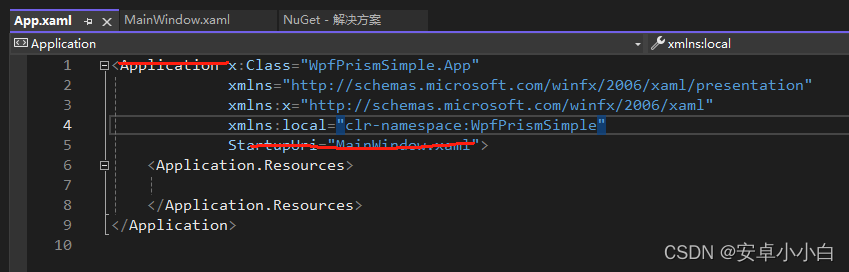
2.1 修改app.xaml
-
删除项目中自带的StartupUri
-
修改Application节点为prism:PrismApplication
-
引入prism命名空间
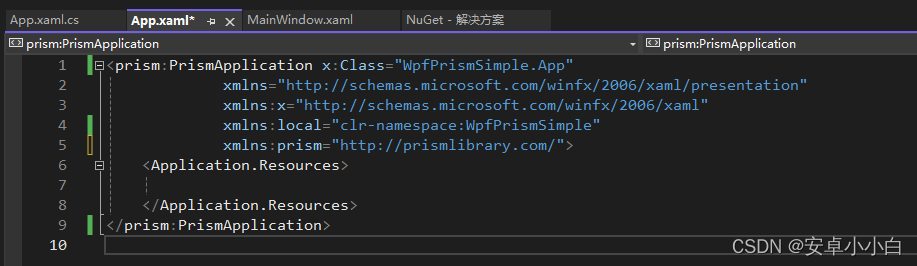
<prism:PrismApplication x:Class="WpfPrismSimple.App"xmlns="http://schemas.microsoft.com/winfx/2006/xaml/presentation"xmlns:x="http://schemas.microsoft.com/winfx/2006/xaml"xmlns:local="clr-namespace:WpfPrismSimple"xmlns:prism="http://prismlibrary.com/"><Application.Resources><ResourceDictionary><!--  全局样式  -->...<ResourceDictionary.MergedDictionaries><!--  样式模板  -->...</ResourceDictionary.MergedDictionaries></ResourceDictionary></Application.Resources>
</prism:PrismApplication>
2.2 修改app.xaml.cs
- 将原继承的Application替换成PrismApplication
- 实现PrismApplication的抽象方法
CreateShellRegisterTypes
- 使用容器构建界面显示
public partial class App : PrismApplication
{protected override Window CreateShell(){return Container.Resolve<MainWindow>();}protected override void RegisterTypes(IContainerRegistry containerRegistry){}
}
3.实现Mvvm
3.1 View和ViewModel自动关联
-
View文件必须放在Views文件夹下,ViewModel文件必须放在ViewModels文件夹下
-
ViewModel命名必须是View文件名称+ViewModel结尾
-
View文件的xaml中需要增加自动关联属性
xmlns:prism="http://prismlibrary.com/"
xmlns:prism="http://prismlibrary.com/"
prism:ViewModelLocator.AutoWireViewModel="True"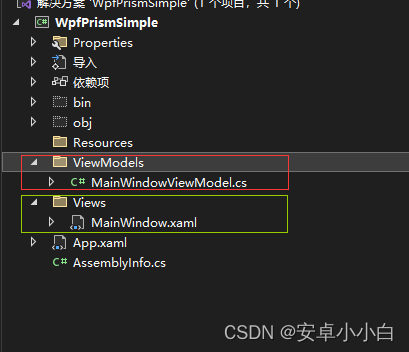
3.2 View和ViewModel手动关联
- 通过手动在App类中的RegisterTypes方法中关联View和ViewModel
protected override void RegisterTypes(IContainerRegistry containerRegistry)
{#region 路由管理//通过RegisterForNavigation进行手动关联containerRegistry.RegisterForNavigation<MainWindow, MainWindowViewModel>();#endregion
}
4.属性绑定
- 在ViewModel中继承
Prism.Mvvm.BindableBase类,并定义一个InputText属性,用于绑定TextBox的Text属性。代码示例如下:
public class MainWindowViewModel : BindableBase
{private string _InputText;public string InputText{get { return _InputText; }set { SetProperty(ref _InputText, value); }}
}
- 在XAML中,将TextBox的Text属性绑定到ViewModel的
InputText属性
<TextBox Text="{Binding SearchText, Mode=TwoWay, UpdateSourceTrigger=PropertyChanged}">
</TextBox>
5.方法绑定
5.1使用 Command
在Button、RadioButton等有Command属性的控件使用命令,将点击事件发送到ViewModel中
<ButtonWidth="200"Height="40"Command="{Binding TextClickCommand}"Content="test click" />
/// <summary>
/// 无参命令
/// </summary>
public ICommand TestClickCommand { get; set; }public MainWindowViewModel()
{TestClickCommand = new DelegateCommand(TestClickExecuted);
}private void TestClickExecuted()
{Console.WriteLine("TestClickExecuted");
}
5.2使用 Behavior
1. 首先,在ViewModel中添加一个命令(Command)来处理TextChanged事件。定义一个实现ICommand接口的属性,并在构造函数中将其初始化为一个DelegateCommand或其他实现ICommand接口的类。
public class MainViewModel
{public ICommand TextChangedCommand { get; set; }public MainViewModel(){TextChangedCommand =  new DelegateCommand<string>(TextChangedExecuted);}private void TextChangedExecuted(string text){// 处理TextChanged事件的逻辑}
}
2. 在XAML中,将TextBox的TextChanged事件绑定到ViewModel中定义的TextChangeCommand,并使用EventTrigger将事件触发绑定到Command,然后将TextBox的TextChanged事件绑定到ViewModel中的Command:
<UserControl...xmlns:i="http://schemas.microsoft.com/xaml/behaviors"...><TextBox Text="{Binding InputText}"><i:Interaction.Triggers><i:EventTrigger EventName="TextChanged"><i:InvokeCommandAction Command="{Binding TextChangedCommand}" CommandParameter="{Binding Text, RelativeSource={RelativeSource Mode=FindAncestor, AncestorType={x:Type TextBox}}}" /></i:EventTrigger></i:Interaction.Triggers></TextBox></UserControl>- 获取在ListBox使用SelectionChanged将选中项事件绑定到ViewModel:
<!-- 数据列表 --><ListBoxx:Name="listBox" ItemContainerStyle="{StaticResource NormalListBoxItem}"ItemTemplate="{StaticResource OSDDataItemTemplate}"ItemsSource="{Binding ModelList}"SelectedIndex="{Binding SelectOsdIndex}"SelectionChanged="DataList_SelectionChanged"><i:Interaction.Triggers><i:EventTrigger EventName="SelectionChanged"><i:InvokeCommandAction Command="{Binding SelectChangedCommand}" CommandParameter="{Binding ElementName=listBox, Path=SelectedItem}" /></i:EventTrigger></i:Interaction.Triggers></ListBox>
6.事件聚合器 Event Aggregator
在Prism框架中,可以使用事件聚合器(Event Aggregator)来实现多个ViewModel之间的松散耦合通信。事件聚合器允许ViewModel之间通过发布和订阅事件来进行通信,而不需要直接引用彼此,从而减少它们之间的依赖性。
以下是在Prism框架中使用事件聚合器的步骤:
- 首先,在
App.xaml.cs文件中初始化事件聚合器:
protected override void RegisterTypes(IContainerRegistry containerRegistry)
{containerRegistry.RegisterSingleton<IEventAggregator, EventAggregator>();
}
- 在需要进行通信的ViewModel中,注入
IEventAggregator接口,并定义一个事件类:
public class UpdateEvent : PubSubEvent<string>
{
}public class FirstViewModel : BindableBase
{private readonly IEventAggregator _eventAggregator;public FirstViewModel(IEventAggregator eventAggregator){_eventAggregator = eventAggregator;// 订阅事件_eventAggregator.GetEvent<UpdateEvent>().Subscribe(UpdateMethod);}private void UpdateMethod(string message){// 处理事件}
}
- 在另一个ViewModel中,也注入
IEventAggregator接口,并订阅事件:
public class SecondViewModel : BindableBase
{private readonly IEventAggregator _eventAggregator;public SecondViewModel(IEventAggregator eventAggregator){_eventAggregator = eventAggregator;// 发布事件_eventAggregator.GetEvent<UpdateEvent>().Publish("Message from SecondViewModel");}
}
通过上述步骤,FirstViewModel和SecondViewModel之间可以通过事件聚合器进行松散耦合的通信。当SecondViewModel发布UpdateEvent事件时,FirstViewModel中的UpdateMethod方法会被调用,并传递消息作为参数。
这种方式可以帮助在Prism框架中实现多个ViewModel之间的通信,使它们之间更加解耦合
7.区域 Region
在Prism框架中,区域(Region)是一种特殊的控件,用于动态加载和管理视图的容器。通过使用区域,可以实现灵活的模块化设计和动态的视图切换。以下是一个简单的示例代码,演示如何在Prism框架中使用区域:
- 首先,定义一个区域控件(如ContentControl)来表示区域,在XAML文件中:
<ContentControl Name="MainRegion" prism:RegionManager.RegionName="MainRegion" />
在这个示例中,我们创建了一个名为MainRegion的区域,通过prism:RegionManager.RegionName属性来标识它。
- 然后,在ViewModel或者Module中,使用
IRegionManager接口来导航到该区域并加载视图:
public class MainViewModel : BindableBase
{private readonly IRegionManager _regionManager;public MyModule(IRegionManager regionManager){_regionManager = regionManager;}public void Initialize(){_regionManager.RegisterViewWithRegion("MainRegion", typeof(MyView));}
}
在这个示例中,我们在Initialize方法中通过_regionManager.RegisterViewWithRegion方法将MyView视图注册到名为MainRegion的区域中。
- 最后,创建并定义
MyView视图(UserControl),并对其进行需要的创建、展示和绑定等操作。
通过以上步骤,区域管理器(RegionManager)会自动加载MyView视图到MainRegion的区域中。通过Prism框架的区域机制,我们可以实现模块化设计,将应用程序拆分成多个模块,每个模块负责自己的视图和逻辑,并通过区域进行展示和管理。
希望这个简单示例对你有帮助,如果有任何问题或需要进一步的说明,请随时告诉我。
8.对话框 DialogService
在Prism框架中,DialogService是一个用于显示对话框的服务,它提供了一种方便的方式让ViewModel调用对话框而不依赖于具体的UI组件。以下是一个简单的示例代码,演示如何在Prism框架中使用DialogService来显示对话框:
- 首先,在
App.xaml.cs中注册DialogService服务:
protected override void RegisterTypes(IContainerRegistry containerRegistry)
{containerRegistry.RegisterDialog<ConfirmationDialog, ConfirmationDialogViewModel>();
}
这里我们注册了一个名为ConfirmationDialog的对话框和相应的ViewModelConfirmationDialogViewModel。
- 在需要显示对话框的ViewModel中,注入
IDialogService服务,并调用ShowDialog方法:
public class MyViewModel : BindableBase
{private readonly IDialogService _dialogService;public MyViewModel(IDialogService dialogService){_dialogService = dialogService;}public void ShowConfirmationDialog(){var result = _dialogService.ShowDialog("ConfirmationDialog", new DialogParameters(), null);if (result.Result == ButtonResult.OK){// 用户点击了确定按钮}}
}
在上述示例中,当需要显示对话框时,调用ShowDialog方法并传递对话框的名称(“ConfirmationDialog”)、参数(DialogParameters对象)和回调方法。最后根据用户操作的结果进行相应的处理。
- 创建对应的对话框视图和ViewModel:
对话框视图(如ConfirmationDialog.xaml)和ViewModel(如ConfirmationDialogViewModel.cs)。在对话框的ViewModel中实现对话框逻辑,并在需要的时候通过IDialogAware接口返回用户操作的结果。
这篇关于WPF Prism框架搭建的文章就介绍到这儿,希望我们推荐的文章对编程师们有所帮助!


