本文主要是介绍qml 实现tableview 双击修改编辑,长按提示,希望对大家解决编程问题提供一定的参考价值,需要的开发者们随着小编来一起学习吧!
qml 实现tableview ,功能包括
1 样式设置,背景,行,列,表头,滚动条
2 实现双击item ,进行编辑,按回车或者点击其他item,保存修改
3 点击选中item
4 长按 item,出现提示,鼠标释放,提示消失。
qml 代码
import QtQuick 2.6
import QtQuick.Window 2.2
import QtQuick.Layouts 1.2
import UserInfoModel 1.0import QtQuick 2.12import QtQuick 2.2
import QtQml.Models 2.2
//import QtQuick.Controls 2.12
//QtQuick.Controls 2.12  和QtQuick.Controls.Styles 1.4不匹配
import QtQuick.Controls.Styles 1.4
import QtQuick.Controls 1.4
import QtQuick.Controls 2.12
// import QtQuick.Controls 2.15//import QtQuick.Controls 2.5Window {id:window//anchors.centerIn: parentwidth: 650;height: 457visible: trueflags: Qt.FramelessWindowHint | Qt.DialogRectangle{id:rect1;anchors.fill: parent;border.width: 1;color: "blue";border.color: "red";clip:true//这一属性设置表示如果他的子类超出了范围,那么就剪切掉,不让他显示和起作用}//无边框移动MouseArea {id: dragRegionanchors.fill: parentproperty point clickPos: "0,0"onPressed: {clickPos = Qt.point(mouse.x,mouse.y)}onReleased: {clickPos = Qt.point(0,0)}onPositionChanged: {//鼠标偏移量var delta = Qt.point(mouse.x-clickPos.x, mouse.y-clickPos.y)//如果mainwindow继承自QWidget,用setPoswindow.setX(window.x+delta.x)window.setY(window.y+delta.y)}}UserInfoModel{id:datamodel}    TableView{property bool doublePress: falseproperty bool scliked: falseproperty int rowIndex: 0property int columnIndex: 0property string tabTitle:""property var lastTextEdit: nullproperty var lastRect: nullid :tableViewheight: 411width: 600x:10y:10    //        anchors.right: parent.right-10//        anchors.rightMargin: 0//        anchors.left: parent.left-10//        anchors.leftMargin: 0//        anchors.top: parent.top-10//        anchors.topMargin: 0//        anchors.bottom:  parent.bottom-10frameVisible: trueonSelectionChanged: {}Keys.onPressed:{if(event.key === Qt.Key_6 && event.modifiers === Qt.ControlModifier){console.log("key press"+ Qt.Key_6)event.accepted = true;}}Rectangle{id : dargRectwidth: 100height: 30visible: falsecolor: "lightpink";}//设置背景以及边框 效果已成//yellowstyle: TableViewStyle {backgroundColor: "#1F1F21" // 设置背景颜色为深蓝色frame: Rectangle {border.color: "yellow"border.width: 2}handle: Rectangle{//color: "#ff0000" // 设置滚动条背景颜色border.color: "green"border.width: 1Rectangle {radius: 12color: "#d1d3d5"anchors.fill: parent}}scrollBarBackground: Rectangle {color: "#ff00ff" // 设置滚动条背景颜色border.color: "green"border.width: 1implicitWidth: 10implicitHeight: 10   //可以改变高度}//连接处corner: Rectangle{color: "#47494C"border.color: "#2C2C2D"border.width: 1}//增量控制按钮incrementControl: Rectangle {color: "#353639"border.color: "#2C2C2D"border.width: 1implicitWidth: 10implicitHeight: 10Image {id: leftArrowx:parent.width/2-12y:parent.height/2-12source: "qrc:/arrow right.png"}} //滑块decrementControl: Rectangle {color: "#353639"border.color: "#2C2C2D"border.width: 1implicitWidth: 10implicitHeight: 10Image {id: rightArrowx:parent.width/2-12y:parent.height/2-12source: "qrc:/arrow left.png"}}  //滑块}TableViewColumn {id:columnIDrole: "userID"title: "ID"width: 80}TableViewColumn {id:columnNamerole: "userName"title: "姓名"width: tableView.width-80elideMode : Text.ElideLeft            }model:datamodel//行设置rowDelegate:Rectangle{id: rowDataheight:30color:styleData.selected?"lightblue":"lightgray"           }//自定义表头代理headerDelegate:Rectangle{border.width:1border.color: "red"color:styleData.selected ?"#1F1F21":"000000"//width: 100;height: 30Text{anchors.verticalCenter: parent.verticalCenteranchors.horizontalCenter: parent.horizontalCentertext: styleData.valuefont.pixelSize: 13color: "#ECEAE6"}}itemDelegate:Item {id: cellItemproperty bool  startPress: falseRectangle { anchors.left: parent.left; height: parent.height; width: 1; color: "transparent"}Rectangle { anchors.top: parent.top; width: parent.width; height: 1; color: "transparent"}Rectangle { anchors.right: parent.right; height: parent.height; width: 1; color: "#ff00ff"; }Rectangle { anchors.bottom: parent.bottom; width: parent.width; height: 1; color: "#ff00ff";  }Text {id:itemTextanchors.verticalCenter: parent.verticalCenteranchors.horizontalCenter: parent.horizontalCenterhorizontalAlignment: Text.AlignHCenterverticalAlignment: Text.AlignVCentertext: styleData.valuecolor: styleData.selected?"pink":"#ffffff"elide: Text.ElideLeftfont.pixelSize: 18}           MouseArea {anchors.fill: parentacceptedButtons: Qt.LeftButtononDoubleClicked:{if(styleData.column===1){console.log("Double clicked at: row=" + styleData.row + ", column=" + styleData.column+ ", text="+styleData.vaule)tableView.scliked = truetabTitleTextEdit.visible = truetabTitleTextEdit.forceActiveFocus()tableView.lastTextEdit = tabTitleTextEdit}}onClicked:{console.log("onClicked!!!!!!:"){tableView.selection.clear();tableView.selection.select(styleData.row);//双击选中某行if(tableView.scliked==true){console.log("visible"+tabTitleTextEdit.visible)tableView.lastTextEdit.accepted()}//console.log("signal clicked at: row=" + styleData.row + ", column=" + styleData.column+ ", text="+itemText.text)}}onPressAndHold:  {startPress = truevar row = styleData.rowtableView.selection.clear();tableView.selection.select(row);//双击选中某行var windowCoordinates = tableView.mapFromItem(cellItem,mouseX,mouseY);//console.log("Window coordinates:", windowCoordinates);dargRect.x = windowCoordinates.xdargRect.y = windowCoordinates.ydargRect.visible = true}onReleased:  {console.log("onReleased!!!!!!:")dargRect.visible = false}onPositionChanged:{var windowCoordinates = tableView.mapFromItem(cellItem,mouseX,mouseY);//console.log("onPositionChanged:"+ row );dargRect.x = windowCoordinates.xdargRect.y = windowCoordinates.yvar row = tableView.rowAt(windowCoordinates.x, windowCoordinates.y)tableView.selection.clear();tableView.selection.select(row);//双击选中某行}}TextInput {id: tabTitleTextEditRectangle{anchors.fill: parentborder.color: "yellow"border.width: 2color: "#000000"z:-1}focus: truetext: itemText.textwidth: parent.widthheight: parent.heightanchors.fill: parentselectByMouse: trueselectionColor: "#4283aa"selectedTextColor: "#ffffff"visible: falsecursorVisible:truefont.pointSize :13readOnly: falsecolor: "#ffffff"horizontalAlignment: Text.AlignHCenterverticalAlignment: Text.AlignVCenter  // @disable-check M16onAccepted: {tableView.lastTextEdit.visible = false;tableView.scliked =falsedatamodel.modifyItemText(styleData.row,styleData.column,text)console.log("onAccepted at: row=" + styleData.row + ", column=" + styleData.column+ ", status="+tableView.scliked)}}}focus:true}Button {id: button1x: parent.width-80y: parent.height-36width:70height:30//text: qsTr("Button")Rectangle{anchors.fill: parentborder.color: "royalblue"border.width: 1color: button1.down ? "red" :(button1.hovered?"blue":"lightsteelblue")}Text {text: "1213";// anchors.fill: parentanchors.centerIn: parent;color: button1.hovered?"yellow":"red";font.pixelSize: 13;//font.weight: Font.DemiBold}onClicked: {datamodel.insertUserInfo("002","张三");window.close();}}
}
c++ 代码
UserInfoModel.h
#ifndef USERINFOMODEL_H
#define USERINFOMODEL_H#include <QAbstractTableModel>
#include <QtCore/QMetaEnum>#include <QAbstractTableModel>
#include <QtCore/QMetaEnum>struct TestData
{QString index;QString name;TestData& operator = (const TestData& data) {this->index = data.index;this->name = data.name;return *this;}
};
class UserInfoModel : public QAbstractTableModel
{Q_OBJECT
public:enum DataRoles{userID = Qt::UserRole + 1,userName};Q_ENUM(DataRoles)explicit UserInfoModel(QObject *parent = 0);// Basic functionality:int rowCount(const QModelIndex &parent = QModelIndex()) const override;int columnCount(const QModelIndex &parent = QModelIndex()) const override;QVariant data(const QModelIndex &index, int role = Qt::DisplayRole) const override;QHash<int, QByteArray> roleNames() const override;Qt::ItemFlags flags(const QModelIndex &index) const override;Q_INVOKABLE void insertUserInfo(QString userID,QString userName);Q_INVOKABLE void modifyItemText(int row,int column,QString text);
private:QList<QMap<QString,QVariant>> userList;QVector<TestData> m_listData;
};
#endif // USERINFOMODEL_H
UserInfoModel.cpp
#include "userinfomodel.h"
#include <QDebug>
UserInfoModel::UserInfoModel(QObject *parent): QAbstractTableModel(parent)
{for(int i=0;i<6;i++){TestData oneData;oneData.index = QString::number(i);oneData.name  = QString("张三%1").arg(i);m_listData.append(oneData);}
}
int UserInfoModel::rowCount(const QModelIndex &parent) const
{return m_listData.count();
}int UserInfoModel::columnCount(const QModelIndex &parent) const
{return 2;
}
Qt::ItemFlags UserInfoModel::flags(const QModelIndex &index) const
{Q_UNUSED(index)if(index.column() ==1){qDebug()<<"UserInfoModel::flags  1111";return Qt::ItemIsSelectable | Qt::ItemIsEnabled | Qt::ItemIsEditable;}return Qt::ItemIsSelectable | Qt::ItemIsEnabled;
}
QVariant UserInfoModel::data(const QModelIndex &index, int role) const
{// FIXME: Implement me!QVariant var;if ( !index.isValid() ){return QVariant();}int nRow    = index.row();int nColumn = index.column();//qDebug()<<"data"<<nRow<<nColumn<<role;if(Qt::UserRole+1 == role){var = QVariant::fromValue(m_listData.at(nRow).index);}else if(Qt::UserRole+2 == role){var = QVariant::fromValue(m_listData.at(nRow).name);// qDebug()<<"m_listData.at(nRow).name"<<m_listData.at(nRow).name;}return var;// QHash<int, QByteArray> temp=roleNames();// QString key =  temp.value(role);// return userList[index.row()].value(key);
}QHash<int, QByteArray> UserInfoModel::roleNames() const
{QHash<int, QByteArray> roles;QMetaEnum metaEnum = QMetaEnum::fromType<DataRoles>();for (int i=0; i<metaEnum.keyCount(); ++i){roles[metaEnum.value(i)]=QByteArray(metaEnum.key(i));}return roles;
}void UserInfoModel::insertUserInfo(QString userID, QString userName)
{   TestData oneData;oneData.index = QString::number(100);oneData.name  = QString("张三%1").arg(oneData.index);m_listData.append(oneData);beginResetModel();endResetModel();
//    emit beginInsertRows(QModelIndex(),userList.count(),userList.count());
//    QMap<QString,QVariant> mapTemp;
//    mapTemp.insert("userID",userID);
//    mapTemp.insert("userName",userName);
//    userList.push_back(mapTemp);//    emit endInsertRows();
}
void UserInfoModel::modifyItemText(int row,int column,QString text)
{// QModelIndex index = this->index(row,column);// QString  name  = index.data(Qt::UserRole+2).toString();// qDebug()<<"modifyItemText"<<name;QModelIndex index = this->index(row,column);TestData oneData  = m_listData.at(row);if(column==0){oneData.index = text;}else{oneData.name = text;}m_listData.replace(row,oneData);for(int i=0;i<m_listData.size();i++){TestData oneData  = m_listData.at(i);// qDebug()<<"oneData"<<i<<oneData.index<<oneData.name;}beginResetModel();endResetModel();}
main.cpp
#include <QApplication>
#include <QQmlApplicationEngine>
#include <QObject>
#include <QDebug>
#include <QQmlComponent>
#include <QQuickView>
#include <QQmlProperty>
#include <QQuickItem>
#include "UserInfoModel.h"
#include <QQmlContext>
int main(int argc, char *argv[])
{QGuiApplication app(argc, argv);QQmlApplicationEngine engine;qmlRegisterType<UserInfoModel>("UserInfoModel", 1, 0, "UserInfoModel");engine.load(QUrl(QStringLiteral("qrc:/ui.qml")));return app.exec();
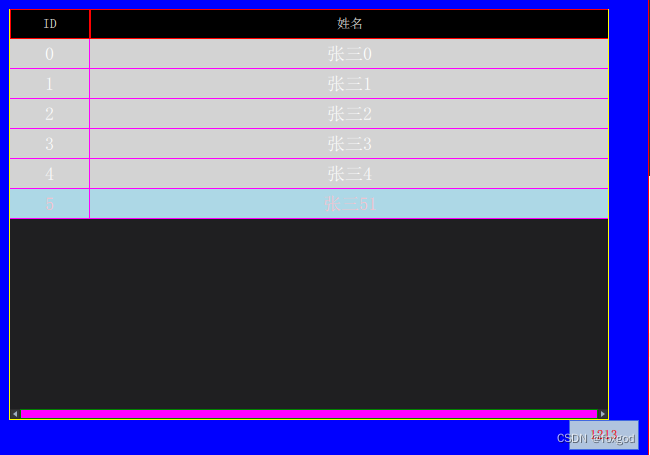
}好了至此可以运行了运行界面如下,可以自行修改颜色:
源码已上传,不能下载的可以联系我 邮箱:moseman@163.com
这篇关于qml 实现tableview 双击修改编辑,长按提示的文章就介绍到这儿,希望我们推荐的文章对编程师们有所帮助!


