本文主要是介绍react传参有哪些常用方法?--Props,Context API和Redux全局管理,希望对大家解决编程问题提供一定的参考价值,需要的开发者们随着小编来一起学习吧!
在 React 中,父子组件之间的传参主要通过以下几种方式实现:
1) Props 传递:父子传参
2)Context API: 跨多层组件传递数据
3) Redux: 全局状态管理库
一、Props父子组件传参(传值、传方法)
1. 父传子数据
// 父组件
<ChildComponent someProp={someValue} />
// 子组件
function ChildComponent(props) {
const { someProp } = props;  // 使用props获取父组件传的值
}
2.子传父 (回调函数)
父组件将一个或多个回调函数作为 props 传递给子组件,子组件在需要时调用这些函数,将数据回传给父组件。
// 父组件
const handleData = (data) => {// 处理数据
};<ChildComponent onDataToParent={handleData} />// 子组件
function ChildComponent(props) {const { onDataToParent } = props;  // 使用props获取到父组件传过来的参数const sendData = (data) => {onDataToParent(data);  // 子组件调用父组件传过来的函数,回传给父组件};
}
3. 父子传参的demo
父组件:
import React from 'react';
import ChildComponent from './ChildComponent.tsx';function ParentComponent() {// 定义父组件的状态和处理函数const [childData, setChildData] = React.useState('Initial Data');// 定义一个处理函数,用于接收子组件传递的数据const handleDataFromChild = (newData) => {setChildData(newData);alert(`Data from child: ${newData}`);};return (<div><h1>Parent Component</h1><p>Current Data: {childData}</p>{/* 将数据和回调函数作为 props 传递给子组件 */}<ChildComponentchildData={childData}onDataToParent={handleDataFromChild}/></div>);
}export default ParentComponent;
子组件ChildComponent.tsx:
import React from 'react';function ChildComponent(props) {// 从 props 中解构出子组件接收到的数据和回调函数const { childData, onDataToParent } = props;// 定义一个函数,用于更新子组件的状态,并触发回调函数const updateData = () => {const newData = `Updated Data from Child: ${new Date().toLocaleTimeString()}`;onDataToParent(newData); // 调用父组件传递的回调函数};return (<div><h2>Child Component</h2><p>Received Data: {childData}</p>{/* 一个按钮,点击时调用 updateData 函数 */}<button onClick={updateData}>Send Data to Parent</button></div>);
}export default ChildComponent;
二、Context API
在react中使用Context API 可以轻松的在组件数间传递数据,无需听过每一层的手动传递props。

步骤 1: 创建 Context
首先,使用 React.createContext 创建一个新的 Context 对象。
utils/context.js文件:
import React from 'react';const MyContext = React.createContext('default value');
export default MyContext;
步骤 2: 提供 Context 值
然后,在组件树的适当层级使用 <MyContext.Provider> 来包裹子组件,并通过 value 属性传递数据。
import React from 'react';
import MyContext from '../../utils/context.js';
import ChildComponent from './ChildComponent.jsx'function App() {const appData = { message: 'Hello, World!', number: 42 };return (<MyContext.Provider value={appData}><ChildComponent /></MyContext.Provider>);
}export default App;
在子组件ChildComponent.js中,使用 useContext Hook 来访问 Context 的值。
import React, { useContext } from 'react';
import MyContext from '../../utils/context.js';function ChildComponent() {const { message, number } = useContext(MyContext);  // 接受传参的值return (<div><p>{message}</p><p>{number}</p></div>);
}export default ChildComponent;
附加功能:动态 Context 值
如果你需要在应用中动态更改 Context 的值,可以在 Provider 中使用状态来实现。
// App.js
import React, { useState } from 'react';
import MyContext from '../../utils/context.js';
import ChildComponent from './ChildComponent.tsx';export default function App() {const [appData, setAppData] = useState({ message: 'Hello, World!', number: 42 });const updateMessage = (newMessage, newNum) => {setAppData((prev) => ({ ...prev, message: newMessage, number: newNum }));};return (<MyContext.Provider value={{ ...appData, updateMessage }}><ChildComponent /></MyContext.Provider>);
}
在子组件ChildComponent.tsx中,你可以使用提供的函数来更新 Context 的值。
// ChildComponent.js
import React, { useContext } from 'react';
import MyContext from '../../utils/context.js';export default function ChildComponent() {const { message, number, updateMessage } = useContext(MyContext);const handleClick = () => {updateMessage('New message from child!', 3333);};return (<div><p>{message}</p><p>{number}</p><button onClick={handleClick}>Update Message</button></div>);
}
三、Redux 全局状态管理
1. redux是什么?
1、redux是一个专门用于做状态管理的js库(不是react插件库)。
2、它可以用在react,angular,vue等项目中,但基本与react配合使用。
3、作用:集中式管理react应用中多个组件共享的状态。
4、 redux只负责管理状态,至于状态的改变驱动着页面的展示,要靠我们自己写
2. 什么情况下需要使用redux
1、某个组件的状态,需要让其他组件可以随时拿到(共享)。
2、一个组件需要改变另一个组件的状态(通信)。
3、总体原则:能不用就不用,如果不用比较吃力才考虑使用。
3. 核心概念
1、Store
store : 用于存储共享数据的仓库
2、State
State 是只读的,任何修改都必须通过触发 actions 来完成。
3、 Action
action : store中所有数据的变化,必须通过派发(dispatch)action来更新
action是一个普通的JavaScript对象,用来描述这次更新的type和content
4、Reducer
reducer : reducer是一个纯函数,接收当前状态和 action,返回新的状态,将state和action联系在一起
reducer做的事情就是将传入的state和action结合起来生成一个新的state
4.工作原理
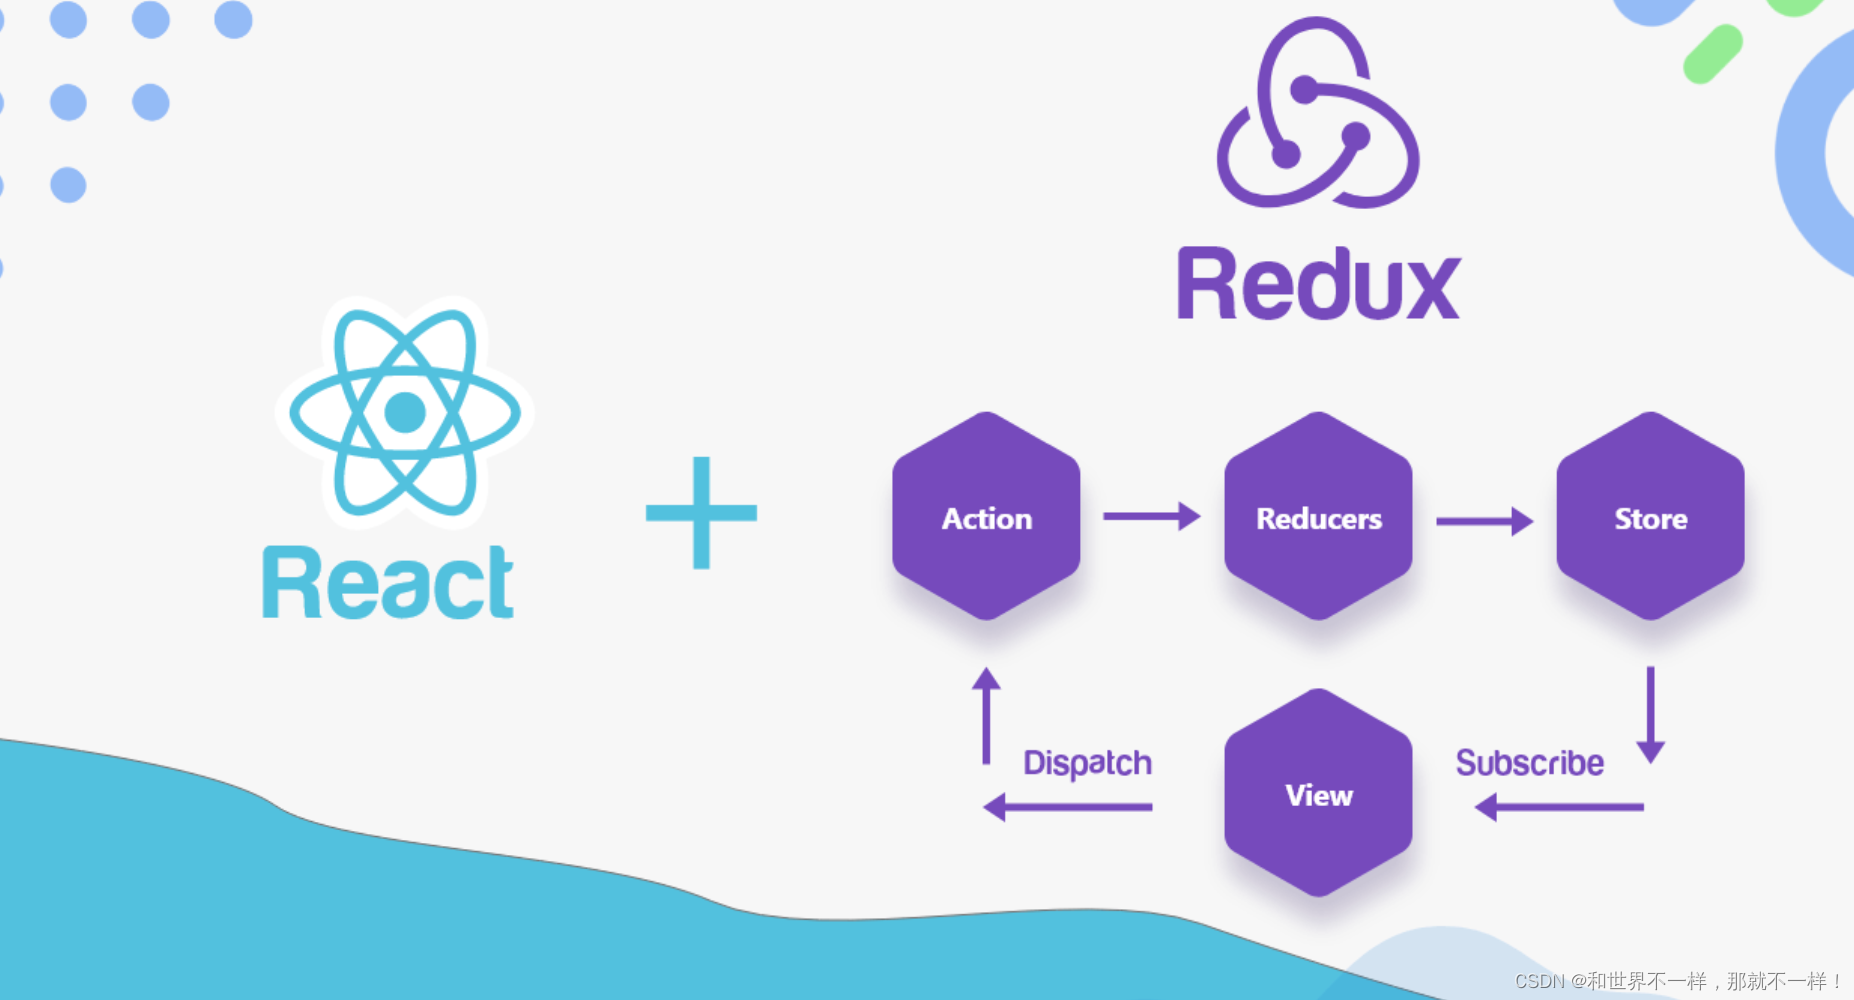
Redux 的工作流程遵循单向数据流原则:
-
View 发起 Action:
- 用户与界面交互,触发一个 Action。
-
Dispatch Action:
- Action 被发送到 Store。
-
Reducer 处理 Action:
- Store 调用 Reducer,传入当前 State 和 Action,Reducer 返回新的 State。
-
State 更新:
- Store 更新 State,任何订阅了 Store 的组件都会收到通知并重新渲染。
-
View 更新:
- 组件从 Store 中读取新的状态,并更新 UI。
5. demo示例
安装redux:
npm install redux
stoer/index.ts 文件
import { createStore, combineReducers } from "redux";
// import UserReducer from "./user/reducer.ts";
import todoReducer from './todo/todoReducer.ts'; //
const reducer = combineReducers({// user: UserReducer,todos: todoReducer,
});// 创建数据公共的存储区域
const store = createStore(reducer,  // 辅助管理数据,reducer是一个纯函数,不需要直接修改state
);export default store;
store/todo/action.ts
// 定义action类型
export const ADD_TODO = 'ADD_TODO';
export const DELETE_TODO = 'DELETE_TODO';
export const TOGGLE_TODO = 'TOGGLE_TODO';// 定义action creators
export const addTodo = (text) => ({type: ADD_TODO,payload: {id: new Date().getTime(),text,completed: false,},
});export const deleteTodo = (id) => ({type: DELETE_TODO,payload: { id },
});export const toggleTodo = (id) => ({type: TOGGLE_TODO,payload: { id },
});
store/todo/todoReducer.ts
import { ADD_TODO, DELETE_TODO, TOGGLE_TODO } from './action.ts';// 定义初始状态
const initialState = [];// 定义reducer函数
const todoReducer = (state = initialState, action) => {switch (action.type) {case ADD_TODO:return [...state, action.payload];case DELETE_TODO:return state.filter(todo => todo.id !== action.payload.id);case TOGGLE_TODO:return state.map(todo => {if (todo.id === action.payload.id) {return { ...todo, completed: !todo.completed };}return todo;});default:return state;}
};export default todoReducer;
页面使用
pages/reducer/index.tsx
import React from 'react';
import { Button, message } from 'antd';
import { useSelector, useDispatch } from 'react-redux';
import { addTodo, deleteTodo, toggleTodo } from '../../store/todo/action.ts';const TodoListStyles = {container: {padding: '20px',},todoItem: {listStyleType: 'none',marginBottom: '10px',},
};function TodoList() {// useSelector Hook,用于从 Redux store 中选择数据。接收一个函数作为参数// 使用 useSelector 钩子从 Redux store 获取 todos 状态const todos = useSelector((state) => state.todos);const dispatch = useDispatch();// 添加待办事项const handleAddTodo = () => {const text = prompt('请输入Todo项的内容:');if (text) {dispatch(addTodo(text));}};// 删除待办事项const handleDeleteTodo = (id) => {dispatch(deleteTodo(id));};// 切换待办事项的完成状态const handleToggleTodo = (id) => {dispatch(toggleTodo(id));};return (<div style={TodoListStyles.container}><h2>Todo List</h2><ul>{todos.map((todo) => (<li key={todo.id} style={TodoListStyles.todoItem}><spanstyle={{textDecoration: todo.completed ? 'line-through' : 'none',cursor: 'pointer',}}onClick={() => handleToggleTodo(todo.id)}>{todo.text}</span><Buttontype="link"dangerstyle={{ marginLeft: '10px' }}onClick={() => handleDeleteTodo(todo.id)}>删除</Button></li>))}</ul><Button onClick={handleAddTodo}>添加Todo</Button></div>);
}export default TodoList;
这篇关于react传参有哪些常用方法?--Props,Context API和Redux全局管理的文章就介绍到这儿,希望我们推荐的文章对编程师们有所帮助!


