1、什么是keepalived?
Keepalived是集群管理中保证集群高可用的一个服务软件,用来防止单点故障。
Keepalived的作用是检测web服务器的状态,如果有一台web服务器死机,或工作出现故障,Keepalived将检测到,并将有故障的web服务器从系统中剔除,当web服务器工作正常后Keepalived自动将web服务器加入到服务器群中,这些工作全部自动完成,不需要人工干涉,需要人工做的只是修复故障的web服务器。
2、keepalived工作原理。
keepalived是以VRRP协议为实现基础的,VRRP全称Virtual Router Redundancy Protocol,即虚拟路由冗余协议。
虚拟路由冗余协议,可以认为是实现路由器高可用的协议,即将N台提供相同功能的路由器组成一个路由器组,这个组里面有一个master和多个backup,master上面有一个对外提供服务的vip(VIP = Virtual IP Address,虚拟IP地址,该路由器所在局域网内其他机器的默认路由为该vip),master会发组播,当backup收不到VRRP包时就认为master宕掉了,这时就需要根据VRRP的优先级来选举一个backup当master。这样的话就可以保证路由器的高可用了。
keepalived主要有三个模块,分别是core、check和VRRP。core模块为keepalived的核心,负责主进程的启动、维护以及全局配置文件的加载和解析。check负责健康检查,包括常见的各种检查方式。VRRP模块是来实现VRRP协议的。
3、keepalived+nginx实现主备过程。
3.1、初始状态。
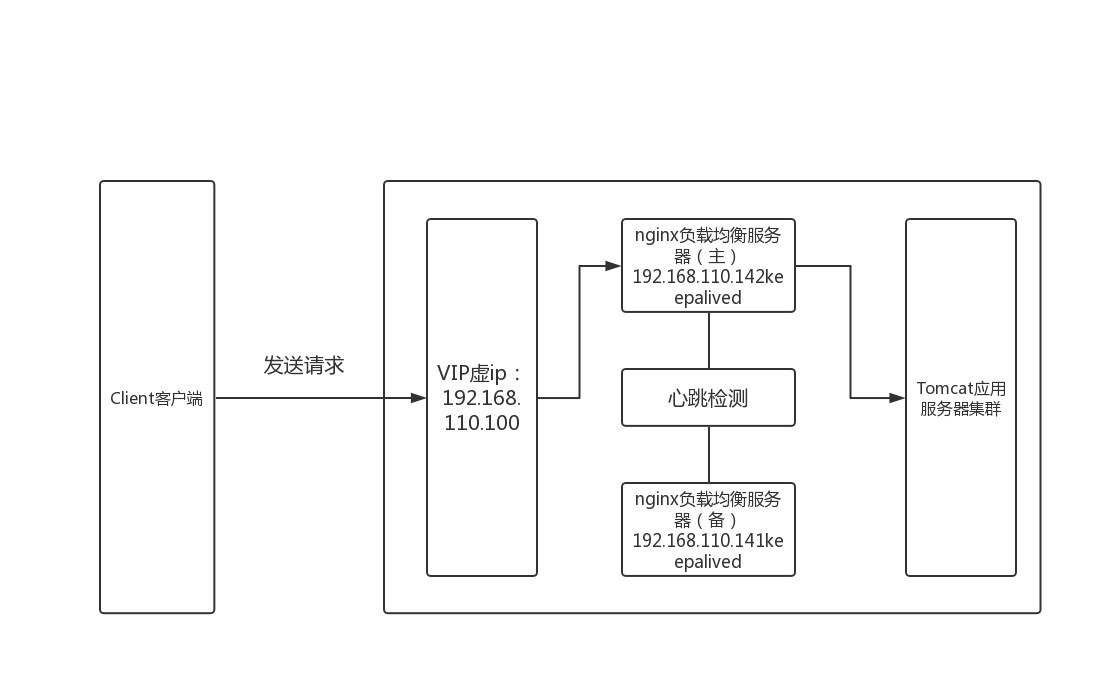
3.2、主机宕机状态。

3.3、主机恢复状态。

4、如何实现keepalived+Nginx高可用环境。
两台nginx,一主一备:192.168.110.142和192.168.110.140。两台tomcat服务器:192.168.110.142、192.168.110.140。
5、开始安装keepalived。
安装环境如何所示(切换到root用户哦):
1 [root@localhost ~]# yum -y install kernel-devel*
2 [root@localhost ~]# yum -y install openssl-*
3 [root@localhost ~]# yum -y install popt-devel
4 [root@localhost ~]# yum -y install lrzsz
5 [root@localhost ~]# yum -y install openssh-clients
6 [root@localhost ~]# yum -y install libnl libnl-devel popt
开始安装keepalived。解压缩如下所示:
1 [root@localhost ~]# ls
2 anaconda-ks.cfg  Documents  install.log         Music     Public     Videos
3 Desktop          Downloads  install.log.syslog  Pictures  Templates  zookeeper.out
4 [root@localhost ~]# cd /home/hadoop/package/
5 [root@localhost package]# ls
6 apache-activemq-5.12.0-bin.tar.gz  IK Analyzer 2012FF_hf1      keepalived-1.2.15.tar.gz  zookeeper-3.4.6.tar.gz
7 apache-activemq-5.12.0-bin.zip     IK Analyzer 2012FF_hf1.rar  nginx-1.8.0.tar.gz
8 apache-tomcat-7.0.47.tar.gz        jdk-7u55-linux-i586.tar.gz  solr-4.10.3.tgz.tgz
9 [root@localhost package]# tar -zxvf keepalived-1.2.15.tar.gz -C /home/hadoop/soft/
执行配置命令如下所示:
1 [root@localhost soft]# ls
2 apache-activemq-5.12.0  apache-tomcat-7.0.47  jdk1.7.0_55  keepalived-1.2.15  nginx-1.8.0  solr-4.10.3  zookeeper-3.4.6
3 [root@localhost soft]# cd keepalived-1.2.15/
4 [root@localhost keepalived-1.2.15]# ls
5 AUTHOR  bin  ChangeLog  configure  configure.in  CONTRIBUTORS  COPYING  doc  genhash  INSTALL  install-sh  keepalived  keepalived.spec.in
6 [root@localhost keepalived-1.2.15]# ./configure --prefix=/usr/local/keepalived
然后进行安装操作和编译操作。如下所示:
1 [root@localhost keepalived-1.2.15]# make
2 [root@localhost keepalived-1.2.15]# make install
至此安装成功。
拷贝执行文件。操作如下所示:
1 [root@localhost keepalived-1.2.15]# cd /usr/local/
2 [root@localhost local]# ls
3 bin  etc  games  include  keepalived  lib  libexec  nginx  sbin  share  solr  solr-cloud  src  tomcat
4 [root@localhost local]# cp /usr/local/keepalived/sbin/keepalived /usr/sbin/
将init.d文件拷贝到etc下,加入开机启动项。
1 [root@localhost local]# cp /usr/local/keepalived/etc/rc.d/init.d/keepalived /etc/init.d/keepalived 将keepalived文件拷贝到etc下,加入网卡配置。
1 [root@localhost local]# cp /usr/local/keepalived/etc/sysconfig/keepalived /etc/sysconfig/ 创建keepalived文件夹。
1 [root@localhost local]# mkdir -p /etc/keepalived 将keepalived配置文件拷贝到etc下。
1 [root@localhost local]# cp /usr/local/keepalived/etc/keepalived/keepalived.conf /etc/keepalived/keepalived.conf 添加可执行权限。
[root@localhost local]# chmod +x /etc/init.d/keepalived
[root@localhost local]# ll /etc/init.d/keepalived
-rwxr-xr-x. 1 root root 1308 Oct  1 19:16 /etc/init.d/keepalived
加入开机启动。
 1 [root@localhost local]# chkconfig --add keepalived #添加时必须保证/etc/init.d/keepalived存在.
 2 [root@localhost local]# chkconfig keepalived on
 3 [root@localhost local]# chkconfig --list #添加完可查询系统服务是否存在.
 4 NetworkManager     0:off    1:off    2:on    3:on    4:on    5:on    6:off
 5 abrt-ccpp          0:off    1:off    2:off    3:on    4:off    5:on    6:off
 6 abrtd              0:off    1:off    2:off    3:on    4:off    5:on    6:off
 7 acpid              0:off    1:off    2:on    3:on    4:on    5:on    6:off
 8 atd                0:off    1:off    2:off    3:on    4:on    5:on    6:off
 9 auditd             0:off    1:off    2:on    3:on    4:on    5:on    6:off
10 blk-availability    0:off    1:on    2:on    3:on    4:on    5:on    6:off
11 bluetooth          0:off    1:off    2:off    3:on    4:on    5:on    6:off
12 cpuspeed           0:off    1:on    2:on    3:on    4:on    5:on    6:off
13 crond              0:off    1:off    2:on    3:on    4:on    5:on    6:off
14 cups               0:off    1:off    2:on    3:on    4:on    5:on    6:off
15 dnsmasq            0:off    1:off    2:off    3:off    4:off    5:off    6:off
16 firstboot          0:off    1:off    2:off    3:on    4:off    5:on    6:off
17 haldaemon          0:off    1:off    2:off    3:on    4:on    5:on    6:off
18 htcacheclean       0:off    1:off    2:off    3:off    4:off    5:off    6:off
19 httpd              0:off    1:off    2:off    3:off    4:off    5:off    6:off
20 ip6tables          0:off    1:off    2:on    3:on    4:on    5:on    6:off
21 iptables           0:off    1:off    2:off    3:off    4:off    5:off    6:off
22 irqbalance         0:off    1:off    2:off    3:on    4:on    5:on    6:off
23 kdump              0:off    1:off    2:off    3:on    4:on    5:on    6:off
24 keepalived         0:off    1:off    2:on    3:on    4:on    5:on    6:off
25 lvm2-monitor       0:off    1:on    2:on    3:on    4:on    5:on    6:off
26 mdmonitor          0:off    1:off    2:on    3:on    4:on    5:on    6:off
27 messagebus         0:off    1:off    2:on    3:on    4:on    5:on    6:off
28 netconsole         0:off    1:off    2:off    3:off    4:off    5:off    6:off
29 netfs              0:off    1:off    2:off    3:on    4:on    5:on    6:off
30 network            0:off    1:off    2:on    3:on    4:on    5:on    6:off
31 ntpd               0:off    1:off    2:off    3:off    4:off    5:off    6:off
32 ntpdate            0:off    1:off    2:off    3:off    4:off    5:off    6:off
33 portreserve        0:off    1:off    2:on    3:on    4:on    5:on    6:off
34 postfix            0:off    1:off    2:on    3:on    4:on    5:on    6:off
35 psacct             0:off    1:off    2:off    3:off    4:off    5:off    6:off
36 quota_nld          0:off    1:off    2:off    3:off    4:off    5:off    6:off
37 rdisc              0:off    1:off    2:off    3:off    4:off    5:off    6:off
38 restorecond        0:off    1:off    2:off    3:off    4:off    5:off    6:off
39 rngd               0:off    1:off    2:off    3:off    4:off    5:off    6:off
40 rsyslog            0:off    1:off    2:on    3:on    4:on    5:on    6:off
41 saslauthd          0:off    1:off    2:off    3:off    4:off    5:off    6:off
42 smartd             0:off    1:off    2:off    3:off    4:off    5:off    6:off
43 snmpd              0:off    1:off    2:off    3:off    4:off    5:off    6:off
44 snmptrapd          0:off    1:off    2:off    3:off    4:off    5:off    6:off
45 spice-vdagentd     0:off    1:off    2:off    3:off    4:off    5:on    6:off
46 sshd               0:off    1:off    2:on    3:on    4:on    5:on    6:off
47 sysstat            0:off    1:on    2:on    3:on    4:on    5:on    6:off
48 udev-post          0:off    1:on    2:on    3:on    4:on    5:on    6:off
49 vmware-tools       0:off    1:off    2:on    3:on    4:on    5:on    6:off
50 vmware-tools-thinprint    0:off    1:off    2:on    3:on    4:on    5:on    6:off
51 wdaemon            0:off    1:off    2:off    3:off    4:off    5:off    6:off
52 winbind            0:off    1:off    2:off    3:off    4:off    5:off    6:off
53 wpa_supplicant     0:off    1:off    2:off    3:off    4:off    5:off    6:off
54 [root@localhost local]#
启动keepalived
启动:service keepalived start
停止:service keepalived stop
重启:service keepalived restart
1 [root@localhost local]# service keepalived start
2 Starting keepalived:                                       [  OK  ]
3 [root@localhost local]# service keepalived stop
4 Stopping keepalived:                                       [  OK  ]
5 [root@localhost local]# service keepalived restart
6 Stopping keepalived:                                       [FAILED]
7 Starting keepalived:                                       [  OK  ]
8 [root@localhost local]#
6、配置日志文件。
将keepalived日志输出到local0:
[root@localhost ~]# vim /etc/sysconfig/keepalived
1 KEEPALIVED_OPTIONS="-D -d -S 0"
在/etc/rsyslog.conf里添加(找一空白行直接添加到里面即可):
1 [root@localhost ~]# vim /etc/rsyslog.conf
2 # save keepalived.log
3 local0.*                                                /var/log/keepalived.log
重新启动keepalived和rsyslog服务:
1 [root@localhost ~]# service rsyslog restart
2 Shutting down system logger:                               [  OK  ]
3 Starting system logger:                                    [  OK  ]
4 [root@localhost ~]# service keepalived restart
5 Stopping keepalived:                                       [  OK  ]
6 Starting keepalived:                                       [  OK  ]
7 [root@localhost ~]#
打开防火墙的通讯地址。
1 [root@localhost ~]# 2 [root@localhost ~]# iptables -A INPUT -d 224.0.0.18 -j ACCEPT
3 [root@localhost ~]# /etc/rc.d/init.d/iptables save
4 iptables: Saving firewall rules to /etc/sysconfig/iptables:[  OK  ]
5 [root@localhost ~]#
至此,一台机器的keepalived全部安装完成,另外一台按照上面安装即可,Nginx之前配过,自己安装一下即可。如果两台机器的Nginx和Keepalived都安装好了呢,接着开始下面的操作。
7、配置keepalived。
现在开始修改主nginx的配置。修改主nginx下/etc/keepalived/keepalived.conf文件。
默认配置如下所示:
  1 ! Configuration File for keepalived
  2
  3 # 全局配置。
  4 global_defs {
  5    notification_email {
  6      # 指定keepalived在发生切换时需要发送email到的对象,一行一个。
  7      acassen@firewall.loc
  8      failover@firewall.loc
  9      sysadmin@firewall.loc
 10    }
 11    notification_email_from Alexandre.Cassen@firewall.loc  # 指定发件人
 12    smtp_server 192.168.200.1                               # 指定smtp服务器地址
 13    smtp_connect_timeout 30                                  # 指定smtp连接超时时间
 14    router_id LVS_DEVEL                                      # 运行keepalived机器的一个标识
 15 }
 16
 17 vrrp_instance VI_1 {
 18     state MASTER                                         # 标示状态为MASTER 备份机为BACKUP
 19     interface eth0                                         # 设置实例绑定的网卡
 20     virtual_router_id 51                                 # 同一实例下virtual_router_id必须相同
 21     priority 100                                         # MASTER权重要高于BACKUP,比如BACKUP为99
 22     advert_int 1                                         # MASTER与BACKUP负载均衡器之间同步检查的时间间隔,单位是秒
 23     authentication {                                     # 设置认证
 24         auth_type PASS                                     # 主从服务器验证方式
 25         auth_pass 1111
 26     }
 27     virtual_ipaddress {                                     # 设置vip
 28         192.168.200.16                                     # 可以多个虚拟IP,换行即可
 29         192.168.200.17
 30         192.168.200.18
 31     }
 32 }
 33
 34 virtual_server 192.168.200.100 443 {
 35     delay_loop 6
 36     lb_algo rr
 37     lb_kind NAT
 38     nat_mask 255.255.255.0
 39     persistence_timeout 50
 40     protocol TCP
 41
 42     real_server 192.168.201.100 443 {
 43         weight 1
 44         SSL_GET {
 45             url {
 46               path /
 47               digest ff20ad2481f97b1754ef3e12ecd3a9cc
 48             }
 49             url {
 50               path /mrtg/
 51               digest 9b3a0c85a887a256d6939da88aabd8cd
 52             }
 53             connect_timeout 3
 54             nb_get_retry 3
 55             delay_before_retry 3
 56         }
 57     }
 58 }
 59
 60 virtual_server 10.10.10.2 1358 {
 61     delay_loop 6
 62     lb_algo rr
 63     lb_kind NAT
 64     persistence_timeout 50
 65     protocol TCP
 66
 67     sorry_server 192.168.200.200 1358
 68
 69     real_server 192.168.200.2 1358 {
 70         weight 1
 71         HTTP_GET {
 72             url {
 73               path /testurl/test.jsp
 74               digest 640205b7b0fc66c1ea91c463fac6334d
 75             }
 76             url {
 77               path /testurl2/test.jsp
 78               digest 640205b7b0fc66c1ea91c463fac6334d
 79             }
 80             url {
 81               path /testurl3/test.jsp
 82               digest 640205b7b0fc66c1ea91c463fac6334d
 83             }
 84             connect_timeout 3
 85             nb_get_retry 3
 86             delay_before_retry 3
 87         }
 88     }
 89
 90     real_server 192.168.200.3 1358 {
 91         weight 1
 92         HTTP_GET {
 93             url {
 94               path /testurl/test.jsp
 95               digest 640205b7b0fc66c1ea91c463fac6334c
 96             }
 97             url {
 98               path /testurl2/test.jsp
 99               digest 640205b7b0fc66c1ea91c463fac6334c
100             }
101             connect_timeout 3
102             nb_get_retry 3
103             delay_before_retry 3
104         }
105     }
106 }
107
108 virtual_server 10.10.10.3 1358 {
109     delay_loop 3
110     lb_algo rr
111     lb_kind NAT
112     nat_mask 255.255.255.0
113     persistence_timeout 50
114     protocol TCP
115
116     real_server 192.168.200.4 1358 {
117         weight 1
118         HTTP_GET {
119             url {
120               path /testurl/test.jsp
121               digest 640205b7b0fc66c1ea91c463fac6334d
122             }
123             url {
124               path /testurl2/test.jsp
125               digest 640205b7b0fc66c1ea91c463fac6334d
126             }
127             url {
128               path /testurl3/test.jsp
129               digest 640205b7b0fc66c1ea91c463fac6334d
130             }
131             connect_timeout 3
132             nb_get_retry 3
133             delay_before_retry 3
134         }
135     }
136
137     real_server 192.168.200.5 1358 {
138         weight 1
139         HTTP_GET {
140             url {
141               path /testurl/test.jsp
142               digest 640205b7b0fc66c1ea91c463fac6334d
143             }
144             url {
145               path /testurl2/test.jsp
146               digest 640205b7b0fc66c1ea91c463fac6334d
147             }
148             url {
149               path /testurl3/test.jsp
150               digest 640205b7b0fc66c1ea91c463fac6334d
151             }
152             connect_timeout 3
153             nb_get_retry 3
154             delay_before_retry 3
155         }
156     }
157 }
主机的Nginx配置如下所示,主机的Keepalived配置如下所示:

分别在主机和备份机加上一个虚拟主机的。主机的配置如下所示:记得拷贝html目录,名称重命名为html-hhh。
 1 server {
 2         listen       192.168.110.142:80; # 相同的端口号80
 3         server_name  www.hhh.com;
 4
 5         location / {
 6             root   html-hhh; # http://www.baidu.com/访问的是这个目录html-baidu下面的index.html,没有index.html就访问index.htm。如果都咩有就访问错误页面
 7             index  index.html index.htm;
 8         }
 9         # redirect server error pages to the static page /50x.html
10         error_page   500 502 503 504  /50x.html;
11         location = /50x.html {
12             root   html-hhh;
13         }
14
15     }
  1 ! Configuration File for keepalived
  2
  3 global_defs {
  4    notification_email {        # 指定keepalived在发生切换时需要发送email到的对象,一行一个
  5      1748741328@qq.com
  6      # acassen@firewall.loc
  7      # failover@firewall.loc
  8      # sysadmin@firewall.loc
  9    }
 10    notification_email_from Alexandre.Cassen@firewall.loc  # 指定发件人
 11    # smtp_server 192.168.200.1     # 指定smtp服务器地址
 12    smtp_server 192.168.110.2
 13    smtp_connect_timeout 30        # 指定smtp连接超时时间
 14    router_id LVS_DEVEL            # 运行keepalived机器的一个标识
 15 }
 16
 17 vrrp_instance VI_1 {
 18     state MASTER             # 标示状态为MASTER 备份机为BACKUP
 19     interface eth0            # 设置实例绑定的网卡
 20     virtual_router_id 51    # 同一实例下virtual_router_id必须相同
 21     priority 100            # MASTER权重要高于BACKUP 比如BACKUP为99
 22     advert_int 1            # MASTER与BACKUP负载均衡器之间同步检查的时间间隔,单位是秒
 23     authentication {        # 设置认证
 24         auth_type PASS        # 主从服务器验证方式
 25         # auth_pass 1111
 26         auth_pass 8888
 27     }
 28     virtual_ipaddress {         # 设置vip
 29         192.168.110.100         # 可以多个虚拟IP,换行即可
 30         # 192.168.200.16
 31         # 192.168.200.17
 32         # 192.168.200.18
 33     }
 34 }
 35
 36 virtual_server 192.168.200.100 443 {
 37     delay_loop 6
 38     lb_algo rr
 39     lb_kind NAT
 40     nat_mask 255.255.255.0
 41     persistence_timeout 50
 42     protocol TCP
 43
 44     real_server 192.168.201.100 443 {
 45         weight 1
 46         SSL_GET {
 47             url {
 48               path /
 49               digest ff20ad2481f97b1754ef3e12ecd3a9cc
 50             }
 51             url {
 52               path /mrtg/
 53               digest 9b3a0c85a887a256d6939da88aabd8cd
 54             }
 55             connect_timeout 3
 56             nb_get_retry 3
 57             delay_before_retry 3
 58         }
 59     }
 60 }
 61
 62 virtual_server 10.10.10.2 1358 {
 63     delay_loop 6
 64     lb_algo rr
 65     lb_kind NAT
 66     persistence_timeout 50
 67     protocol TCP
 68
 69     sorry_server 192.168.200.200 1358
 70
 71     real_server 192.168.200.2 1358 {
 72         weight 1
 73         HTTP_GET {
 74             url {
 75               path /testurl/test.jsp
 76               digest 640205b7b0fc66c1ea91c463fac6334d
 77             }
 78             url {
 79               path /testurl2/test.jsp
 80               digest 640205b7b0fc66c1ea91c463fac6334d
 81             }
 82             url {
 83               path /testurl3/test.jsp
 84               digest 640205b7b0fc66c1ea91c463fac6334d
 85             }
 86             connect_timeout 3
 87             nb_get_retry 3
 88             delay_before_retry 3
 89         }
 90     }
 91
 92     real_server 192.168.200.3 1358 {
 93         weight 1
 94         HTTP_GET {
 95             url {
 96               path /testurl/test.jsp
 97               digest 640205b7b0fc66c1ea91c463fac6334c
 98             }
 99             url {
100               path /testurl2/test.jsp
101               digest 640205b7b0fc66c1ea91c463fac6334c
102             }
103             connect_timeout 3
104             nb_get_retry 3
105             delay_before_retry 3
106         }
107     }
108 }
109
110 virtual_server 10.10.10.3 1358 {
111     delay_loop 3
112     lb_algo rr
113     lb_kind NAT
114     nat_mask 255.255.255.0
115     persistence_timeout 50
116     protocol TCP
117
118     real_server 192.168.200.4 1358 {
119         weight 1
120         HTTP_GET {
121             url {
122               path /testurl/test.jsp
123               digest 640205b7b0fc66c1ea91c463fac6334d
124             }
125             url {
126               path /testurl2/test.jsp
127               digest 640205b7b0fc66c1ea91c463fac6334d
128             }
129             url {
130               path /testurl3/test.jsp
131               digest 640205b7b0fc66c1ea91c463fac6334d
132             }
133             connect_timeout 3
134             nb_get_retry 3
135             delay_before_retry 3
136         }
137     }
138
139     real_server 192.168.200.5 1358 {
140         weight 1
141         HTTP_GET {
142             url {
143               path /testurl/test.jsp
144               digest 640205b7b0fc66c1ea91c463fac6334d
145             }
146             url {
147               path /testurl2/test.jsp
148               digest 640205b7b0fc66c1ea91c463fac6334d
149             }
150             url {
151               path /testurl3/test.jsp
152               digest 640205b7b0fc66c1ea91c463fac6334d
153             }
154             connect_timeout 3
155             nb_get_retry 3
156             delay_before_retry 3
157         }
158     }
159 }
备份机的Nginx配置和Keepalived配置如下所示:
修改备nginx下/etc/keepalived/keepalived.conf文件
配置备nginx时需要注意:需要修改state为BACKUP , priority比MASTER低,virtual_router_id和master的值一致。
 1 server {
 2         listen       192.168.110.140:80; # 相同的端口号80
 3         server_name  www.hhh.com;
 4
 5         location / {
 6             root   html-hhh; # http://www.baidu.com/访问的是这个目录html-baidu下面的index.html,没有index.html就访问index.htm。如果都咩有就访问错误页面
 7             index  index.html index.htm;
 8         }
 9         # redirect server error pages to the static page /50x.html
10         error_page   500 502 503 504  /50x.html;
11         location = /50x.html {
12             root   html-hhh;
13         }
14
15     }
  1 ! Configuration File for keepalived
  2
  3 global_defs {
  4    notification_email {        # 指定keepalived在发生切换时需要发送email到的对象,一行一个
  5      1748741328@qq.com
  6      # acassen@firewall.loc
  7      # failover@firewall.loc
  8      # sysadmin@firewall.loc
  9    }
 10    notification_email_from Alexandre.Cassen@firewall.loc  # 指定发件人
 11    # smtp_server 192.168.200.1     # 指定smtp服务器地址
 12    smtp_server 192.168.110.2
 13    smtp_connect_timeout 30        # 指定smtp连接超时时间
 14    router_id LVS_DEVEL            # 运行keepalived机器的一个标识
 15 }
 16
 17 vrrp_instance VI_1 {
 18     state BACKUP             # 标示状态,备份机为BACKUP
 19     interface eth0            # 设置实例绑定的网卡
 20     virtual_router_id 51    # 同一实例下virtual_router_id必须相同
 21     priority 99            # MASTER权重要高于BACKUP 比如BACKUP为99
 22     advert_int 1            # MASTER与BACKUP负载均衡器之间同步检查的时间间隔,单位是秒
 23     authentication {        # 设置认证
 24         auth_type PASS        # 主从服务器验证方式
 25         # auth_pass 1111
 26         auth_pass 8888
 27     }
 28     virtual_ipaddress {         # 设置vip
 29         192.168.110.100         # 可以多个虚拟IP,换行即可
 30         # 192.168.200.16
 31         # 192.168.200.17
 32         # 192.168.200.18
 33     }
 34 }
 35
 36 virtual_server 192.168.200.100 443 {
 37     delay_loop 6
 38     lb_algo rr
 39     lb_kind NAT
 40     nat_mask 255.255.255.0
 41     persistence_timeout 50
 42     protocol TCP
 43
 44     real_server 192.168.201.100 443 {
 45         weight 1
 46         SSL_GET {
 47             url {
 48               path /
 49               digest ff20ad2481f97b1754ef3e12ecd3a9cc
 50             }
 51             url {
 52               path /mrtg/
 53               digest 9b3a0c85a887a256d6939da88aabd8cd
 54             }
 55             connect_timeout 3
 56             nb_get_retry 3
 57             delay_before_retry 3
 58         }
 59     }
 60 }
 61
 62 virtual_server 10.10.10.2 1358 {
 63     delay_loop 6
 64     lb_algo rr
 65     lb_kind NAT
 66     persistence_timeout 50
 67     protocol TCP
 68
 69     sorry_server 192.168.200.200 1358
 70
 71     real_server 192.168.200.2 1358 {
 72         weight 1
 73         HTTP_GET {
 74             url {
 75               path /testurl/test.jsp
 76               digest 640205b7b0fc66c1ea91c463fac6334d
 77             }
 78             url {
 79               path /testurl2/test.jsp
 80               digest 640205b7b0fc66c1ea91c463fac6334d
 81             }
 82             url {
 83               path /testurl3/test.jsp
 84               digest 640205b7b0fc66c1ea91c463fac6334d
 85             }
 86             connect_timeout 3
 87             nb_get_retry 3
 88             delay_before_retry 3
 89         }
 90     }
 91
 92     real_server 192.168.200.3 1358 {
 93         weight 1
 94         HTTP_GET {
 95             url {
 96               path /testurl/test.jsp
 97               digest 640205b7b0fc66c1ea91c463fac6334c
 98             }
 99             url {
100               path /testurl2/test.jsp
101               digest 640205b7b0fc66c1ea91c463fac6334c
102             }
103             connect_timeout 3
104             nb_get_retry 3
105             delay_before_retry 3
106         }
107     }
108 }
109
110 virtual_server 10.10.10.3 1358 {
111     delay_loop 3
112     lb_algo rr
113     lb_kind NAT
114     nat_mask 255.255.255.0
115     persistence_timeout 50
116     protocol TCP
117
118     real_server 192.168.200.4 1358 {
119         weight 1
120         HTTP_GET {
121             url {
122               path /testurl/test.jsp
123               digest 640205b7b0fc66c1ea91c463fac6334d
124             }
125             url {
126               path /testurl2/test.jsp
127               digest 640205b7b0fc66c1ea91c463fac6334d
128             }
129             url {
130               path /testurl3/test.jsp
131               digest 640205b7b0fc66c1ea91c463fac6334d
132             }
133             connect_timeout 3
134             nb_get_retry 3
135             delay_before_retry 3
136         }
137     }
138
139     real_server 192.168.200.5 1358 {
140         weight 1
141         HTTP_GET {
142             url {
143               path /testurl/test.jsp
144               digest 640205b7b0fc66c1ea91c463fac6334d
145             }
146             url {
147               path /testurl2/test.jsp
148               digest 640205b7b0fc66c1ea91c463fac6334d
149             }
150             url {
151               path /testurl3/test.jsp
152               digest 640205b7b0fc66c1ea91c463fac6334d
153             }
154             connect_timeout 3
155             nb_get_retry 3
156             delay_before_retry 3
157         }
158     }
159 }
8、现在开始测试。主备nginx都启动keepalived及nginx。
8.1、初始状态,查看主nginx的eth0设置:vip绑定在主nginx的eth0上。

查看备nginx的eth0设置:vip没有绑定在备nginx的eth0上。
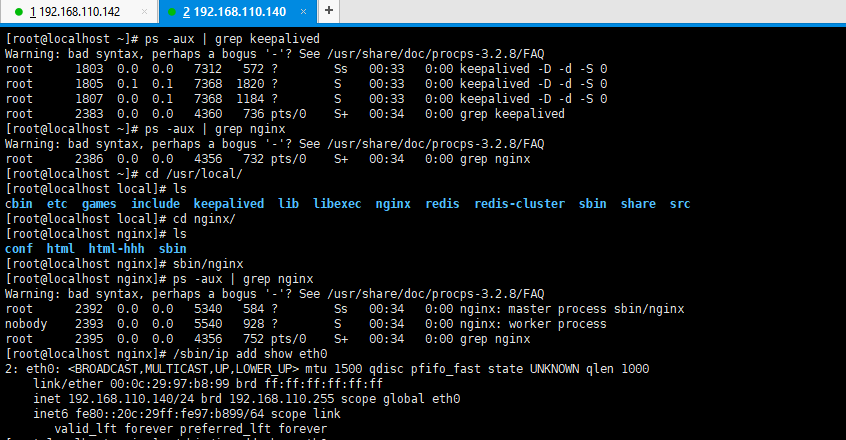
访问www.hhh.com正常访问。

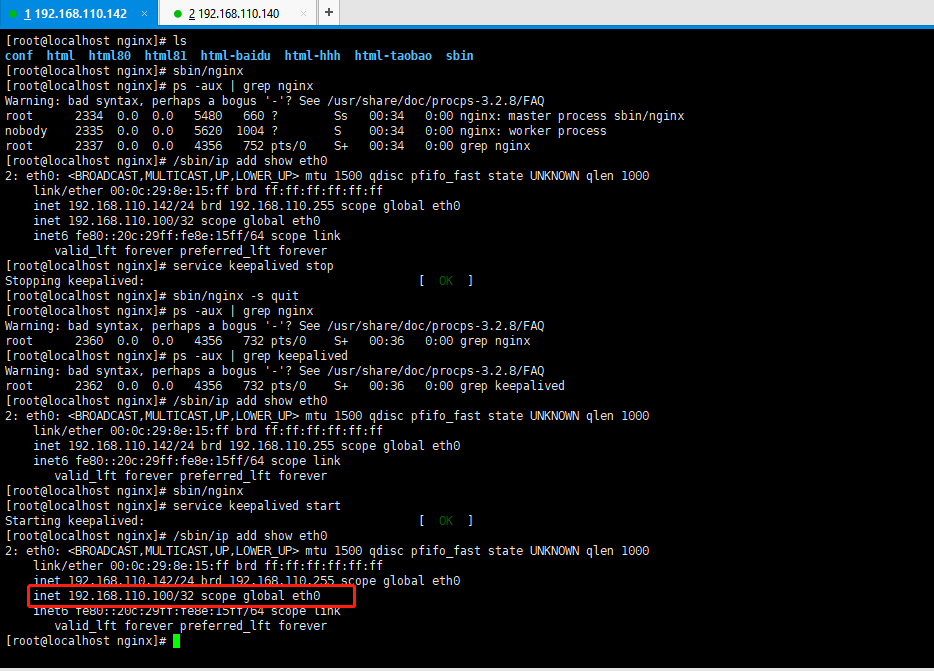
8.2、主机宕机,将主nginx的keepalived停止或将主nginx关机(相当于模拟宕机),查看主nginx的eth0:eth0没有绑定vip。
注意:这里模拟的是停止 keepalived进程没有模拟宕机,所以还要将nginx进程也停止表示主nginx服务无法提供。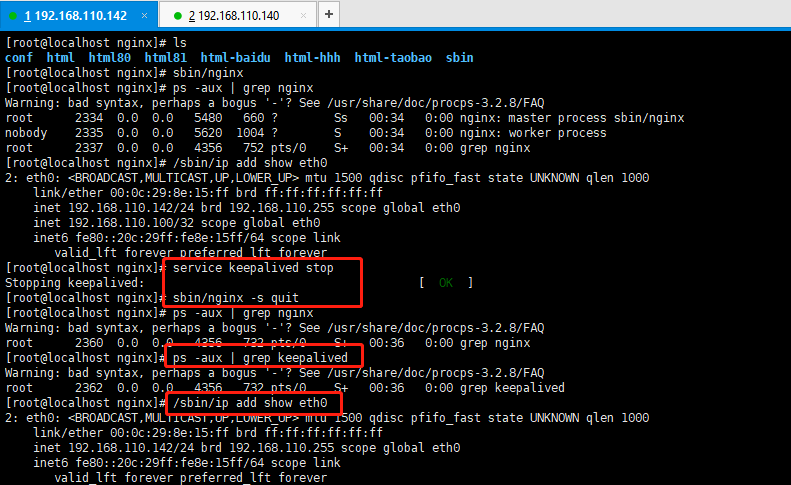
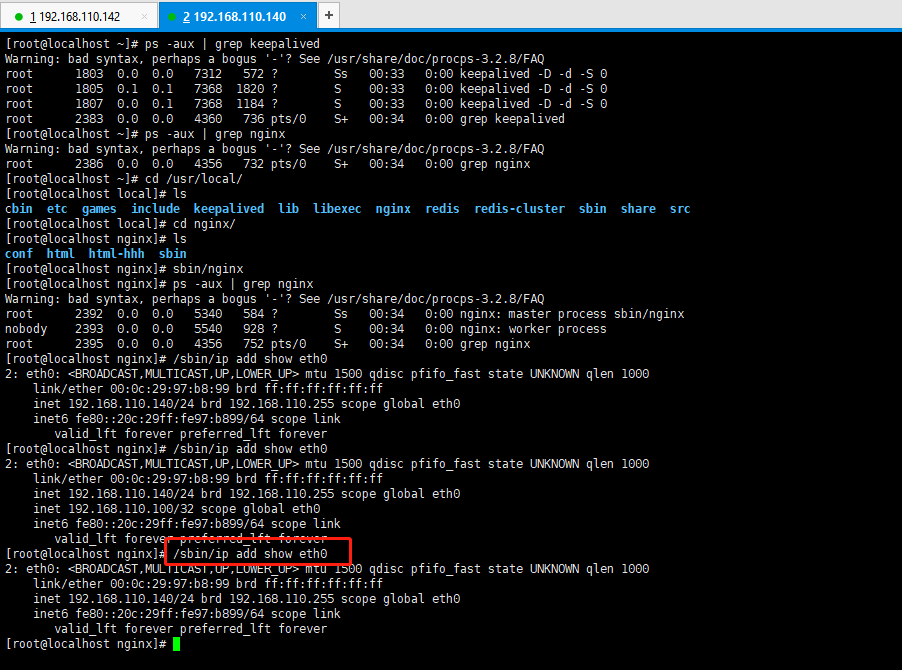
查看备nginx的eth0:vip已经漂移到备nginx。
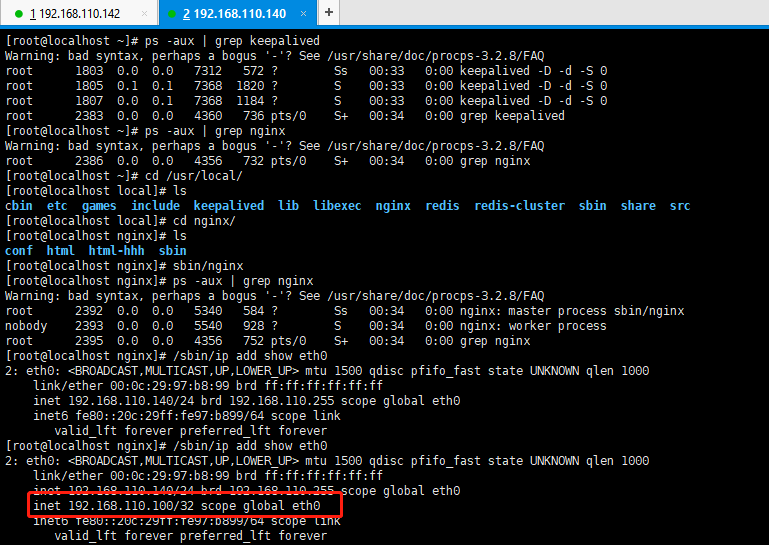
访问www.hhh.com正常访问。

8.3、主机恢复,将主nginx的keepalived和nginx都启动。查看主nginx的eth0:查看备nginx的eth0:vip漂移到主nginx。
查看备nginx的eth0:eth0没有绑定vip。
访问:http://www.hhh.com/,正常访问。
注意:主nginx恢复时一定要将nginx也启动(通常nginx启动要加在开机启动中),否则即使vip漂移到主nginx也无法访问。
待续......


