本文主要是介绍一文读懂Web Codecs API:浏览器背后的媒体魔术师,希望对大家解决编程问题提供一定的参考价值,需要的开发者们随着小编来一起学习吧!
引言
在早期的Web 网页中,视频播放通常要依靠 Flash 和 Silverlight 等插件来完成,浏览器是不支持直接播放视频的。
随着网络技术的发展,视频这种媒体方式的需求变得普遍,HTML5中,出现了一个新的元素Video,使得我们可以不借助插件播放视频。
当然,它并不支持所有的格式,而且不同的浏览器厂商支持的格式也有所不同,为什么会出现只支持部分格式?
在 Web 中,能实现无插件播放的有3GP、 ADTS、Flac、Mpeg-4、Ogg、Mov、WebM等,为什么能播放这些呢?
其实就是浏览器内置了相关的解码器,使得我们可以对其解码播放,反之,没有对应解码器,就无法进行播放。
视频播放的步骤
大致如下:

当然,我们今天的主角并不是 Video 元素,我们的主角是 Web Codecs Api。
什么是 Web Codecs ,顾名思义,就是 Web 中的编码解码器。
对谁编码和解码?对视频和音频
旗下主要有 AudioDecode、 VideoDecoder、 AudioEncoder 和 VideoEncoder 这四大将。
能干啥?能获得到对视频流的单个帧和音频数据块的底层访问能力,实现完全控制媒体。
例子:使用 Web Codecs 对 MP4(H264) 获取数据、解封装播放。
我们所见到的视频文件,里面往往包含视频和音频,视频其实是像幻灯片一样,由一张一张的图像组成。
而视频文件,就是一堆图像数据和音频组合起来的,通过特定的编码压缩,通过特定的协议存储。
反过来可以通过解协议、解封装、解码来进行播放。
第一步:解协议解封装。

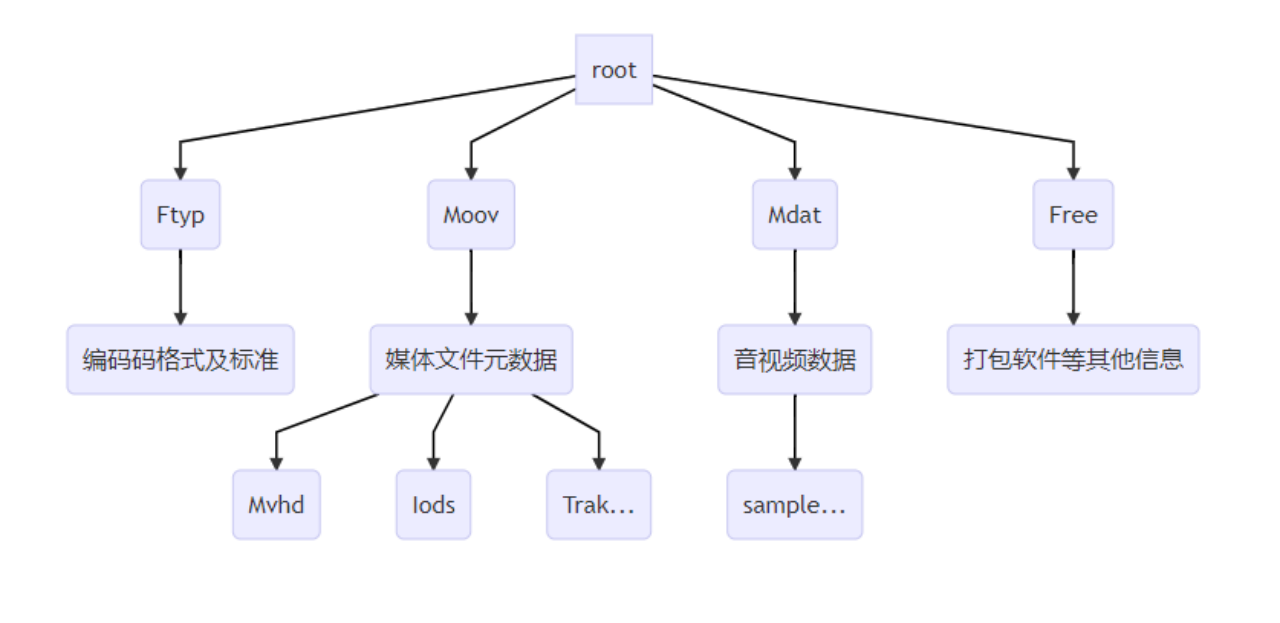
一个MP4视频文件大致由以上部分组成。这里我们使用的是 MP4Box.js 进行解封装。
解封装获取文件的信息后,我们就需要配置解码器,需要用到的解码器有视频解码器和音频解码器,对解码后的数据进行处理就能用于播放。
基本的流程如下:

代码实现
使用类封装
// 使用MP4 Box 解封装
import Mp4box from 'mp4box'// 非worker模式export default class VideoPlayer {// options 暂时只有一个renderCanvasconstructor(options) {// 解码器this.$codecs = new Codecs(this.output.bind(this))// 渲染器this.$render = new Render(options.renderCanvas)}// 输出output(type, data) {// 输出if(type === 'frame') {this.$render.render(data)} else {this.$render.playAudio(data)}// 销毁帧data.close()}// 加载文件loadFile(file) {return new Promise((resolve, reject) => {file.arrayBuffer().then((buffer) => {buffer.fileStart = 0this.$codecs.codecFile(buffer)resolve(true)}).catch((e) => {reject(e)})})}
}
渲染类封装
// 渲染类
class Render {constructor(canvas) {this.canvas = canvasthis.ctx = canvas.getContext('2d')this.audioCtx = new AudioContext()this.audioOutput = this.audioCtx.destinationthis.interleavingBuffers = []this.trackGenerator = new MediaStreamTrackGenerator({ kind: "audio" });this.writer = this.trackGenerator.writable.getWriter()const audio = document.createElement('audio')audio.setAttribute('controls', 'controls')document.body.appendChild(audio)const mediaStream = new MediaStream([this.trackGenerator]);audio.srcObject = mediaStream;}render(frame) {const { canvas, ctx } = thiscanvas.width = frame.displayWidthcanvas.height = frame.displayHeightctx.fillStyle = '#f00'ctx.clearRect(0, 0, frame.displayWidth, frame.displayHeight)ctx.drawImage(frame, 0, 0, frame.displayWidth, frame.displayHeight)}playAudio(audioData) {this.bufferAudioData(audioData)}bufferAudioData(audioData) {const data = structuredClone(audioData)this.writer.write(audioData)}
}
解码类封装
class Codecs {// 初始化MP4public $M: any = Mp4box.createFile();constructor(output = (type, frame) => {}) {// 初始化this.$M.onReady = this.onReady.bind(this);this.$M.onSamples = this.onSamples.bind(this);// 视频解码器this.$videoCodec = new VideoDecoder({output(frame: any) {output('frame', frame);},error(e: any) {console.error(e);},});// 音频解码器this.$audioCodec = new AudioDecoder({output: (audioData: any) => {output('audioData', audioData);},error: (e: any) => {console.error(e);},});}// 当准备好了之后onReady(info: any) {const videoTrack = info.videoTracks[0];const videoConfig = {codec: videoTrack.codec,codedHeight: videoTrack.video.height,codedWidth: videoTrack.video.width,description: this.description(videoTrack),};const audioTrack = info.audioTracks[0];const audioConfig = {codec: audioTrack.codec,sampleRate: 48000,numberOfChannels: 2,description: this.description(audioTrack),};// 是否支持编码标准VideoDecoder.isConfigSupported(videoConfig).then((res) => {this.$videoCodec.configure(videoConfig);this.$M.setExtractionOptions(videoTrack.id);AudioDecoder.isConfigSupported(audioConfig).then((res) => {this.$audioCodec.configure(audioConfig);this.$M.setExtractionOptions(audioTrack.id);this.$M.start();});});}// 获取解码器的描述,才能完整解码description(track) {const trak = this.$M.getTrackById(track.id);console.log('trak', trak);for (const entry of trak.mdia.minf.stbl.stsd.entries) {if (entry.avcC || entry.hvcC) {const stream = new Mp4box.DataStream(undefined,0,Mp4box.DataStream.BIG_ENDIAN);if (entry.avcC) {entry.avcC.write(stream);} else {entry.hvcC.write(stream);}return new Uint8Array(stream.buffer, 8); // Remove the box header.}if (entry.esds) {return entry.esds.esd.descs[0].descs[0].data;}}throw 'avcC or hvcC not found';}// MP4Box 传出的样本onSamples(track_id: any, ref: any, samples: any) {if (track_id === 2) {this.decodeAudio(samples);} else {this.decodeVideo(samples);}}// 解码视频decodeVideo(samples) {for (const sample of samples) {const data = new EncodedVideoChunk({type: sample.is_sync ? 'key' : 'delta',timestamp: (1e6 * sample.cts) / sample.timescale,duration: (1e6 * sample.duration) / sample.timescale,data: sample.data,});this.$videoCodec.decode(data);}}// 解码音频decodeAudio(samples) {for (const sample of samples) {const data = new EncodedAudioChunk({type: sample.is_sync ? 'key' : 'delta',timestamp: (1e6 * sample.cts) / sample.timescale,duration: (1e6 * sample.duration) / sample.timescale,data: sample.data,});this.$audioCodec.decode(data);}}// 开始解码codecFile(file: File | ArrayBuffer) {if (file instanceof File) {file.arrayBuffer().then((buffer) => {this.$M.appendBuffer(buffer);this.$M.flush();});} else if (file instanceof ArrayBuffer) {this.$M.appendBuffer(file);this.$M.flush();}}
}
以上就是 Web Codes Api 的一个小案例,实现了基本的解码播放。
– 欢迎点赞、关注、转发、收藏【我码玄黄】,gonghao同名
这篇关于一文读懂Web Codecs API:浏览器背后的媒体魔术师的文章就介绍到这儿,希望我们推荐的文章对编程师们有所帮助!


