本文主要是介绍NDK r21编译FFmpeg 4.2.2+x264及使用ffmpeg转换视频文件,希望对大家解决编程问题提供一定的参考价值,需要的开发者们随着小编来一起学习吧!
文章目录
- 1.编译ffmpeg+x264
- 2.使用ffmpeg api转换视频格式
1.编译ffmpeg+x264
使用Ubuntu编译。以aarch64为例。
下载x264,进行编译。
#!/bin/bashNDK=/home/qwe/android-ndk-r21
export TOOLCHAIN=$NDK/toolchains/llvm/prebuilt/linux-x86_64
export TARGET=aarch64-linux-android
export API=21export AR=$TOOLCHAIN/bin/aarch64-linux-android-ar
#export AS=$TOOLCHAIN/bin/arm-linux-androideabi-as
export CC=$TOOLCHAIN/bin/$TARGET$API-clang
export CXX=$TOOLCHAIN/bin/$TARGET$API-clang++
export LD=$TOOLCHAIN/bin/aarch64-linux-android-ld
export RANLIB=$TOOLCHAIN/bin/aarch64-linux-android-ranlib
export STRIP=$TOOLCHAIN/bin/aarch64-linux-android-stripfunction build_one
{
echo 'start' $kind
./configure \--enable-shared \--enable-pic \--host=$my_host \--sysroot=$NDK/toolchains/llvm/prebuilt/linux-x86_64/sysroot \--libdir=$libpathmake clean
make
make install
echo 'end' $kind
}#aarch64
kind=aarch64
my_host=aarch64-linux-android
libpath=/usr/local/lib/x264/$kind
build_one
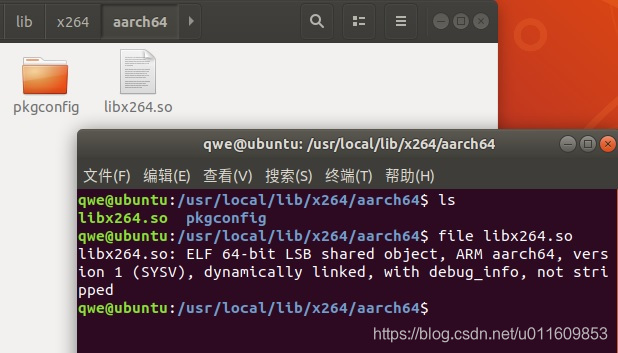
得到文件

编译ffmpeg+x264
#!/bin/bash
NDK=/home/qwe/android-ndk-r21
HOST_TAG=linux-x86_64
TOOLCHAIN=$NDK/toolchains/llvm/prebuilt/$HOST_TAG
AR=$TOOLCHAIN/bin/aarch64-linux-android-ar
AS=$TOOLCHAIN/bin/aarch64-linux-android-as
CC=$TOOLCHAIN/bin/aarch64-linux-android21-clang
CXX=$TOOLCHAIN/bin/aarch64-linux-android21-clang++
LD=$TOOLCHAIN/bin/aarch64-linux-android-ld
RANLIB=$TOOLCHAIN/bin/aarch64-linux-android-ranlib
STRIP=$TOOLCHAIN/bin/aarch64-linux-android-strip
NM=$TOOLCHAIN/bin/aarch64-linux-android-nm#arm64  x86 x86_64 对应 aarch64  i686  x86_64 PREFIX=./SO/aarch64function build
{./configure \
--prefix=$PREFIX \
--disable-static \
--enable-shared \
--enable-small \
--enable-gpl \
--enable-version3 \
--enable-pic \
--disable-doc \
--enable-asm \
--enable-cross-compile \
--target-os=android \
--arch=aarch64 \
--cc=$CC \
--ar=$AR \
--cxx=$CXX \
--ranlib=$RANLIB \
--strip=$STRIP \
--nm=$NM \
--sysroot=/home/qwe/android-ndk-r21/toolchains/llvm/prebuilt/linux-x86_64/sysroot \
--enable-libx264 \
--extra-cflags="-I/usr/local/include" \
--extra-ldflags="-L/usr/local/lib/x264/aarch64" make clean
make -j4
make install}build
编译完成

使用

运行

2.使用ffmpeg api转换视频格式
c/c++代码
#include <jni.h>
#include <string>extern "C" {
#include "libavcodec/avcodec.h"
#include "libavutil/timestamp.h"
#include "libavformat/avformat.h"
#include "libavutil/mathematics.h"
}//代码来自ffmpeg demo中的代码remuxing.c
static void log_packet(const AVFormatContext *fmt_ctx, const AVPacket *pkt, const char *tag) {AVRational *time_base = &fmt_ctx->streams[pkt->stream_index]->time_base;printf("%s: pts:%s pts_time:%s dts:%s dts_time:%s duration:%s duration_time:%s stream_index:%d\n",tag,av_ts2str(pkt->pts), av_ts2timestr(pkt->pts, time_base),av_ts2str(pkt->dts), av_ts2timestr(pkt->dts, time_base),av_ts2str(pkt->duration), av_ts2timestr(pkt->duration, time_base),pkt->stream_index);
}//代码来自ffmpeg demo中的代码remuxing.c
extern "C"
int main(int argc, char **argv) {AVOutputFormat *ofmt = NULL;AVFormatContext *ifmt_ctx = NULL, *ofmt_ctx = NULL;AVPacket pkt;const char *in_filename, *out_filename;int ret, i;int stream_index = 0;int *stream_mapping = NULL;int stream_mapping_size = 0;if (argc < 3) {printf("usage: %s input output\n""API example program to remux a media file with libavformat and libavcodec.\n""The output format is guessed according to the file extension.\n""\n", argv[0]);return 1;}in_filename = argv[1];out_filename = argv[2];if ((ret = avformat_open_input(&ifmt_ctx, in_filename, 0, 0)) < 0) {fprintf(stderr, "Could not open input file '%s'", in_filename);goto end;}if ((ret = avformat_find_stream_info(ifmt_ctx, 0)) < 0) {fprintf(stderr, "Failed to retrieve input stream information");goto end;}av_dump_format(ifmt_ctx, 0, in_filename, 0);avformat_alloc_output_context2(&ofmt_ctx, NULL, NULL, out_filename);if (!ofmt_ctx) {fprintf(stderr, "Could not create output context\n");ret = AVERROR_UNKNOWN;goto end;}stream_mapping_size = ifmt_ctx->nb_streams;stream_mapping = (int *) av_mallocz_array(stream_mapping_size, sizeof(*stream_mapping));if (!stream_mapping) {ret = AVERROR(ENOMEM);goto end;}ofmt = ofmt_ctx->oformat;for (i = 0; i < ifmt_ctx->nb_streams; i++) {AVStream *out_stream;AVStream *in_stream = ifmt_ctx->streams[i];AVCodecParameters *in_codecpar = in_stream->codecpar;if (in_codecpar->codec_type != AVMEDIA_TYPE_AUDIO &&in_codecpar->codec_type != AVMEDIA_TYPE_VIDEO &&in_codecpar->codec_type != AVMEDIA_TYPE_SUBTITLE) {stream_mapping[i] = -1;continue;}stream_mapping[i] = stream_index++;out_stream = avformat_new_stream(ofmt_ctx, NULL);if (!out_stream) {fprintf(stderr, "Failed allocating output stream\n");ret = AVERROR_UNKNOWN;goto end;}ret = avcodec_parameters_copy(out_stream->codecpar, in_codecpar);if (ret < 0) {fprintf(stderr, "Failed to copy codec parameters\n");goto end;}out_stream->codecpar->codec_tag = 0;}av_dump_format(ofmt_ctx, 0, out_filename, 1);if (!(ofmt->flags & AVFMT_NOFILE)) {ret = avio_open(&ofmt_ctx->pb, out_filename, AVIO_FLAG_WRITE);if (ret < 0) {fprintf(stderr, "Could not open output file '%s'", out_filename);goto end;}}ret = avformat_write_header(ofmt_ctx, NULL);if (ret < 0) {fprintf(stderr, "Error occurred when opening output file\n");goto end;}while (1) {AVStream *in_stream, *out_stream;ret = av_read_frame(ifmt_ctx, &pkt);if (ret < 0)break;in_stream = ifmt_ctx->streams[pkt.stream_index];if (pkt.stream_index >= stream_mapping_size ||stream_mapping[pkt.stream_index] < 0) {av_packet_unref(&pkt);continue;}pkt.stream_index = stream_mapping[pkt.stream_index];out_stream = ofmt_ctx->streams[pkt.stream_index];log_packet(ifmt_ctx, &pkt, "in");
/* copy packet */pkt.pts = av_rescale_q_rnd(pkt.pts, in_stream->time_base, out_stream->time_base,(AVRounding)(AV_ROUND_NEAR_INF | AV_ROUND_PASS_MINMAX));pkt.dts = av_rescale_q_rnd(pkt.dts, in_stream->time_base, out_stream->time_base,(AVRounding)(AV_ROUND_NEAR_INF | AV_ROUND_PASS_MINMAX));pkt.duration = av_rescale_q(pkt.duration, in_stream->time_base, out_stream->time_base);pkt.pos = -1;log_packet(ofmt_ctx, &pkt, "out");ret = av_interleaved_write_frame(ofmt_ctx, &pkt);if (ret < 0) {fprintf(stderr, "Error muxing packet\n");break;}av_packet_unref(&pkt);}av_write_trailer(ofmt_ctx);end:avformat_close_input(&ifmt_ctx);
/* close output */if (ofmt_ctx && !(ofmt->flags & AVFMT_NOFILE))avio_closep(&ofmt_ctx->pb);avformat_free_context(ofmt_ctx);av_freep(&stream_mapping);if (ret < 0 && ret != AVERROR_EOF) {fprintf(stderr, "Error occurred: %s\n", av_err2str(ret));return 1;}return 0;
}extern "C"
JNIEXPORT jint JNICALL
Java_cn_study_testffmpeg_MainActivity_execute(JNIEnv *env, jobject thiz, jobjectArray commands) {int argc = env->GetArrayLength(commands);char *argv[argc];int i;for (i = 0; i < argc; i++) {jstring js = (jstring) env->GetObjectArrayElement(commands, i);argv[i] = (char *) env->GetStringUTFChars(js, 0);}return main(argc, argv);
}
java代码
String a = Environment.getExternalStorageDirectory().getAbsolutePath();String cmd = "ffmpeg " + a + "/video.mp4 " + a + "/output.flv";File file = new File(a, "output.flv");try {file.createNewFile();} catch (IOException e) {e.printStackTrace();}String[] commands = cmd.split("\\s+");int asd = execute(commands);
效果

这篇关于NDK r21编译FFmpeg 4.2.2+x264及使用ffmpeg转换视频文件的文章就介绍到这儿,希望我们推荐的文章对编程师们有所帮助!


