本文主要是介绍nginx优化与防盗链【☆☆☆】,希望对大家解决编程问题提供一定的参考价值,需要的开发者们随着小编来一起学习吧!
目录
一、用户层面的优化
1、隐藏版本号
方法一:修改配置文件
方法二:修改源码文件,重新编译安装
2、修改nginx用户与组
3、配置nginx网页缓存时间
4、nginx的日志切割
5、配置nginx实现连接超时
6、更改nginx运行进程数
7、开启网页压缩功能
8、网页图片的大小缩放
9、加密模块(了解)
10、nginx网站限速(了解)
11、防盗链优化(重要)
二、系统内核的优化
1、优化文件打开数
2、优化内核参数
一、用户层面的优化
1、隐藏版本号
上一篇中我们部署好nginx服务器了,此时任何主机都能通过浏览器访问nginx服务器,按F12获取nginx服务器的网页的信息,在响应头的server一栏标注了nginx的服务器类型以及版本号;或者直接在CentOS使用命令curl -I http://192.168.170.100获取nginx服务器响应头中的server服务器类型和版本号。因为每一个软件版本都有其特定的漏洞或者bug,别人想要攻击的话就会更容易,所以需要我们做隐藏版本号的优化。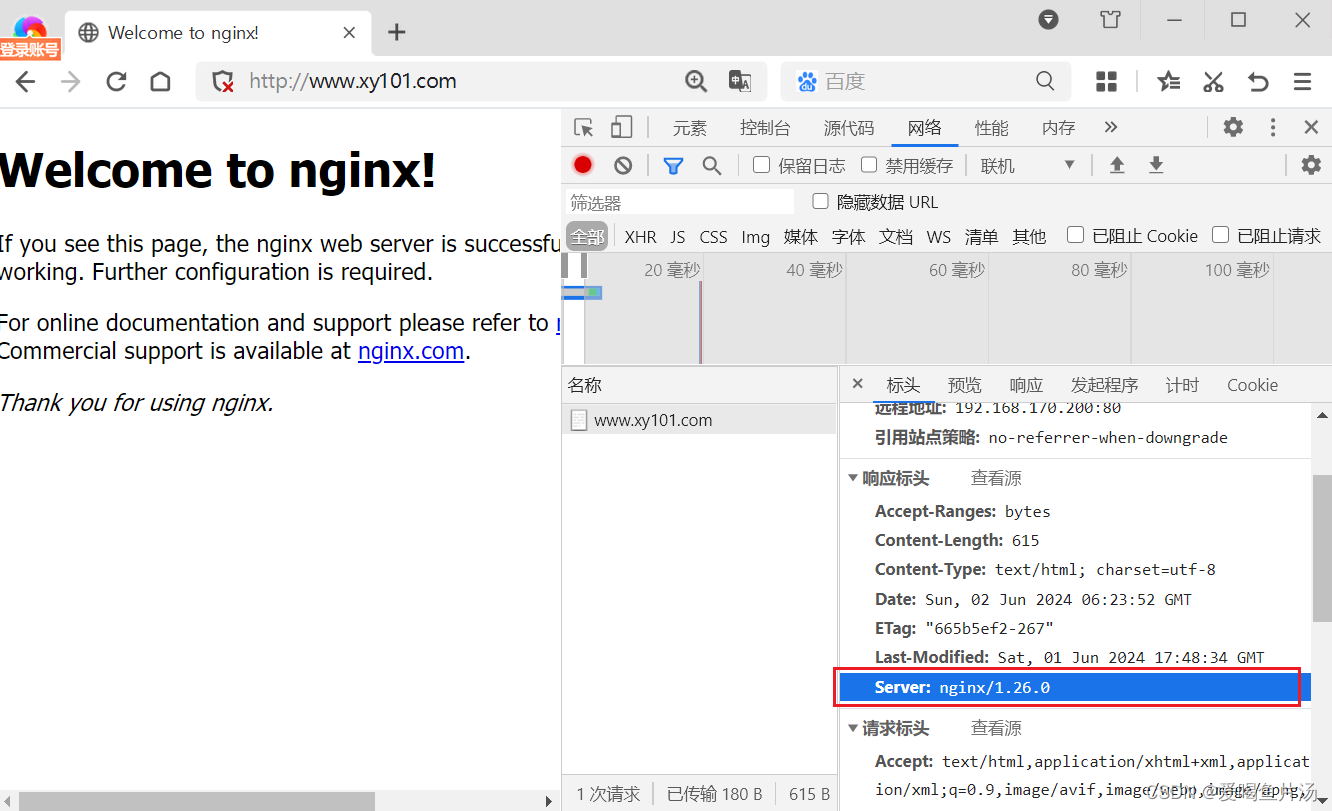
方法一:修改配置文件
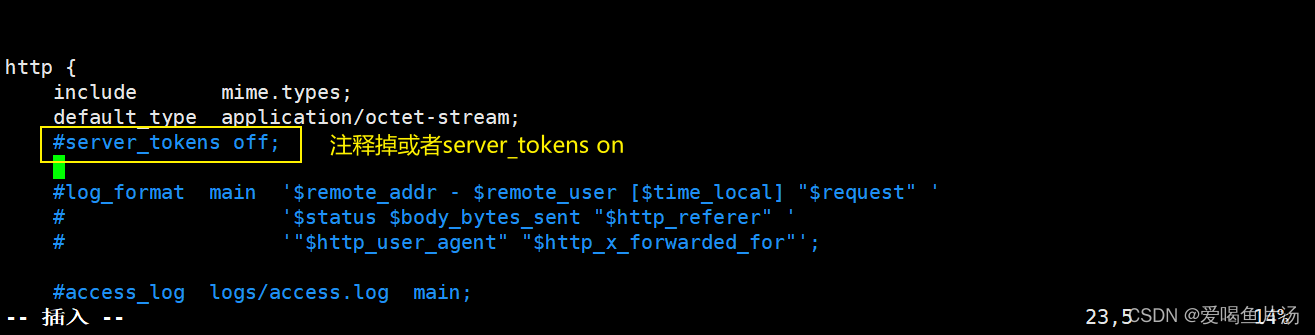
#将nginx配置文件中添加server_tokens off;关闭显示版本号
[root@centOS2 ~]# cd /usr/local/nginx/conf/
[root@centOS2 conf]# ls
fastcgi.conf fastcgi_params.default mime.types nginx.conf.default uwsgi_params
fastcgi.conf.default koi-utf mime.types.default scgi_params uwsgi_params.default
fastcgi_params koi-win nginx.conf scgi_params.default win-utf
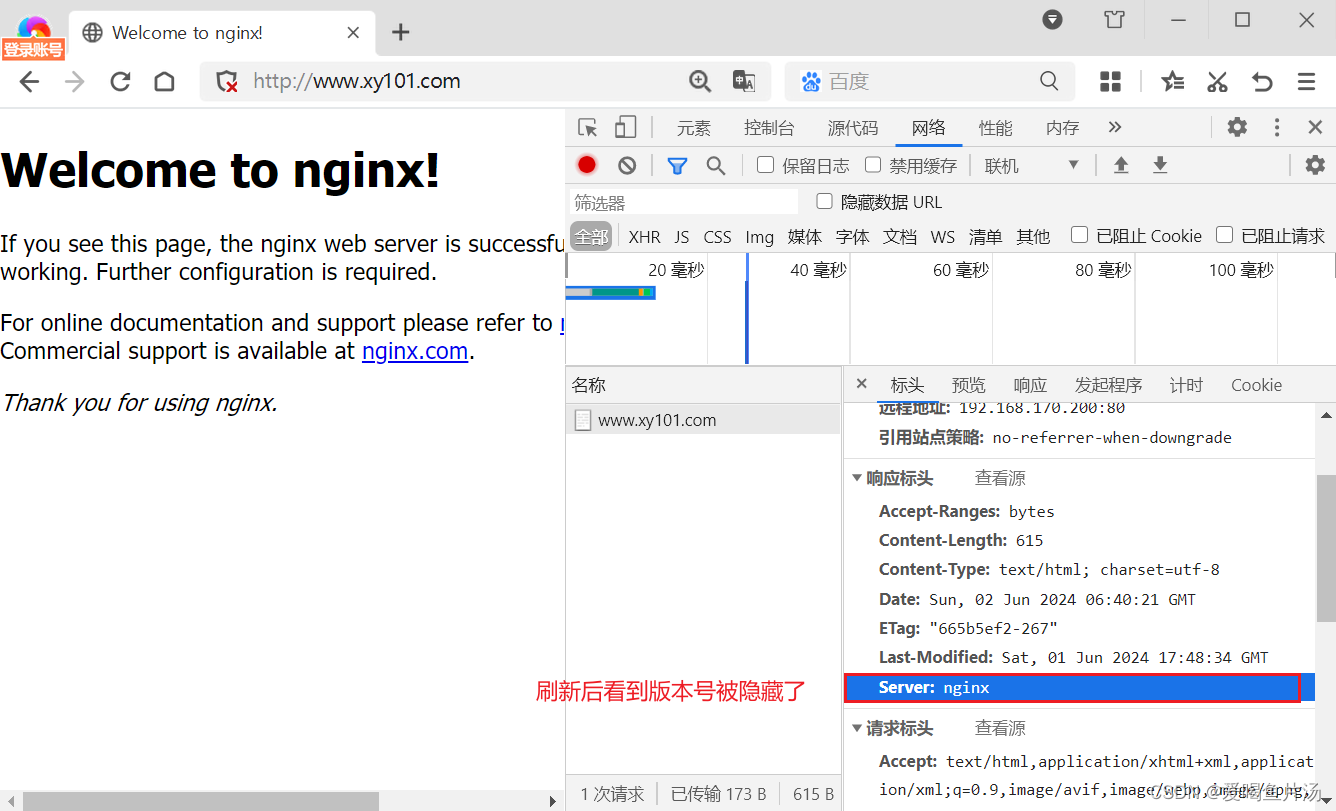
[root@centOS2 conf]# vim nginx.conf19 http {20 include mime.types;21 default_type application/octet-stream;22 server_tokens off;#检查语法
[root@centOS2 conf]# nginx -t
nginx: the configuration file /usr/local/nginx/conf/nginx.conf syntax is ok
nginx: configuration file /usr/local/nginx/conf/nginx.conf test is successful#重载nginx服务
[root@centOS2 conf]# systemctl reload nginx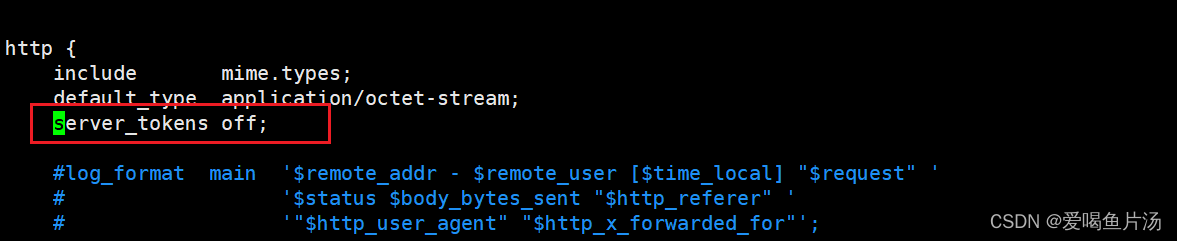
方法二:修改源码文件,重新编译安装
#备份头部配置文件nginx.h
[root@centOS2 conf]# cd /opt/nginx-1.26.0/
[root@centOS2 nginx-1.26.0]# ls
auto  CHANGES  CHANGES.ru  conf  configure  contrib  html  LICENSE  Makefile  man  objs  README  src
[root@centOS2 nginx-1.26.0]# cd src/
[root@centOS2 src]# cd core/
[root@centOS2 core]# ls
nginx.c           ngx_crc32.h  ngx_md5.c              ngx_proxy_protocol.h  ngx_shmtx.h
nginx.h           ngx_crc.h    ngx_md5.h              ngx_queue.c           ngx_slab.c
ngx_array.c       ngx_crypt.c  ngx_module.c           ngx_queue.h           ngx_slab.h
ngx_array.h       ngx_crypt.h  ngx_module.h           ngx_radix_tree.c      ngx_spinlock.c
ngx_bpf.c         ngx_cycle.c  ngx_murmurhash.c       ngx_radix_tree.h      ngx_string.c
ngx_bpf.h         ngx_cycle.h  ngx_murmurhash.h       ngx_rbtree.c          ngx_string.h
ngx_buf.c         ngx_file.c   ngx_open_file_cache.c  ngx_rbtree.h          ngx_syslog.c
ngx_buf.h         ngx_file.h   ngx_open_file_cache.h  ngx_regex.c           ngx_syslog.h
ngx_conf_file.c   ngx_hash.c   ngx_output_chain.c     ngx_regex.h           ngx_thread_pool.c
ngx_conf_file.h   ngx_hash.h   ngx_palloc.c           ngx_resolver.c        ngx_thread_pool.h
ngx_config.h      ngx_inet.c   ngx_palloc.h           ngx_resolver.h        ngx_times.c
ngx_connection.c  ngx_inet.h   ngx_parse.c            ngx_rwlock.c          ngx_times.h
ngx_connection.h  ngx_list.c   ngx_parse.h            ngx_rwlock.h
ngx_core.h        ngx_list.h   ngx_parse_time.c       ngx_sha1.c
ngx_cpuinfo.c     ngx_log.c    ngx_parse_time.h       ngx_sha1.h
ngx_crc32.c       ngx_log.h    ngx_proxy_protocol.c   ngx_shmtx.c
[root@centOS2 core]# cp nginx.h nginx.h.bak#修改nginx.h头部文件中的版本号以及服务器类型
[root@centOS2 core]# vim nginx.h
#define NGINX_VERSION   "2.48.0"					#修改版本号
#define NGINX_VER    "apache/" NGINX_VERSION	    #修改服务器类型#重新编译安装
[root@centOS2 nginx-1.26.0]# make -j2 && make install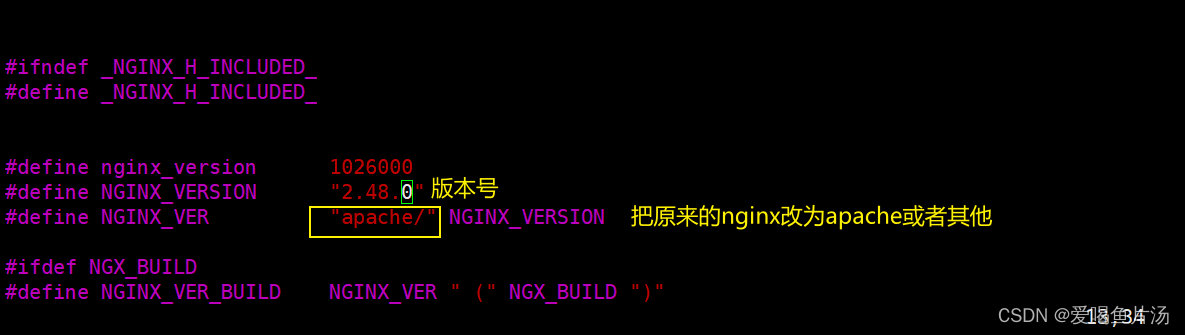
#修改nginx.conf配置文件,把响应头中的版本信息打开
[root@centOS2 conf]# vim nginx.conf
http {include mime.types;default_type application/octet-stream;#server_tokens off;
[root@centOS2 conf]# systemctl restart nginx.service#查看nginx服务器此时显示的版本信息是apache了
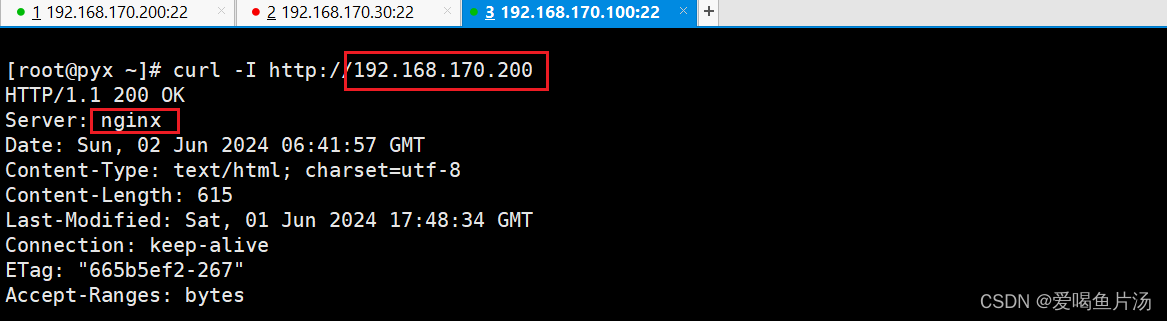
[root@centOS2 conf]# curl -I http://192.168.170.200
HTTP/1.1 200 OK
Server: apache/2.48.0
Date: Sun, 02 Jun 2024 12:45:33 GMT
Content-Type: text/html; charset=utf-8
Content-Length: 615
Last-Modified: Sat, 01 Jun 2024 17:48:34 GMT
Connection: keep-alive
ETag: "665b5ef2-267"
Accept-Ranges: bytes
方法三:第三方模块插件
使用headers-more-nginx-module-0.34.tar.gz第三方插件包,能够实现在不修改源码的基础上使页面不提供关于系统版本的任何信息。解压到一个目录,编译安装nginx,./configure -add-module='添加的模块路径' && make && make install,修改nginx.conf文件,在http配置快加more_clear_headers '响应头字段'即可去除nginx响应头任何想去除的字段。
2、修改nginx用户与组
nginx运行时的进程需要有用户与组的支持,实现对网站文件读取时进行访问显示。nginx默认的用户账号和组账号都为nobody。
①在编译安装时我们就可以指定用户与组为nginx或其他

②安装时没有指定用户或组账号,可以通过修改nginx.conf配置文件指定一个用户与组账号
#把用户和组账户改为nobody
[root@centOS2 src]# vim /usr/local/nginx/conf/nginx.conf
[root@centOS2 src]# systemctl reload nginx.service
[root@centOS2 src]# ps aux | grep nginx
root      74968  0.0  0.1 149904  5908 pts/2    S+   16:17   0:00 vim nginx.h
root      78208  0.0  0.0  20588   640 ?        Ss   21:03   0:00 nginx: master process /usr/local/nginx/sbin/nginx
nobody    78209  0.0  0.7  49296 27660 ?        S    21:03   0:00 nginx: worker process
nobody    78210  0.0  0.7  49296 27660 ?        S    21:03   0:00 nginx: worker process
root      78223  0.0  0.0 112824   980 pts/1    S+   21:03   0:00 grep --color=auto nginx#修改回nginx
[root@centOS2 src]# vim /usr/local/nginx/conf/nginx.conf
[root@centOS2 src]# systemctl reload nginx.service
[root@centOS2 src]# ps aux | grep nginx
root      74968  0.0  0.1 149904  5908 pts/2    S+   16:17   0:00 vim nginx.h
root      78260  0.0  0.0  20588   648 ?        Ss   21:05   0:00 nginx: master process /usr/local/nginx/sbin/nginx
nginx     78261  0.0  0.7  49296 27664 ?        S    21:05   0:00 nginx: worker process
nginx     78262  0.0  0.7  49296 27664 ?        S    21:05   0:00 nginx: worker process
root      78264  0.0  0.0 112824   976 pts/1    R+   21:05   0:00 grep --color=auto nginx


注意:nginx有两种进程,一是master进程,用来管理进程和加载配置文件的,由root用户启动;二是worker工作进程,用来处理用户请求的,是由配置文件指定的用户运行的。
3、配置nginx网页缓存时间
当nginx将网页数据返回给客户端后,可设置缓存时间,方便在日后进行相同内容的请求时直接返回,避免重复请求,加快了访问速度(一般针对静态页面网页设置,对动态页面不设置缓存时间)。
通过nginx服务端配置网页缓存时间可以实现将网页的资源内容临时保存到客户端,该客户端在一定时间内访问相同内容时直接在客户端获取相关资源即可,不需要服务端每次响应该内容了。(就像我们刷视频,第一次看的时候可能会卡,但是后面一段时间内看是流畅的,因为客户端临时缓存了。)
如何设置?在/usr/local/nginx/conf/nginx.conf配置文件中的http块或server块或location块添加配置,作用范围、效果不同。重载或重启服务后生效。
- http块:对当前nginx服务器所有站点有效
- server块:只针对server当前站点有效
- location块:只针对站点的某个访问路径网页有效

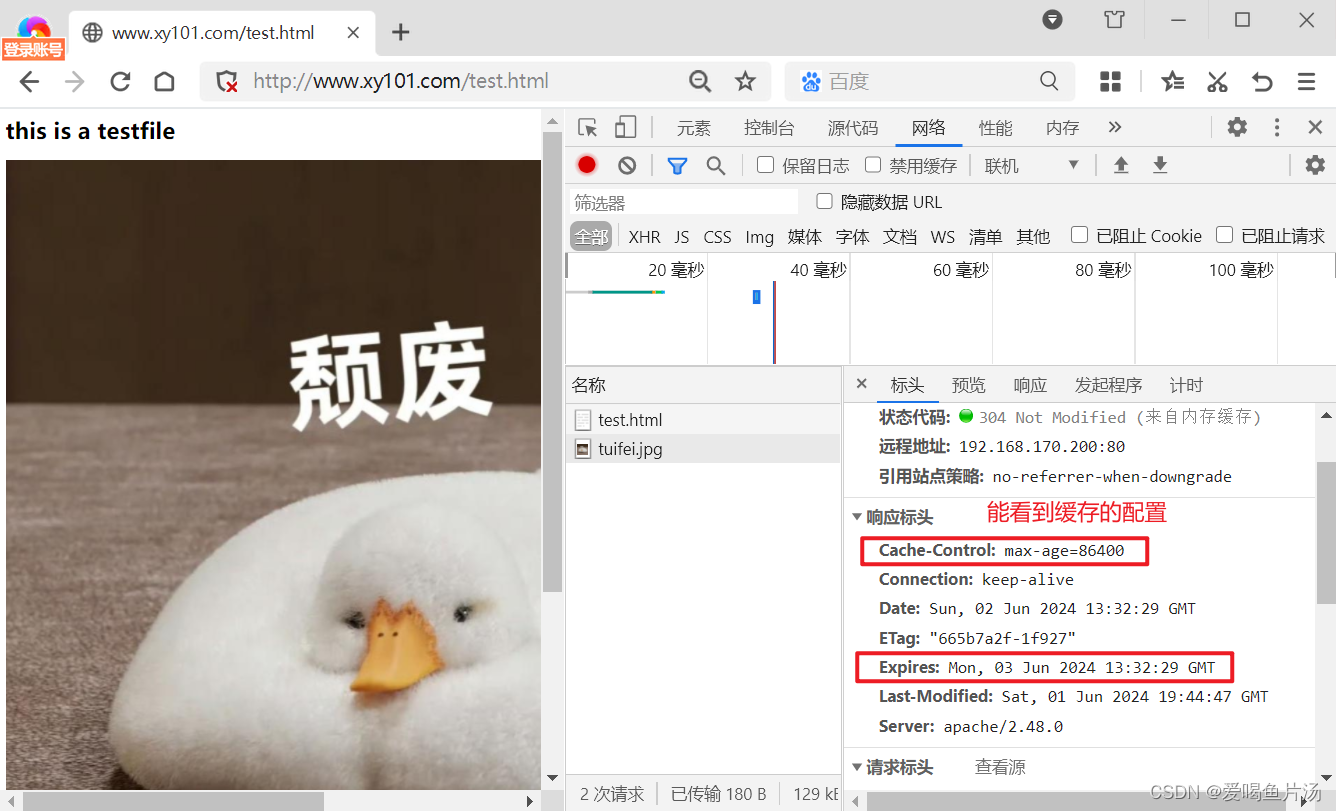
以上仅仅是做了图片的缓存配置,根据需要还可以在格式添加html、txt、css等等不同的格式。

4、nginx的日志切割
随着nginx运行时间的增加,日志也会增加。为了方便掌握Nginx运行状态,需要时刻关注Nginx日志文件,而太大的日志文件对监控来说是一个大灾难,所以需要定期进行日志文件的切割。但Nginx自身不具备日志分割处理的功能,可以通过Nginx信号控制功能的脚本实现日志的自动切割,使用kill -USER1 能够重新生成空文件用来记录后续的日志内容,再通过Linux的计划任务周期性地进行日志切割。
vim /root/nginx_log.sh
chmod +x /opt/fenge.sh
/opt/fenge.sh
ls /var/log/nginx
ls /usr/local/nginx/logs/access.log
systemctl status crond       #确保crondtab服务式开启状态
crontab -e---> 0 1 * * * /root/nginx_log.sh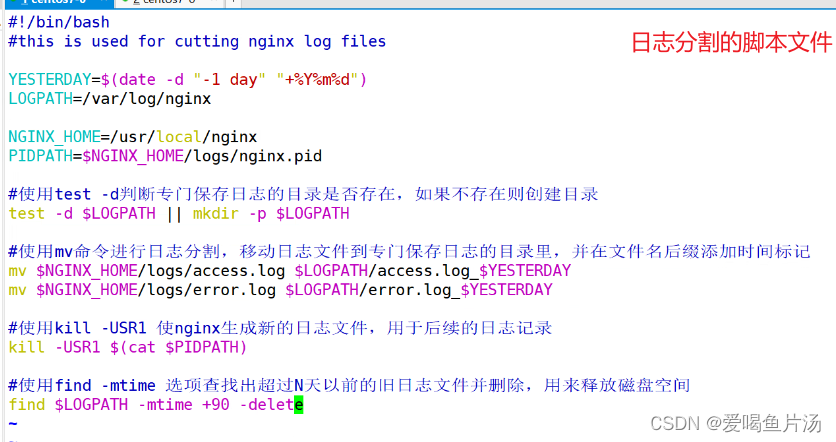
5、配置nginx实现连接超时
我们知道keepalive是连接保持,可以实现在一个tcp连接中完成多次的http请求和响应的过程。如果不设置超时时间,会出现一直有一个tcp连接挂着。服务端的tcp连接是有限制的,一个nginx服务器最多五六万的并发。为了避免一个客户端长时间占用链接,造成资源浪费,可设置响应的连接超时参数,在限制时间内如果没有操作即超时断开连接,实施控制访问时间。
Nginx的默认值是65秒,有些浏览器最多只保持 60 秒,所以可以设定为 60 秒。若将它设置为0,就禁止了keepalive 连接。防护服务端timewait过多的问题的方法就是设置keepalive_timeout的参数,让客户端主动断开连接。
[root@centOS2 ~]# vim /usr/local/nginx/conf/nginx.conf
http {
...... #keepalive_timeout 0;     表示关闭长连接。keepalive_timeout 60 50;  表示服务端超时时间60秒断开连接,客户端超时50秒主动断开连接。这样设置能让timewait在客户端,不挂在服务端keepalive_requests 100;   表示在长连接中最多支持100个请求client_header_timeout 80; 指定客户端向服务端在时间内需要发送一个完整的请求头,如果不完整返回408(数据包在传输过程中会被分片,一些数据片段在传输过程中可能会因为网络波动丢失或者传输变慢)client_body_timeout 80;   指定客户端向服务端在时间内需要发送一个完整的请求体,如果不完整返回408
......
}
#重载nginx服务
[root@centOS2 ~]# systemctl restart nginx

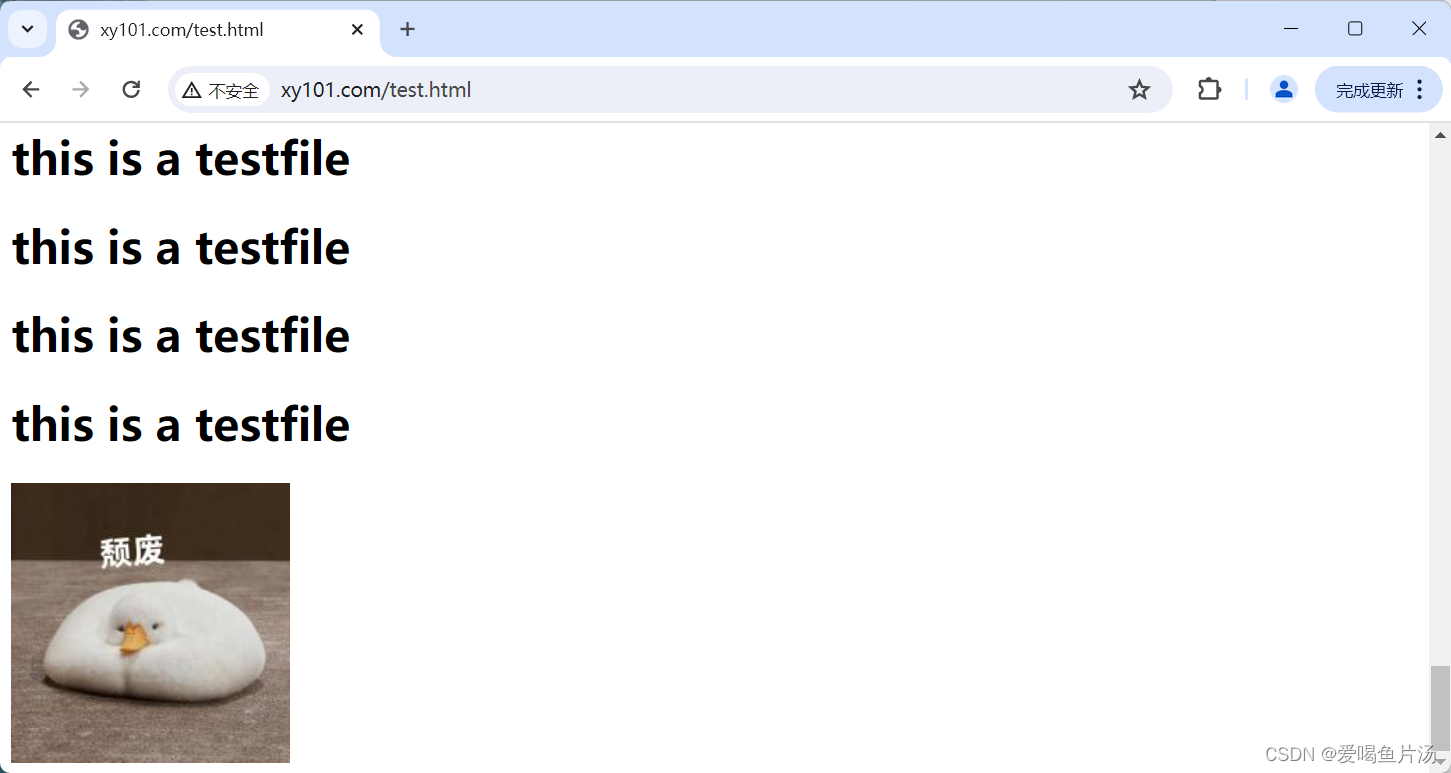
验证:访问http://www.xy101.com/test.html

6、更改nginx运行进程数
在高并发场景,需要启动更多的Nginx进程以保证快速响应,以处理用户的请求,避免造成阻塞。
更改进程数的配置方法:
修改配置文件的worker_processes参数一般设为CPU的个数或者核数或者auto,在高并发情况下可减少系统的开销,提升了服务速度。使用ps aux查看运行进程数的变化情况。
#查看cpu核数
[root@centOS2 html]# cat /proc/cpuinfo | grep -c "physical id"
2
#查看nginx主进程中包含几个子进程
[root@centOS2 html]# ps aux | grep nginx
root       8706  0.0  0.0  20588   644 ?        Ss   02:48   0:00 nginx: master process /usr/local/nginx/sbin/nginx
nginx      8707  0.0  0.7  49296 27660 ?        S    02:48   0:00 nginx: worker process
nginx      8708  0.0  0.7  49296 27660 ?        S    02:48   0:00 nginx: worker process
root       8870  0.0  0.0 112824   980 pts/0    R+   03:03   0:00 grep --color=auto nginx#实现cpu和工作进程的静态绑核。提升cpu利用率,进而提升性能。避免同一个worker子进程在不同的CPU核心上切换或者多个进程跑在一个CPU上,缓存失效,降低性能。
[root@centOS2 html]# vim /usr/local/nginx/conf/nginx.conf
worker_processes  2;                       #修改为cpu的总核数,一般情况不超过8个
worker_cpu_affinity 01 10;
#设置每个进程由不同cpu处理,2个进程时,由2位二进制数表示cpu绑定关系,01表示第一个工作进程绑定0号cpu;10表示第二个工作进程绑定1号cpu(看下标)。如果processes数配为4核时这里配置为0001 0010 0100 1000以此类推。[root@centOS2 ~]# systemctl restart nginx

7、开启网页压缩功能
ngx_http_gzip_module是Nginx提供对文件压缩功能的模块,允许Nginx服务器将输出内容在发送客户端之前进行压缩,以节约网站带宽,提升用户的访问体验,默认已经安装并开启,可在配置文件中加入相应的压缩功能参数对压缩性能进行优化。(生产环境中配置文能直接复制就直接复制,减少手敲出错)

[root@centOS2 ~]# vim /usr/local/nginx/conf/nginx.confhttp {...... 40     gzip  on;41     gzip_min_length 1k;42     gzip_buffers 4 16k;43     gzip_http_version 1.1;44     gzip_comp_level 5;45     gzip_vary on;46     gzip_disable "MSIE [1-6]\.";47     gzip_types text/plain text/javascript text/css text/xml application/x-javascript application/xml appli    cation/x-httpd-php application/javascript application/json image/jpeg image/png test/html;...... }#检查语法,重启服务
[root@centOS2 ~]# nginx -t
nginx: the configuration file /usr/local/nginx/conf/nginx.conf syntax is ok
nginx: configuration file /usr/local/nginx/conf/nginx.conf test is successful
[root@centOS2 ~]# systemctl restart nginx.service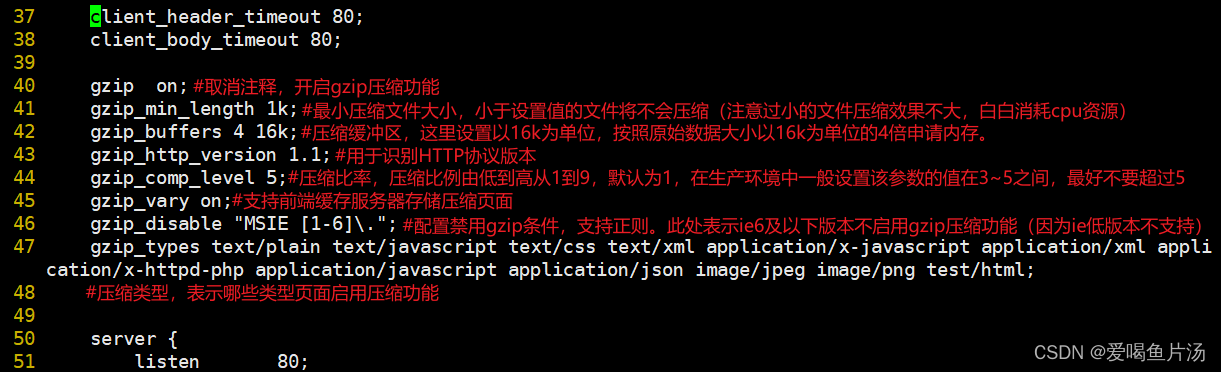


ps:图片的压缩效果不大, 因为图片本身就是被压缩过的资源。
8、网页图片的大小缩放
http_image_filter_module是Nginx提供的集成图片处理模块,可以用于实时缩放图片,旋转图片,验证图片有效性以及获取图片宽高以及图片类型信息。要实现此模块功能,需要先安装依赖包gd-devel,然后重新编译nginx。
image_filter resize 200 200;
#按等比例缩小图像的宽或高至指定大小。如果只想设置一个维度,另一维可以指定为:“-”
#使用在线源安装依赖包gd-devel,http_image_filter_module模块需要依赖gd-devel的支持
[root@centOS2 html]# cd /etc/yum.repos.d/
[root@centOS2 yum.repos.d]# ls
local.repo  repo.bak
[root@centOS2 yum.repos.d]# cd repo.bak/
[root@centOS2 repo.bak]# cd ..
[root@centOS2 yum.repos.d]# mv repo.bak/* ./
[root@centOS2 yum.repos.d]# ls
CentOS-Base.repo  CentOS-Debuginfo.repo  CentOS-Media.repo    CentOS-Vault.repo          local.repo
CentOS-CR.repo    CentOS-fasttrack.repo  CentOS-Sources.repo  CentOS-x86_64-kernel.repo  repo.bak
[root@centOS2 yum.repos.d]# mv local.repo repo.bak/
[root@centOS2 yum.repos.d]# ls
CentOS-Base.repo  CentOS-Debuginfo.repo  CentOS-Media.repo    CentOS-Vault.repo          repo.bak
CentOS-CR.repo    CentOS-fasttrack.repo  CentOS-Sources.repo  CentOS-x86_64-kernel.repo
[root@centOS2 yum.repos.d]# yum install -y gd-devel#重新编译安装nginx
[root@centOS2 yum.repos.d]#  cd /opt/nginx-1.26.0/
[root@centOS2 yum.repos.d]#  ./configure --prefix=/usr/local/nginx --user=nginx --group=nginx --with-http_stub_status_module --with-http_ssl_module --with-http_image_filter_module
[root@centOS2 yum.repos.d]#  make && make install#添加缩放配置项
[root@centOS2 ~]# vim /usr/local/nginx/conf/nginx.conf50     server {......60           61         location ~ \.(jpg|png|gif)$ {62             root   html;63             image_filter resize 200 200;64             expires 1d;65         }......}
[root@centOS2 ~]# systemctl restart nginx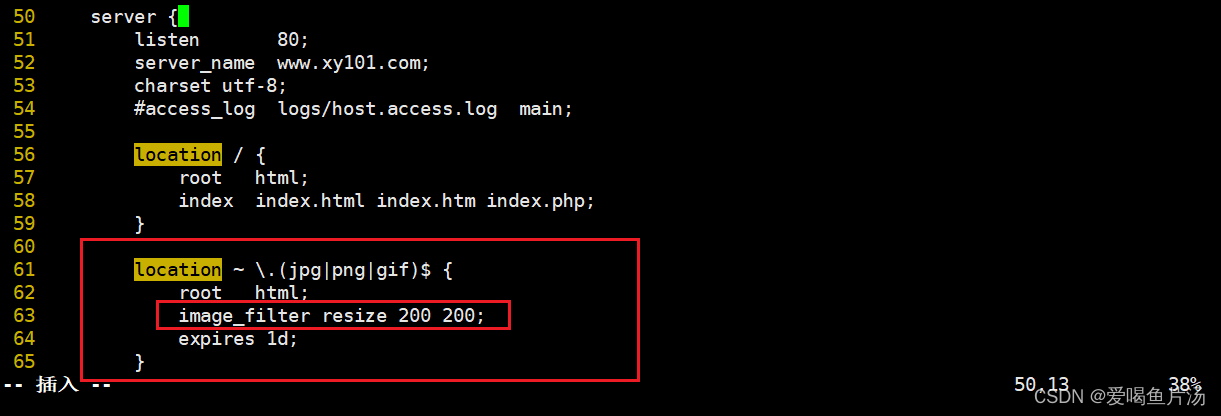
#注:Nginx的Gzip压缩功能虽然好用,但是下面两类文件资源不太建议启用此压缩功能。
1)图片/视频类型资源。原因:图片如jpg、png文件本身就会有压缩,所以就算开启gzip后,压缩前和压缩后大小没有多大区别,所以开启了反而会白白的浪费资源。
2)大文件资源。原因:会消耗大量的cpu资源,且不一定有明显的效果。
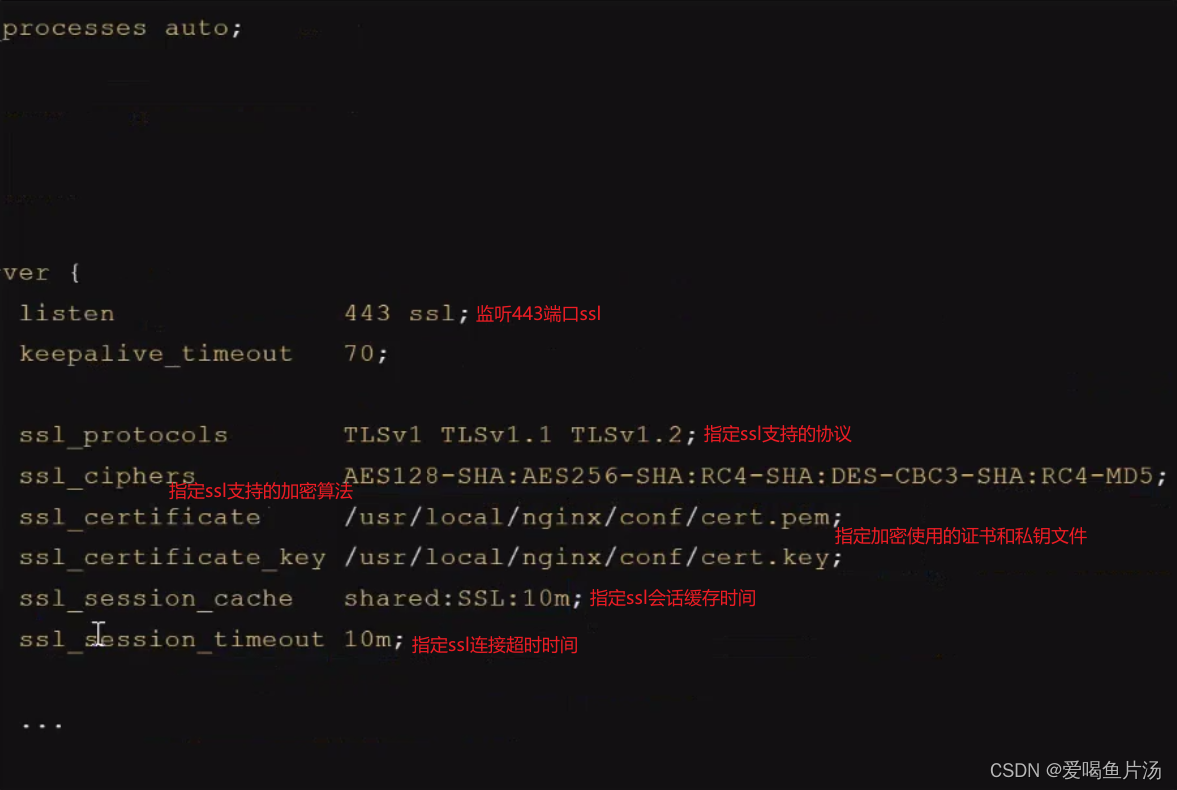
9、加密模块(了解)
nginx_http_ssl_module模块主要用于nginx的https协议。(先了解,后面还会说到)

10、nginx网站限速(了解)
有时候有的ip访问太频繁,为了防止恶意攻击,需要我们做一些防护措施来保护我们的nginx Web服务器。在nginx配置文件中添加以下配置:
#根据ip限制($binary_remote_addr)
http {limit_req_zone $binary_remote_addr zone=testip:10m rate=5r/s;server {location / {#可以放在http/server/location,不同位置作用范围不同limit_req zone=testip burst=10 nodelay;}    }
}#根据域名限制($server_name)
http {limit_req_zone $server_name zone=testip:10m rate=5r/s;server {location / {#可以放在http/server/location,不同位置作用范围不同limit_req zone=testip burst=10 nodelay;}    }
}#限制连接数,配置方法同上
#限制单个ip最大连接数为5
http {limit_conn_zone $binary_remote_addr zone=testip:10m;server {location / {#可以放在http/server/location,不同位置作用范围不同limit_conn testip 5;}    }
}#限制带宽(不常用)server {listen    80;server_name    sdpro.top;//例如限制下载速度为500klimit_rate     500k;location / {root     html;index    index.html;}    }

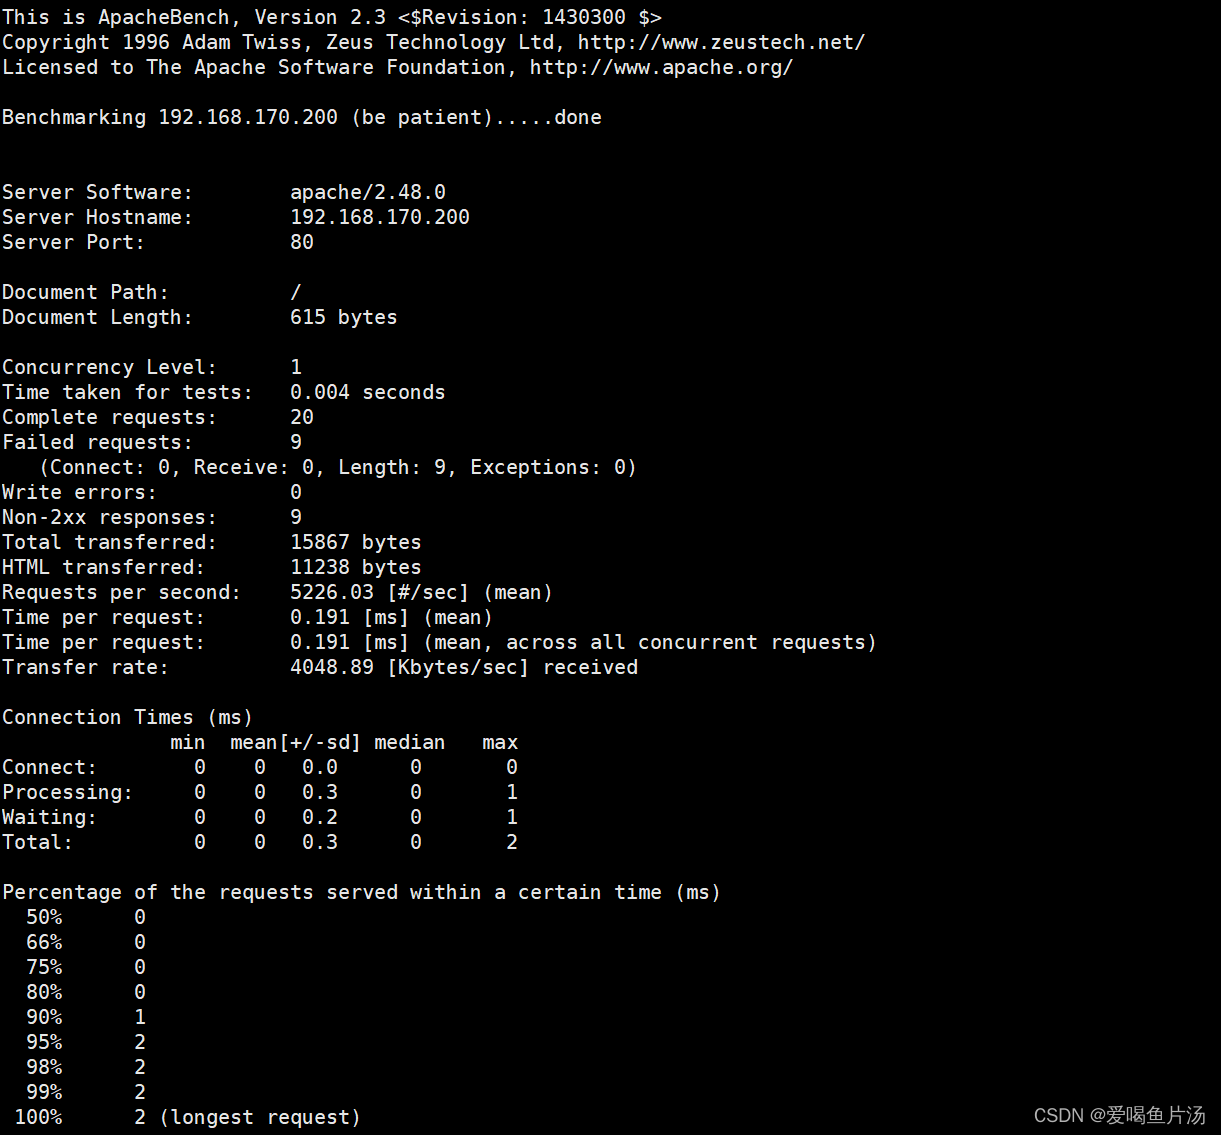
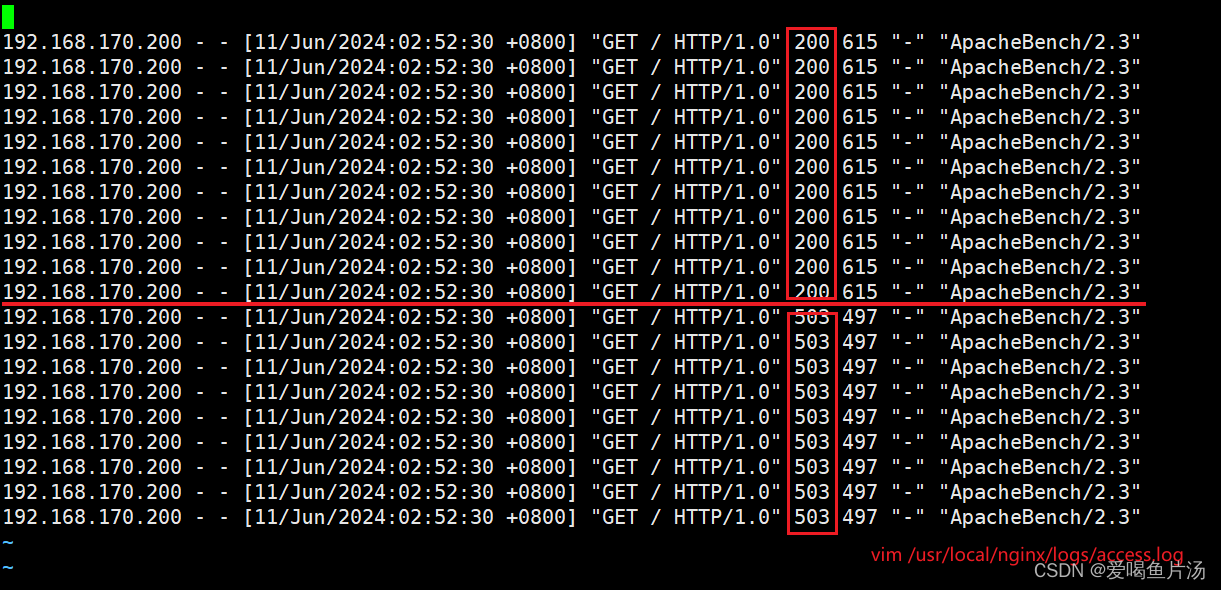
验证:模拟一秒发送多次请求的方法,使用ab命令(先安装http-tools),ab -c指定请求数 -n指定连接数 http://测试ip/,访问次数过多被限制。
[root@centOS2 nginx-1.26.0]# yum install -y httpd-tools.x86_64
[root@centOS2 nginx-1.26.0]# ab -c 1 -n 20 http://192.168.170.200/
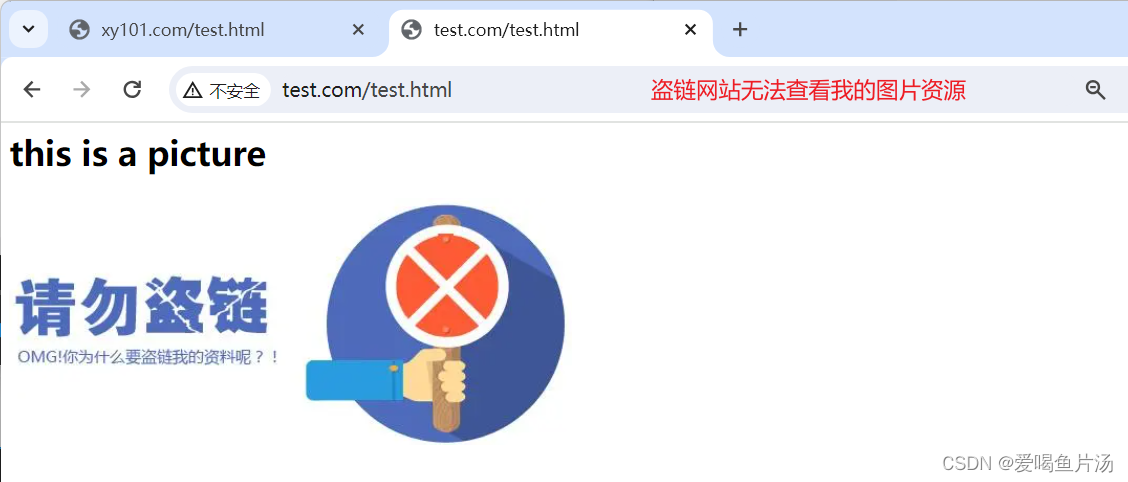
11、防盗链优化(重要)
在企业网站服务中,一般都要配置防盗链功能,以避免网站内容被非法盗用,造成经济损失。Nginx防盗链功能也非常强大,默认情况下,只需要进行简单的配置,即可实现防盗链处理。
①模拟盗链和防盗链实验需要两台主机,被盗的服务器沿用之前的192.168.170.200,以下为盗链服务器的配置,ip为192.168.170.4
#盗链端服务器,ip为192.168.170.4
[root@server2 ~]# cd /etc/yum.repos.d/
[root@server2 yum.repos.d]# ls
local.repo  repo.bak
[root@server2 yum.repos.d]# rz -E
[root@server2 yum.repos.d]# ls
local.repo  nginx.repo  repo.bak
[root@server2 yum.repos.d]# yum install -y nginx
[root@server2 yum.repos.d]# systemctl enable nginx --now
[root@server2 yum.repos.d]# netstat -lntp | grep nginx
tcp        0      0 0.0.0.0:80              0.0.0.0:*               LISTEN      11281/nginx: master
[root@server2 yum.repos.d]# cd /etc/nginx/
[root@server2 nginx]# cd conf.d/
#改域名,并查看网页根目录的位置
[root@server2 conf.d]# vim default.conf
server {listen       80;server_name  www.test.com;......   location / {root   /usr/share/nginx/html;
[root@server2 conf.d]# systemctl restart nginx
#新建盗链网页
[root@server2 conf.d]# cd /usr/share/nginx/html/
[root@server2 html]# vim test.html

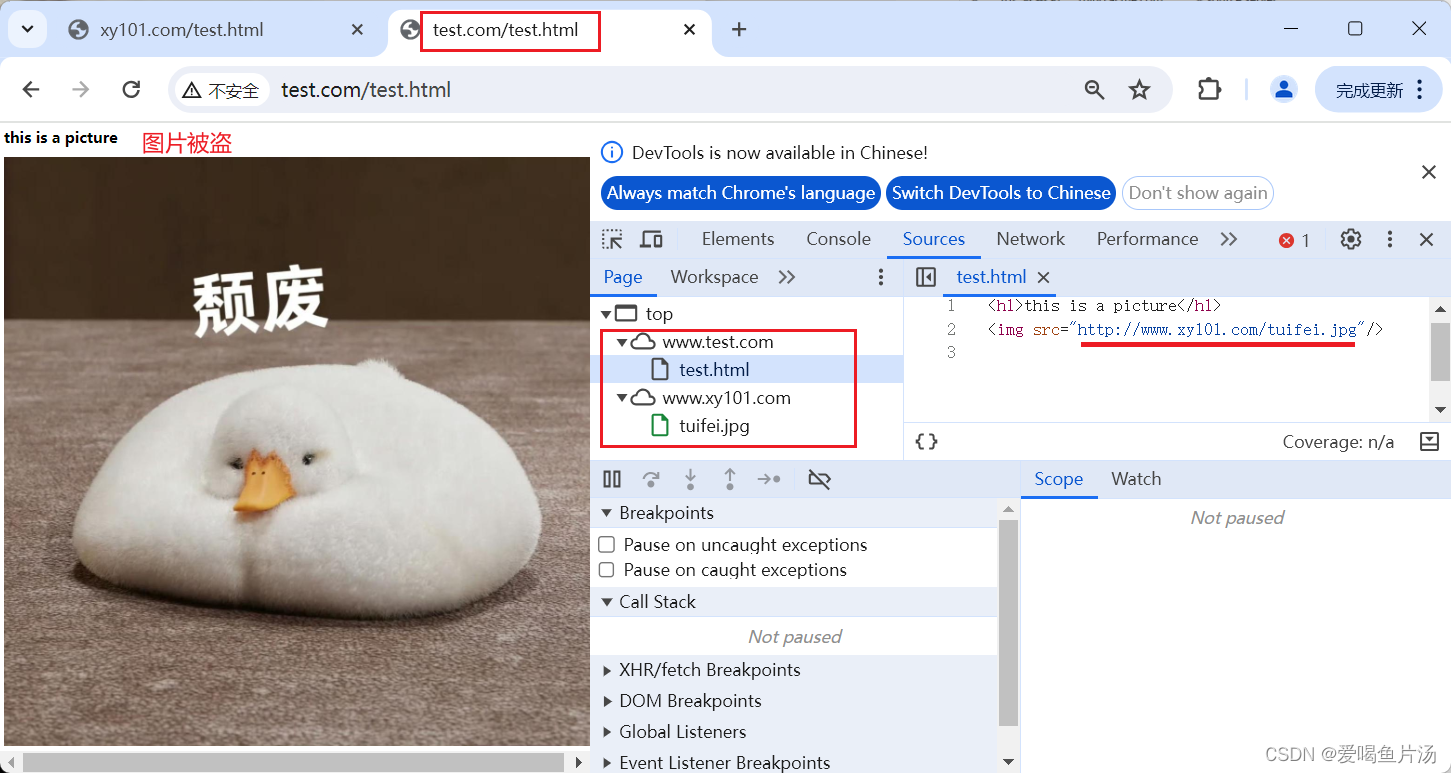

②防止别人盗链,需要在服务器做以下配置
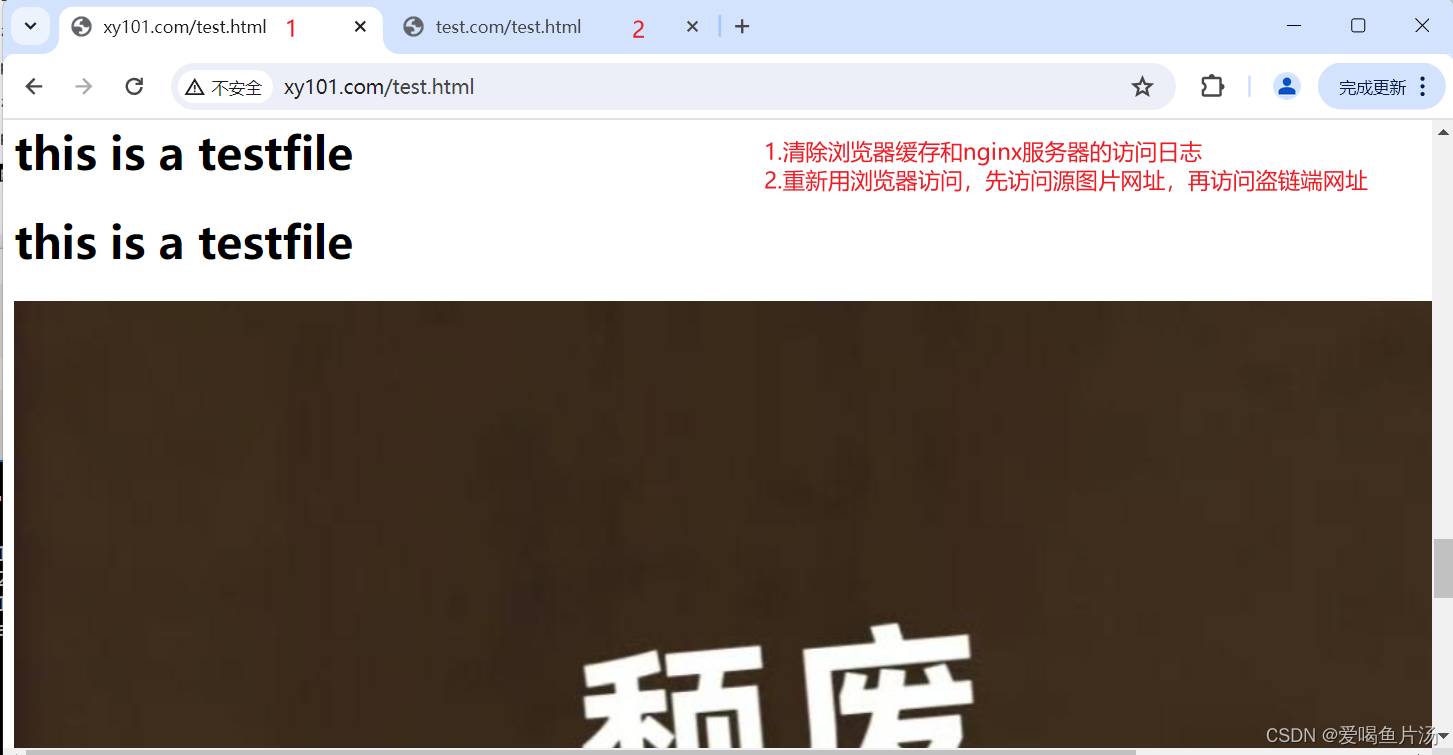
[root@centOS2 conf]# vim nginx.conflocation ~ \.(jpg|gif|jpeg)$ {root html;expires 1d;valid_referers none blocked xy101.com *.xy101.com;if ($invalid_referer) {rewrite ^/ http://www.xy101.com/error.png;#return 403;  表示直接返回403}
[root@centOS2 conf]# systemctl restart nginx.service
expires 设置缓存时间;
valid_referers定义信任的访问链接
none表示直接访问图片的链接(如http://www.xy101.com/tuifei.jpg) ;
blocked表示没有用协议访问(如www.xy101.com/test.html) ;
$invalid_referer表示不是通过以上信任的访问链接访问来的,给他地址重写,让其访问tuifei.jpg的请求重写成访问error.png的请求。
注意:location块中地址重写的图片格式png不能在匹配范围内,否则会陷入死循环。
本地验证

二、系统内核的优化
1、优化文件打开数
#临时设置文件数,重启后参数失效
[root@centOS2 html]# ulimit -n 65535#永久设置文件最大数,在内核限制文件/etc/security/limits.conf末尾追加
[root@centOS2 html]# vim /etc/security/limits.conf
* soft  noproc    65535    #noproc进程数
* hard  noproc    65535
* soft  nofile    65535    #nofile文件数
* hard  nofile    65535
2、优化内核参数
#修改内核参数文件/etc/sysctl.conf
#以下配置用于解决系统存在大量TIME WAIT状态连接的问题
net.ipv4.tcp_syncookies=1 表示开启SYN Cookies。当出现SYN等待队列溢出时,启用cookies来处理,可防范少量SYN攻击
net.ipv4.tcp_tw_reuse=1 表示开启重用。允许将TIME-WAIT sockets重新用于新的TCP连接
net.ipv4.tcp_tw_recycle=1 表示开启TCP连接中TIME-WAIT sockets的快速回收
net.ipv4.tcp_fin_timeout=30 修改MSL值,系统默认的TIMEOUT时间#如果连接数本身就很多,可再优化TCP的可用端口范围,进一步提升服务器的并发能力
net.ipv4.tcp_keepalive_time=1200 #当keepalive启用时,TCP发送keepalive探测消息的频率,确认客户端是否断网
net.ipv4.ip_local_port_range=1024 65535 #用于向外连接的端口范围。缺省情况下很小,为32768 60999
net.ipv4.tcp_max_syn_backlog=8192 #SYN队列长度,默认为1024,加大队列长度为8192,可容纳更多等待连接的网络连接数
net.ipv4.tcp_max_tw_buckets=5000 #表示系统同时保持TIME WAIT的最大数量
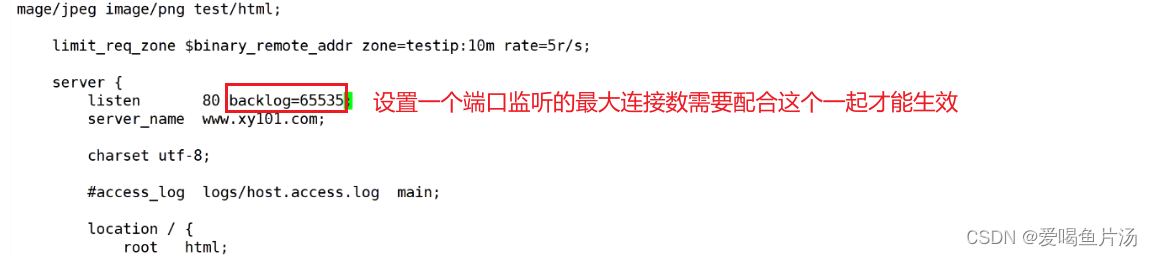
net.core.somaxconn=65535 #一个端口能够监听的最大连接数,这个需要配合nginx配置文件中listen 80 后面添加 backlog=65535;才能生效#如果需要IP路由转发
net.ipv4.ip_forward=1
这篇关于nginx优化与防盗链【☆☆☆】的文章就介绍到这儿,希望我们推荐的文章对编程师们有所帮助!


