本文主要是介绍Android5.0系统:Material风格以及DrawerLayout抽屉效果,希望对大家解决编程问题提供一定的参考价值,需要的开发者们随着小编来一起学习吧!
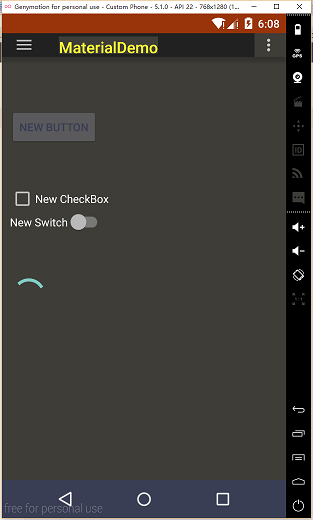
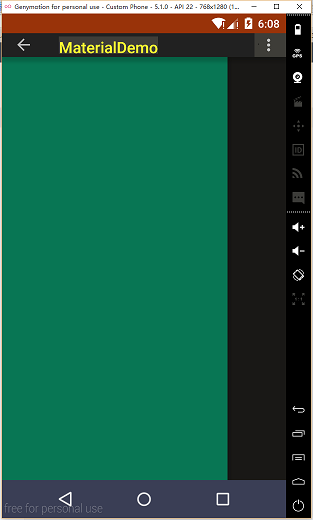
先上效果图:


主要组件:
- DrawerLayout
- Toolbar
首先,配置文件代码:
<RelativeLayout xmlns:android="http://schemas.android.com/apk/res/android"xmlns:tools="http://schemas.android.com/tools"xmlns:app= "http://schemas.android.com/apk/res-auto"android:layout_width="match_parent"android:layout_height="match_parent"tools:context=".MainActivity"><TextView android:text="@string/hello_world" android:layout_width="wrap_content"android:layout_height="wrap_content" /><android.support.v7.widget.Toolbarandroid:id="@+id/toolbar"android:layout_width="match_parent"android:layout_height="?attr/actionBarSize"android:minHeight="?attr/actionBarSize"android:elevation="10dp"app:contentInsetLeft="72dp"app:contentInsetStart = "72dp"android:background="?attr/colorPrimary"></android.support.v7.widget.Toolbar><android.support.v4.widget.DrawerLayoutandroid:id="@+id/drawer"android:layout_below="@id/toolbar"android:layout_width="match_parent"android:layout_height="match_parent"><LinearLayoutandroid:layout_width="match_parent"android:layout_height="match_parent"android:orientation="vertical"android:padding="10dp"><Buttonandroid:layout_width="wrap_content"android:layout_height="wrap_content"android:id="@+id/button"android:text="New Button"android:layout_marginTop="55dp"/><CheckBoxandroid:layout_width="wrap_content"android:layout_height="wrap_content"android:text="New CheckBox"android:id="@+id/checkbox"android:layout_marginTop="51dp"/><Switchandroid:layout_width="wrap_content"android:layout_height="wrap_content"android:text="New Switch"android:id="@+id/switch1"/><ProgressBarandroid:layout_width="wrap_content"android:layout_height="wrap_content"android:id="@+id/progressBar"android:layout_marginTop="55dp"android:indeterminate="false" /></LinearLayout><LinearLayoutandroid:id="@+id/menu_frame"android:layout_gravity="left"android:layout_marginEnd="10dp"android:background="#087654"android:layout_marginRight="10dp"android:orientation="vertical"android:paddingTop="48dp"android:layout_width="match_parent"android:layout_height="match_parent"></LinearLayout></android.support.v4.widget.DrawerLayout></RelativeLayout>
使用DrawerLayout时需注意:DrawerLayout中需要放两个Layout,在收起的Layout中一定要设置:
android:layout_gravity="left"Activity代码:
package com.demo.monty.materialdemo;import android.support.v4.widget.DrawerLayout;
import android.support.v7.app.ActionBarDrawerToggle;
import android.support.v7.app.AppCompatActivity;
import android.os.Bundle;
import android.support.v7.widget.Toolbar;
import android.view.Menu;
import android.view.MenuItem;
import android.view.View;
import android.view.Window;public class MainActivity extends AppCompatActivity {private DrawerLayout mDrawerLayout;private ActionBarDrawerToggle mDrawerToggle;@Overrideprotected void onCreate(Bundle savedInstanceState) {super.onCreate(savedInstanceState);setContentView(R.layout.activity_main);Toolbar toolbar = (Toolbar)findViewById(R.id.toolbar);setSupportActionBar(toolbar); getSupportActionBar().setDisplayHomeAsUpEnabled(true);mDrawerLayout = (DrawerLayout) findViewById(R.id.drawer);mDrawerToggle = new ActionBarDrawerToggle(this,mDrawerLayout,toolbar,R.string.open,R.string.close){@Overridepublic void onDrawerClosed(View drawerView) {super.onDrawerClosed(drawerView);}@Overridepublic void onDrawerOpened(View drawerView) {super.onDrawerOpened(drawerView);}};mDrawerLayout.setDrawerListener(mDrawerToggle);mDrawerToggle.syncState();}@Overridepublic boolean onCreateOptionsMenu(Menu menu) {// Inflate the menu; this adds items to the action bar if it is present.getMenuInflater().inflate(R.menu.menu_main, menu);return true;}@Overridepublic boolean onOptionsItemSelected(MenuItem item) {// Handle action bar item clicks here. The action bar will// automatically handle clicks on the Home/Up button, so long// as you specify a parent activity in AndroidManifest.xml.int id = item.getItemId();//noinspection SimplifiableIfStatementif (id == R.id.action_settings) {return true;}return super.onOptionsItemSelected(item);}
}
下面是设置Material风格的界面:

配置文件如下,styles.xml:
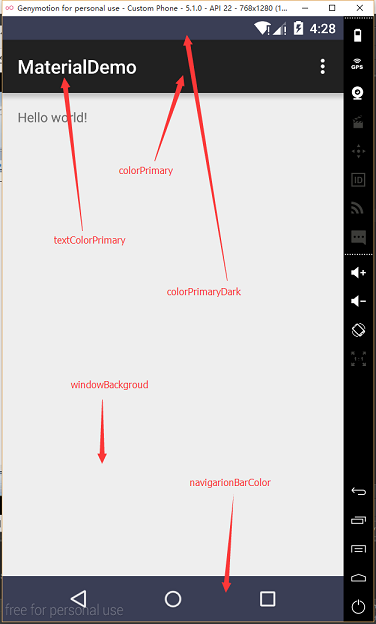
<resources><!-- Base application theme. --><style name="AppTheme" parent="Theme.AppCompat.NoActionBar"><!-- Customize your theme here. --><item name="android:colorPrimary">#675634</item><item name="android:colorPrimaryDark">#993309</item><item name="android:colorAccent">#7767ff</item><item name="android:textColorPrimary">#ffff33</item><item name="android:textColor">#3a3e55</item><item name="android:background">#3e3d38</item><item name="android:actionBarSize">30dp</item><item name="android:navigationBarColor">#3a3e55</item></style>
</resources>
其中部分属性在5.0以下操作系统中无法生效:
<item name="android:navigationBarColor">#3a3e55</item> //在5.0以下无法生效,以及华为手机Mate S 5.1系统中也无法生效,其他机器目前没有验证。这篇关于Android5.0系统:Material风格以及DrawerLayout抽屉效果的文章就介绍到这儿,希望我们推荐的文章对编程师们有所帮助!


