本文主要是介绍如何使用GPT-4o函数调用构建一个实时应用程序?,希望对大家解决编程问题提供一定的参考价值,需要的开发者们随着小编来一起学习吧!
本教程介绍了如何使用OpenAI最新的LLM GPT-4o通过函数调用将实时数据引入LLM。
我们在LLM函数调用指南(详见https://thenewstack.io/a-comprehensive-guide-to-function-calling-in-llms/)中讨论了如何将实时数据引入聊天机器人和代理。现在,我们将通过将来自FlightAware.com的API与新的GPT-4o模型集成,进一步探究这个概念,以便实时跟踪航班状态。
FlightAware的AeroAPI是一个可靠的充分利用REST的API,提供按需访问航班跟踪和状态数据。它允许开发人员通过一个基于查询的简单系统,获取实时、历史或未来的航班信息。API支持基于航班标识符、飞机注册号或机场或运营商等位置的详细请求。它旨在以JSON格式提供精确、可操作的航空数据,支持整个航空业从航空公司到机场的运营需求。

在继续之前,注册FlightAware并获得API密钥,这对于调用REST API至关重要。免费的个人套餐足以完成本教程。
第1步:定义获取航班状态的函数
一旦您获得了API密钥,用Python创建以下函数来检索任何航班的状态。
import astimport jsonimport randomfrom datetime import datetime, timedeltaimport requestsimport pytzdef get_flight_status(flight):"""Returns Flight Information"""AEROAPI_BASE_URL = "https://aeroapi.flightaware.com/aeroapi"AEROAPI_KEY="YOUR FLIGHTAWARE API KEY"def get_api_session():session = requests.Session()session.headers.update({"x-apikey": AEROAPI_KEY})return sessiondef fetch_flight_data(flight_id, session):if "flight_id=" in flight_id:flight_id = flight_id.split("flight_id=")[1] start_date = datetime.now().date().strftime('%Y-%m-%d')end_date = (datetime.now().date() + timedelta(days=1)).strftime('%Y-%m-%d')api_resource = f"/flights/{flight_id}?start={start_date}&end={end_date}"response = session.get(f"{AEROAPI_BASE_URL}{api_resource}")response.raise_for_status()return response.json()['flights'][0]def utc_to_local(utc_date_str, local_timezone_str):utc_datetime = datetime.strptime(utc_date_str, '%Y-%m-%dT%H:%M:%SZ').replace(tzinfo=pytz.utc)local_timezone = pytz.timezone(local_timezone_str)local_datetime = utc_datetime.astimezone(local_timezone)return local_datetime.strftime('%Y-%m-%d %H:%M:%S') session = get_api_session()flight_data = fetch_flight_data(flight, session)dep_key = 'estimated_out' if 'estimated_out' in flight_data and flight_data['estimated_out'] else \'actual_out' if 'actual_out' in flight_data and flight_data['actual_out'] else \'scheduled_out'arr_key = 'estimated_in' if 'estimated_in' in flight_data and flight_data['estimated_in'] else \'actual_in' if 'actual_in' in flight_data and flight_data['actual_in'] else \'scheduled_in' flight_details = {'flight':flight,'source': flight_data['origin']['city'],'destination': flight_data['destination']['city'],'depart_time': utc_to_local(flight_data[dep_key], flight_data['origin']['timezone']),'arrival_time': utc_to_local(flight_data[arr_key], flight_data['destination']['timezone']),'status': flight_data['status']}return json.dumps(flight_details)flight_info = get_flight_status("EK524")print(flight_info)#'{"flight": "EK524", "source": "Dubai", "destination": "Hyderabad", "depart_time": "2024-05-23 22:00:00", "arrival_time": "2024-05-24 03:05:00", "status": "Scheduled"}'虽然代码很简单,但还是不妨解释一下关键步骤。
get_flight_status函数接受一个航班参数(假设是航班标识符),并以JSON格式返回格式化的航班详细信息。它查询AeroAPI以根据给定的航班标识符获取航班数据,并确定关键细节的格式,比如出发地、目的地、离开时间、到达时间和状态。
不妨看看脚本的组件:
API凭据:
AEROAPI_BASE_URL是FlightAware AeroAPI的基础URL。
AEROAPI_KEY是用于身份验证的API密钥。
会话管理:
get_api_session:这个嵌套函数初始化请求。会话对象使用API密钥设置所需的报头,并返回会话对象。该会话将处理所有API请求。
数据获取:
fetch_flight_data:这个函数接受flight_id和session作为参数。它使用适当的日期过滤器构造端点URL,用于获取一天的数据,并发送GET请求以检索航班数据。该函数处理API响应,并提取相关的航班信息。
时间转换:
utc_to_local:根据所提供的时区字符串将UTC时间(来自API响应)转换为本地时间。这个函数可以帮助我们获得基于城市的到达和离开时间。
数据处理:
脚本根据估计或实际时间的可用性确定离开时间和到达时间的键,并返回到计划时间。然后,它构造一个含有格式化航班详细信息的字典。

上面的截图显示了我们从FlightAware API收到的从迪拜飞往海得拉巴的阿联酋航空EK524航班的响应信息。请注意,到达和离开时间是基于城市的当地时间。
我们的目的是将该函数与GPT-4 Omni集成,使其能够实时访问航班跟踪信息。
第2步:用GPT- 4o实现函数调用
不妨从导入OpenAI库并初始化它入手。
from openai import OpenAI
client = OpenAI()
这一行创建了OpenAI类的一个实例。这个实例(客户端)将用于与OpenAI API交互。
我们将定义一个名为tools的列表,含有一个字典,该字典指定了函数get_flight_status。该函数旨在用作OpenAI API上下文中的工具,描述参数和所需输入。
繁重工作在下面的函数中进行,其中LLM检查提示以确定是否需要调用函数/工具,然后继续生成适当的响应。
def chatbot(prompt):# Step 1: send the conversation and available functions to the modelmessages = [{"role": "user", "content": prompt}]response = client.chat.completions.create(model="gpt-4o",messages=messages,tools=tools,tool_choice="auto")response_message = response.choices[0].messagetool_calls = response_message.tool_calls# Step 2: check if the model wanted to call a functionif tool_calls:available_functions = {"get_flight_status": get_flight_status,} messages.append(response_message) # Step 3: send the function response to the modelfor tool_call in tool_calls:function_name = tool_call.function.namefunction_to_call = available_functions[function_name]function_args = json.loads(tool_call.function.arguments)function_response = function_to_call(flight=function_args.get("flight"))messages.append({"tool_call_id": tool_call.id,"role": "tool","name": function_name,"content": function_response,}) final_response = client.chat.completions.create(model="gpt-4o",messages=messages,) return final_response这个函数chatbot接受用户提示,并使用OpenAI API对其进行处理。它将提示和定义的工具发送到OpenAI模型并处理响应。
通过嵌入来自用户的提示并将其发送到OpenAI API(chat.completion .create)来创建消息。API使用指定的工具(如果适用)处理这些消息。
比如说,当我们发送提示“EK524的状态是什么?”,GPT- 4o需要调用工具列表中提供的函数,并返回以下响应:
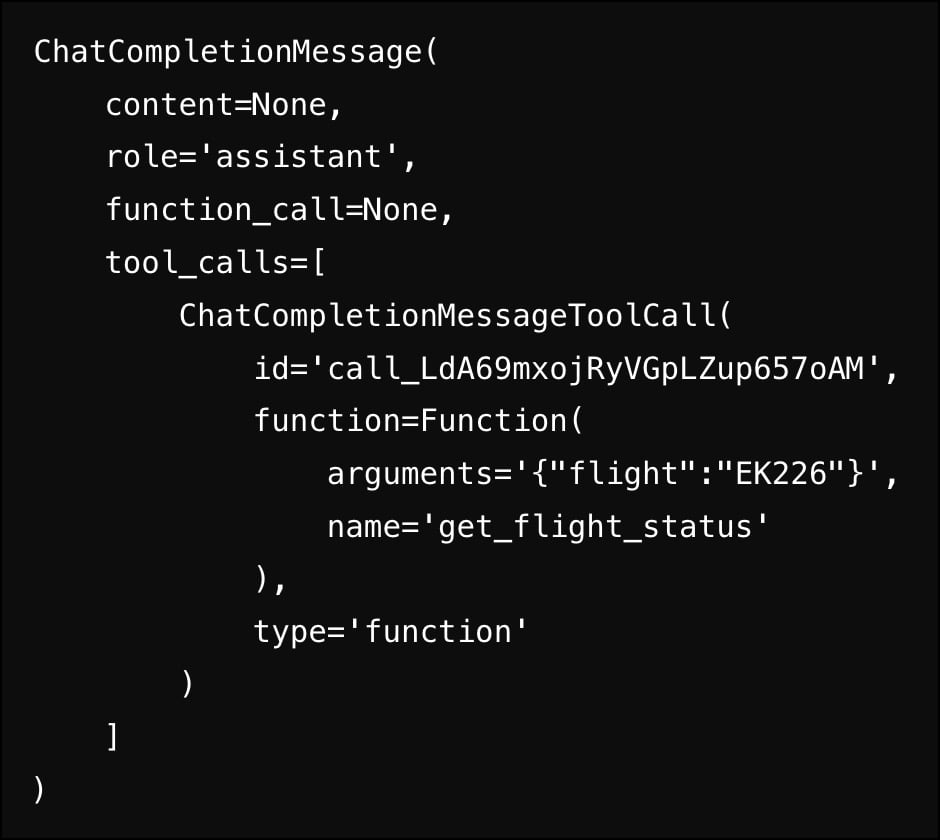
注意,响应包括函数(get_flight_status)和参数(EK226)。
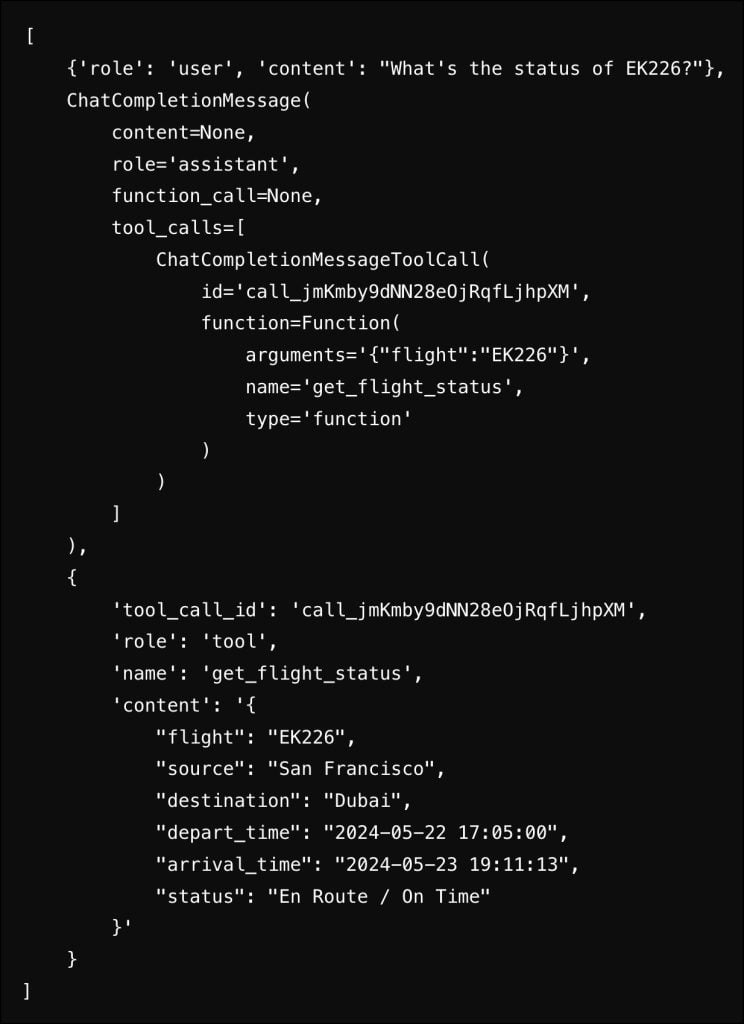
下一步检查是否调用了任何工具(即工具中的函数)。它使用提供的参数执行这些函数,将它们的输出集成到对话中,并将这些更新后的信息发回到OpenAI API以进行进一步处理。
# Step 2: check if the model wanted to call a functionif tool_calls:available_functions = {"get_flight_status": get_flight_status,} messages.append(response_message) # Step 3: send the info for each function call and function response to the modelfor tool_call in tool_calls:function_name = tool_call.function.namefunction_to_call = available_functions[function_name]function_args = json.loads(tool_call.function.arguments)function_response = function_to_call(flight=function_args.get("flight"))messages.append({"tool_call_id": tool_call.id,"role": "tool","name": function_name,"content": function_response,})此时,messages列表包括原始提示、带有函数名和变量的初始响应以及函数的实际输出。下面的屏幕截图显示了含有所有要素的列表。
由于来自工具的响应附加到历史记录中,我们可以调用聊天完成端点,从LLM获得最终答案。
final_response = client.chat.completions.create(model="gpt-4o",messages=messages,) return final_responsefinal_response对象有我们所寻找的答案:

将提示发送给函数chatbot将返回指定航班的实时状态。

下面是本教程的完整代码:
from openai import OpenAI#Initialize the environment variable OPENAI_API_KEY with your api keyclient = OpenAI()#Function is available at
https://gist.github.com/janakiramm/2143b909626f5f01d64739e3fe90c9c8tools = [{"type": "function","function": {"name": "get_flight_status","description": "Get status of a flight","parameters": {"type": "object","properties": {"flight": {"type": "string","description": "Flight number"}},"required": ["flight"]}}}]def chatbot(prompt):# Step 1: send the conversation and available functions to the modelmessages = [{"role": "user", "content": prompt}]response = client.chat.completions.create(model="gpt-4o",messages=messages,tools=tools,tool_choice="auto")response_message = response.choices[0].messagetool_calls = response_message.tool_calls# Step 2: check if the model wanted to call a functionif tool_calls:available_functions = {"get_flight_status": get_flight_status,}  messages.append(response_message)  # Step 3: send the info for each function call and function response to the modelfor tool_call in tool_calls:function_name = tool_call.function.namefunction_to_call = available_functions[function_name]function_args = json.loads(tool_call.function.arguments)function_response = function_to_call(flight=function_args.get("flight"))messages.append({"tool_call_id": tool_call.id,"role": "tool","name": function_name,"content": function_response,}) final_response = client.chat.completions.create(model="gpt-4o",messages=messages,)  return final_responseres=chatbot("What's the status of EK226?")print(res.choices[0].message.content)
我们在本教程中探讨了如何通过函数调用将实时数据引入LLM。在本系列的下一部分中,我们将把GPT-4o换成Gemini Pro,以探究相同的概念,但使用不同的模型。
这篇关于如何使用GPT-4o函数调用构建一个实时应用程序?的文章就介绍到这儿,希望我们推荐的文章对编程师们有所帮助!


