本文主要是介绍Asp .Net Core 系列:详解鉴权(身份验证)以及实现 Cookie、JWT、自定义三种鉴权 (含源码解析),希望对大家解决编程问题提供一定的参考价值,需要的开发者们随着小编来一起学习吧!
什么是鉴权(身份验证)?
https://learn.microsoft.com/zh-cn/aspnet/core/security/authentication/?view=aspnetcore-8.0
- 定义
- 鉴权,又称身份验证,是确定用户身份的过程。它验证用户提供的凭据(如用户名和密码)是否有效,并据此确认用户是否具备访问系统的权利。
- 过程
- 用户向系统提供凭据(如用户名和密码)。
- 系统使用已注册的身份验证服务(如IAuthenticationService)和身份验证处理程序来验证这些凭据的有效性。
- 如果凭据有效,系统将识别并确认用户的身份,然后用户可以访问系统。
- 方式
- 传统的鉴权方式通常依赖于密码验证,但这种方式存在安全风险,如密码泄露或被盗用。
- 为了提高安全性,现代系统常采用更加复杂的鉴权方式,如基于数字签名的认证授权(如JWT认证),这种方式通过验证数字签名的正确性来确定用户的身份。
- 与授权的关系
- 鉴权与授权是两个不同的概念,但密切相关。鉴权是验证用户身份的过程,而授权是确定用户是否有权访问系统资源的过程。
- 鉴权是授权的前提,只有经过鉴权确认用户身份后,才能进行授权操作。
- .NET Core中的实现
- 在.NET Core中,身份验证服务由IAuthenticationService负责,并通过身份验证中间件使用。
- 身份验证服务使用已注册的身份验证处理程序来完成与身份验证相关的操作。
- 开发者可以通过配置和扩展身份验证服务来支持不同的鉴权方式,以满足不同应用场景的需求。
基于 Cookie 的方式实现
注入容器,将CookieAuthenticationHandler作为处理逻辑
CookieAuthenticationOptions 类中一些常用属性的说明:
- AuthenticationScheme:获取或设置用于此身份验证选项的身份验证方案的名称。这通常是唯一的标识符,用于在应用程序中区分不同的身份验证方案。
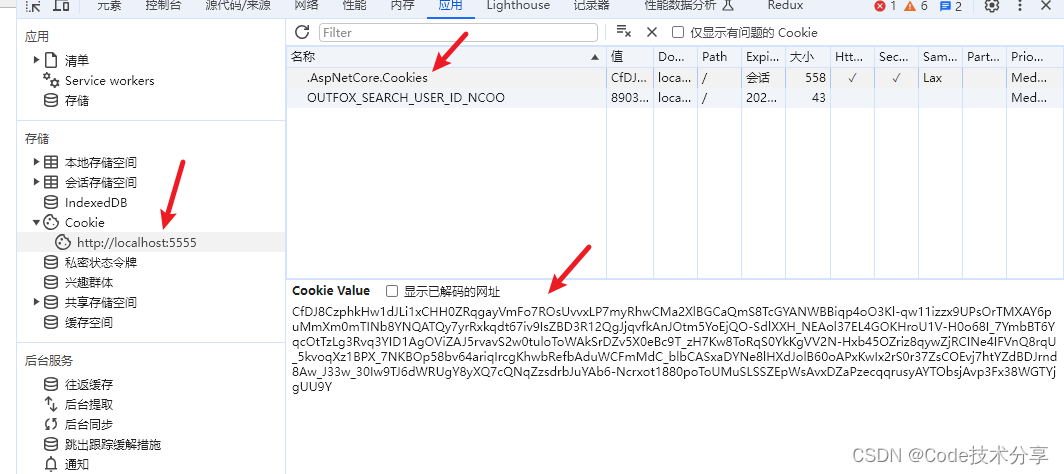
- CookieName:获取或设置用于存储身份验证信息的Cookie的名称。默认值是 “.AspNetCore.Cookies”。
- CookieDomain:获取或设置Cookie的域名。如果未设置,则默认为空字符串,这表示Cookie将仅与创建它的域名一起发送。
- CookiePath:获取或设置Cookie的路径。这定义了哪些路径的请求将发送Cookie。如果未设置,则默认为应用程序的根路径。
- CookieHttpOnly:获取或设置一个值,该值指示浏览器是否仅通过HTTP访问Cookie(即,不允许通过客户端脚本访问)。默认值为
true,这是一个安全特性,用于防止跨站脚本攻击(XSS)。 - CookieSecure:获取或设置Cookie的安全级别。可以是
CookieSecurePolicy.None、CookieSecurePolicy.Always或CookieSecurePolicy.SameAsRequest。这决定了Cookie是否应通过HTTPS传输。 - CookieSameSite:获取或设置SameSite属性的值,该属性有助于防止跨站请求伪造(CSRF)攻击。可以是
SameSiteMode.None、SameSiteMode.Lax或SameSiteMode.Strict。 - AccessDeniedPath:获取或设置当用户尝试访问他们未经授权的资源时应重定向到的路径。
- LoginPath:获取或设置当用户需要登录时应重定向到的路径。
- LogoutPath:获取或设置当用户注销时应重定向到的路径。
- SlidingExpiration:获取或设置一个值,该值指示是否应在每次请求时重置身份验证Cookie的过期时间。如果设置为
true,则每次用户请求页面时,Cookie的过期时间都会重置为其原始过期时间。这有助于在用户活跃时保持会话的活跃状态。 - ExpireTimeSpan:获取或设置身份验证Cookie在客户端上的过期时间。如果未设置,则Cookie将不会过期(但请注意,服务器可能会因其他原因使会话无效)。
- Events:获取或设置
CookieAuthenticationEvents的实例,该实例包含可以在身份验证过程中调用的委托,以自定义行为(如重定向、登录后操作等)。
CookieAuthenticationEvents 类包含多个事件,这些事件在 Cookie 身份验证的不同阶段被触发:
OnRedirectToLogin: 当用户尝试访问需要身份验证的资源,但尚未登录时触发。OnRedirectToAccessDenied: 当用户已登录,但尝试访问他们没有权限的资源时触发。OnRedirectToLogout: 当用户登出时触发。OnSigningIn: 在用户登录之前触发,但身份验证票据(ticket)已经被创建。OnSignedIn: 在用户成功登录后触发。OnSigningOut: 在用户登出之前触发,但身份验证票据尚未被移除。OnSignedOut: 在用户成功登出后触发。OnValidatePrincipal: 在每次请求时触发,用于验证身份验证票据的有效性。
builder.Services.AddAuthentication(CookieAuthenticationDefaults.AuthenticationScheme).AddCookie(CookieAuthenticationDefaults.AuthenticationScheme, options =>{// 配置Cookie参数 options.Cookie.Name = ".AspNetCore.Cookies"; // Cookie名称 options.Cookie.HttpOnly = true; // 限制Cookie只能通过HTTP访问,不能通过客户端脚本访问 options.Cookie.SecurePolicy = CookieSecurePolicy.Always; // 仅在HTTPS下传输Cookie options.Cookie.SameSite = SameSiteMode.Lax; // 设置SameSite属性 options.LoginPath = "/Account/Login"; // 登录页面路径 options.AccessDeniedPath = "/Account/AccessDenied"; // 访问被拒绝时重定向到的路径 options.SlidingExpiration = true; // 是否在每次请求时滑动Cookie的过期时间 options.ExpireTimeSpan = TimeSpan.FromHours(1); // Cookie过期时间// 如果需要,你还可以配置其他事件,如登录成功、登出成功等 //options.Events = new CookieAuthenticationEvents()//{// OnRedirectToAccessDenied = context =>// {// return context.Response.WriteAsJsonAsync(new// {// Result = false,// Message = "访问失败,请先登录"// });// },// OnValidatePrincipal = context =>// {// return context.Response.WriteAsJsonAsync(new// {// Result = false,// Message = "访问失败,请先登录"// });// },// OnRedirectToLogin = context =>// {// return context.Response.WriteAsJsonAsync(new// {// Result = false,// Message = "访问失败,请先登录"// });// },//};});
使用中间件加入管道,用于找到鉴权HttpContext.AuthenticateAsync()
//鉴权 (核心源码就是AuthenticationMiddleware中间件)app.UseAuthentication();//授权 使用Authorize必须配置app.UseAuthorization();app.UseAuthorization();
在登录时写入凭证
ClaimsPrincipal:代表当前经过身份验证的用户的主体,验证后附加到HTTP请求的上下文中,通常可以通过 HttpContext.User 属性来访问
ClaimsIdentity:表示一个特定的身份,并存储与该用户相关的所有声明
Claim:用于描述用户的某个属性或权限,例如用户名、电子邮件地址、角色等
/// <summary>/// http://localhost:5555/Auth/Login?name=admin&password=123456/// </summary>/// <param name="name"></param>/// <param name="password"></param>/// <returns></returns>public async Task<IActionResult> Login(string name, string password){if ("admin".Equals(name, StringComparison.CurrentCultureIgnoreCase)&& password.Equals("123456"))//等同于去数据库校验{var claimIdentity = new ClaimsIdentity(CookieAuthenticationDefaults.AuthenticationScheme);claimIdentity.AddClaim(new Claim(ClaimTypes.Name, name));claimIdentity.AddClaim(new Claim(ClaimTypes.Email, "2545233857@qq.com"));claimIdentity.AddClaim(new Claim(ClaimTypes.Role, "admin"));claimIdentity.AddClaim(new Claim(ClaimTypes.Country, "Chinese"));claimIdentity.AddClaim(new Claim(ClaimTypes.DateOfBirth, "1998"));await base.HttpContext.SignInAsync(CookieAuthenticationDefaults.AuthenticationScheme, new ClaimsPrincipal(claimIdentity), new AuthenticationProperties{ExpiresUtc = DateTime.UtcNow.AddSeconds(30),});return new JsonResult(new{Result = true,Message = "登录成功"});}else{await Task.CompletedTask;return new JsonResult(new{Result = false,Message = "登录失败"});}}
在其他控制器上标记[Authorize]特性,在访问接口框架会自动进行鉴权并将身份信息写入上下文
[AllowAnonymous]:匿名可访问[Authorize]:必须登录才可访问
// <summary>/// 不需要权限就能访问---/// http://localhost:5555/Auth/Index/// 但是项目里面总有些数据是要登陆后才能看到的/// </summary>/// <returns></returns>[AllowAnonymous]public IActionResult Index(){return View();}/// <summary>/// 要求登陆后才能看到,没登陆是不能看的/// http://localhost:5555/Auth/Info/// </summary>/// <returns></returns>[Authorize]//表明该Action需要鉴权通过---得有鉴权动作public IActionResult Info(){return View();}
在登出时清理凭证
/// <summary>/// 退出登陆/// http://localhost:5555/Auth/Logout/// </summary>/// <returns></returns>public async Task<IActionResult> Logout(){await base.HttpContext.SignOutAsync(CookieAuthenticationDefaults.AuthenticationScheme);return new JsonResult(new{Result = true,Message = "退出成功"});}
源码
https://github.com/dotnet/aspnetcore/blob/main/src/Security/Authentication/Cookies/src/CookieAuthenticationHandler.cs
    protected override async Task<AuthenticateResult> HandleAuthenticateAsync(){//确保Cookie票据(验证Cookie)var result = await EnsureCookieTicket();if (!result.Succeeded){return result;}// We check this before the ValidatePrincipal event because we want to make sure we capture a clean clone// without picking up any per-request modifications to the principal.await CheckForRefreshAsync(result.Ticket);Debug.Assert(result.Ticket != null);//认证cookie校验认证上下文的方法var context = new CookieValidatePrincipalContext(Context, Scheme, Options, result.Ticket);await Events.ValidatePrincipal(context);if (context.Principal == null){return AuthenticateResults.NoPrincipal;}//判断上下文中的ShouldRenew参数,判断是否刷新Cookieif (context.ShouldRenew){RequestRefresh(result.Ticket, context.Principal);}return AuthenticateResult.Success(new AuthenticationTicket(context.Principal, context.Properties, Scheme.Name));}//读取Cookie
private async Task<AuthenticateResult> ReadCookieTicket(){//读取客户端存在的cookie信息.var cookie = Options.CookieManager.GetRequestCookie(Context, Options.Cookie.Name!);if (string.IsNullOrEmpty(cookie)){return AuthenticateResult.NoResult();}//解密Cookie内容var ticket = Options.TicketDataFormat.Unprotect(cookie, GetTlsTokenBinding());if (ticket == null){return AuthenticateResults.FailedUnprotectingTicket;}//如果配置了SessionStore,可以进行持久化管理,if (Options.SessionStore != null){// 拿到seesionId的cliamvar claim = ticket.Principal.Claims.FirstOrDefault(c => c.Type.Equals(SessionIdClaim));if (claim == null){return AuthenticateResults.MissingSessionId;}// Only store _sessionKey if it matches an existing session. Otherwise we'll create a new one.ticket = await Options.SessionStore.RetrieveAsync(claim.Value, Context, Context.RequestAborted);if (ticket == null){return AuthenticateResults.MissingIdentityInSession;}_sessionKey = claim.Value;}var currentUtc = TimeProvider.GetUtcNow();var expiresUtc = ticket.Properties.ExpiresUtc;//cookie过期检测if (expiresUtc != null && expiresUtc.Value < currentUtc){if (Options.SessionStore != null){await Options.SessionStore.RemoveAsync(_sessionKey!, Context, Context.RequestAborted);// Clear out the session key if its expired, so renew doesn't try to use it_sessionKey = null;}return AuthenticateResults.ExpiredTicket;}// Finally we have a valid ticketreturn AuthenticateResult.Success(ticket);}// 检查并且刷新private async Task CheckForRefreshAsync(AuthenticationTicket ticket){var currentUtc = TimeProvider.GetUtcNow();var issuedUtc = ticket.Properties.IssuedUtc;var expiresUtc = ticket.Properties.ExpiresUtc;var allowRefresh = ticket.Properties.AllowRefresh ?? true; if (issuedUtc != null && expiresUtc != null && Options.SlidingExpiration && allowRefresh) //Options.SlidingExpiration 和allowRefresh控制是否自动刷新{var timeElapsed = currentUtc.Subtract(issuedUtc.Value);var timeRemaining = expiresUtc.Value.Subtract(currentUtc);var eventContext = new CookieSlidingExpirationContext(Context, Scheme, Options, ticket, timeElapsed, timeRemaining){ShouldRenew = timeRemaining < timeElapsed,};await Events.CheckSlidingExpiration(eventContext);if (eventContext.ShouldRenew){ //请求刷新RequestRefresh(ticket);}}}
基于 Jwt 的方式实现
https://learn.microsoft.com/zh-cn/dotnet/api/microsoft.aspnetcore.authentication.jwtbearer?view=aspnetcore-8.0
JWT简介
-
https://jwt.io/
-
JWT是JSON Web Token的简称,是一个开放标准,用于在各方之间安全地传输信息。
-
JWT通常用于用户认证和信息交换。由于它是数字签名的,所以信息可以验证和信任
JWT由三部分组成,分别是Header(头部)、Payload(负载)和Signature(签名),它们之间用点(.)分隔。
- Header(头部):包含了两部分信息,即所使用的签名算法(如HMAC SHA256或RSA)和Token的类型(通常是JWT)。例如:
{"alg":"HS256","typ":"JWT"}。这个JSON对象会被Base64Url编码以形成JWT的第一部分。 - Payload(负载):包含了要传输的声明(Claims)。这些声明是关于实体(通常是用户)和其他数据的声明。声明有三种类型:Registered Claims(注册声明)、Public Claims(公共声明)和Private Claims(私有声明)。例如:
{"sub":"123","name":"Tom","admin":true}。这个JSON对象也会被Base64Url编码以形成JWT的第二部分。 - Signature(签名):是将Header、Payload和密钥(Key)通过指定算法(HMAC、RSA)进行加密生成的。例如,HMACSHA256(base64UrlEncode(header)+“.”+base64UrlEncode(payload), secret)。这个签名就是JWT的第三部分。
JWT的工作原理
- 用户向服务器发送用户名和密码。
- 服务器验证这些信息后,会生成一个JWT,并将其作为响应返回给用户。
- 用户将JWT保存在本地(如浏览器的cookie中),并在后续的请求中将其发送给服务器。
- 服务器验证JWT的有效性(如签名是否正确、Token是否过期等),如果验证通过,则允许用户访问资源。
JWT的优势
- 去中心化:JWT的数据保存在各个客户端而不是服务器,降低了服务器的负担。
- 可扩展性:由于JWT是自包含的,因此可以在多个系统之间轻松实现单点登录。
- 安全性:JWT使用了数字签名,可以确保信息的完整性和有效性。
使用场景
JWT常用于用户认证、单点登录、信息交换等场景。由于其紧凑、自包含和可验证的特性,JWT在现代Web应用中得到了广泛的应用。
定义JWT加解密类
public class JWTTokenOptions{public string Audience { get; set; }public string SecurityKey { get; set; }public string Issuer { get; set; }}public interface IJWTService{/// <summary>/// 新版本/// </summary>/// <param name="userInfo"></param>/// <returns></returns>string GetTokenWithModel(User userInfo);/// <summary>/// 获取Token+RefreshToken/// </summary>/// <param name="userInfo"></param>/// <returns>Token+RefreshToken</returns>Tuple<string, string> GetTokenWithRefresh(User userInfo);/// <summary>/// 基于refreshToken获取Token/// </summary>/// <param name="refreshToken"></param>/// <returns></returns>string GetTokenByRefresh(string refreshToken);}public class JWTService: IJWTService{private static Dictionary<string, User> TokenCache = new Dictionary<string, User>();private JWTTokenOptions _JWTTokenOptions = null;public JWTService(IOptions<JWTTokenOptions> options){this._JWTTokenOptions = options.Value;}/// <summary>/// 刷新token的有效期问题上端校验/// </summary>/// <param name="refreshToken"></param>/// <returns></returns>public string GetTokenByRefresh(string refreshToken){//refreshToken在有效期,但是缓存可能没有? 还能去手动清除--比如改密码了,清除缓存,用户来刷新token就发现没有了,需要重新登陆if (TokenCache.ContainsKey(refreshToken)){string token = this.IssueToken(TokenCache[refreshToken], 60);return token;}else{return "";}}/// <summary>/// 2个token 就是有效期不一样/// </summary>/// <param name="userInfo"></param>/// <returns></returns>public Tuple<string, string> GetTokenWithRefresh(User userInfo){string token = this.IssueToken(userInfo, 60);//1分钟string refreshToken = this.IssueToken(userInfo, 60 * 60 * 24 * 7);//7*24小时TokenCache.Add(refreshToken, userInfo);return Tuple.Create(token, refreshToken);}public string GetTokenWithModel(User userModel){//return this.IssueToken(userModel);return this.IssueToken(userModel, 1);}private string IssueToken(User userModel, int second = 600){var claims = new[]{new Claim(ClaimTypes.Name, userModel.UserName),new Claim(ClaimTypes.Email, userModel.Email),new Claim(ClaimTypes.Role,userModel.Role),};var key = new SymmetricSecurityKey(Encoding.UTF8.GetBytes(this._JWTTokenOptions.SecurityKey));var creds = new SigningCredentials(key, SecurityAlgorithms.HmacSha256);/*** Claims (Payload)Claims 部分包含了一些跟这个 token 有关的重要信息。 JWT 标准规定了一些字段,下面节选一些字段:iss: The issuer of the token,token 是给谁的sub: The subject of the token,token 主题exp: Expiration Time。 token 过期时间,Unix 时间戳格式iat: Issued At。 token 创建时间, Unix 时间戳格式jti: JWT ID。针对当前 token 的唯一标识除了规定的字段外,可以包含其他任何 JSON 兼容的字段。* */var token = new JwtSecurityToken(issuer: this._JWTTokenOptions.Issuer,audience: this._JWTTokenOptions.Audience,claims: claims,expires: DateTime.Now.AddSeconds(second),//10分钟有效期notBefore: DateTime.Now,//立即生效 DateTime.Now.AddMilliseconds(30),//30s后有效signingCredentials: creds);string returnToken = new JwtSecurityTokenHandler().WriteToken(token);return returnToken;}}/// <summary>/// 用户类/// </summary>public class User{public string UserName { get; set; }public string Email { get; set; }public string Role { get; set; }}
定义JWT验证方案
定义JWTTokenOptions
"JWTTokenOptions": {"Audience": "http://localhost:5555","Issuer": "http://localhost:5555","SecurityKey": "MIGfMA0GCSqGSIb3DQEBAQUAA4GNADCBiQKBgQDI2a2EJ7m872v0afyoSDJT2o1+SitIeJSWtLJU8/Wz2m7gStexajkeD+Lka6DSTy8gt9UwfgVQo6uKjVLG5Ex7PiGOODVqAEghBuS7JzIYU5RvI543nNDAPfnJsas96mSA7L/mD7RTE2drj6hf3oZjJpMPZUQI/B1Qjb5H3K3PNwIDAQAB"}
在 builder.Services 中,你需要定义你的自定义身份验证方案,并配置相关的处理程序。这可以通过 AddAuthentication 和 AddScheme 方法来完成。
//配置JWTTokenOptionsbuilder.Services.Configure<JWTTokenOptions>(builder.Configuration.GetSection("JWTTokenOptions"));builder.Services.AddTransient<IJWTService, JWTService>();JWTTokenOptions tokenOptions = new JWTTokenOptions();builder.Configuration.Bind("JWTTokenOptions", tokenOptions);builder.Services.AddAuthentication(x =>{x.DefaultAuthenticateScheme = JwtBearerDefaults.AuthenticationScheme;x.DefaultChallengeScheme = JwtBearerDefaults.AuthenticationScheme;}).AddJwtBearer(options =>{options.TokenValidationParameters = new TokenValidationParameters{ValidateIssuer = true,//是否验证IssuerValidateAudience = true, //是否验证AudienceValidateLifetime = true, //是否验证失效时间ValidateIssuerSigningKey = true, //是否验证SecurityKeyValidAudience = tokenOptions.Audience, //订阅人AudienceValidIssuer = tokenOptions.Issuer,//发行人IssuerClockSkew = TimeSpan.FromSeconds(60), //特别注意:默认是5分钟缓冲,过期时间容错值,解决服务器端时间不同步问题(秒)RequireExpirationTime = true,IssuerSigningKey = new SymmetricSecurityKey(Encoding.UTF8.GetBytes(tokenOptions.SecurityKey)) //SecurityKey};//options.Events = new JwtBearerEvents//{// OnAuthenticationFailed = async (context) =>// {// await context.Response.WriteAsJsonAsync(// new// {// Result = false,// Message = context?.Exception?.Message// });// // await Task.CompletedTask;// },// OnTokenValidated = async (context) =>// {// //await context.Response.WriteAsJsonAsync(// // new// // {// // Result = false,// // Message = context?.Result?.Failure?.Message// // });// await Console.Out.WriteLineAsync(context?.Result?.Failure?.Message);// },// OnChallenge = async (context) =>// {// await context.Response.WriteAsJsonAsync(// new// {// Result = false,// Message = context?.AuthenticateFailure?.Message// });// },// OnForbidden = async (context) =>// {// await context.Response.WriteAsJsonAsync(// new// {// Result = false,// Message = context?.Result?.Failure?.Message// });// },// OnMessageReceived = async (context) =>// {// await Console.Out.WriteLineAsync(context?.Result?.Failure?.Message);// //await context.Response.WriteAsJsonAsync(// // new// // {// // Result = false,// // Message = context?.Result?.Failure?.Message// // });// }//};});
TokenValidationParameters 类用于配置 JWT(JSON Web Tokens)的验证参数。以下是这个类中的一些常用属性
- ValidIssuer
- 类型:
string - 描述:预期的发行者(Issuer)值。如果令牌中的发行者与此值不匹配,则令牌验证将失败。
- 类型:
- ValidIssuers
- 类型:
IEnumerable<string> - 描述:预期的发行者列表。如果令牌中的发行者在此列表中,则令牌验证将成功。
- 类型:
- ValidAudience
- 类型:
string - 描述:预期的受众(Audience)值。如果令牌中的受众与此值不匹配,则令牌验证将失败。
- 类型:
- ValidAudiences
- 类型:
IEnumerable<string> - 描述:预期的受众列表。如果令牌中的受众在此列表中,则令牌验证将成功。
- 类型:
- IssuerSigningKey
- 类型:
SecurityKey - 描述:用于验证令牌签名的安全密钥。这通常是一个
SymmetricSecurityKey(用于 HMACSHA 系列算法)或RsaSecurityKey(用于 RSA 算法)。
- 类型:
- IssuerSigningKeys
- 类型:
IEnumerable<SecurityKey> - 描述:用于验证令牌签名的安全密钥列表。这允许在验证过程中使用多个密钥。
- 类型:
- ValidateIssuerSigningKey
- 类型:
bool - 描述:一个标志,指示是否应验证发行者签名密钥。默认值为
true。
- 类型:
- ValidateIssuer
- 类型:
bool - 描述:一个标志,指示是否应验证发行者。默认值为
true。
- 类型:
- ValidateAudience
- 类型:
bool - 描述:一个标志,指示是否应验证受众。默认值为
true。
- 类型:
- ValidateLifetime
- 类型:
bool - 描述:一个标志,指示是否应验证令牌的生命周期(即
exp和nbf声明)。默认值为true。
- 类型:
- ClockSkew
- 类型:
TimeSpan - 描述:用于处理由于时钟偏差而导致的时间差。当验证令牌的
exp和nbf声明时,此值将被考虑在内。默认值为 5 分钟。
- 类型:
- RequireExpirationTime
- 类型:
bool - 描述:一个标志,指示是否应要求令牌具有过期时间(
exp声明)。默认值为false。
- 类型:
- RequireSignedTokens
- 类型:
bool - 描述:一个标志,指示是否应要求令牌是签名的。默认值为
true。
- 类型:
- SaveSigningKey
- 类型:
bool - 描述:一个标志,指示是否应将签名密钥保存到缓存中,以便在后续请求中重用。默认值为
false。
- 类型:
- TokenDecryptionKey
- 类型:
SecurityKey - 描述:用于解密令牌的密钥(如果令牌是加密的)。
- 类型:
- TokenDecryptionKeys
- 类型:
IEnumerable<SecurityKey> - 描述:用于解密令牌的密钥列表(如果令牌是加密的)。
- 类型:
- ValidateTokenReplay
- 类型:
bool - 描述:一个标志,指示是否应验证令牌是否已经被使用过(即重放攻击)。这不是
TokenValidationParameters类中的内置属性,但可以通过自定义逻辑实现。
- 类型:
JwtBearerEvents 类提供了一组事件,这些事件可以在 JWT 承载令牌认证过程中被触发,以便你可以添加自定义逻辑。以下是 JwtBearerEvents 类中的一些常用事件
- OnAuthenticationFailed
- 描述:当身份验证失败时触发。这通常发生在 JWT 令牌验证不通过、签名不匹配或过期时,可以使用此事件进行错误记录、自定义错误响应或执行其他逻辑。
- OnChallenge
- 描述:当需要挑战(即返回 401 Unauthorized 响应)客户端以提供认证凭据时触发。这通常发生在需要认证但请求中没有包含有效令牌的情况下。你可以在这个事件处理器中修改挑战响应,比如添加额外的头部信息或自定义错误消息。
- OnMessageReceived
- 描述:在令牌从请求中读取之前触发。你可以在这个事件处理器中自定义令牌的读取逻辑,比如从自定义的请求头或查询字符串中获取令牌。
- OnTokenValidated
- 描述:在令牌验证成功之后但在创建
ClaimsIdentity之前触发。你可以在这个事件处理器中添加或修改用户的声明(Claims)。
- 描述:在令牌验证成功之后但在创建
- OnForbidden
- 描述:当资源被授权但用户没有访问权限时触发(例如,用户没有足够的角色或权限),可以使用此事件记录禁止访问的事件或发送自定义的禁止访问响应。
配置中间件
在 Startup.Configure 方法中,确保 UseAuthentication 中间件被添加到请求处理管道中。
//鉴权 (核心源码就是AuthenticationMiddleware中间件)app.UseAuthentication();//授权 使用Authorize必须配置app.UseAuthorization();app.UseAuthorization();
测试认证
在你的应用程序代码中,你可以通过 HttpContext.AuthenticateAsync 方法来触发认证流程。但是,在大多数情况下,认证是在中间件级别自动处理的
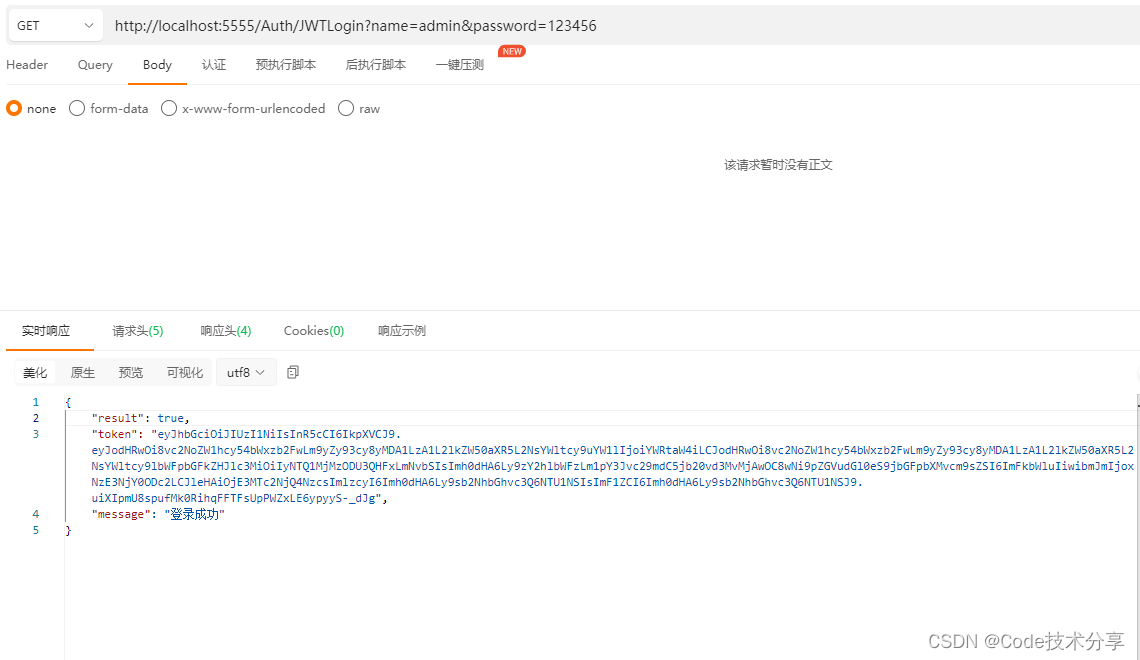
/// <summary>/// http://localhost:5555/Auth/JWTLogin?name=admin&password=123456/// </summary>/// <param name="name"></param>/// <param name="password"></param>/// <returns></returns>public async Task<IActionResult> JWTLogin(string name, string password){if ("admin".Equals(name, StringComparison.CurrentCultureIgnoreCase)&& password.Equals("123456"))//等同于去数据库校验{User user = new User{UserName = name,Email = "2545233857@qq.com",Role = "admin",};var token = _jwtService.GetTokenWithModel(user);return new JsonResult(new{Result = true,token = token,Message = "登录成功"});}else{await Task.CompletedTask;return new JsonResult(new{Result = false,Message = "登录失败"});}}/// <summary>/// http://localhost:5555/Auth/JWTToken/// </summary>/// <returns></returns>//[Authorize] //使用Authorize必须配置app.UseAuthorization();public async Task<IActionResult> JWTToken(){var userOrigin = base.HttpContext.User;var result = await base.HttpContext.AuthenticateAsync(JwtBearerDefaults.AuthenticationScheme);if (result?.Principal == null){return new JsonResult(new{Result = false,Message = result?.Failure?.Message ?? $"认证失败,用户未登录"});}else{base.HttpContext.User = result.Principal;StringBuilder sb = new StringBuilder();foreach (var item in base.HttpContext.User.Identities.First().Claims){Console.WriteLine($"Claim {item.Type}:{item.Value}");}return new JsonResult(new{Result = true,Message = $"认证成功,用户已登录"});}}

源码
https://github.com/dotnet/aspnetcore/blob/main/src/Security/Authentication/JwtBearer/src/JwtBearerHandler.cs
 protected override async Task<AuthenticateResult> HandleAuthenticateAsync(){string? token;try{// Give application opportunity to find from a different location, adjust, or reject tokenvar messageReceivedContext = new MessageReceivedContext(Context, Scheme, Options);// event can set the token//发布消息订阅await Events.MessageReceived(messageReceivedContext);if (messageReceivedContext.Result != null){return messageReceivedContext.Result;}// If application retrieved token from somewhere else, use that.token = messageReceivedContext.Token;if (string.IsNullOrEmpty(token)){//获取authorizationstring authorization = Request.Headers.Authorization.ToString();// If no authorization header found, nothing to process furtherif (string.IsNullOrEmpty(authorization)){return AuthenticateResult.NoResult();}//获取tokenif (authorization.StartsWith("Bearer ", StringComparison.OrdinalIgnoreCase)){token = authorization.Substring("Bearer ".Length).Trim();}// If no token found, no further work possibleif (string.IsNullOrEmpty(token)){return AuthenticateResult.NoResult();}}var tvp = await SetupTokenValidationParametersAsync();List<Exception>? validationFailures = null;SecurityToken? validatedToken = null;ClaimsPrincipal? principal = null;//不使用SecurityToken验证器if (!Options.UseSecurityTokenValidators){foreach (var tokenHandler in Options.TokenHandlers){try{//验证tokenvar tokenValidationResult = await tokenHandler.ValidateTokenAsync(token, tvp);if (tokenValidationResult.IsValid){principal = new ClaimsPrincipal(tokenValidationResult.ClaimsIdentity);validatedToken = tokenValidationResult.SecurityToken;break;}else{validationFailures ??= new List<Exception>(1);RecordTokenValidationError(tokenValidationResult.Exception ?? new SecurityTokenValidationException($"The TokenHandler: '{tokenHandler}', was unable to validate the Token."), validationFailures);}}catch (Exception ex){validationFailures ??= new List<Exception>(1);RecordTokenValidationError(ex, validationFailures);}}}else{
#pragma warning disable CS0618 // Type or member is obsoleteforeach (var validator in Options.SecurityTokenValidators){if (validator.CanReadToken(token)){try{//验证tokenprincipal = validator.ValidateToken(token, tvp, out validatedToken);}catch (Exception ex){validationFailures ??= new List<Exception>(1);RecordTokenValidationError(ex, validationFailures);continue;}}}
#pragma warning restore CS0618 // Type or member is obsolete}//判断凭证和tokenif (principal != null && validatedToken != null){Logger.TokenValidationSucceeded();var tokenValidatedContext = new TokenValidatedContext(Context, Scheme, Options){Principal = principal};tokenValidatedContext.SecurityToken = validatedToken;tokenValidatedContext.Properties.ExpiresUtc = GetSafeDateTime(validatedToken.ValidTo);tokenValidatedContext.Properties.IssuedUtc = GetSafeDateTime(validatedToken.ValidFrom);//发布Token验证成功事件await Events.TokenValidated(tokenValidatedContext);if (tokenValidatedContext.Result != null){return tokenValidatedContext.Result;}if (Options.SaveToken){tokenValidatedContext.Properties.StoreTokens(new[]{new AuthenticationToken { Name = "access_token", Value = token }});}tokenValidatedContext.Success();return tokenValidatedContext.Result!;}//验证失败结果if (validationFailures != null){var authenticationFailedContext = new AuthenticationFailedContext(Context, Scheme, Options){Exception = (validationFailures.Count == 1) ? validationFailures[0] : new AggregateException(validationFailures)};//发布验证失败事件await Events.AuthenticationFailed(authenticationFailedContext);if (authenticationFailedContext.Result != null){return authenticationFailedContext.Result;}return AuthenticateResult.Fail(authenticationFailedContext.Exception);}if (!Options.UseSecurityTokenValidators){return AuthenticateResults.TokenHandlerUnableToValidate;}return AuthenticateResults.ValidatorNotFound;}catch (Exception ex){Logger.ErrorProcessingMessage(ex);var authenticationFailedContext = new AuthenticationFailedContext(Context, Scheme, Options){Exception = ex};//发布验证失败事件await Events.AuthenticationFailed(authenticationFailedContext);if (authenticationFailedContext.Result != null){return authenticationFailedContext.Result;}throw;}}
基于自定义的方式实现
定义自定义身份验证方案
在 builder.Services 中,你需要定义你的自定义身份验证方案,并配置相关的处理程序。这可以通过 AddAuthentication 和 AddScheme 方法来完成。
builder.Services.AddAuthentication(options =>{options.AddScheme<XTokenAuthenticationHandler2>(XTokenAuthenticationDefaults.AuthenticationScheme, "");options.DefaultAuthenticateScheme = XTokenAuthenticationDefaults.AuthenticationScheme;options.DefaultChallengeScheme = XTokenAuthenticationDefaults.AuthenticationScheme;options.DefaultSignInScheme = XTokenAuthenticationDefaults.AuthenticationScheme;options.DefaultForbidScheme = XTokenAuthenticationDefaults.AuthenticationScheme;options.DefaultSignOutScheme = XTokenAuthenticationDefaults.AuthenticationScheme;});
实现自定义身份验证处理器
你需要创建一个类,实现 IAuthenticationHandler 接口或继承 AuthenticationHandler<TOptions> 类(其中 TOptions 是你的认证选项类),并在这个类中实现你的自定义认证逻辑。
/// <summary>/// DES加解密/// </summary>public class DesEncrypt{private static byte[] key = Encoding.UTF8.GetBytes("1234567812345678"); // 16字节的密钥private static byte[] iv = Encoding.UTF8.GetBytes("1234567812345678"); // 16字节的初始化向量/// <summary>/// 加密/// </summary>/// <param name="plainText"></param>/// <returns></returns>public static string Encrypt(string plainText){using (Aes aes = Aes.Create()){aes.Key = key;aes.IV = iv;ICryptoTransform encryptor = aes.CreateEncryptor(aes.Key, aes.IV);using (MemoryStream ms = new MemoryStream()){using (CryptoStream cs = new CryptoStream(ms, encryptor, CryptoStreamMode.Write)){using (StreamWriter sw = new StreamWriter(cs)){sw.Write(plainText);}}return Convert.ToBase64String(ms.ToArray());}}}/// <summary>/// 解密/// </summary>/// <param name="cipherText"></param>/// <returns></returns>public static string Decrypt(string cipherText){using (Aes aes = Aes.Create()){aes.Key = key;aes.IV = iv;ICryptoTransform decryptor = aes.CreateDecryptor(aes.Key, aes.IV);byte[] bytes = Convert.FromBase64String(cipherText);using (MemoryStream ms = new MemoryStream(bytes)){using (CryptoStream cs = new CryptoStream(ms, decryptor, CryptoStreamMode.Read)){using (StreamReader sr = new StreamReader(cs)){return sr.ReadToEnd();}}}}}}/// <summary>/// 用户类/// </summary>public class User{public string UserName { get; set; }public string Email { get; set; }public string Role { get; set; }}
基于IAuthenticationHandler 接口
public class XTokenAuthenticationHandler : IAuthenticationHandler{private AuthenticationScheme _authenticationScheme;private HttpContext _httpContext;private string _tokenName = "x-token";private ILogger<XTokenAuthenticationHandler> _logger;public XTokenAuthenticationHandler(ILogger<XTokenAuthenticationHandler> logger){_logger = logger; }public Task InitializeAsync(AuthenticationScheme scheme, HttpContext context){_authenticationScheme = scheme;_httpContext = context;return Task.CompletedTask;}public Task<AuthenticateResult> AuthenticateAsync(){try{if (_httpContext.Request.Headers.ContainsKey(_tokenName)){string token = _httpContext.Request.Headers[_tokenName];var userStr = DesEncrypt.Decrypt(token);var userInfo = JsonConvert.DeserializeObject<User>(userStr);//校验---整理信息,保存起来var claimIdentity = new ClaimsIdentity("Custom");claimIdentity.AddClaim(new Claim(ClaimTypes.Name, userInfo.UserName));claimIdentity.AddClaim(new Claim(ClaimTypes.Role, userInfo.Role));claimIdentity.AddClaim(new Claim(ClaimTypes.Email, userInfo.Email));ClaimsPrincipal claimsPrincipal = new ClaimsPrincipal(claimIdentity);//信息拼装和传递return Task.FromResult(AuthenticateResult.Success(new AuthenticationTicket(claimsPrincipal, null, _authenticationScheme.Name)));}else{return Task.FromResult(AuthenticateResult.NoResult());//没有凭证}}catch (Exception ex){_logger.LogError(ex, ex.Message);return Task.FromResult(AuthenticateResult.Fail($"认证失败请重新登录"));}}/// <summary>/// 未登录/// </summary>/// <param name="properties"></param>/// <returns></returns>public Task ChallengeAsync(AuthenticationProperties? properties){_httpContext.Response.StatusCode = 401;//_httpContext.Response.WriteAsJsonAsync(new//{// Result = false,// Message = !string.IsNullOrEmpty(_errorMessage) ? _errorMessage : "认证失败,请重新登录"//}) ;return Task.CompletedTask;}/// <summary>/// 未授权,无权限/// </summary>/// <param name="properties"></param>/// <returns></returns>public Task ForbidAsync(AuthenticationProperties? properties){_httpContext.Response.StatusCode = 403;//_httpContext.Response.WriteAsJsonAsync(new//{// Result = false,// Message = "访问失败,未授权"//});return Task.CompletedTask;}}public class XTokenAuthenticationDefaults{/// <summary>/// 提供固定名称/// </summary>public const string AuthenticationScheme = "XTokenScheme";}
基于继承 AuthenticationHandler<TOptions> 类
public class XTokenAuthenticationHandler2 : AuthenticationHandler<AuthenticationSchemeOptions>{private string _tokenName = "x-token";private ILogger<XTokenAuthenticationHandler2> _logger;public XTokenAuthenticationHandler2(ILogger<XTokenAuthenticationHandler2> logger1, IOptionsMonitor<AuthenticationSchemeOptions> options, ILoggerFactory logger, UrlEncoder encoder, ISystemClock clock) : base(options, logger, encoder, clock){_logger = logger1;}/// <summary>/// 认证/// </summary>/// <returns></returns>protected override Task<AuthenticateResult> HandleAuthenticateAsync(){try{if (Request.Headers.ContainsKey(_tokenName)){string token = Request.Headers[_tokenName];var userStr = DesEncrypt.Decrypt(token);var userInfo = JsonConvert.DeserializeObject<User>(userStr);//校验---整理信息,保存起来var claimIdentity = new ClaimsIdentity("Custom");claimIdentity.AddClaim(new Claim(ClaimTypes.Name, userInfo.UserName));claimIdentity.AddClaim(new Claim(ClaimTypes.Role, userInfo.Role));claimIdentity.AddClaim(new Claim(ClaimTypes.Email, userInfo.Email));ClaimsPrincipal claimsPrincipal = new ClaimsPrincipal(claimIdentity);//信息拼装和传递return Task.FromResult(AuthenticateResult.Success(new AuthenticationTicket(claimsPrincipal, null, Scheme.Name)));}else{return Task.FromResult(AuthenticateResult.NoResult());//没有凭证}}catch (Exception ex){_logger.LogError(ex, ex.Message);return Task.FromResult(AuthenticateResult.Fail($"认证失败请重新登录"));}}}
配置中间件
在 Startup.Configure 方法中,确保 UseAuthentication 中间件被添加到请求处理管道中。
//鉴权 (核心源码就是AuthenticationMiddleware中间件)app.UseAuthentication();
测试认证
在你的应用程序代码中,你可以通过 HttpContext.AuthenticateAsync 方法来触发认证流程。但是,在大多数情况下,认证是在中间件级别自动处理的
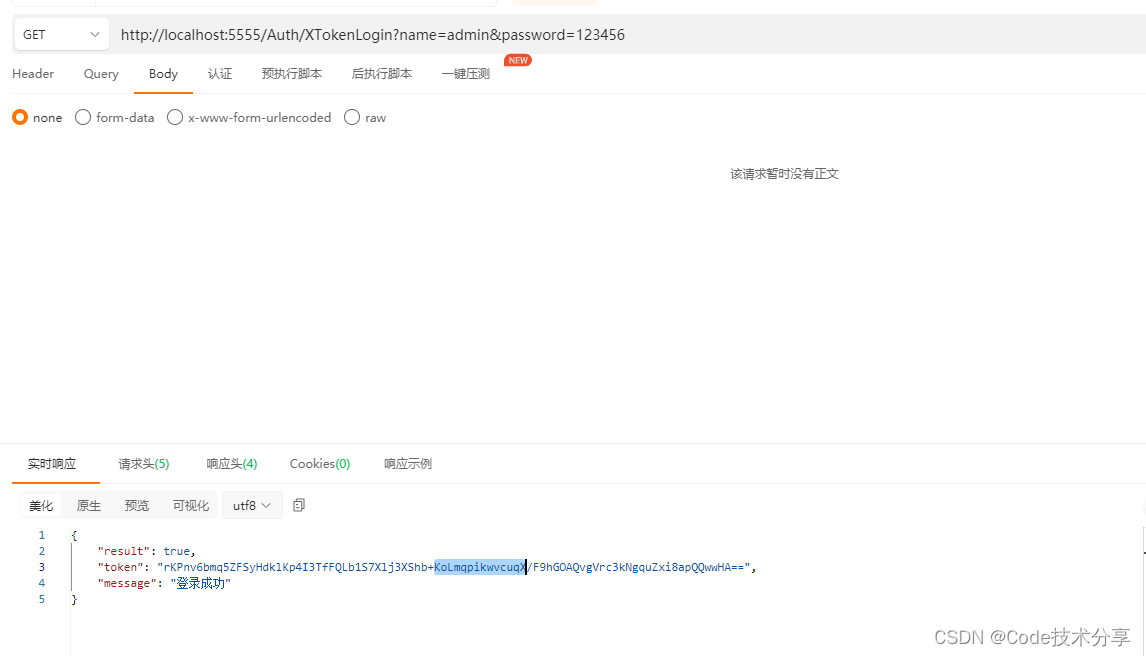
/// <summary>/// http://localhost:5555/Auth/XTokenLogin?name=admin&password=123456/// </summary>/// <param name="name"></param>/// <param name="password"></param>/// <returns></returns>public async Task<IActionResult> XTokenLogin(string name, string password){if ("admin".Equals(name, StringComparison.CurrentCultureIgnoreCase)&& password.Equals("123456"))//等同于去数据库校验{User user = new User{UserName = name,Email = "2545233857@qq.com",Role = "admin",};var token = DesEncrypt.Encrypt(Newtonsoft.Json.JsonConvert.SerializeObject(user));return new JsonResult(new{Result = true,token = token,Message = "登录成功"});}else{await Task.CompletedTask;return new JsonResult(new{Result = false,Message = "登录失败"});}}/// <summary>/// http://localhost:5555/Auth/XToken/// </summary>/// <returns></returns>//没有要求授权public async Task<IActionResult> XToken(){var userOrigin = base.HttpContext.User;var result = await base.HttpContext.AuthenticateAsync(XTokenAuthenticationDefaults.AuthenticationScheme);if (result?.Principal == null){return new JsonResult(new{Result = false,Message = $"认证失败,用户未登录"});}else{base.HttpContext.User = result.Principal;StringBuilder sb = new StringBuilder();foreach (var item in base.HttpContext.User.Identities.First().Claims){Console.WriteLine($"Claim {item.Type}:{item.Value}");}return new JsonResult(new{Result = true,Message = $"认证成功,用户已登录"});}}
源码
https://github.com/dotnet/aspnetcore/blob/main/src/Security/Authentication/Core/src/AuthenticationMiddleware.cs
/// <summary>
/// Extension methods to add authentication capabilities to an HTTP application pipeline.
/// </summary>
public static class AuthAppBuilderExtensions
{public static IApplicationBuilder UseAuthentication(this IApplicationBuilder app){return app.UseMiddleware<AuthenticationMiddleware>();}
}public class AuthenticationMiddleware
{public async Task Invoke(HttpContext context){//其它...var defaultAuthenticate = await Schemes.GetDefaultAuthenticateSchemeAsync();if (defaultAuthenticate != null){//验证var result = await context.AuthenticateAsync(defaultAuthenticate.Name);if (result?.Principal != null){//赋值context.User = result.Principal;}if (result?.Succeeded ?? false){var authFeatures = new AuthenticationFeatures(result);context.Features.Set<IHttpAuthenticationFeature>(authFeatures);context.Features.Set<IAuthenticateResultFeature>(authFeatures);}}await _next(context);}
}
这篇关于Asp .Net Core 系列:详解鉴权(身份验证)以及实现 Cookie、JWT、自定义三种鉴权 (含源码解析)的文章就介绍到这儿,希望我们推荐的文章对编程师们有所帮助!


