本文主要是介绍微服务:Rabbitmq中的不同交换机的使用Fanout、Direct、Topic(消息队列中间件),希望对大家解决编程问题提供一定的参考价值,需要的开发者们随着小编来一起学习吧!
文章目录
- 发布订阅
- Fanout 交换机
- Direct 交换机
- Topic 交换机
- 通配符规则
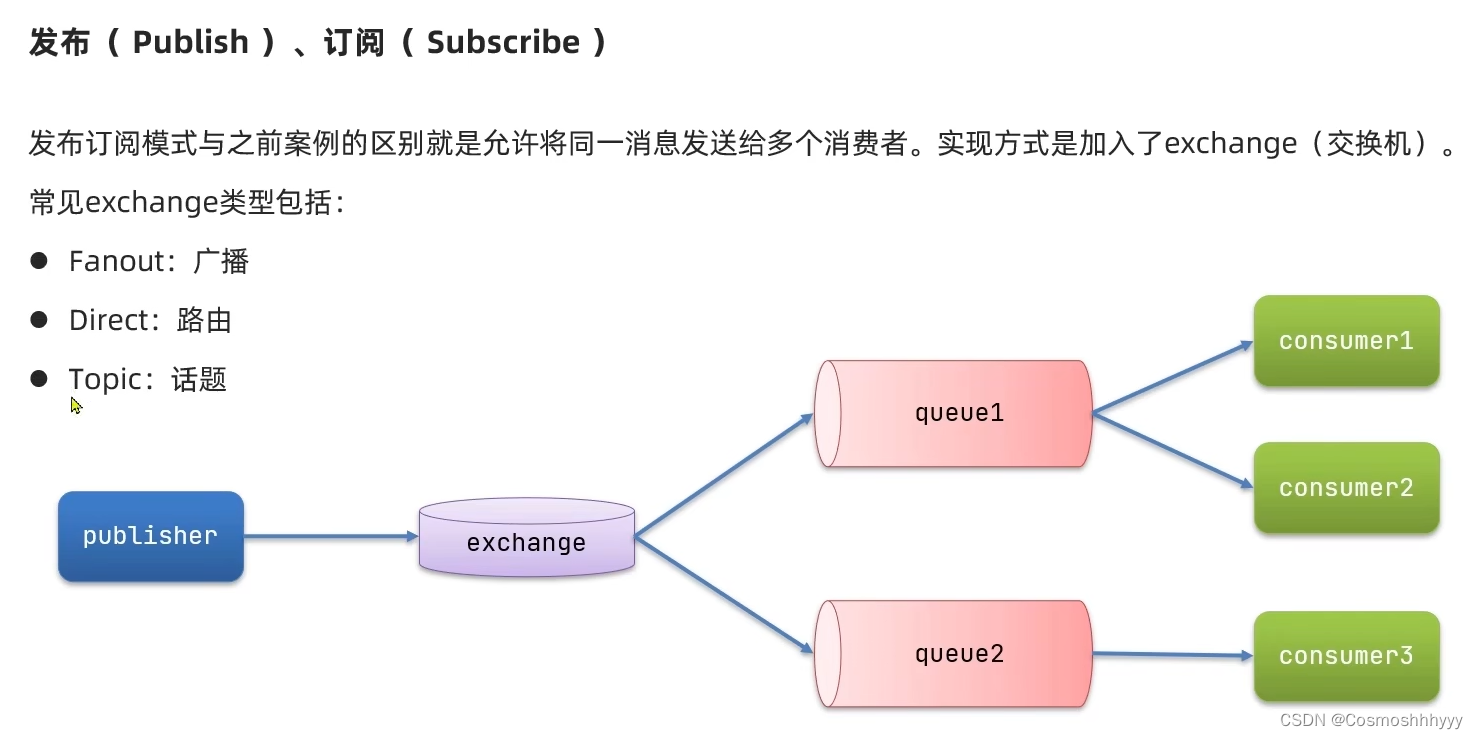
发布订阅
在这里插入图片描述


Fanout 交换机
Fanout 交换机会将收到的消息路由到每一个跟其绑定的queue上。
我们做一个交换机,两个队列,两个消费者分别连接两个队列。
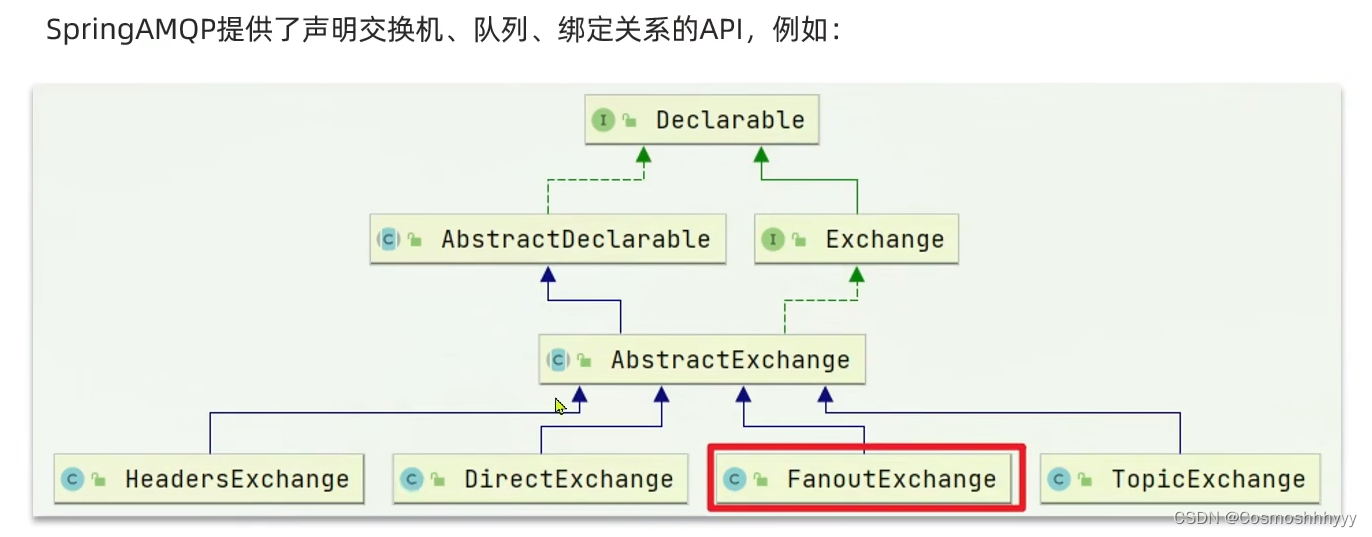
定义交换机,队列,交换机与队列之间的连接:
/*** fanout交换机配置*/
@Configuration
public class FanoutConfig {/*** 声明交换机,设置名称* @return*/@Beanpublic FanoutExchange fanoutExchange() {return new FanoutExchange("lpy.fanout");}/*** 队列1* @return*/@Beanpublic Queue fanoutQueue1() {return new Queue("fanout.queue1");}/*** 绑定交换机和队列1*/@Beanpublic Binding bindingQueue1(Queue fanoutQueue1, FanoutExchange fanoutExchange) {return BindingBuilder.bind(fanoutQueue1).to(fanoutExchange);}/*** 队列1* @return*/@Beanpublic Queue fanoutQueue2() {return new Queue("fanout.queue2");}/*** 绑定交换机和队列2*/@Beanpublic Binding bindingQueue2(Queue fanoutQueue2, FanoutExchange fanoutExchange) {return BindingBuilder.bind(fanoutQueue2).to(fanoutExchange);}}
定义监听接口:
@RabbitListener(queues = "fanout.queue1")public void listenFanoutQueue1(String msg) {System.out.println("消费者1接收到Fanout消息:" + msg);}@RabbitListener(queues = "fanout.queue2")public void listenFanoutQueue2(String msg) {System.out.println("消费者2接收到Fanout消息:" + msg);}
发送消息:
@Testpublic void testFanoutExchange() {// 队列名称String exchangeName = "lpy.fanout";// 消息String message = "hello fanout!";rabbitTemplate.convertAndSend(exchangeName, "", message);}
启动,运行:

可以看到,我们发的一个消息,被两个消费者消费了,说明实现成功,交换机把消息路由到了每个队列。
Direct 交换机
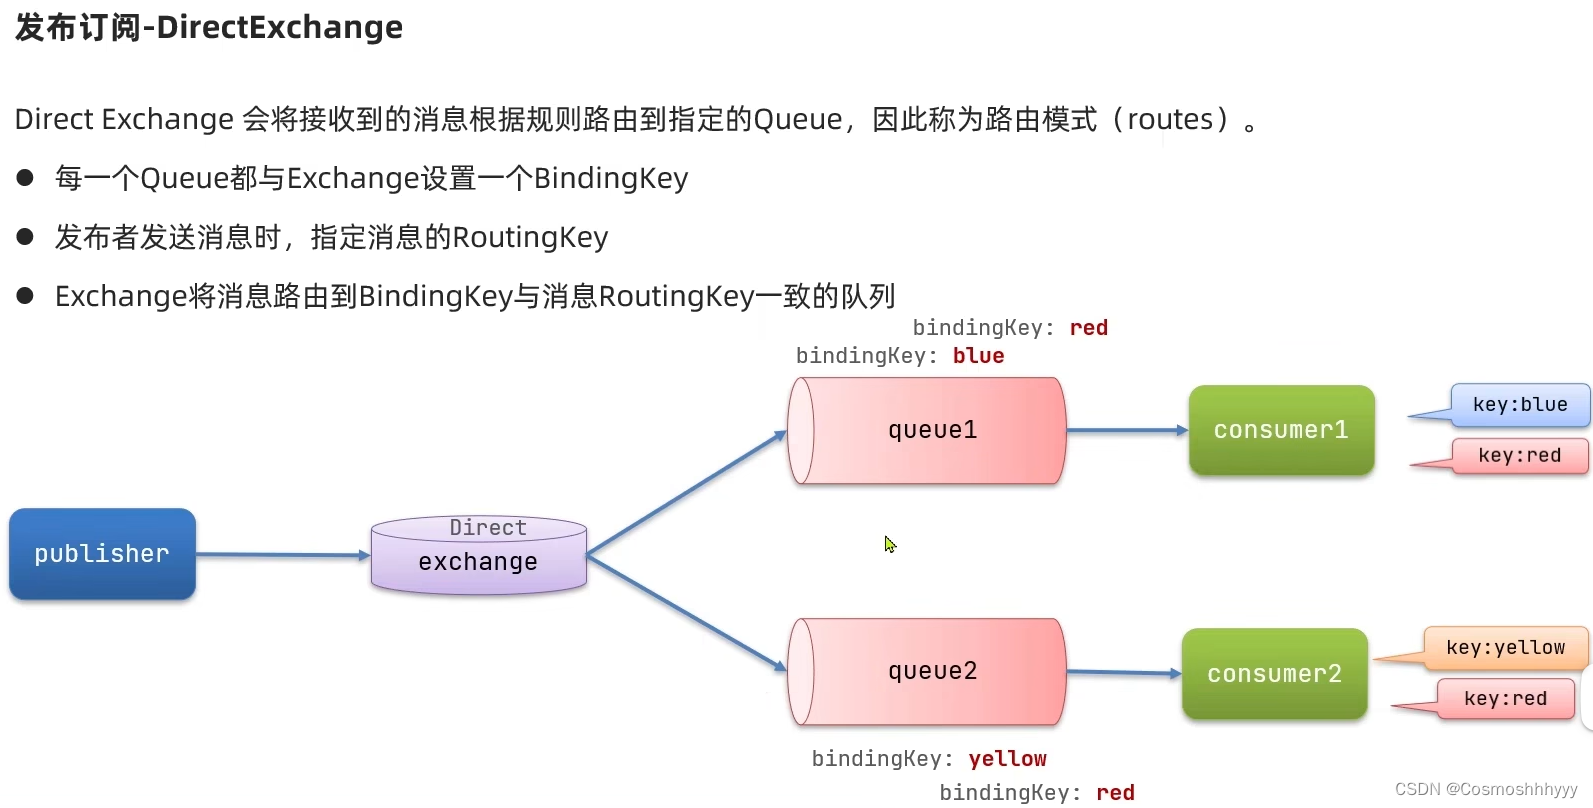
不同的消息路由到不同的队列,根据key路由建。

下面来实现一下,基于注解来声明队列和交换机,这样比较方便,直接定义再接口上。
@RabbitListener(bindings = @QueueBinding(value = @Queue(name = "direct.queue1"),exchange = @Exchange(name = "lpy.direct", type = ExchangeTypes.DIRECT),key = {"red", "blue"}))public void listenDirectQueue1(String msg){System.out.println("消费者1接收到direct.queue1的消息:" + msg);}@RabbitListener(bindings = @QueueBinding(value = @Queue(name = "direct.queue2"),exchange = @Exchange(name = "lpy.direct", type = ExchangeTypes.DIRECT),key = {"red", "yellow"}))public void listenDirectQueue2(String msg){System.out.println("消费者2接收到direct.queue2的消息:" + msg);}
启动测试:
- key 为 red
@Testpublic void testSendDirectExchange() {// 交换机名称String exchangeName = "lpy.direct";// 消息String message = "hello direct red";// 发送消息rabbitTemplate.convertAndSend(exchangeName, "red", message);// 消息String message2 = "hello direct blue";// 发送消息rabbitTemplate.convertAndSend(exchangeName, "blue", message2);// 消息String message3 = "hello direct yellow";// 发送消息rabbitTemplate.convertAndSend(exchangeName, "yellow", message3);}

可以看到,根据key来进行了路由。
Topic 交换机
Topic 交换机与Direct相似,只不过使用了key可以使用通配符。
RoutingKey一般由一个或多个单词组成,用“.”分割。
通配符规则
# 匹配一个或多个词
* 匹配一个词
例如:
举例:
a.# 可以匹配a.b.c、a.b等a.* 只可以匹配a.b
现在来实验一下吧:
和Direct同样的写法,只是key改为通配符的:
@RabbitListener(bindings = @QueueBinding(value = @Queue(name = "topic.queue1"),exchange = @Exchange(name = "lpy.topic", type = ExchangeTypes.TOPIC),key = "a.*"))public void listenTopicQueue1(String msg){System.out.println("消费者接收到topic.queue1的消息:" + msg);}@RabbitListener(bindings = @QueueBinding(value = @Queue(name = "topic.queue2"),exchange = @Exchange(name = "lpy.topic", type = ExchangeTypes.TOPIC),key = "a.#"))public void listenTopicQueue2(String msg){System.out.println("消费者接收到topic.queue2的消息:" + msg);}
发送消息:
@Testpublic void testSendTopicExchange() {// 交换机名称String exchangeName = "lpy.topic";// 消息String message = "hello topic a.b";// 发送消息rabbitTemplate.convertAndSend(exchangeName, "a.b", message);// 消息String message1 = "hello topic a.b.c";// 发送消息rabbitTemplate.convertAndSend(exchangeName, "a.b.c", message1);}
运行结果:

可以看到#确实可以匹配多个单词,而*只能匹配一个。
这篇关于微服务:Rabbitmq中的不同交换机的使用Fanout、Direct、Topic(消息队列中间件)的文章就介绍到这儿,希望我们推荐的文章对编程师们有所帮助!


