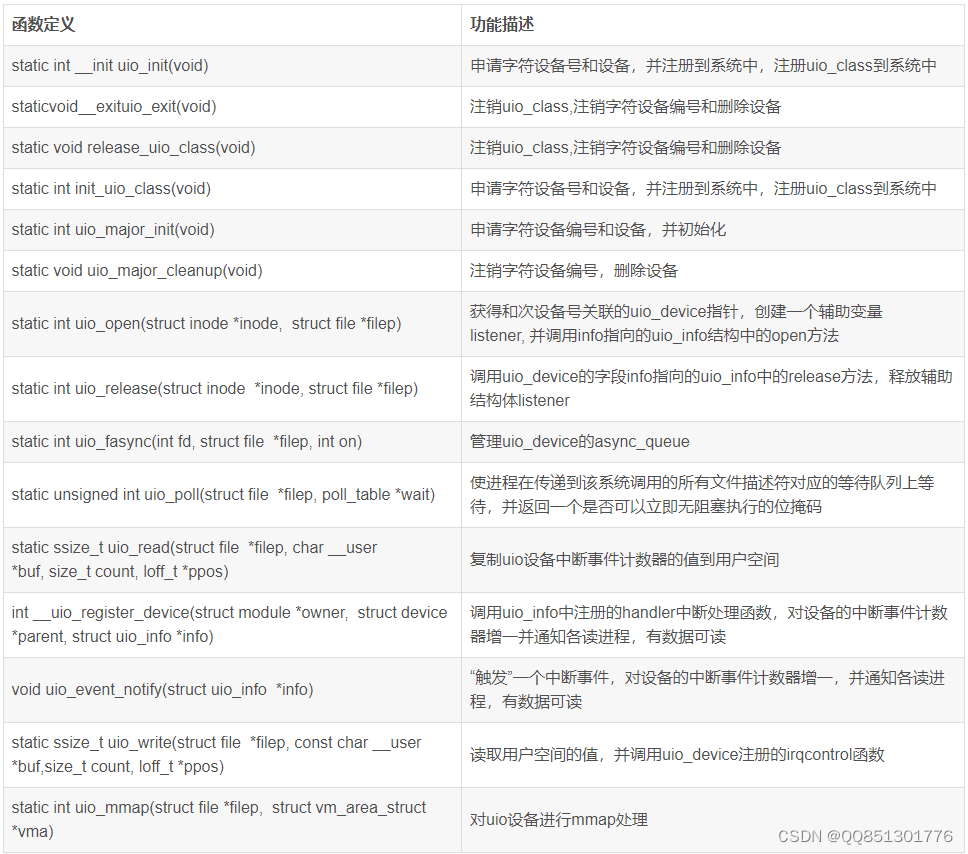
本文主要是介绍dpdk uio整体分析及网卡加载,希望对大家解决编程问题提供一定的参考价值,需要的开发者们随着小编来一起学习吧!
参考:https://zhuanlan.zhihu.com/p/477600165
一、Linux内核知识点
1. __attribute__ constructor/destructor
(1)若函数被设定为constructor属性,则该函数会在 main()函数执行之前被自动的执行。
(2)若函数被设定为destructor属性,则该函数会在main()函数执行之后或者exit()被调用后被自动的执行
2.container_of宏
作用是通过结构体内某个成员变量的地址和该变量名,以及结构体类型。找到该结构体变量的地址
3. EXPORT_SYMBOL
标签内定义的函数或者符号对全部内核代码公开,不用修改内核代码就可以在您的内核模块中直接调用,即使用EXPORT_SYMBOL可以将一个函数以符号的方式导出给其他模块使用。
4.EXPORT_SYMBOL_GPL
与EXPORT_SYMBOL类似,_GPL版本的宏定义只能使符号对GPL许可的模块可用。 符号必须在模块文件的全局部分导出,不能在函数中导出
5.ATTR
#define DRIVER_ATTR(_name, _mode, _show, _store) \
    struct driver_attribute driver_attr_##_name = __ATTR(_name, _mode, _show, _store)
#define DRIVER_ATTR_RW(_name) \
    struct driver_attribute driver_attr_##_name = __ATTR_RW(_name)
#define DRIVER_ATTR_RO(_name) \
    struct driver_attribute driver_attr_##_name = __ATTR_RO(_name)
#define DRIVER_ATTR_WO(_name) \
    struct driver_attribute driver_attr_##_name = __ATTR_WO(_name)__ATTR定义于文件 include/linux/sysfs.h
#define __ATTR(_name, _mode, _show, _store) {    \.attr = {.name = __stringify(_name), .mode = _mode },  \.show = _show,      \.store = _store,      \
}
说明_name:名称,也就是将在sys fs中生成的文件名称。_mode:上述文件的访问权限,与普通文件相同,UGO的格式,最高权限0644,否则会报错。_show:显示函数,cat该文件时,此函数被调用。_store:写函数,echo内容到该文件时,此函数被调用。
这个主要是绑定网卡时会用到
二、内核UIO驱动框架
内核uio框架通过配置内核选项CONFIG_UIO=y使能Userspace I/O drivers,在内核初始化时会调用uio_init创建uio_class; -----内核uio.c中完成,纯内核操作;

//dpdk定义的uio pci设备描述结构
struct rte_uio_pci_dev {struct uio_info info; //uio 通用结构struct pci_dev *pdev;  //pci设备描述结构enum rte_intr_mode mode; //中断模式
};
struct uio_info {struct uio_device    *uio_dev; //uio设备属于const char        *name; //名称const char        *version; //版本号struct uio_mem        mem[MAX_UIO_MAPS];//可映射的内存区域列表,size == 0表示列表结束struct uio_port        port[MAX_UIO_PORT_REGIONS]; //网口区域列表long            irq; //UIO_IRQ_CUSTOM 中断号unsigned long        irq_flags; //请求中断号的标志void            *priv;  //可选的私有数据irqreturn_t (*handler)(int irq, struct uio_info *dev_info); //中断信息处理int (*mmap)(struct uio_info *info, struct vm_area_struct *vma);//内存映射操作int (*open)(struct uio_info *info, struct inode *inode); //打开int (*release)(struct uio_info *info, struct inode *inode); //释放int (*irqcontrol)(struct uio_info *info, s32 irq_on); //中断控制操作 关闭/打开 当向/dev/uioX中写入值时
/*1.注册uio驱动入口部分
*/
module_init(uio_init)/*2.调用此函数
*/
static int __init uio_init(void)
{return init_uio_class();
}/*3. 真正的注册部分
*/
static int init_uio_class(void)
{int ret;/* 申请字符设备号(alloc_chrdev_region),分配字符设备(cdev_alloc),uio字符设备操作函数挂载(cdev->ops = &uio_fops;)并将字符设备"uio"注册到系统中(cdev_add); */ret = uio_major_init();if (ret)goto exit;/*创建“/sys/class/uio”设备目录或文件系统,此时该目录为空,在insmod igb_uio.ko后且运行python脚本绑定网卡后此目录下才有内容;*/ret = class_register(&uio_groups);if (ret) {printk(KERN_ERR "class_register failed for uio\n");goto err_class_register;}return 0;err_class_register:uio_major_cleanup();
exit:return ret;
}/*__class_register函数
*/int __class_register(struct class *cls, struct lock_class_key *key)
{struct subsys_private *cp;int error;pr_debug("device class '%s': registering\n", cls->name);cp = kzalloc(sizeof(*cp), GFP_KERNEL);if (!cp)return -ENOMEM;klist_init(&cp->klist_devices, klist_class_dev_get, klist_class_dev_put);INIT_LIST_HEAD(&cp->interfaces);kset_init(&cp->glue_dirs);__mutex_init(&cp->mutex, "subsys mutex", key);error = kobject_set_name(&cp->subsys.kobj, "%s", cls->name);if (error) {kfree(cp);return error;}/* set the default /sys/dev directory for devices of this class */if (!cls->dev_kobj)cls->dev_kobj = sysfs_dev_char_kobj;#if defined(CONFIG_BLOCK)/* let the block class directory show up in the root of sysfs */if (!sysfs_deprecated || cls != &block_class)cp->subsys.kobj.kset = class_kset;
#elsecp->subsys.kobj.kset = class_kset;
#endifcp->subsys.kobj.ktype = &class_ktype;cp->class = cls;cls->p = cp;error = kset_register(&cp->subsys);if (error) {kfree(cp);return error;}error = class_add_groups(class_get(cls), cls->class_groups);class_put(cls);error = add_class_attrs(class_get(cls));class_put(cls);return error;
}EXPORT_SYMBOL_GPL(__class_register);
三、dpdk中的igb_uio模块
1.dpdk-steup.sh中插入igb_uid模块
step2_func()
{TITLE="Setup linux environment"TEXT[1]="Insert IGB UIO module"FUNC[1]="load_igb_uio_module"
}load_igb_uio_module()
{if [ ! -f $RTE_SDK/$RTE_TARGET/kmod/igb_uio.ko ];thenecho "## ERROR: Target does not have the DPDK UIO Kernel Module."echo "       To fix, please try to rebuild target."returnfiremove_igb_uio_module/sbin/lsmod | grep -s uio > /dev/nullif [ $? -ne 0 ] ; thenmodinfo uio > /dev/nullif [ $? -eq 0 ]; thenecho "Loading uio module"sudo /sbin/modprobe uiofifi# UIO may be compiled into kernel, so it may not be an error if it can't# be loaded.echo "Loading DPDK UIO module"//把igb_uio模块加入到linux内核驱动中,执行insmod igb_ui.losudo /sbin/insmod $RTE_SDK/$RTE_TARGET/kmod/igb_uio.koif [ $? -ne 0 ] ; thenecho "## ERROR: Could not load kmod/igb_uio.ko."quitfi
}
2.igb_uio
注册igb_uio驱动主要做两件事情
第一件事是配置中断模式;
第二种是注册驱动
static struct pci_driver igbuio_pci_driver = {.name = "igb_uio",//id_table指针为空(即deviceid为空,类似内核igb_pci_tbl,dpdk的pci_id_igb_map),找不到驱动能匹配的设备,不会调用.probe钩子函数初始化;.id_table = NULL,.probe = igbuio_pci_probe,.remove = igbuio_pci_remove,
};//插入驱动到内核
static int __init
igbuio_pci_init_module(void)
{int ret;if (igbuio_kernel_is_locked_down()) {pr_err("Not able to use module, kernel lock down is enabled\n");return -EINVAL;}if (wc_activate != 0)pr_info("wc_activate is set\n");//配置中断模式ret = igbuio_config_intr_mode(intr_mode);if (ret < 0)return ret;//注册驱动return pci_register_driver(&igbuio_pci_driver);
}/*1.入口部分
*/
module_init(igbuio_pci_init_module);
pci_register_driver属于内核中函数,是向pci总线上注册uio设备驱动
以下是内核函数
#define pci_register_driver(driver)		\__pci_register_driver(driver, THIS_MODULE, KBUILD_MODNAME)int __pci_register_driver(struct pci_driver *drv, struct module *owner,const char *mod_name)
{/* initialize common driver fields */drv->driver.name = drv->name;drv->driver.bus = &pci_bus_type;drv->driver.owner = owner;drv->driver.mod_name = mod_name;spin_lock_init(&drv->dynids.lock);INIT_LIST_HEAD(&drv->dynids.list);/* register with core */return driver_register(&drv->driver);
}
EXPORT_SYMBOL(__pci_register_driver);int driver_register(struct device_driver *drv)
{int ret;struct device_driver *other;BUG_ON(!drv->bus->p);if ((drv->bus->probe && drv->probe) ||(drv->bus->remove && drv->remove) ||(drv->bus->shutdown && drv->shutdown))printk(KERN_WARNING "Driver '%s' needs updating - please use ""bus_type methods\n", drv->name);other = driver_find(drv->name, drv->bus);if (other) {printk(KERN_ERR "Error: Driver '%s' is already registered, ""aborting...\n", drv->name);return -EBUSY;}ret = bus_add_driver(drv);if (ret)return ret;ret = driver_add_groups(drv, drv->groups);if (ret) {bus_remove_driver(drv);return ret;}kobject_uevent(&drv->p->kobj, KOBJ_ADD);return ret;
}
EXPORT_SYMBOL_GPL(driver_register);int bus_add_driver(struct device_driver *drv)
{struct bus_type *bus;struct driver_private *priv;int error = 0;bus = bus_get(drv->bus);if (!bus)return -EINVAL;pr_debug("bus: '%s': add driver %s\n", bus->name, drv->name);priv = kzalloc(sizeof(*priv), GFP_KERNEL);if (!priv) {error = -ENOMEM;goto out_put_bus;}klist_init(&priv->klist_devices, NULL, NULL);priv->driver = drv;drv->p = priv;priv->kobj.kset = bus->p->drivers_kset;error = kobject_init_and_add(&priv->kobj, &driver_ktype, NULL,"%s", drv->name);if (error)goto out_unregister;klist_add_tail(&priv->knode_bus, &bus->p->klist_drivers);if (drv->bus->p->drivers_autoprobe) {if (driver_allows_async_probing(drv)) {pr_debug("bus: '%s': probing driver %s asynchronously\n",drv->bus->name, drv->name);async_schedule(driver_attach_async, drv);} else {error = driver_attach(drv);if (error)goto out_unregister;}}module_add_driver(drv->owner, drv);error = driver_create_file(drv, &driver_attr_uevent);if (error) {printk(KERN_ERR "%s: uevent attr (%s) failed\n",__func__, drv->name);}error = driver_add_groups(drv, bus->drv_groups);if (error) {/* How the hell do we get out of this pickle? Give up */printk(KERN_ERR "%s: driver_create_groups(%s) failed\n",__func__, drv->name);}if (!drv->suppress_bind_attrs) {error = add_bind_files(drv);if (error) {/* Ditto */printk(KERN_ERR "%s: add_bind_files(%s) failed\n",__func__, drv->name);}}return 0;out_unregister:kobject_put(&priv->kobj);kfree(drv->p);drv->p = NULL;
out_put_bus:bus_put(bus);return error;
}int sysfs_create_groups(struct kobject *kobj,const struct attribute_group **groups)
{int error = 0;int i;if (!groups)return 0;for (i = 0; groups[i]; i++) {error = sysfs_create_group(kobj, groups[i]);if (error) {while (--i >= 0)sysfs_remove_group(kobj, groups[i]);break;}}return error;
}
EXPORT_SYMBOL_GPL(sysfs_create_groups);
流程梳理:
insmod igb_uio.ko-->module_init(igbuio_pci_init_module)-->igbuio_pci_init_module-->pci_register_driver(内核函数)-->__pci_register_driver(内核)-->driver_register(内核)
注:
(1)“/sys/bus/pci/drivers/igb_uio/”下存放的是驱动igb_uio目录文件;
(2)“/sys/class/uio/uioX”下存放的是uio设备目录文件,与“/dev/uioX”设备句柄对应
四.绑定网卡到igb_uio模块
4.1 脚本中的代码
dpdk.setup.shstep2_func()
{TEXT[7]="Bind Ethernet/Baseband/Crypto device to IGB UIO module"FUNC[7]="bind_devices_to_igb_uio"}bind_devices_to_igb_uio()
{if [ -d /sys/module/igb_uio ]; then${RTE_SDK}/usertools/dpdk-devbind.py --statusecho ""echo -n "Enter PCI address of device to bind to IGB UIO driver: "read PCI_PATH//主要是执行此部分sudo ${RTE_SDK}/usertools/dpdk-devbind.py -b igb_uio $PCI_PATH && echo "OK"elseecho "# Please load the 'igb_uio' kernel module before querying or "echo "# adjusting device bindings"fi
}
#! /usr/bin/env python
# SPDX-License-Identifier: BSD-3-Clause
# Copyright(c) 2010-2014 Intel Corporation
#from __future__ import print_function
import sys
import os
import getopt
import subprocess
from os.path import exists, abspath, dirname, basename# The PCI base class for all devices
network_class = {'Class': '02', 'Vendor': None, 'Device': None,'SVendor': None, 'SDevice': None}
acceleration_class = {'Class': '12', 'Vendor': None, 'Device': None,'SVendor': None, 'SDevice': None}
ifpga_class = {'Class': '12', 'Vendor': '8086', 'Device': '0b30','SVendor': None, 'SDevice': None}
encryption_class = {'Class': '10', 'Vendor': None, 'Device': None,'SVendor': None, 'SDevice': None}
intel_processor_class = {'Class': '0b', 'Vendor': '8086', 'Device': None,'SVendor': None, 'SDevice': None}
cavium_sso = {'Class': '08', 'Vendor': '177d', 'Device': 'a04b,a04d','SVendor': None, 'SDevice': None}
cavium_fpa = {'Class': '08', 'Vendor': '177d', 'Device': 'a053','SVendor': None, 'SDevice': None}
cavium_pkx = {'Class': '08', 'Vendor': '177d', 'Device': 'a0dd,a049','SVendor': None, 'SDevice': None}
cavium_tim = {'Class': '08', 'Vendor': '177d', 'Device': 'a051','SVendor': None, 'SDevice': None}
cavium_zip = {'Class': '12', 'Vendor': '177d', 'Device': 'a037','SVendor': None, 'SDevice': None}
avp_vnic = {'Class': '05', 'Vendor': '1af4', 'Device': '1110','SVendor': None, 'SDevice': None}octeontx2_sso = {'Class': '08', 'Vendor': '177d', 'Device': 'a0f9,a0fa','SVendor': None, 'SDevice': None}
octeontx2_npa = {'Class': '08', 'Vendor': '177d', 'Device': 'a0fb,a0fc','SVendor': None, 'SDevice': None}
octeontx2_dma = {'Class': '08', 'Vendor': '177d', 'Device': 'a081','SVendor': None, 'SDevice': None}intel_ioat_bdw = {'Class': '08', 'Vendor': '8086', 'Device': '6f20,6f21,6f22,6f23,6f24,6f25,6f26,6f27,6f2e,6f2f','SVendor': None, 'SDevice': None}
intel_ioat_skx = {'Class': '08', 'Vendor': '8086', 'Device': '2021','SVendor': None, 'SDevice': None}
intel_ntb_skx = {'Class': '06', 'Vendor': '8086', 'Device': '201c','SVendor': None, 'SDevice': None}network_devices = [network_class, cavium_pkx, avp_vnic, ifpga_class]
baseband_devices = [acceleration_class]
crypto_devices = [encryption_class, intel_processor_class]
eventdev这篇关于dpdk uio整体分析及网卡加载的文章就介绍到这儿,希望我们推荐的文章对编程师们有所帮助!


