本文主要是介绍如何使用浔川AI翻译机?——浔川AI社,希望对大家解决编程问题提供一定的参考价值,需要的开发者们随着小编来一起学习吧!
1 前言
对于“如何使用浔川AI翻译机?”这个问题,我们官方 总结出以下结论:
首先:
复制以下代码:
# -*- coding: utf-8 -*-
import tkinter as tk
import tkinter.messagebox
import pickle
import random# 窗口
window = tk.Tk()
window.title('AI翻译登录界面')
window.geometry('450x200')
# 画布放置图片
# canvas=tk.Canvas(window,height=300,width=500)
# imagefile=tk.PhotoImage(file='qm.png')
# image=canvas.create_image(0,0,anchor='nw',image=imagefile)
# canvas.pack(side='top')
# 标签 用户名密码
Verification_Code = random.randint(1000, 9999)#设置一个随机的四位数
Verification_Code = str(Verification_Code)#把类型转换为str型
print(type(Verification_Code))
tk.Label(window, text='用户名:').place(x=100, y=30)
tk.Label(window, text='密码:').place(x=100, y=70)
tk.Label(window, text='验证码').place(x=100, y=110)
tk.Label(window, text=Verification_Code).place(x=320, y=110)
# 用户名输入框
var_usr_name = tk.StringVar()
entry_usr_name = tk.Entry(window, textvariable=var_usr_name)
entry_usr_name.place(x=160, y=30)
# 密码输入框
var_usr_pwd = tk.StringVar()
entry_usr_pwd = tk.Entry(window, textvariable=var_usr_pwd, show='*')
entry_usr_pwd.place(x=160, y=70)
#验证码输入框
var_usr_yzm = tk.StringVar()
entry_usr_yzm = tk.Entry(window, textvariable=var_usr_yzm)
entry_usr_yzm.place(x=160, y=110)# 登录函数
def usr_log_in():# 输入框获取用户名密码usr_name = var_usr_name.get()usr_pwd = var_usr_pwd.get()usr_yzm = var_usr_yzm.get()#测试类型print(type(usr_yzm),type(Verification_Code))# 从本地字典获取用户信息,如果没有则新建本地数据库try:with open('usr_info.pickle', 'rb') as usr_file:usrs_info = pickle.load(usr_file)except FileNotFoundError:with open('usr_info.pickle', 'wb') as usr_file:usrs_info = {'admin': 'admin'}pickle.dump(usrs_info, usr_file)# 判断验证码是否正确用户名和密码是否匹配if usr_yzm == Verification_Code:if usr_name in usrs_info:if usr_pwd == usrs_info[usr_name]:tk.messagebox.showinfo(title='welcome',message='欢迎您:' + usr_name)else:tk.messagebox.showerror(message='密码错误')# 用户名密码不能为空elif usr_name == '' or usr_pwd == '':tk.messagebox.showerror(message='用户名或密码为空')# 不在数据库中弹出是否注册的框else:is_signup = tk.messagebox.askyesno('欢迎', '您还没有注册,是否现在注册')if is_signup:usr_sign_up()elif usr_yzm == '':tk.messagebox.showerror(message='验证码不能为空')else:tk.messagebox.showerror(message='验证码有误!')# 注册函数
def usr_sign_up():# 确认注册时的相应函数def signtowcg():# 获取输入框内的内容nn = new_name.get()np = new_pwd.get()npf = new_pwd_confirm.get()# 本地加载已有用户信息,如果没有则已有用户信息为空try:with open('usr_info.pickle', 'rb') as usr_file:exist_usr_info = pickle.load(usr_file)except FileNotFoundError:exist_usr_info = {}# 检查用户名存在、密码为空、密码前后不一致if nn in exist_usr_info:tk.messagebox.showerror('错误', '用户名已存在')elif np == '' or nn == '':tk.messagebox.showerror('错误', '用户名或密码为空')elif np != npf:tk.messagebox.showerror('错误', '密码前后不一致')# 注册信息没有问题则将用户名密码写入数据库else:exist_usr_info[nn] = npwith open('usr_info.pickle', 'wb') as usr_file:pickle.dump(exist_usr_info, usr_file)tk.messagebox.showinfo('欢迎', '注册成功')# 注册成功关闭注册框window_sign_up.destroy()# 新建注册界面window_sign_up = tk.Toplevel(window)window_sign_up.geometry('350x200')window_sign_up.title('注册')# 用户名变量及标签、输入框new_name = tk.StringVar()tk.Label(window_sign_up, text='用户名:').place(x=10, y=10)tk.Entry(window_sign_up, textvariable=new_name).place(x=150, y=10)# 密码变量及标签、输入框new_pwd = tk.StringVar()tk.Label(window_sign_up, text='请输入密码:').place(x=10, y=50)tk.Entry(window_sign_up, textvariable=new_pwd, show='*').place(x=150, y=50)# 重复密码变量及标签、输入框new_pwd_confirm = tk.StringVar()tk.Label(window_sign_up, text='请再次输入密码:').place(x=10, y=90)tk.Entry(window_sign_up, textvariable=new_pwd_confirm, show='*').place(x=150, y=90)# 确认注册按钮及位置bt_confirm_sign_up = tk.Button(window_sign_up, text='确认注册',command=signtowcg)bt_confirm_sign_up.place(x=150, y=130)# 退出的函数
def usr_sign_quit():window.destroy()# 登录 注册按钮
bt_login = tk.Button(window, text='登录', command=usr_log_in)
bt_login.place(x=140, y=150)
bt_logup = tk.Button(window, text='注册', command=usr_sign_up)
bt_logup.place(x=210, y=150)
bt_logquit = tk.Button(window, text='退出', command=usr_sign_quit)
bt_logquit.place(x=280, y=150)
# 主循环
window.mainloop()from tkinter import *
from tkinter import messagebox
import http.client
import hashlib
import json
import urllib.parse
import random# 创建窗口
root = Tk()
# 标题
root.title('AI翻译2.0')
# 窗口大小
root.geometry('370x200')
# 获取屏幕宽
s_with = root.winfo_screenwidth()
# 获取屏幕高度
s_height = root.winfo_screenheight()# 计算页面打开在屏幕中央的位置
l_x = str(round((s_with - 370) / 2))
l_y = str(round((s_height - 100) / 2))
root.geometry('+' + l_x + '+' + l_y)# add by 0730
def setRadio1():root.title("汉译英")print(v.get())
def setRadio2():root.title("英译汉")print(v.get())#可以通过传入特定参数直接和一个程序变量绑定, 这些参数包括: variable, textvariable, onvalue, offvalue, value.
v = IntVar() #保存一个整型变量, 默认值为0
radio1=Radiobutton(root,text="汉译英",variable=v,value=1,command=setRadio1)
radio1.grid()
# 输入控件
entry = Entry(root, font=('微软雅黑', 15))
# entry.grid(row=0, column=1)
radio2=Radiobutton(root,text="英译汉",variable=v,value=2,command=setRadio2)
radio2.grid()
entry = Entry(root, font=('微软雅黑', 15))
# entry.grid(row=0, column=2)
# 第一列标签
lable = Label(root, text='请输入内容:')
# 定位布局 grid网格式布局 pack包 place位置
lable.grid()
# 输入控件
entry = Entry(root, font=('微软雅黑', 15))
entry.grid(row=2, column=1)
res = StringVar() # 保存一个 string 类型变量, 默认值为""# 翻译结果标签
lable1 = Label(root, text='翻译结果:')
lable1.grid(row=3, column=0)
# 翻译结果输入框
entry1 = Entry(root, font=('微软雅黑', 15), textvariable=res)
entry1.grid(row=3, column=1)
def baidu_translate():#获取界面输入的内容content = entry.get().strip()# content = content.strip()# 判断输入翻译的内容是否为空if content == '':messagebox.showinfo('提示', '请输入翻译内容')else:appid = '20151113000005349'secretKey = 'osubCEzlGjzvw8qdQc41'# httpClient = Nonemyurl = '/api/trans/vip/translate'q = contentfromLang = 'zh'  # 源语言toLang = 'en'  # 翻译后的语言salt = random.randint(32768, 65536)sign = appid + q + str(salt) + secretKeysign = hashlib.md5(sign.encode()).hexdigest()#作为十六进制数据字符串值if(v.get()==1):myurl = myurl + '?appid=' + appid + '&q=' + urllib.parse.quote(q) + '&from=' + fromLang + '&to=' + toLang + '&salt=' + str(salt) + '&sign=' + signelse:myurl = myurl + '?appid=' + appid + '&q=' + urllib.parse.quote(q) + '&from=' + toLang + '&to=' + fromLang + '&salt=' + str(salt) + '&sign=' + signtry:httpClient = http.client.HTTPConnection('api.fanyi.baidu.com')httpClient.request('GET', myurl)response = httpClient.getresponse()# response是HTTPResponse对象jsonResponse = response.read().decode("utf-8")  # 获得返回的结果,结果为json格式js = json.loads(jsonResponse)  # 将json格式的结果转换字典结构print(js)dst = str(js["trans_result"][0]["dst"])  # 取得翻译后的文本结果print(dst)  # 打印结果# return dstres.set(dst)except Exception as e:print('err:' + str(e))finally:if httpClient:httpClient.close()
# 按钮
button = Button(root, text='翻译', width='10', command=baidu_translate)
# sticky 对齐方式 N S W E 上下左右
button.grid(row=4, column=0, sticky=W)# 退出按钮 command是点击事件的方法
exit_button = Button(root, text='退出', width='10', command=root.quit)
exit_button.grid(row=4, column=1, sticky=E)# 显示窗口 消息循环 接收对窗口的所有操作的消息
# 主事件循环
root.mainloop()
在python中运行该代码,运行结果如下:

2 需要登录
2.1 需注意:如果是未注册用户,系统会提示用户先注册在登录。如是已注册用户,可以直接登录。
2.2 验证码就填写后面的数字。注意:注册完成后,验证码会改动。
3 AI翻译机
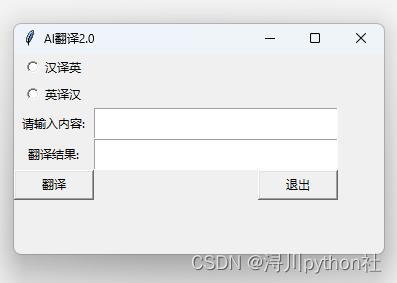
登录完成后,点击‘退出’即可显示AI翻译机2.0翻译页面。
4 总结
以上就是所有使用浔川AI翻译机的步骤。
这篇关于如何使用浔川AI翻译机?——浔川AI社的文章就介绍到这儿,希望我们推荐的文章对编程师们有所帮助!


