本文主要是介绍【B站 heima】小兔鲜Vue3 项目学习笔记 Day06,希望对大家解决编程问题提供一定的参考价值,需要的开发者们随着小编来一起学习吧!
文章目录
- 购物车本地
- 1. 列表购物车基础数据渲染
- 2. 列表购物车单选功能
- 3. 列表购物车全选功能
- 4. 列表购物车统计列表实现
- 5. 接口-加入购物车
- 6. 接口-删除购物车
- 7. 退出登录-清空购物车数据
- 8. 合并购物车到服务器(重要)
- 结算
- 1. 路由配置和基础数据渲染
- 2. 地址切换-打开弹框交互实现
- 3. 切换地址-地址激活交互实现
- 4. 生成订单功能实现
- 支付
- 1. 渲染基础数据
- 2. 实现支付功能
- 3. 支付结果展示
- 4. 封装倒计数函数
- 小结
购物车本地
1. 列表购物车基础数据渲染
- 模板
views/CartList/index.vue
<script setup>
const cartList = []
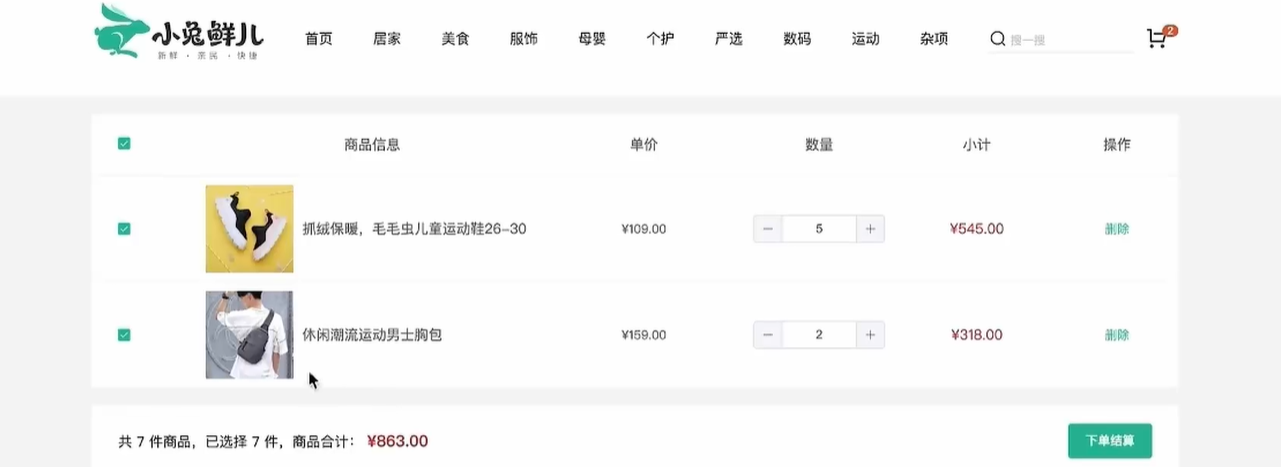
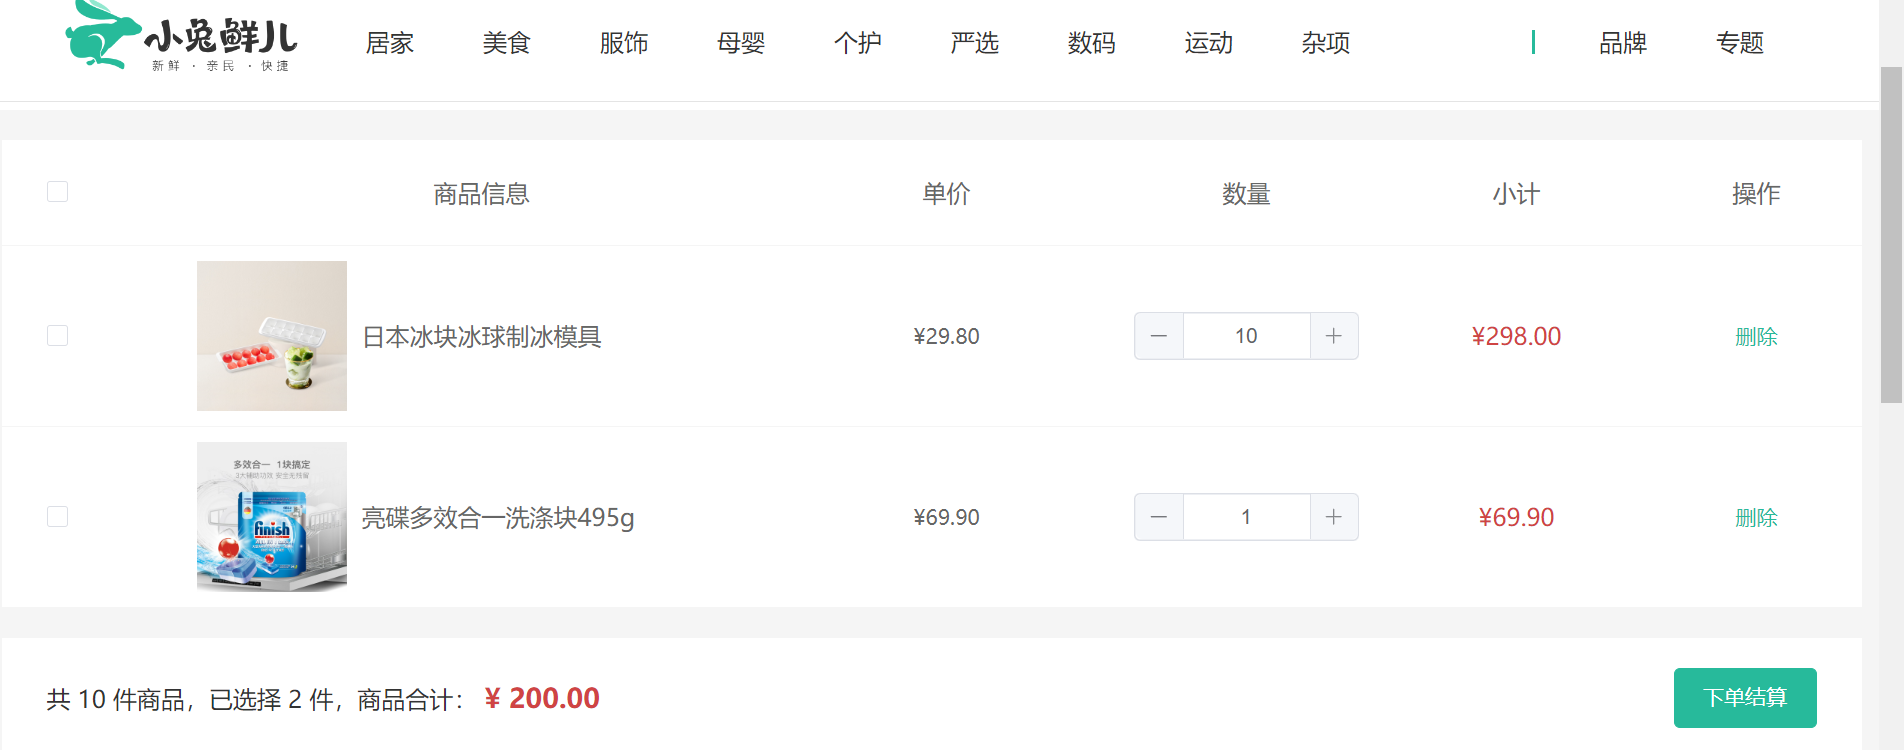
</script><template><div class="xtx-cart-page"><div class="container m-top-20"><div class="cart"><table><thead><tr><th width="120"><el-checkbox/></th><th width="400">商品信息</th><th width="220">单价</th><th width="180">数量</th><th width="180">小计</th><th width="140">操作</th></tr></thead><!-- 商品列表 --><tbody><tr v-for="i in cartList" :key="i.id"><td><el-checkbox /></td><td><div class="goods"><RouterLink to="/"><img :src="i.picture" alt="" /></RouterLink><div><p class="name ellipsis">{{ i.name }}</p></div></div></td><td class="tc"><p>¥{{ i.price }}</p></td><td class="tc"><el-input-number v-model="i.count" /></td><td class="tc"><p class="f16 red">¥{{ (i.price * i.count).toFixed(2) }}</p></td><td class="tc"><p><el-popconfirm title="确认删除吗?" confirm-button-text="确认" cancel-button-text="取消" @confirm="delCart(i)"><template #reference><a href="javascript:;">删除</a></template></el-popconfirm></p></td></tr><tr v-if="cartList.length === 0"><td colspan="6"><div class="cart-none"><el-empty description="购物车列表为空"><el-button type="primary">随便逛逛</el-button></el-empty></div></td></tr></tbody></table></div><!-- 操作栏 --><div class="action"><div class="batch">共 10 件商品,已选择 2 件,商品合计:<span class="red">¥ 200.00 </span></div><div class="total"><el-button size="large" type="primary" >下单结算</el-button></div></div></div></div>
</template><style scoped lang="scss">
.xtx-cart-page {margin-top: 20px;.cart {background: #fff;color: #666;table {border-spacing: 0;border-collapse: collapse;line-height: 24px;th,td {padding: 10px;border-bottom: 1px solid #f5f5f5;&:first-child {text-align: left;padding-left: 30px;color: #999;}}th {font-size: 16px;font-weight: normal;line-height: 50px;}}}.cart-none {text-align: center;padding: 120px 0;background: #fff;p {color: #999;padding: 20px 0;}}.tc {text-align: center;a {color: $xtxColor;}.xtx-numbox {margin: 0 auto;width: 120px;}}.red {color: $priceColor;}.green {color: $xtxColor;}.f16 {font-size: 16px;}.goods {display: flex;align-items: center;img {width: 100px;height: 100px;}>div {width: 280px;font-size: 16px;padding-left: 10px;.attr {font-size: 14px;color: #999;}}}.action {display: flex;background: #fff;margin-top: 20px;height: 80px;align-items: center;font-size: 16px;justify-content: space-between;padding: 0 30px;.xtx-checkbox {color: #999;}.batch {a {margin-left: 20px;}}.red {font-size: 18px;margin-right: 20px;font-weight: bold;}}.tit {color: #666;font-size: 16px;font-weight: normal;line-height: 50px;}}
</style>
- 绑定路由,二级路由,测试可用
{path: 'cartlist',component: CartList
}
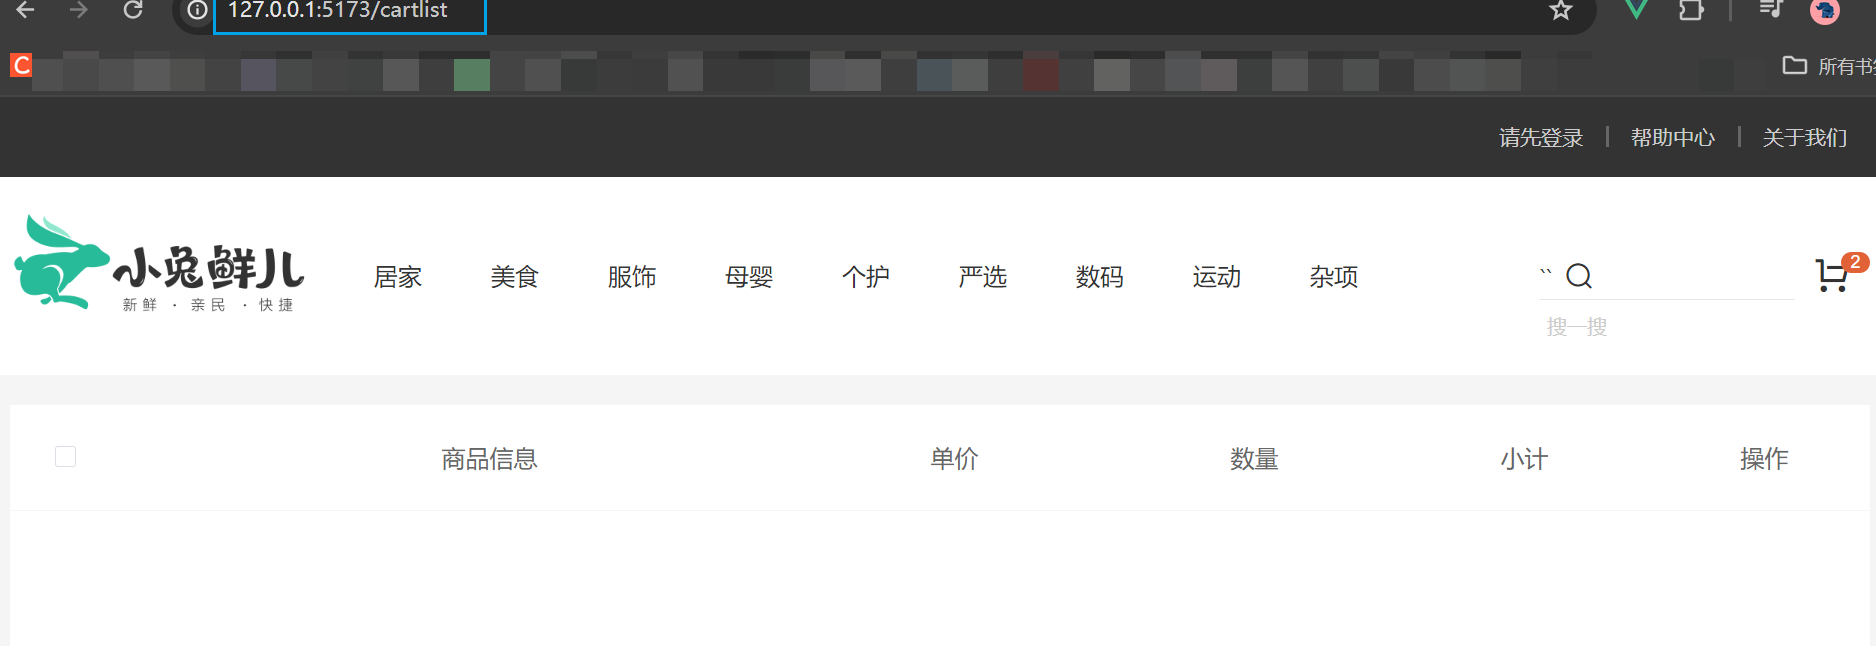
头部购物车点击 购物车结算 按钮,跳转到这个页面
<el-button size="large" type="primary" @click="$router.push('/cartlist')">去购物车结算</el-button>
- 渲染列表
<!--cartLsit/index.vue-->
<script setup>
// const cartList = []
import { useCartStore } from '@/stores/cartStore';
const cartStore = useCartStore()
</script><template><div class="xtx-cart-page"><div class="container m-top-20"><div class="cart"><table><thead><tr><th width="120"><el-checkbox /></th><th width="400">商品信息</th><th width="220">单价</th><th width="180">数量</th><th width="180">小计</th><th width="140">操作</th></tr></thead><!-- 商品列表 --><tbody><tr v-for="i in cartStore.cartList" :key="i.id"><td><el-checkbox /></td><td><div class="goods"><RouterLink to="/"><img :src="i.picture" alt="" /></RouterLink><div><p class="name ellipsis">{{ i.name }}</p></div></div></td><td class="tc"><p>¥{{ i.price }}</p></td><td class="tc"><el-input-number v-model="i.count" /></td><td class="tc"><p class="f16 red">¥{{ (i.price * i.count).toFixed(2) }}</p></td><td class="tc"><p><el-popconfirm title="确认删除吗?" confirm-button-text="确认" cancel-button-text="取消"@confirm="delCart(i)"><template #reference><a href="javascript:;">删除</a></template></el-popconfirm></p></td></tr><tr v-if="cartStore.cartList.length === 0"><td colspan="6"><div class="cart-none"><el-empty description="购物车列表为空"><el-button type="primary">随便逛逛</el-button></el-empty></div></td></tr></tbody></table></div><!-- 操作栏 --><div class="action"><div class="batch">共 10 件商品,已选择 2 件,商品合计:<span class="red">¥ 200.00 </span></div><div class="total"><el-button size="large" type="primary">下单结算</el-button></div></div></div></div>
</template><style scoped lang="scss">
.xtx-cart-page {margin-top: 20px;.cart {background: #fff;color: #666;table {border-spacing: 0;border-collapse: collapse;line-height: 24px;th,td {padding: 10px;border-bottom: 1px solid #f5f5f5;&:first-child {text-align: left;padding-left: 30px;color: #999;}}th {font-size: 16px;font-weight: normal;line-height: 50px;}}}.cart-none {text-align: center;padding: 120px 0;background: #fff;p {color: #999;padding: 20px 0;}}.tc {text-align: center;a {color: $xtxColor;}.xtx-numbox {margin: 0 auto;width: 120px;}}.red {color: $priceColor;}.green {color: $xtxColor;}.f16 {font-size: 16px;}.goods {display: flex;align-items: center;img {width: 100px;height: 100px;}>div {width: 280px;font-size: 16px;padding-left: 10px;.attr {font-size: 14px;color: #999;}}}.action {display: flex;background: #fff;margin-top: 20px;height: 80px;align-items: center;font-size: 16px;justify-content: space-between;padding: 0 30px;.xtx-checkbox {color: #999;}.batch {a {margin-left: 20px;}}.red {font-size: 18px;margin-right: 20px;font-weight: bold;}}.tit {color: #666;font-size: 16px;font-weight: normal;line-height: 50px;}}
</style>
2. 列表购物车单选功能
核心思路:单选的核心思路就是始终把单选框的状态和Pinia中store对应的状态保持同步
注意事项: v-model双向绑定指令不方便进行命令式的操作(因为后续还需要调用接口),所以把v-model回退到一般模式,也就是:model-value 和 @change 的配合实现
// 单选功能
const singleCheck = (skuId, selected) => {// 通过skuId找到要修改的那一项 然后把它的selected修改为传过来的selectedconst item = cartList.value.find((item) => item.skuId === skuId)item.selected = selected
}
<!--cartList/index.vue-->
<script setup>
// 单选回调
const singleCheck = (i, selected) => {console.log(i, selected)// store cartList 数组 无法知道要修改谁的选中状态?// 除了selected补充一个用来筛选的参数 - skuIdcartStore.singleCheck(i.skuId, selected)
}
</script><template><td><!-- 单选框 --><el-checkbox :model-value="i.selected" @change="(selected) => singleCheck(i, selected)" /></td>
</template>
3. 列表购物车全选功能
基础思想:
-
全选状态决定单选框状态 - 遍历
cartList把每一项的selected都设置为何全选框状态一致 -
单选框状态决定全选状态 - 只有所有单选框的
selected都为true, 全选框才为true
// 全选功能action
const allCheck = (selected) => {// 把cartList中的每一项的selected都设置为当前的全选框状态cartList.value.forEach(item => item.selected = selected)
}// 是否全选计算属性
const isAll = computed(() => cartList.value.every((item) => item.selected))
<script setup>
const allCheck = (selected) => {cartStore.allCheck(selected)
}</script><template><!-- 全选框 --><el-checkbox :model-value="cartStore.isAll" @change="allCheck" />
</template>
4. 列表购物车统计列表实现
下面的价格/件数,与之前计算的同理同理
// 3. 已选择数量
const selectedCount = computed(() => cartList.value.filter(item => item.selected).reduce((a, c) => a + c.count, 0))
// 4. 已选择商品价钱合计
const selectedPrice = computed(() => cartList.value.filter(item => item.selected).reduce((a, c) => a + c.count * c.price, 0))
 <div class="batch">共 {{ cartStore.allCount }} 件商品,已选择 {{ cartStore.selectedCount }} 件,商品合计:<span class="red">¥ {{ cartStore.selectedPrice }} </span>
</div>
5. 接口-加入购物车
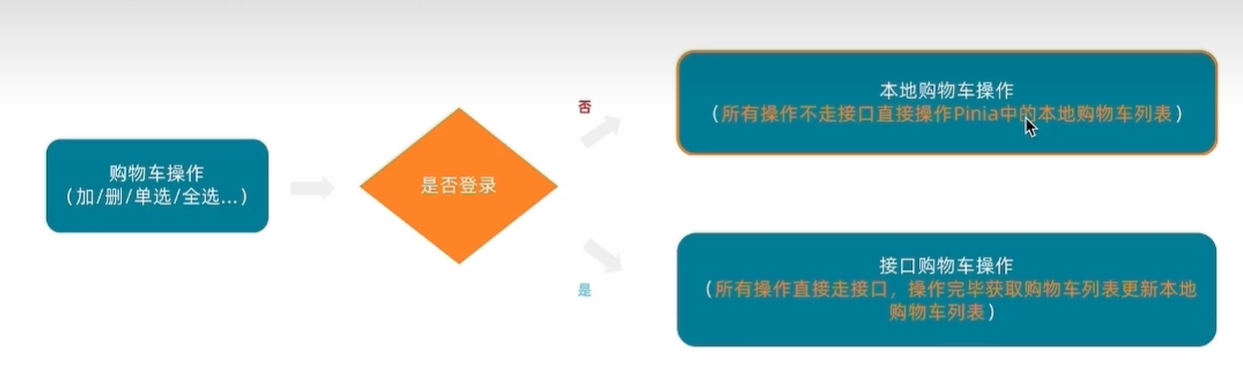
步骤:
- 找到加入购物车
addCart的action,判断是否是登录状态(看token)
- 封装调用加入购物车接口
apis新增cart.js、
import httpInstance from "@/utils/http"//加入购物车
export const insertCartAPI = ({ skuId, count }) => {return httpInstance({url: '/member/cart',method: 'POST',data: {skuId,count}})
}//获取最新的购物车列表
export const findNewCartListAPI = () => {return httpInstance({url: '/member/cart'})
}
-
封装调用获取购物车列表接口
-
用接口购物车列表去覆盖本地购物车列表
// 封装购物车模块import { defineStore } from 'pinia'
import { ref } from 'vue'
import { computed } from 'vue'
import { useUserStore } from './user'
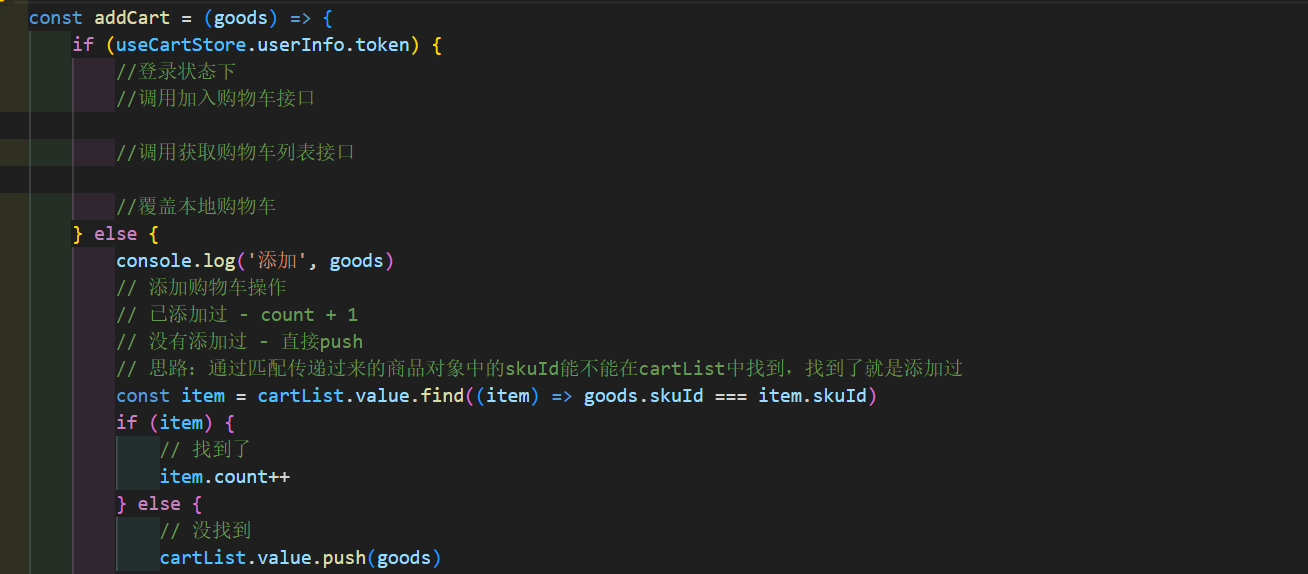
import { insertCartAPI, findNewCartListAPI } from '@/apis/cart.js'export const useCartStore = defineStore('cart', () => {const userStore = useUserStore()//用computed映射一下token,方便数据转换,响应式更新const isLogin = computed(() => userStore.userInfo.token)// 1. 定义state - cartList购物车列表const cartList = ref([])// 2. 定义action - addCart添加购物车const addCart = async (goods) => {//解构出来const { skuId, count } = goodsif (isLogin.value) {//登录状态下//调用加入购物车接口await insertCartAPI({ skuId, count })//调用获取购物车列表接口const res = await findNewCartListAPI()//覆盖本地购物车cartList.value = res.result} else {console.log('添加', goods)// 添加购物车操作// 已添加过 - count + 1// 没有添加过 - 直接push// 思路:通过匹配传递过来的商品对象中的skuId能不能在cartList中找到,找到了就是添加过const item = cartList.value.find((item) => goods.skuId === item.skuId)if (item) {// 找到了item.count++} else {// 没找到cartList.value.push(goods)}}}// 删除购物车const delCart = async (skuId) => {// 思路:// 1. 找到要删除项的下标值 - splice// 2. 使用数组的过滤方法 - filterconst idx = cartList.value.findIndex((item) => skuId === item.skuId)cartList.value.splice(idx, 1)}// 单选功能const singleCheck = (skuId, selected) => {// 通过skuId找到要修改的那一项 然后把它的selected修改为传过来的selectedconst item = cartList.value.find((item) => item.skuId === skuId)item.selected = selected}// 全选功能actionconst allCheck = (selected) => {// 把cartList中的每一项的selected都设置为当前的全选框状态cartList.value.forEach(item => item.selected = selected)}// 是否全选计算属性const isAll = computed(() => cartList.value.every((item) => item.selected))//计算购物车件数和总价格//总数const allCount = computed(() => cartList.value.reduce((a, c) => a + c.count, 0))//总价const allPrice = computed(() => cartList.value.reduce((a, c) => a + c.count * c.price, 0))// 3. 已选择数量const selectedCount = computed(() => cartList.value.filter(item => item.selected).reduce((a, c) => a + c.count, 0))// 4. 已选择商品价钱合计const selectedPrice = computed(() => cartList.value.filter(item => item.selected).reduce((a, c) => a + c.count * c.price, 0))return {cartList,allCount,allPrice,selectedCount,selectedPrice,addCart,delCart,singleCheck,allCheck}
}, {persist: true,
})
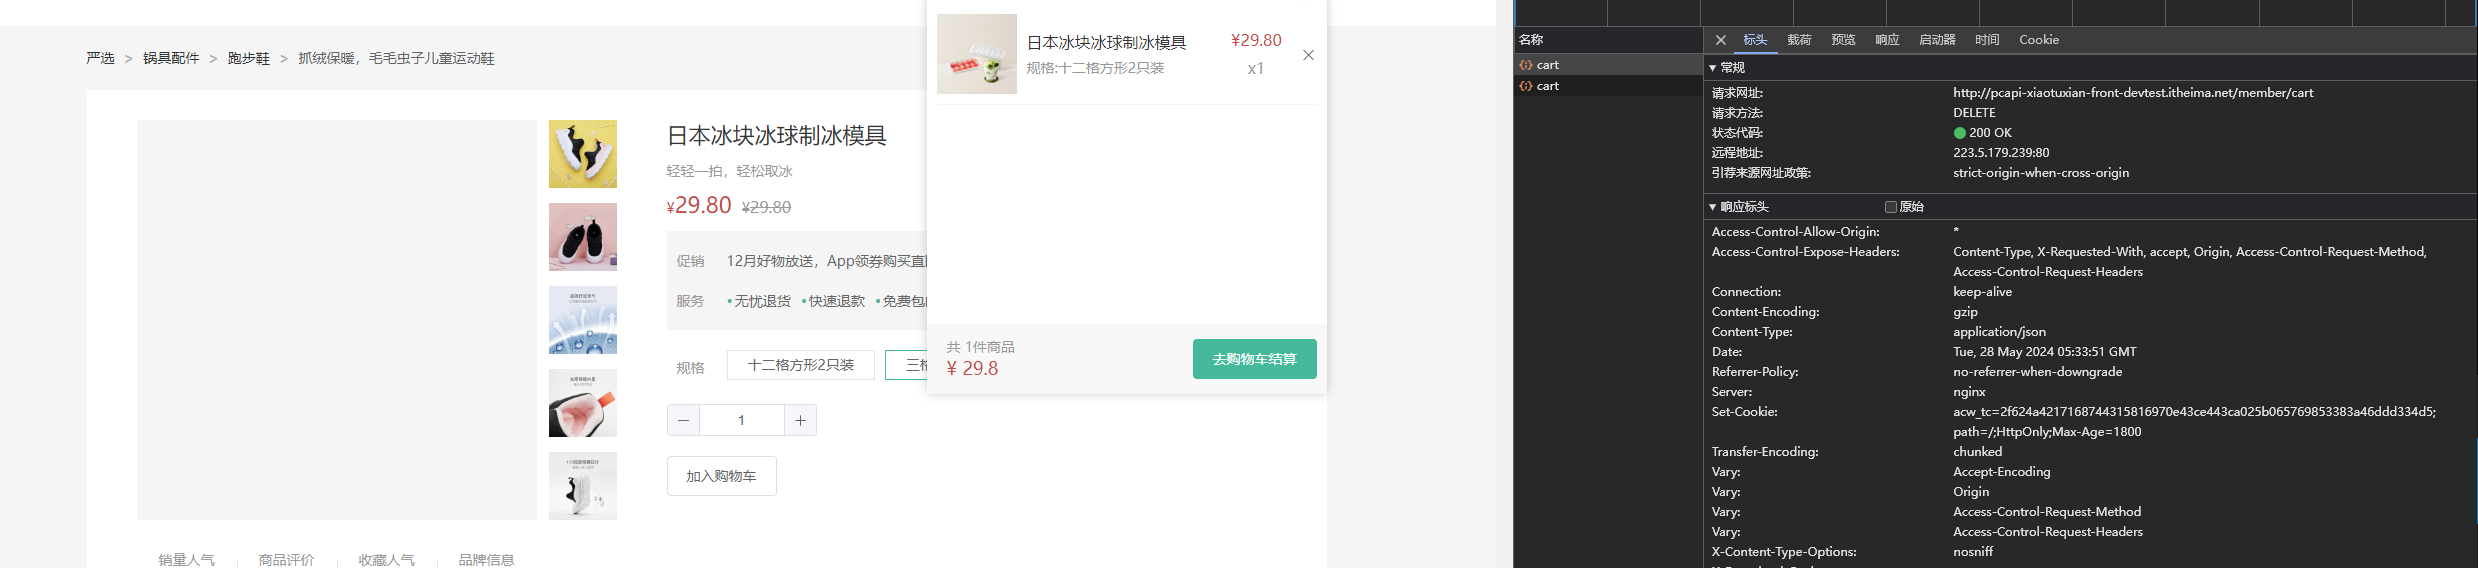
6. 接口-删除购物车
思路和 加入购物车 类似
封装接口
// 删除购物车
export const delCartAPI = (ids) => {return httpInstance({url: '/member/cart',method: 'DELETE',data: {ids}})
}
书写逻辑
// 删除购物车const delCart = async (skuId) => {if (isLogin.value) {// 调用接口实现接口购物车中的删除功能await delCartAPI([skuId])//调用获取购物车列表接口const res = await findNewCartListAPI()//覆盖本地购物车cartList.value = res.result} else {// 思路:// 1. 找到要删除项的下标值 - splice// 2. 使用数组的过滤方法 - filterconst idx = cartList.value.findIndex((item) => skuId === item.skuId)cartList.value.splice(idx, 1)}}
-
优化
由于更新列表都需要重复使用下面两行代码,我们抽象成一个
action函数方便使用(虽然就两行代码,但我们学习的是这种思想,有些公司就对于代码的重复度有要求。)
//获取最新的购物车列表const updateNewList = async () => {//调用获取购物车列表接口const res = await findNewCartListAPI()//覆盖本地购物车cartList.value = res.result}
使用的时候调用updateNewList就可以了
7. 退出登录-清空购物车数据
- 清除购物车
action,记得return出去
//清空购物车 stores/cartStore.jsconst clearCart = () => {cartList = []}
- 退出登录时清除购物车
//退出登录,数据清空 stores/user.jsconst clearData = () => {//用户数据清空userInfo.value = {}//购物车清空cartStore.clearCart()}
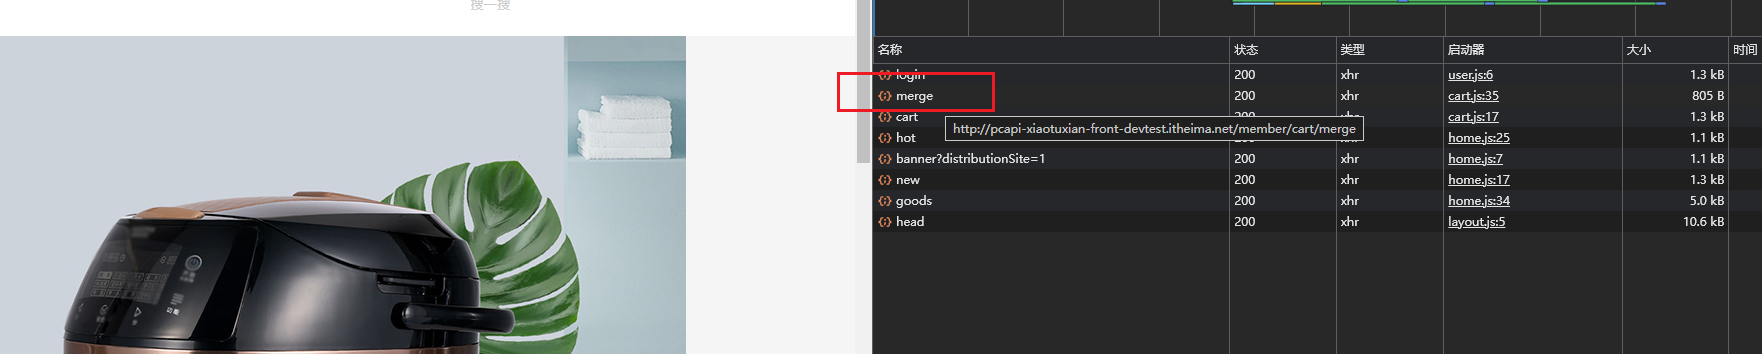
8. 合并购物车到服务器(重要)
目的是让用户在非登录状态下的行为有效,别白操作一顿
- 登录时调用合并购物车接口
//合并购物车    apis/cart.js
export const mergeCartAPI = (data) => {return httpInstance({url: '/member/cart/merge',method: 'post',data})
}
//stores/user.js
//合并购物车的操作 根据现有数组经过映射得到一个全新的数组使用mapmergeCartAPI(cartStore.cartList.map(item => {return {skuId: item.skuId,selected: item.selected,count: item.count}}))
-
获取最新的购物车列表
-
覆盖本地购物车列表
cartStore.updateNewList()
如何测试?非登录添加新商品,登录看network的接口有没有merge
结算
1. 路由配置和基础数据渲染
views/Cheakout/index.vue组件模板
<script setup>
const checkInfo = {} // 订单对象
const curAddress = {} // 地址对象</script><template><div class="xtx-pay-checkout-page"><div class="container"><div class="wrapper"><!-- 收货地址 --><h3 class="box-title">收货地址</h3><div class="box-body"><div class="address"><div class="text"><div class="none" v-if="!curAddress">您需要先添加收货地址才可提交订单。</div><ul v-else><li><span>收<i />货<i />人:</span>{{ curAddress.receiver }}</li><li><span>联系方式:</span>{{ curAddress.contact }}</li><li><span>收货地址:</span>{{ curAddress.fullLocation }} {{ curAddress.address }}</li></ul></div><div class="action"><el-button size="large" @click="toggleFlag = true">切换地址</el-button><el-button size="large" @click="addFlag = true">添加地址</el-button></div></div></div><!-- 商品信息 --><h3 class="box-title">商品信息</h3><div class="box-body"><table class="goods"><thead><tr><th width="520">商品信息</th><th width="170">单价</th><th width="170">数量</th><th width="170">小计</th><th width="170">实付</th></tr></thead><tbody><tr v-for="i in checkInfo.goods" :key="i.id"><td><a href="javascript:;" class="info"><img :src="i.picture" alt=""><div class="right"><p>{{ i.name }}</p><p>{{ i.attrsText }}</p></div></a></td><td>¥{{ i.price }}</td><td>{{ i.price }}</td><td>¥{{ i.totalPrice }}</td><td>¥{{ i.totalPayPrice }}</td></tr></tbody></table></div><!-- 配送时间 --><h3 class="box-title">配送时间</h3><div class="box-body"><a class="my-btn active" href="javascript:;">不限送货时间:周一至周日</a><a class="my-btn" href="javascript:;">工作日送货:周一至周五</a><a class="my-btn" href="javascript:;">双休日、假日送货:周六至周日</a></div><!-- 支付方式 --><h3 class="box-title">支付方式</h3><div class="box-body"><a class="my-btn active" href="javascript:;">在线支付</a><a class="my-btn" href="javascript:;">货到付款</a><span style="color:#999">货到付款需付5元手续费</span></div><!-- 金额明细 --><h3 class="box-title">金额明细</h3><div class="box-body"><div class="total"><dl><dt>商品件数:</dt><dd>{{ checkInfo.summary?.goodsCount }}件</dd></dl><dl><dt>商品总价:</dt><dd>¥{{ checkInfo.summary?.totalPrice.toFixed(2) }}</dd></dl><dl><dt>运<i></i>费:</dt><dd>¥{{ checkInfo.summary?.postFee.toFixed(2) }}</dd></dl><dl><dt>应付总额:</dt><dd class="price">{{ checkInfo.summary?.totalPayPrice.toFixed(2) }}</dd></dl></div></div><!-- 提交订单 --><div class="submit"><el-button type="primary" size="large" >提交订单</el-button></div></div></div></div><!-- 切换地址 --><!-- 添加地址 -->
</template><style scoped lang="scss">
.xtx-pay-checkout-page {margin-top: 20px;.wrapper {background: #fff;padding: 0 20px;.box-title {font-size: 16px;font-weight: normal;padding-left: 10px;line-height: 70px;border-bottom: 1px solid #f5f5f5;}.box-body {padding: 20px 0;}}
}.address {border: 1px solid #f5f5f5;display: flex;align-items: center;.text {flex: 1;min-height: 90px;display: flex;align-items: center;.none {line-height: 90px;color: #999;text-align: center;width: 100%;}>ul {flex: 1;padding: 20px;li {line-height: 30px;span {color: #999;margin-right: 5px;>i {width: 0.5em;display: inline-block;}}}}>a {color: $xtxColor;width: 160px;text-align: center;height: 90px;line-height: 90px;border-right: 1px solid #f5f5f5;}}.action {width: 420px;text-align: center;.btn {width: 140px;height: 46px;line-height: 44px;font-size: 14px;&:first-child {margin-right: 10px;}}}
}.goods {width: 100%;border-collapse: collapse;border-spacing: 0;.info {display: flex;text-align: left;img {width: 70px;height: 70px;margin-right: 20px;}.right {line-height: 24px;p {&:last-child {color: #999;}}}}tr {th {background: #f5f5f5;font-weight: normal;}td,th {text-align: center;padding: 20px;border-bottom: 1px solid #f5f5f5;&:first-child {border-left: 1px solid #f5f5f5;}&:last-child {border-right: 1px solid #f5f5f5;}}}
}.my-btn {width: 228px;height: 50px;border: 1px solid #e4e4e4;text-align: center;line-height: 48px;margin-right: 25px;color: #666666;display: inline-block;&.active,&:hover {border-color: $xtxColor;}
}.total {dl {display: flex;justify-content: flex-end;line-height: 50px;dt {i {display: inline-block;width: 2em;}}dd {width: 240px;text-align: right;padding-right: 70px;&.price {font-size: 20px;color: $priceColor;}}}
}.submit {text-align: right;padding: 60px;border-top: 1px solid #f5f5f5;
}.addressWrapper {max-height: 500px;overflow-y: auto;
}.text {flex: 1;min-height: 90px;display: flex;align-items: center;&.item {border: 1px solid #f5f5f5;margin-bottom: 10px;cursor: pointer;&.active,&:hover {border-color: $xtxColor;background: lighten($xtxColor, 50%);}>ul {padding: 10px;font-size: 14px;line-height: 30px;}}
}
</style>
- 配置路由,引入组件配置二级路由
{path: 'checkout',component: Checkout
},
- 给按钮绑定事件,实现跳转
<el-button size="large" type="primary" @click="$router.push('/checkout')">下单结算</el-button>
- 封装接口
apis/checkout.js
import httpInstance from "@/utils/http";//获取结算信息
export const getCheckoutInfoAPI = () => {return httpInstance({url: '/member/order/pre'})
}
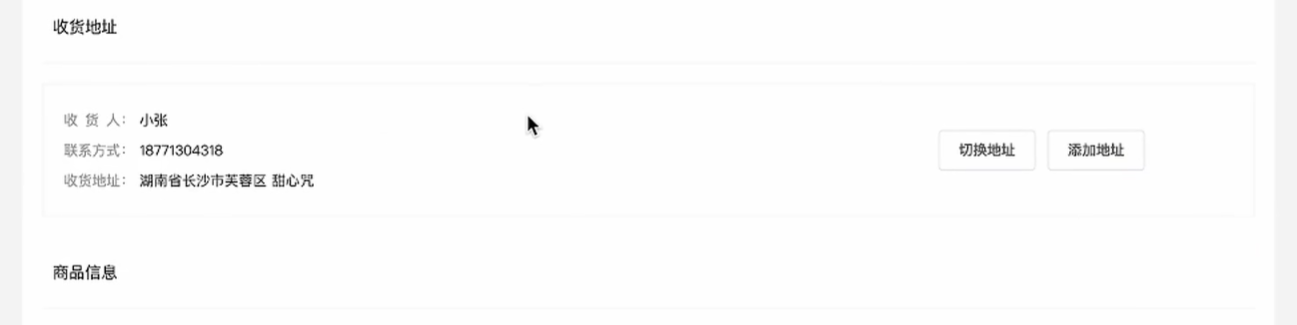
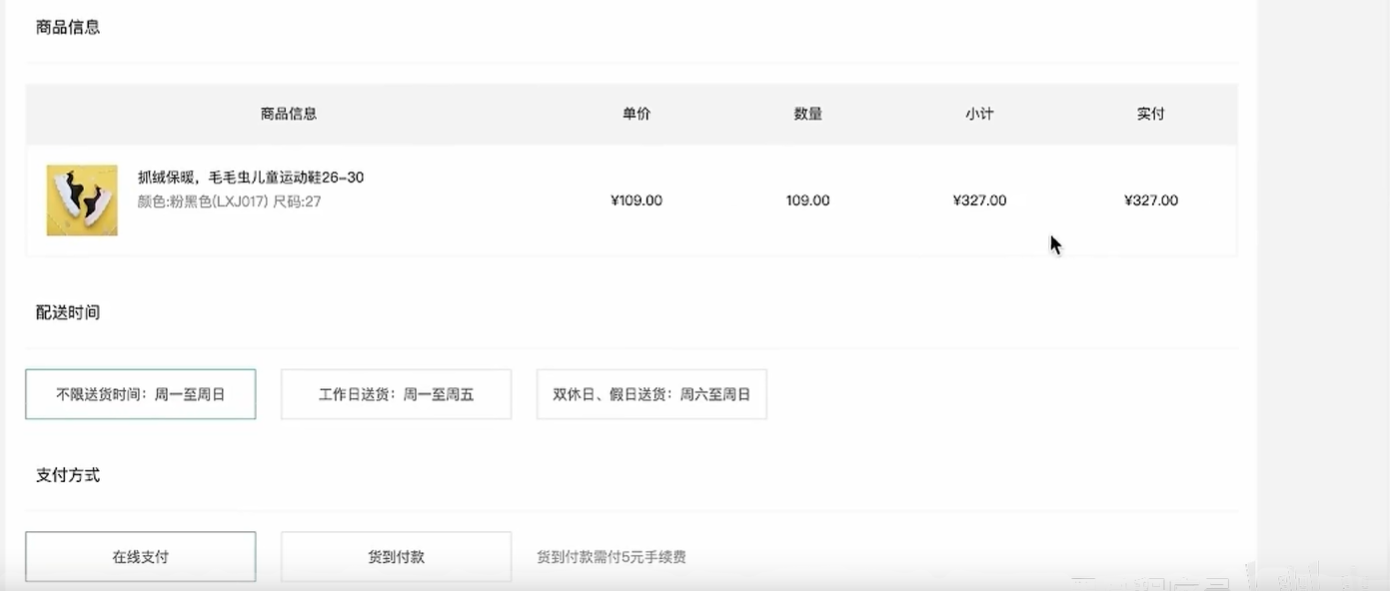
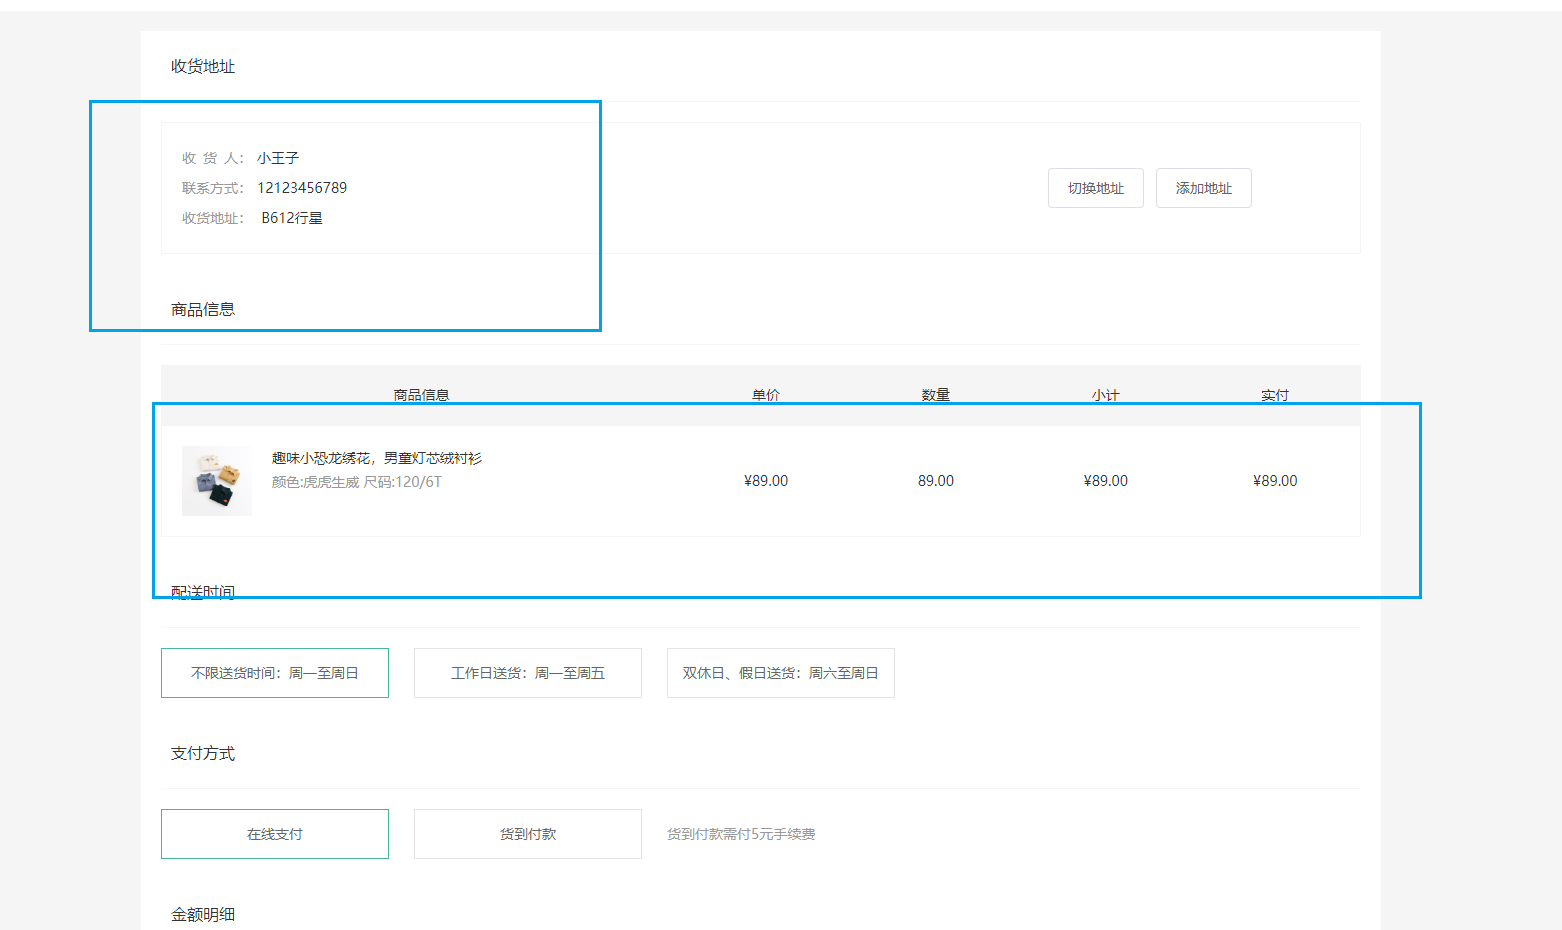
- 获取数据,渲染数据(默认地址、商品列表、统计数据)
<!-- 订单页 -->
<script setup>
import { getCheckoutInfoAPI } from '@/apis/checkout.js'
import { onMounted, ref } from 'vue'
const checkInfo = ref({}) // 订单对象
const curAddress = ref({}) // 地址对象
const getCheckoutInfo = async () => {//获取结算数据const res = await getCheckoutInfoAPI()console.log(res)checkInfo.value = res.result//适配默认地址,根据isDefault === 0筛选,使用filter或find筛选都可以const item = checkInfo.value.userAddresses.find(item => item.isDefault === 0)curAddress.value = item
}
onMounted(() => getCheckoutInfo())
</script><template><div class="xtx-pay-checkout-page"><div class="container"><div class="wrapper"><!-- 收货地址 --><h3 class="box-title">收货地址</h3><div class="box-body"><div class="address"><div class="text"><div class="none" v-if="!curAddress">您需要先添加收货地址才可提交订单。</div><ul v-else><li><span>收<i />货<i />人:</span>{{ curAddress.receiver }}</li><li><span>联系方式:</span>{{ curAddress.contact }}</li><li><span>收货地址:</span>{{ curAddress.fullLocation }} {{ curAddress.address }}</li></ul></div><div class="action"><el-button size="large" @click="toggleFlag = true">切换地址</el-button><el-button size="large" @click="addFlag = true">添加地址</el-button></div></div></div><!-- 商品信息 --><h3 class="box-title">商品信息</h3><div class="box-body"><table class="goods"><thead><tr><th width="520">商品信息</th><th width="170">单价</th><th width="170">数量</th><th width="170">小计</th><th width="170">实付</th></tr></thead><tbody><tr v-for="i in checkInfo.goods" :key="i.id"><td><a href="javascript:;" class="info"><img :src="i.picture" alt=""><div class="right"><p>{{ i.name }}</p><p>{{ i.attrsText }}</p></div></a></td><td>¥{{ i.price }}</td><td>{{ i.price }}</td><td>¥{{ i.totalPrice }}</td><td>¥{{ i.totalPayPrice }}</td></tr></tbody></table></div><!-- 配送时间 --><h3 class="box-title">配送时间</h3><div class="box-body"><a class="my-btn active" href="javascript:;">不限送货时间:周一至周日</a><a class="my-btn" href="javascript:;">工作日送货:周一至周五</a><a class="my-btn" href="javascript:;">双休日、假日送货:周六至周日</a></div><!-- 支付方式 --><h3 class="box-title">支付方式</h3><div class="box-body"><a class="my-btn active" href="javascript:;">在线支付</a><a class="my-btn" href="javascript:;">货到付款</a><span style="color:#999">货到付款需付5元手续费</span></div><!-- 金额明细 --><h3 class="box-title">金额明细</h3><div class="box-body"><div class="total"><dl><dt>商品件数:</dt><dd>{{ checkInfo.summary?.goodsCount }}件</dd></dl><dl><dt>商品总价:</dt><dd>¥{{ checkInfo.summary?.totalPrice.toFixed(2) }}</dd></dl><dl><dt>运<i></i>费:</dt><dd>¥{{ checkInfo.summary?.postFee.toFixed(2) }}</dd></dl><dl><dt>应付总额:</dt><dd class="price">{{ checkInfo.summary?.totalPayPrice.toFixed(2) }}</dd></dl></div></div><!-- 提交订单 --><div class="submit"><el-button type="primary" size="large">提交订单</el-button></div></div></div></div><!-- 切换地址 --><!-- 添加地址 -->
</template><style scoped lang="scss">
.xtx-pay-checkout-page {margin-top: 20px;.wrapper {background: #fff;padding: 0 20px;.box-title {font-size: 16px;font-weight: normal;padding-left: 10px;line-height: 70px;border-bottom: 1px solid #f5f5f5;}.box-body {padding: 20px 0;}}
}.address {border: 1px solid #f5f5f5;display: flex;align-items: center;.text {flex: 1;min-height: 90px;display: flex;align-items: center;.none {line-height: 90px;color: #999;text-align: center;width: 100%;}>ul {flex: 1;padding: 20px;li {line-height: 30px;span {color: #999;margin-right: 5px;>i {width: 0.5em;display: inline-block;}}}}>a {color: $xtxColor;width: 160px;text-align: center;height: 90px;line-height: 90px;border-right: 1px solid #f5f5f5;}}.action {width: 420px;text-align: center;.btn {width: 140px;height: 46px;line-height: 44px;font-size: 14px;&:first-child {margin-right: 10px;}}}
}.goods {width: 100%;border-collapse: collapse;border-spacing: 0;.info {display: flex;text-align: left;img {width: 70px;height: 70px;margin-right: 20px;}.right {line-height: 24px;p {&:last-child {color: #999;}}}}tr {th {background: #f5f5f5;font-weight: normal;}td,th {text-align: center;padding: 20px;border-bottom: 1px solid #f5f5f5;&:first-child {border-left: 1px solid #f5f5f5;}&:last-child {border-right: 1px solid #f5f5f5;}}}
}.my-btn {width: 228px;height: 50px;border: 1px solid #e4e4e4;text-align: center;line-height: 48px;margin-right: 25px;color: #666666;display: inline-block;&.active,&:hover {border-color: $xtxColor;}
}.total {dl {display: flex;justify-content: flex-end;line-height: 50px;dt {i {display: inline-block;width: 2em;}}dd {width: 240px;text-align: right;padding-right: 70px;&.price {font-size: 20px;color: $priceColor;}}}
}.submit {text-align: right;padding: 60px;border-top: 1px solid #f5f5f5;
}.addressWrapper {max-height: 500px;overflow-y: auto;
}.text {flex: 1;min-height: 90px;display: flex;align-items: center;&.item {border: 1px solid #f5f5f5;margin-bottom: 10px;cursor: pointer;&.active,&:hover {border-color: $xtxColor;background: lighten($xtxColor, 50%);}>ul {padding: 10px;font-size: 14px;line-height: 30px;}}
}
</style>
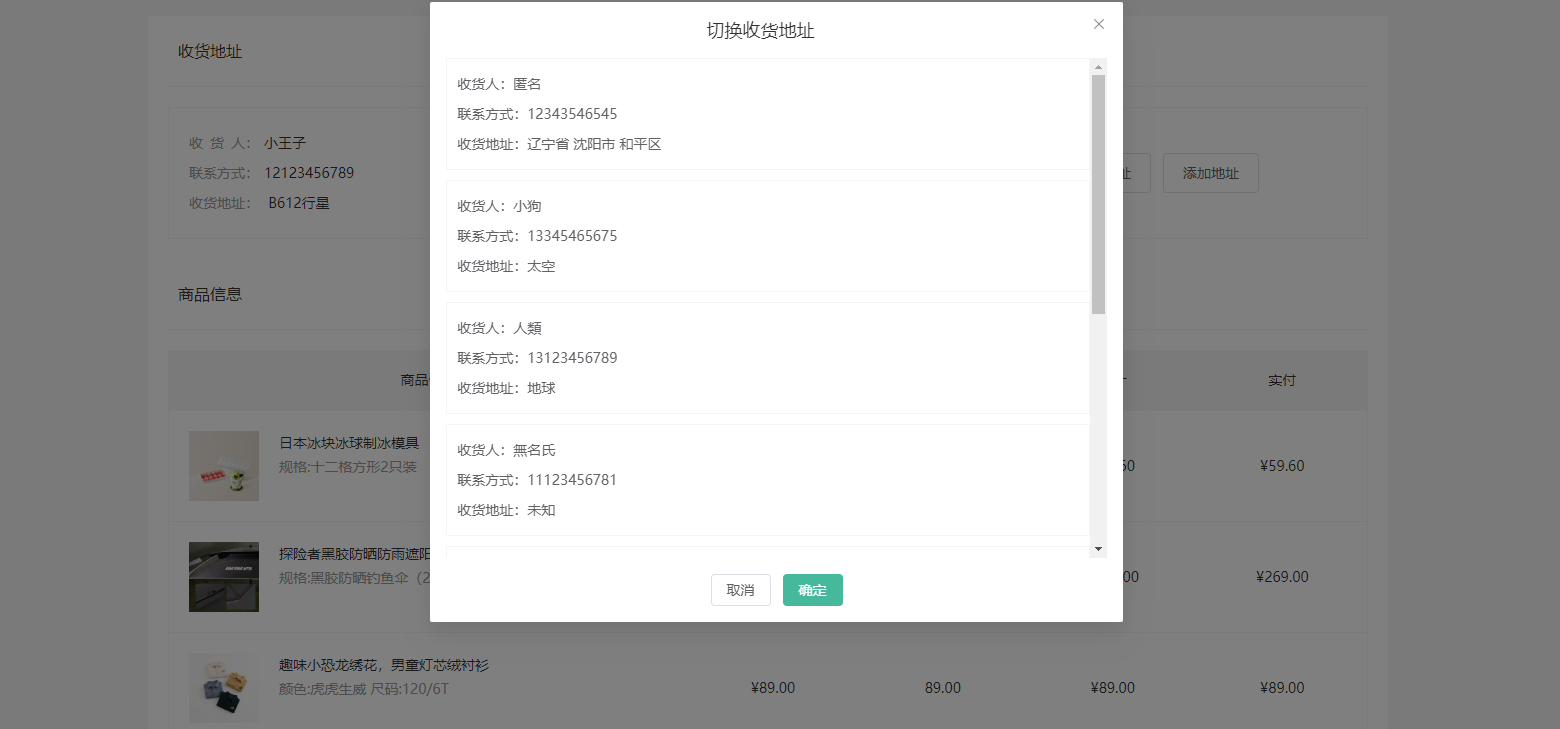
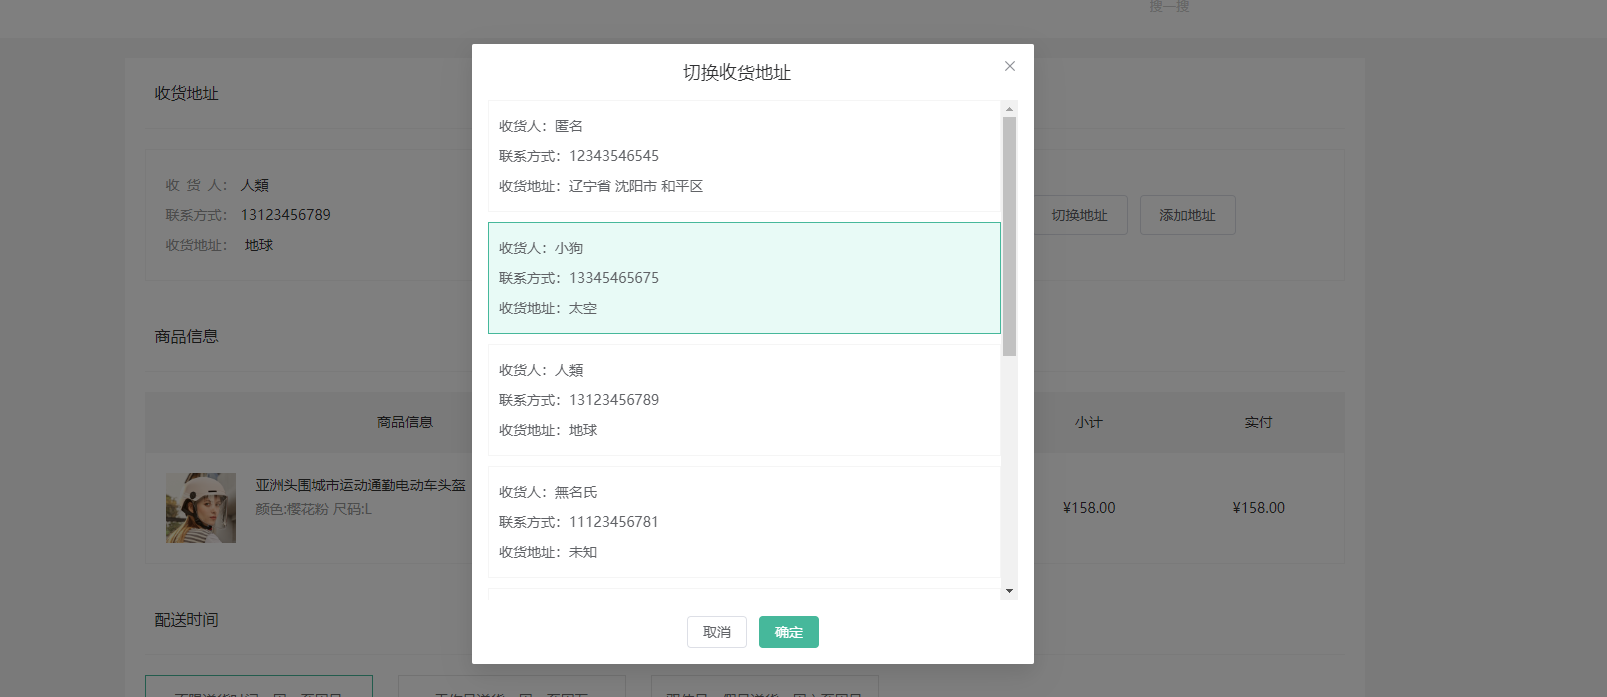
2. 地址切换-打开弹框交互实现
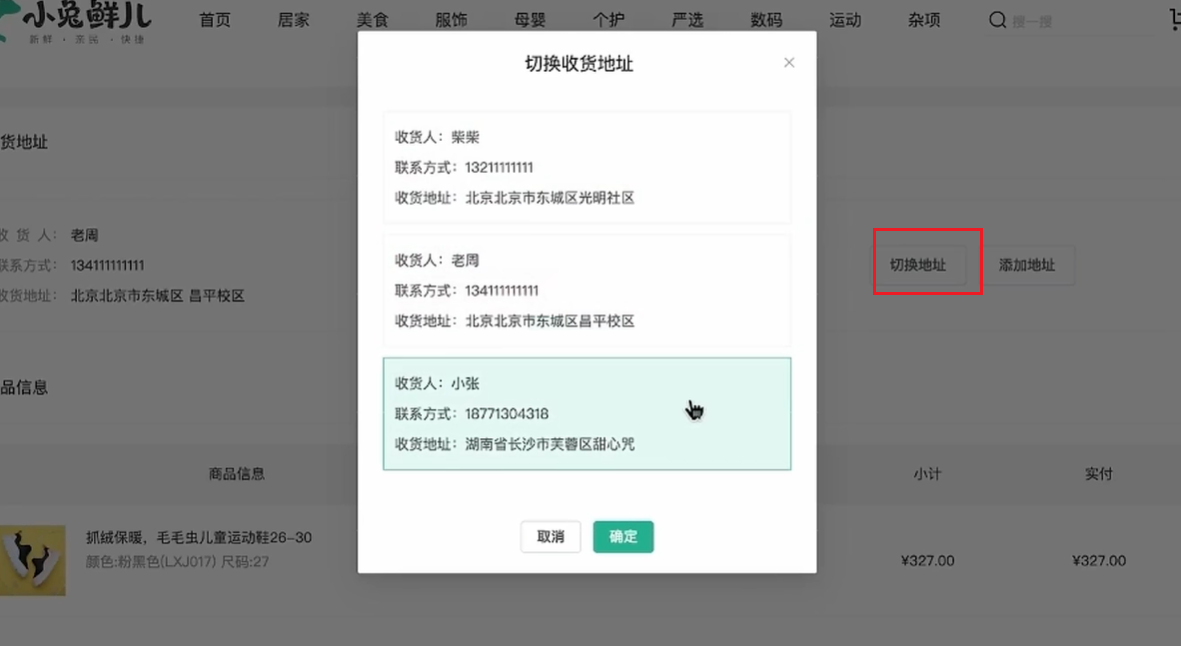
- 打开弹框,回显用户可选地址列表
弹框组件:checkout/index.vue
<!-- 切换地址 -->
<el-dialog title="切换收货地址" width="30%" center><div class="addressWrapper"><div class="text item" v-for="item in checkInfo.userAddresses"  :key="item.id"><ul><li><span>收<i />货<i />人:</span>{{ item.receiver }} </li><li><span>联系方式:</span>{{ item.contact }}</li><li><span>收货地址:</span>{{ item.fullLocation + item.address }}</li></ul></div></div><template #footer><span class="dialog-footer"><el-button>取消</el-button><el-button type="primary">确定</el-button></span></template>
</el-dialog>
绑定数据showDialog,点击按钮控制弹框打开关闭,渲染可选地址列表
//控制弹框打开
const showDialog = ref(false)
...
<el-dialog title="切换收货地址" width="30%" center v-model="showDialog">
...
...
<el-button size="large" @click="showDialog = true">切换地址</el-button>
...
3. 切换地址-地址激活交互实现
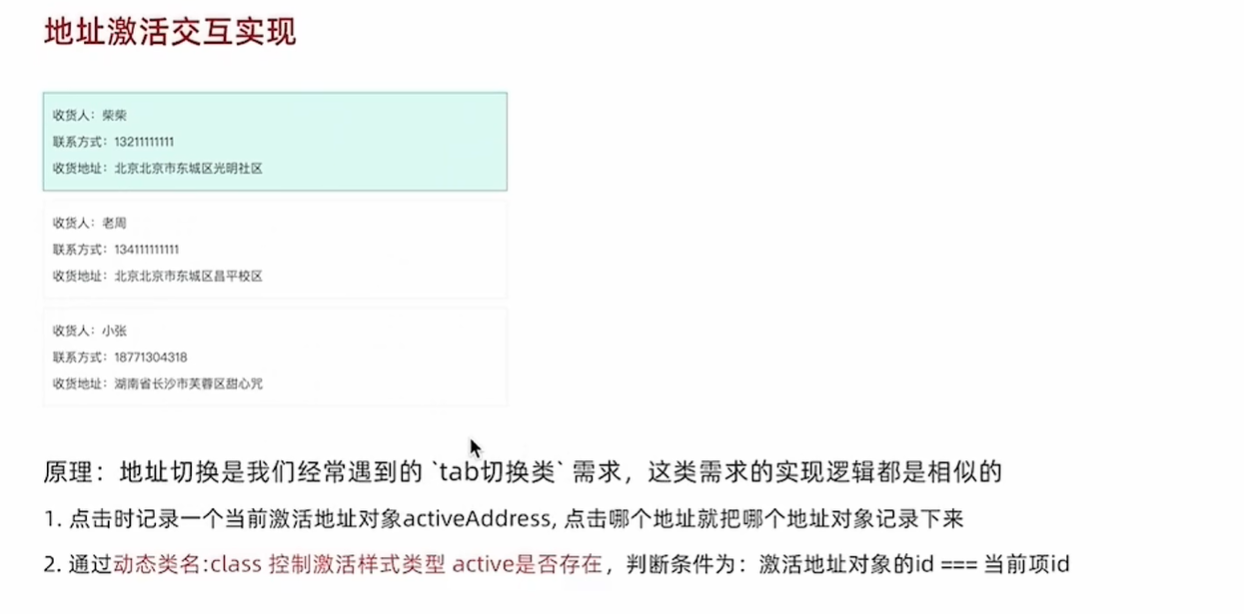
这个需求是通用类需求,学习以后可以多多的用
绑定事件,拿到地址这一项
<div class="text item" @click="switchAddress(item)" v-for="item in checkInfo.userAddresses" :key="item.id">
//激活拿到这个对象
const activeAddress = ref({})
const switchAddress = (item) => {//将拿到的这个对象记录下来activeAddress.value = item
}
激活样式,判断条件是激活对象id===当前项id
:class="{ active: activeAddress.id === item.id }"
给确认按钮绑定事件,新地址覆盖原地址
<el-button type="primary" @click="addressConfirm">确定</el-button>
//地址确认
const addressConfirm = () => {//覆盖当前的地址curAddress.value = activeAddress.value//关闭弹层showDialog.value = false//当前地址置为初始值activeAddress.value = {}
}
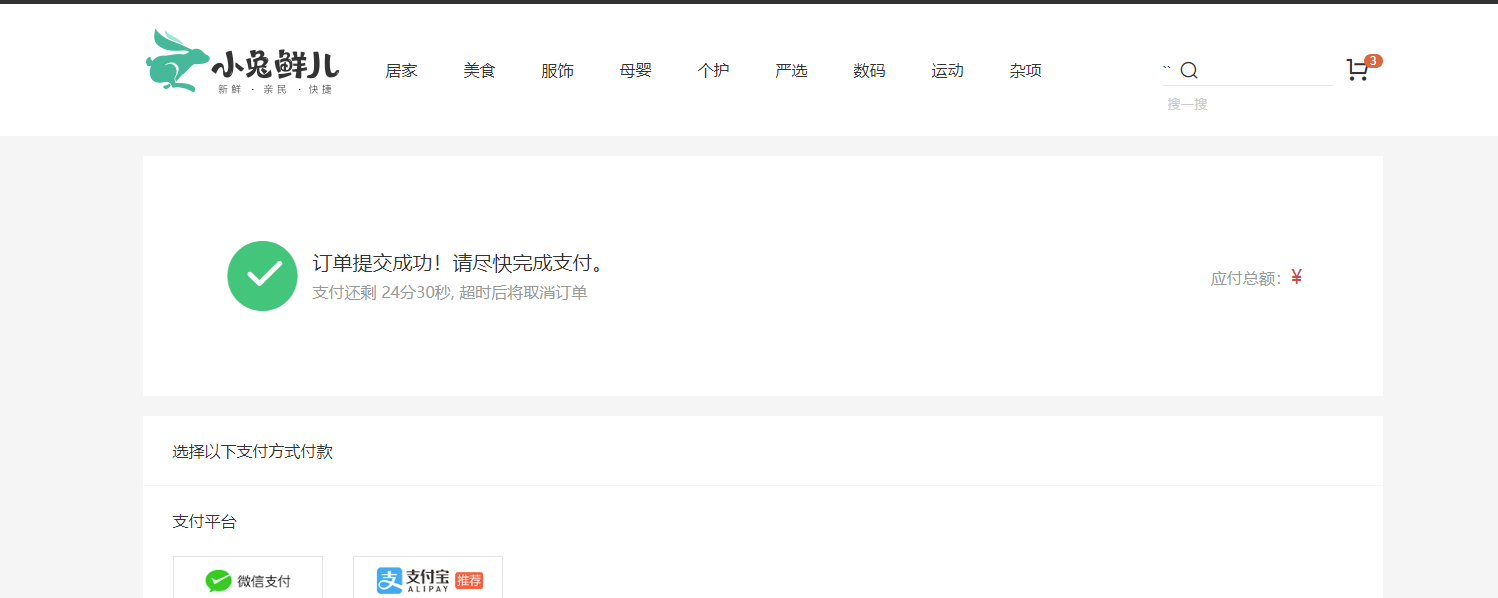
4. 生成订单功能实现
购物车清空

- 准备 支付 路由
views/Pay/index.vue
<script setup>
const payInfo = {}
</script><template><div class="xtx-pay-page"><div class="container"><!-- 付款信息 --><div class="pay-info"><span class="icon iconfont icon-queren2"></span><div class="tip"><p>订单提交成功!请尽快完成支付。</p><p>支付还剩 <span>24分30秒</span>, 超时后将取消订单</p></div><div class="amount"><span>应付总额:</span><span>¥{{ payInfo.payMoney?.toFixed(2) }}</span></div></div><!-- 付款方式 --><div class="pay-type"><p class="head">选择以下支付方式付款</p><div class="item"><p>支付平台</p><a class="btn wx" href="javascript:;"></a><a class="btn alipay" :href="payUrl"></a></div><div class="item"><p>支付方式</p><a class="btn" href="javascript:;">招商银行</a><a class="btn" href="javascript:;">工商银行</a><a class="btn" href="javascript:;">建设银行</a><a class="btn" href="javascript:;">农业银行</a><a class="btn" href="javascript:;">交通银行</a></div></div></div></div>
</template><style scoped lang="scss">
.xtx-pay-page {margin-top: 20px;
}.pay-info {background: #fff;display: flex;align-items: center;height: 240px;padding: 0 80px;.icon {font-size: 80px;color: #1dc779;}.tip {padding-left: 10px;flex: 1;p {&:first-child {font-size: 20px;margin-bottom: 5px;}&:last-child {color: #999;font-size: 16px;}}}.amount {span {&:first-child {font-size: 16px;color: #999;}&:last-child {color: $priceColor;font-size: 20px;}}}
}.pay-type {margin-top: 20px;background-color: #fff;padding-bottom: 70px;p {line-height: 70px;height: 70px;padding-left: 30px;font-size: 16px;&.head {border-bottom: 1px solid #f5f5f5;}}.btn {width: 150px;height: 50px;border: 1px solid #e4e4e4;text-align: center;line-height: 48px;margin-left: 30px;color: #666666;display: inline-block;&.active,&:hover {border-color: $xtxColor;}&.alipay {background: url(https://cdn.cnbj1.fds.api.mi-img.com/mi-mall/7b6b02396368c9314528c0bbd85a2e06.png) no-repeat center / contain;}&.wx {background: url(https://cdn.cnbj1.fds.api.mi-img.com/mi-mall/c66f98cff8649bd5ba722c2e8067c6ca.jpg) no-repeat center / contain;}}
}
</style>
- 路由,二级
{path: 'pay',component: Pay
}
- 接口封装
// 创建订单
export const createOrderAPI = (data) => {return httpInstance({url: '/member/order',method: 'POST',data})
}
checkout/index.vue引入,给 提交订单 绑定事件,调用接口传参,从res获得id,使用orderId记录,然后路由传参。
<el-button type="primary" size="large" @click="createOrder">提交订单</el-button>
// 创建订单
const createOrder = async () => {const res = await createOrderAPI({deliveryTimeType: 1,payType: 1,payChannel: 1,buyerMessage: '',goods: checkInfo.value.goods.map(item => {return {skuId: item.skuId,count: item.count}}),addressId: curAddress.value.id})const orderId = res.result.idrouter.push({path: '/pay',query: {id: orderId}})
}
更新购物车
支付
1. 渲染基础数据

支付页有俩个关键数据,一个是要支付的钱数,一个是倒计时数据(超时不支付商品释放)
- 获取并调用订单详情的接口
apis/pay.js
import httpInstance from '@/utils/http'export const getOrderAPI = (id) => {return httpInstance({url: `/member/order/${id}`})
}
<script setup>
import { getOrderAPI } from '@/apis/pay.js'
import { onMounted, ref } from 'vue'
const payInfo = ref({})  //支付信息
const getPayInfo = async () => {//获取支付详情const res = await getOrderAPI(route.query.id)payInfo.value = res.resultonMounted(() => getPayInfo())
}
</script>
2. 实现支付功能
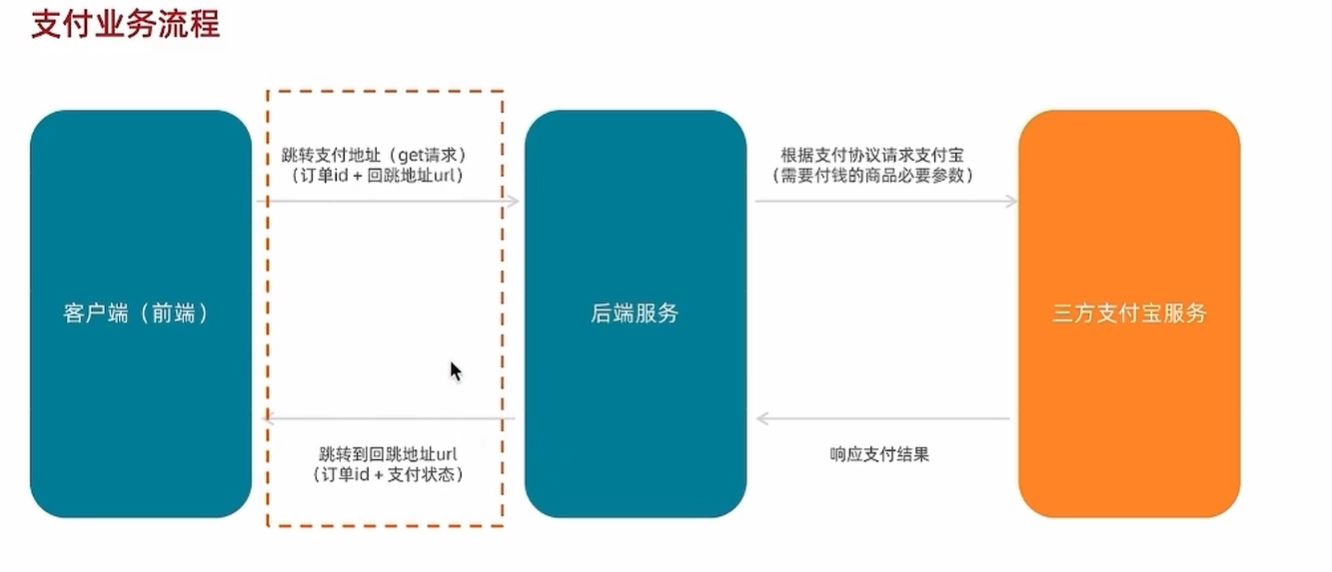
支付携带参数:放到Pay/index.vue中,绑定给按钮即可
// 支付地址
const baseURL = 'http://pcapi-xiaotuxian-front-devtest.itheima.net/'
const backURL = 'http://127.0.0.1:5173/paycallback'
const redirectUrl = encodeURIComponent(backURL)
const payUrl = `${baseURL}pay/aliPay?orderId=${route.query.id}&redirect=${redirectUrl}`
绑定:
<!-- 微信 -->
<a class="btn wx" href="javascript:;"></a>
<!-- 支付宝 -->
<a class="btn alipay" :href="payUrl"></a>

支付宝沙箱账号信息:
| 账号 | jfjbwb4477@sandbox.com |
|---|---|
| 登录密码 | 111111 |
| 支付密码 | 111111 |
应该是支付不了,但是正常跳转没问题
3. 支付结果展示
没法支付了,这个模块没法验证了,那我们来看看具体的写法吧,以后应该会用到
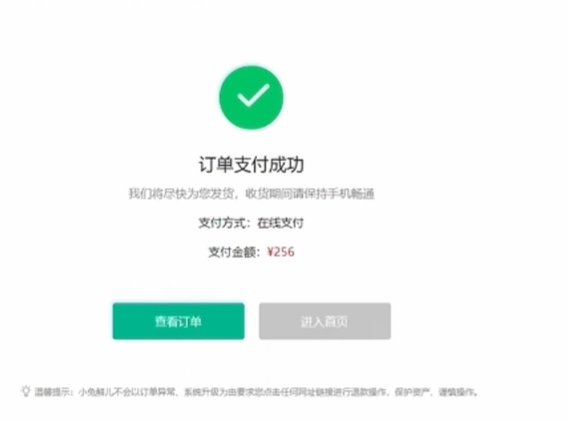
Pay/PayBack.vue
<script setup></script><template><div class="xtx-pay-page"><div class="container"><!-- 支付结果 --><div class="pay-result"><span class="iconfont icon-queren2 green"></span><span class="iconfont icon-shanchu red"></span><p class="tit">支付成功</p><p class="tip">我们将尽快为您发货,收货期间请保持手机畅通</p><p>支付方式:<span>支付宝</span></p><p>支付金额:<span>¥200.00</span></p><div class="btn"><el-button type="primary" style="margin-right:20px">查看订单</el-button><el-button>进入首页</el-button></div><p class="alert"><span class="iconfont icon-tip"></span>温馨提示:小兔鲜儿不会以订单异常、系统升级为由要求您点击任何网址链接进行退款操作,保护资产、谨慎操作。</p></div></div></div>
</template><style scoped lang="scss">
.pay-result {padding: 100px 0;background: #fff;text-align: center;margin-top: 20px;>.iconfont {font-size: 100px;}.green {color: #1dc779;}.red {color: $priceColor;}.tit {font-size: 24px;}.tip {color: #999;}p {line-height: 40px;font-size: 16px;}.btn {margin-top: 50px;}.alert {font-size: 12px;color: #999;margin-top: 50px;}
}
</style>
- 路由配置,二级,path不是随便写的昂
{path: 'paycallback',component: PayBack
}
- 根据支付结果
payResult适配支付状态
 <!-- 支付图标 -->
<span class="iconfont icon-queren2 green" v-if="$route.query.payResult === 'true'"></span>
<span class="iconfont icon-shanchu red" v-else></span>
<p class="tit">支付{{ $route.query.payResult === 'true' ? '成功' : '失败' }}</p>
<!--PayBack.vue-->
<script setup>
import { getOrderAPI } from '@/apis/pay'
import { onMounted, ref } from 'vue'
import { useRoute } from 'vue-router'
const route = useRoute()
const orderInfo = ref({})//获取订单信息
const getOrderInfo = async () => {const res = await getOrderAPI(route.query.orderId)orderInfo.value = res.result
}onMounted(() => getOrderInfo())
</script><p>支付金额:<span>¥{{ orderInfo.payMoney?.toFixed(2) }}</span></p>
4. 封装倒计数函数

编写一个函数 useCountDown 可以把秒数格式化为倒计时的显示状态
formatTime为显示的倒计时时间
start是倒计时启动函数,调用时可以设置初始值并且开始倒计时
步骤:
- 编写函数框架,确定参数和返回值
- 编写核心倒计时逻辑实现基础倒计时
- 实现格式化
装一个dayjs插件:npm i dayjs
//comppsables/useCountDown.js
// 封装倒计时逻辑函数
import { computed, onUnmounted, ref } from 'vue'
import dayjs from 'dayjs'export const useCountDown = () => {// 1. 响应式的数据let timer = nullconst time = ref(0)// 格式化时间 为 xx分xx秒const formatTime = computed(() => dayjs.unix(time.value).format('mm分ss秒'))// 2. 开启倒计时的函数const start = (currentTime) => {// 开始倒计时的逻辑// 核心逻辑的编写:每隔1s就减一time.value = currentTimetimer = setInterval(() => {time.value--}, 1000)}// 组件销毁时清除定时器onUnmounted(() => {timer && clearInterval(timer)})return {formatTime,start}
}
<!--Pay/index.vue-->
<script>
import { useCountDown } from '@/composables/useCountDown.js'
// 倒计时
const { start, formatTime } = useCountDown()// 获取订单数据
const route = useRoute()
const payInfo = ref({})
const getPayInfo = async () => {const res = await getOrderAPI(route.query.id)payInfo.value = res.result//初始化倒计数秒数start(res.result.countdown)
}
onMounted(() => getPayInfo())//跳转支付
// 携带订单id以及回调地址跳转到支付地址(get)
// 支付地址
const baseURL = 'http://pcapi-xiaotuxian-front-devtest.itheima.net/'
const backURL = 'http://127.0.0.1:5173/paycallback'
const redirectUrl = encodeURIComponent(backURL)
const payUrl = `${baseURL}pay/aliPay?orderId=${route.query.id}&redirect=${redirectUrl}`
</script><p>支付还剩 <span>{{ formatTime }}</span>, 超时后将取消订单</p>

接口老是崩掉emmm
小结
功能有些杂,代码书写的位置要仔细斟酌以便后期维护。
看网络请求的时候,要记得打开检查左上角的录制网络日志不然不显示(默认是开的),我不知道点哪了给关了,找这个bug找半天。
祝大家学习顺利

这篇关于【B站 heima】小兔鲜Vue3 项目学习笔记 Day06的文章就介绍到这儿,希望我们推荐的文章对编程师们有所帮助!


