本文主要是介绍龙芯-大数据平台搭建(ambari+hdp),希望对大家解决编程问题提供一定的参考价值,需要的开发者们随着小编来一起学习吧!
准备
主节点:master(10.40.25.190)
从节点:slave1(10.40.25.191),slave2(10.40.25.192)
注意事项:确保所有节点时间同步;确保所有节点能互相通信以及能访问外网
检查DNS和NSCD
所有节点都要设置
ambari在安装时需要配置全域名,所以需要检查DNS。为了减轻DNS的负担, 建议在节点里用 Name Service Caching Daemon (NSCD)
vi /etc/hosts
10.40.25.190 master.com master
10.40.25.191 slave01.com slave01
10.40.25.192 slave02.com slave02
说明:
- 第一部份:网络IP地址。
- 第二部份:主机名.域名,注意主机名和域名之间有个半角的点。
- 第二部份:主机名(主机名别名) ,其实就是主机名。
- 主机名就机器本身的名字,域名是用来解析到IP的。但值得一说的是在局域网中,主机名也是可以解析到IP上的
每台节点分别配置
主节点:
echo “master” >> /etc/hostname
slave01
echo “slave01” >> /etc/hostname
slave02:
echo “slave02” >> /etc/hostname
主节点操作如下
[root@localhost .ssh]# echo "master" >> /etc/hostname
[root@localhost .ssh]# hostname master
[root@localhost .ssh]# hostname -i
10.40.25.190
配置SSH免密码登录
主节点(master)里root用户登录执行如下步骤
ssh-keygen
cd ~/.ssh/
cat id_rsa.pub>> authorized_keys
验证:
[root@master ~]# ssh root@master
Last login: Mon Aug  5 15:22:25 2019
[root@master ~]#
在从节点登录root执行命令
mkdir ~/.ssh/
分发主节点里配置好的authorized_keys到各从节点
scp /root/.ssh/authorized_keys root@10.40.25.191:~/.ssh/authorized_keys
scp /root/.ssh/authorized_keys root@10.40.25.192:~/.ssh/authorized_keys
或
cd /root
ssh-copy-id -i .ssh/id_rsa.pub root@slave01
ssh-copy-id -i .ssh/id_rsa.pub root@slave02
开启NTP服务
所有集群上节点都需要操作
yum install ntp
systemctl is-enabled ntpd
systemctl enable ntpd
systemctl start ntpd
说明:如果连接外网可以不用设置局域网同步,无需执行下面的
修改配置文件vi /etc/ntp.conf
所有节点添加如下:
#允许内网其他机器同步时间
restrict 10.40.25.254 mask 255.255.255.0 nomodify notrap
#外部时间服务器不可用时,以本地时间作为时间服务
server 127.127.1.0
fudge  127.127.1.0 stratum 10
从节点修改如下:
注释掉server 0 ~ n,将server指向主节点
restrict 10.40.25.190 nomodify notrap noquery
restrict 10.40.25.254 mask 255.255.255.0 nomodify
#局域网的ntp服务器
server 10.40.25.190 prefer
server  127.127.1.0     # local clock
fudge   127.127.1.0 stratum 15
验证命令
ntpstat 查看ntp状态
timedatectl 查看系统所有时钟和同步状态
ntpq -p 可以列出目前我们的NTP与相关的上层NTP的状态
关闭防火墙
iptables -F
systemctl disable firewalld
systemctl stop firewalld
关闭SELinux
临时关闭,不用重启机器:
setenforce 0
修改配置文件需要重启机器:
vi /etc/sysconfig/selinux
SELINUX=disabled
安装依赖包
不按装也可以,后面遇到问题在进行安装也行;(每个主机都需要安装,master、slave都需要)
1、安装bigtop,后面问题一有遇到的问题
rpm -i bigtop-jsvc-1.0.15-8.mips64el.rpm
如果”rpm -i bigtop-jsvc-1.0.15-8.mips64el.rpm”失败的话,可以尝试
rpm -i /var/www/html/ambari/HDP-2.6.0.3/bigtop-jsvc/bigtop-jsvc-1.0.15-8.mips64el.rpm
2、安装python模块
yum install leveldb python-psutil.mips64el
3、重新安装gcc
yum reinstall gcc
制作本地源
制作本地源只需在主节点上进行即可
安装 Apache HTTP 服务器
yum install httpd
systemctl start httpd.service
systemctl enable httpd.service
下载安装资源
CentOS 6
Ambari 2.5.0
Base URL	http://public-repo-1.hortonworks.com/ambari/centos6/2.x/updates/2.5.0.3
Repo File	http://public-repo-1.hortonworks.com/ambari/centos6/2.x/updates/2.5.0.3/ambari.repo
Tarball md5 | asc	http://public-repo-1.hortonworks.com/ambari/centos6/2.x/updates/2.5.0.3/ambari-2.5.0.3-centos6.tar.gz
HDP-2.6.0.3
HDP
Version Definition File (VDF)	http://public-repo-1.hortonworks.com/HDP/centos6/2.x/updates/2.6.0.3/HDP-2.6.0.3-8.xml
Base URL	http://public-repo-1.hortonworks.com/HDP/centos6/2.x/updates/2.6.0.3
Repo File	http://public-repo-1.hortonworks.com/HDP/centos6/2.x/updates/2.6.0.3/hdp.repo
Tarball md5 | asc	http://public-repo-1.hortonworks.com/HDP/centos6/2.x/updates/2.6.0.3/HDP-2.6.0.3-centos6-rpm.tar.gzHDP-UTILS
Base URL	http://public-repo-1.hortonworks.com/HDP-UTILS-1.1.0.21/repos/centos6
Tarball md5 | asc	http://public-repo-1.hortonworks.com/HDP-UTILS-1.1.0.21/repos/centos6/HDP-UTILS-1.1.0.21-centos6.tar.gz
这里用mips64的包
需要下载的压缩到指定目录,/var/www/html/
[root@master ambari]# ls
mips64el-Source  mips64el-Source.tar.gz
[root@master ambari]# mv mips64el-Source /var/www/html/ambari
[root@master ambari]# cd /var/www/html/
[root@master html]# ls
ambari
[root@master html]#
浏览器中验证
http://10.40.25.190/ambari/
这里有使用文档
http://10.40.25.190/ambari/docs/
访问结果如下
Index of /ambari
[ICO]	Name	Last modified	Size	Description
[PARENTDIR]	Parent Directory	 	-
[DIR]	HDP-2.6.0.3/	2019-04-10 18:00	-
[DIR]	HDP-UTILS-1.1.0.21/	2019-04-10 18:00	-
[DIR]	ambari-2.5.0.3/	2019-04-10 18:01	-
[DIR]	docs/	2019-04-10 18:00	-
[   ]	test.sh	2019-04-10 18:00	84
配置ambari、HDP、HDP-UTILS的本地源
vim /etc/yum.repos.d/ambari.repo
#VERSION_NUMBER=2.5.0.3
[ambari-2.5.0.3]
name=ambari
baseurl=http://10.40.25.190/ambari/ambari-2.5.0.3
gpgcheck=0
#gpgkey=http:/http://10.40.25.190/ambari/ambari-2.5.0.3
enabled=1
priority=1
#VERSION_NUMBER=2.6.0.3
[HDP-2.6.0.3]
name=hdp
baseurl=http://10.40.25.190/ambari/HDP-2.6.0.3
gpgcheck=0
enabled=1
#VERSION_NUMBER=1.1.0.21
[HDP-UTILS-1.1.0.21]
name=hdp-util
baseurl=http://10.40.25.190/ambari/HDP-UTILS-1.1.0.21
gpgcheck=0
enabled=1
源设置好以后执行如下命令:
yum clean all
yum list update
yum makecache
yum repolist
安装 MariaDB
安装MariaDB主要是为了后面安装hive和oozie时选择mariaDB,如果对这两个插件没有需求可以不装
yum install mariadb-server
systemctl start mariadb
systemctl enable mariadb
数据库初始化设置
mysql_secure_installation
[root@master yum.repos.d]# mysql_secure_installation/usr/bin/mysql_secure_installation:行379: find_mysql_client: 未找到命令NOTE: RUNNING ALL PARTS OF THIS SCRIPT IS RECOMMENDED FOR ALL MariaDBSERVERS IN PRODUCTION USE! PLEASE READ EACH STEP CAREFULLY!In order to log into MariaDB to secure it, we'll need the currentpassword for the root user. If you've just installed MariaDB, andyou haven't set the root password yet, the password will be blank,so you should just press enter here.Enter current password for root (enter for none): ERROR 1045 (28000): Access denied for user 'root'@'localhost' (using password: YES)Enter current password for root (enter for none): ERROR 1045 (28000): Access denied for user 'root'@'localhost' (using password: YES)Enter current password for root (enter for none): OK, successfully used password, moving on...Setting the root password ensures that nobody can log into the MariaDBroot user without the proper authorisation.Set root password? [Y/n] yNew password: Re-enter new password: Password updated successfully!Reloading privilege tables..... Success!By default, a MariaDB installation has an anonymous user, allowing anyoneto log into MariaDB without having to have a user account created forthem. This is intended only for testing, and to make the installationgo a bit smoother. You should remove them before moving into aproduction environment.Remove anonymous users? [Y/n] y... Success!Normally, root should only be allowed to connect from 'localhost'. Thisensures that someone cannot guess at the root password from the network.Disallow root login remotely? [Y/n] n... skipping.By default, MariaDB comes with a database named 'test' that anyone canaccess. This is also intended only for testing, and should be removedbefore moving into a production environment.Remove test database and access to it? [Y/n] n... skipping.Reloading the privilege tables will ensure that all changes made so farwill take effect immediately.Reload privilege tables now? [Y/n] n... skipping.Cleaning up...All done! If you've completed all of the above steps, your MariaDBinstallation should now be secure.Thanks for using MariaDB![root@master yum.repos.d]#
初始化MariaDB完成,接下来测试登录,输入密码能正常登陆就完成了
[root@master ~]# mysql -uroot -p
安装完成后创建ambari数据库及用户,登录root用户执行下面语句:
create database ambari character set utf8 ;
CREATE USER 'ambari'@'%'IDENTIFIED BY 'bigdata';
GRANT ALL PRIVILEGES ON *.* TO 'ambari'@'%';
FLUSH PRIVILEGES;
如果要安装Hive,再创建Hive数据库和用户 再执行下面的语句:
create database hive character set utf8 ;
CREATE USER 'hive'@'%'IDENTIFIED BY 'bigdata';
GRANT ALL PRIVILEGES ON *.* TO 'hive'@'%';
FLUSH PRIVILEGES;
如果要安装Oozie,再创建Oozie数据库和用户 再执行下面的语句:
create database oozie character set utf8 ;
CREATE USER 'oozie'@'%'IDENTIFIED BY 'bigdata';
GRANT ALL PRIVILEGES ON *.* TO 'oozie'@'%';
FLUSH PRIVILEGES;
安装mysql jdbc 驱动
yum install mysql-connector-java
安装JDK
如果没有JDK,需要安装JDK
安装:
yum install java-1.8.0-openjdk.mips64el
yum install java-1.8.0-openjdk-devel.mips64el
验证:
[root@master yum.repos.d]# java -version
openjdk version "1.8.0_60"
OpenJDK Runtime Environment (Loongson 8-loongson3a-Fedora) (build 1.8.0_60-b32)
OpenJDK 64-Bit Server VM (build 25.60-b24, mixed mode)
[root@master yum.repos.d]#
安装:
安装 ambari-srver
只有主节点安装
[root@master yum.repos.d]# yum install ambari-server
已加载插件:langpacks
正在解决依赖关系
--> 正在检查事务
---> 软件包 ambari-server.mips64el.0.2.5.0.3-7 将被 安装
--> 正在处理依赖关系 postgresql-server >= 8.1,它被软件包 ambari-server-2.5.0.3-7.mips64el 需要
--> 解决依赖关系完成
错误:软件包:ambari-server-2.5.0.3-7.mips64el (ambari-2.5.0.3)**需要:postgresql-server >= 8.1**
您可以尝试添加 --skip-broken 选项来解决该问题
您可以尝试执行:rpm -Va --nofiles --nodigest
需要:postgresql-server >= 8.1
注意 如果python的版本小于2.6,则需要进行如下修改
vim /etc/init.d/ambari-server
注释掉如下内容:
#majversion=`$PYTHON -V 2>&1 | awk '{print $2}' | cut -d'.' -f1`
#minversion=`$PYTHON -V 2>&1 | awk '{print $2}' | cut -d'.' -f2`
#numversion=$(( 10 * $majversion + $minversion))
#if (( $numversion < 26 )); then
# echo "Need python version > 2.6"
# exit 1
#fi
安装配置postgresql
yum install postgresql
安装后需要初始化配置,添加ambari数据库配置
rm -rf /var/lib/pgsql/data
postgresql-setup initdb
vim /var/lib/pgsql/data/pg_hba.conf
# TYPE  DATABASE        USER            ADDRESS                 METHOD
# "local" is for Unix domain socket connections only
local   all             all                                     peer
# IPv4 local connections:
host    all             all             127.0.0.1/32            ident
# IPv6 local connections:
host    all             all             ::1/128                 ident
# Allow replication connections from localhost, by a user with the
# replication privilege.
#local   replication     postgres                                peer
#host    replication     postgres        127.0.0.1/32            ident
#host    replication     postgres        ::1/128                 ident
local  all  ambari,mapred md5
host  all   ambari,mapred 0.0.0.0/0  md5
host  all   ambari,mapred ::/0 md5
安装 ambari-agent
每个节点安装
yum install ambari-agent
配置Ambari
先执行这条,hive数据库需要
ambari-server setup —jdbc-db=mysql —jdbc-driver=/usr/share/java/mysql-connector-java.jar
使用PostgreSQL数据库的配置
[root@localhost home]# /etc/init.d/ambari-server setup
Using python  /usr/bin/python
Setup ambari-server
Checking SELinux...
SELinux status is 'disabled'
Customize user account for ambari-server daemon [y/n] (n)? y
Enter user account for ambari-server daemon (hadoop):
Aborting ... Keyboard Interrupt.
[root@localhost home]# /etc/init.d/ambari-server setup
Using python  /usr/bin/python
Setup ambari-server
Checking SELinux...
SELinux status is 'disabled'
Customize user account for ambari-server daemon [y/n] (n)? n
Adjusting ambari-server permissions and ownership...
Checking firewall status...
Redirecting to /bin/systemctl status  iptables.service
Checking JDK...
Do you want to change Oracle JDK [y/n] (n)? y
[1] Oracle JDK 1.8 + Java Cryptography Extension (JCE) Policy Files 8
[2] Oracle JDK 1.7 + Java Cryptography Extension (JCE) Policy Files 7
[3] Custom JDK
==============================================================================
Enter choice (1): 3
WARNING: JDK must be installed on all hosts and JAVA_HOME must be valid on all hosts.
WARNING: JCE Policy files are required for configuring Kerberos security. If you plan to use Kerberos,please make sure JCE Unlimited Strength Jurisdiction Policy Files are valid on all hosts.
Path to JAVA_HOME: /usr/lib/jvm/java-1.8.0-openjdk
Validating JDK on Ambari Server...done.
Completing setup...
Configuring database...
Enter advanced database configuration [y/n] (n)? y
Configuring database...
==============================================================================
Choose one of the following options:
[1] - PostgreSQL (Embedded)
[2] - Oracle
[3] - MySQL / MariaDB
[4] - PostgreSQL
[5] - Microsoft SQL Server (Tech Preview)
[6] - SQL Anywhere
[7] - BDB
==============================================================================
Enter choice (3): 1
Database admin user (postgres):
Database name (ambari):
Postgres schema (ambari):
Username (ambari):
Enter Database Password (bigdata):
Default properties detected. Using built-in database.
Configuring ambari database...
Checking PostgreSQL...
Running initdb: This may take up to a minute.
Initializing database ... OK
About to start PostgreSQL
Configuring local database...
Configuring PostgreSQL...
Restarting PostgreSQL
Creating schema and user...
done.
Creating tables...
done.
Extracting system views...
............
Adjusting ambari-server permissions and ownership...
Ambari Server 'setup' completed successfully.
[root@localhost home]#
数据库使用mariaDB的配置
……
Completing setup...
Configuring database...
Enter advanced database configuration [y/n] (n)? **y**
Configuring database...
==============================================================================
Choose one of the following options:
[1] - PostgreSQL (Embedded)
[2] - Oracle
[3] - MySQL / MariaDB
[4] - PostgreSQL
[5] - Microsoft SQL Server (Tech Preview)
[6] - SQL Anywhere
[7] - BDB
==============================================================================
Enter choice (1): **3**
Hostname (localhost): **master**
Port (3306):
Database name (ambari):
Username (ambari):
Enter Database Password (bigdata): **(上面设置的Ambari-123)**
Configuring ambari database...
Copying JDBC drivers to server resources...
Configuring remote database connection properties...
WARNING: Before starting Ambari Server, you must run the following DDL against the database to create the schema: /var/lib/ambari-server/resources/Ambari-DDL-MySQL-CREATE.sql
Proceed with configuring remote database connection properties [y/n] (y)?
Extracting system views...
.........Error extracting ambari-admin-2.5.0.3.7.jar
..
Adjusting ambari-server permissions and ownership...
Ambari Server 'setup' completed successfully.
[root@master yum.repos.d]#
说明:
- 最后的Error没有影响。
- 最后一步如果是n,需要执行下面的步骤,“将Ambari数据库脚本导入到数据库”,如果yes或PostgreSQL数据库,下一步可以不用执行
将Ambari数据库脚本导入到数据库
如果使用自己定义的数据库,必须在启动Ambari服务之前导入Ambari的sql脚本
用Ambari用户(上面设置的用户)登录mysql
mysql -u ambari -p
use ambari
source /var/lib/ambari-server/resources/Ambari-DDL-MySQL-CREATE.sql
启动Amabri
执行启动命令,启动Ambari服务
ambari-server start
执行结果有个ERROR还未找到原因,但看样子不影响使用
[root@master ~]# ambari-server start
Using python  /usr/bin/python
Starting ambari-server
Ambari Server running with administrator privileges.
Organizing resource files at /var/lib/ambari-server/resources...
Ambari database consistency check started...
Server PID at: /var/run/ambari-server/ambari-server.pid
Server out at: /var/log/ambari-server/ambari-server.out
Server log at: /var/log/ambari-server/ambari-server.log
Waiting for server start............................................................
DB configs consistency check: no errors and warnings were found.
**ERROR: Exiting with exit code 1.**
REASON: Server not yet listening on http port 8080 after 50 seconds. Exiting.
[root@master ~]#
登陆web页面
http://10.40.25.190:8080
username:admin,pw:admin

登录成功后出现下面的界面,至此Ambari的安装成功

安装HDP 配置集群
点击上面登录成功页面的Launch Install Wizard 按钮进行集群配置
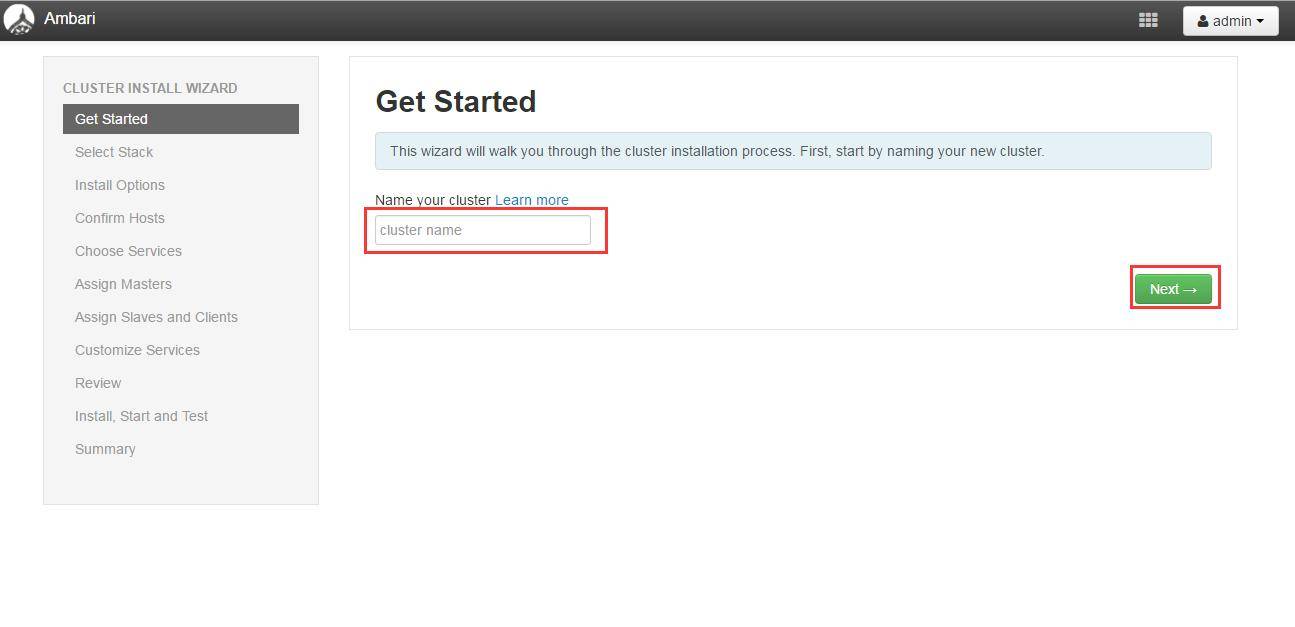
设置集群名称
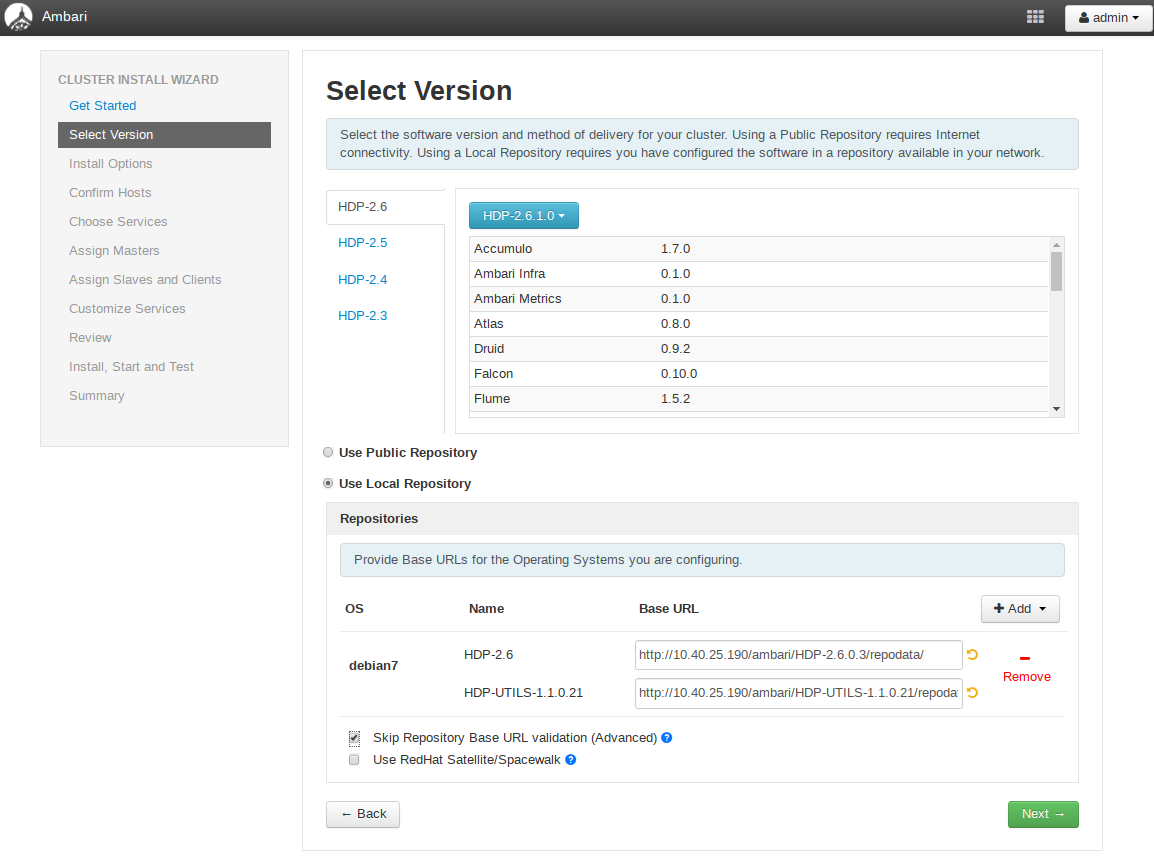
“Select Version”页面
修改 debian7 的 Base URL,填写本地源,并删除其余的源。Base Url 根据实际情况填写,例如:
http://10.40.25.190/ambari/HDP-2.6.0.3/repodata/
http://10.40.25.190/ambari/HDP-UTILS-1.1.0.21/repodata/
注意:下面的两个选项
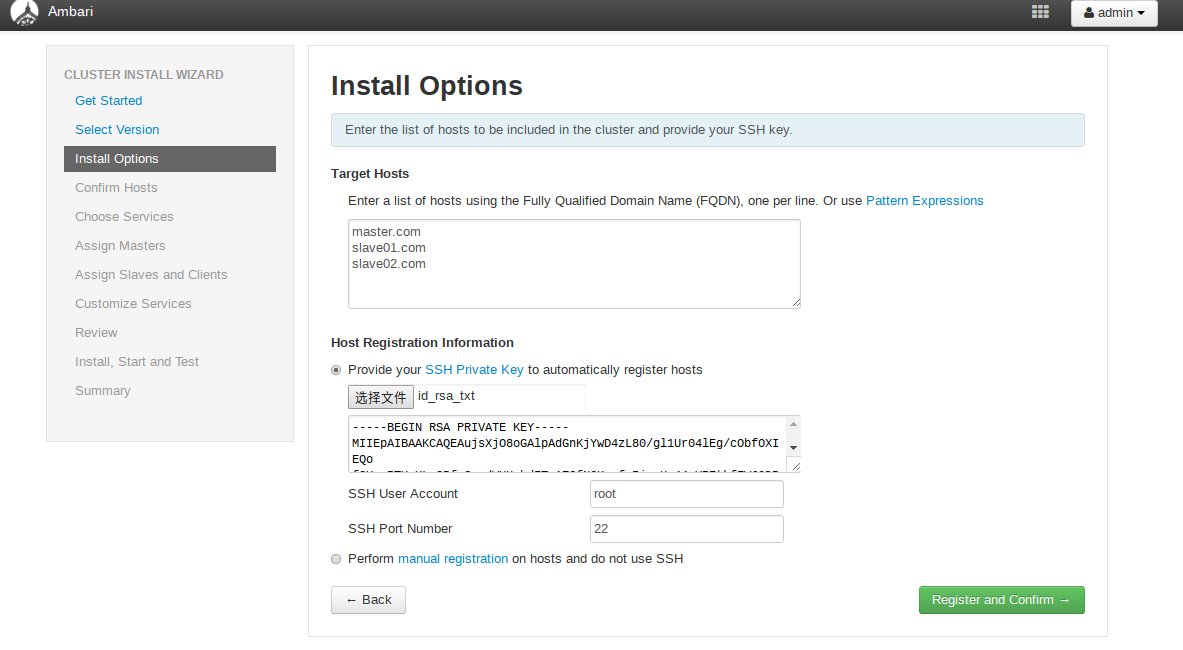
设置集群机器
说明:
- 上面的框里填写的是集群中各个节点的域名
- ssh kye 是master的私钥
- ssh user 就是从免密登陆各个节点的用户名
原理:通过ssh协议免密登陆各个节点进行安装
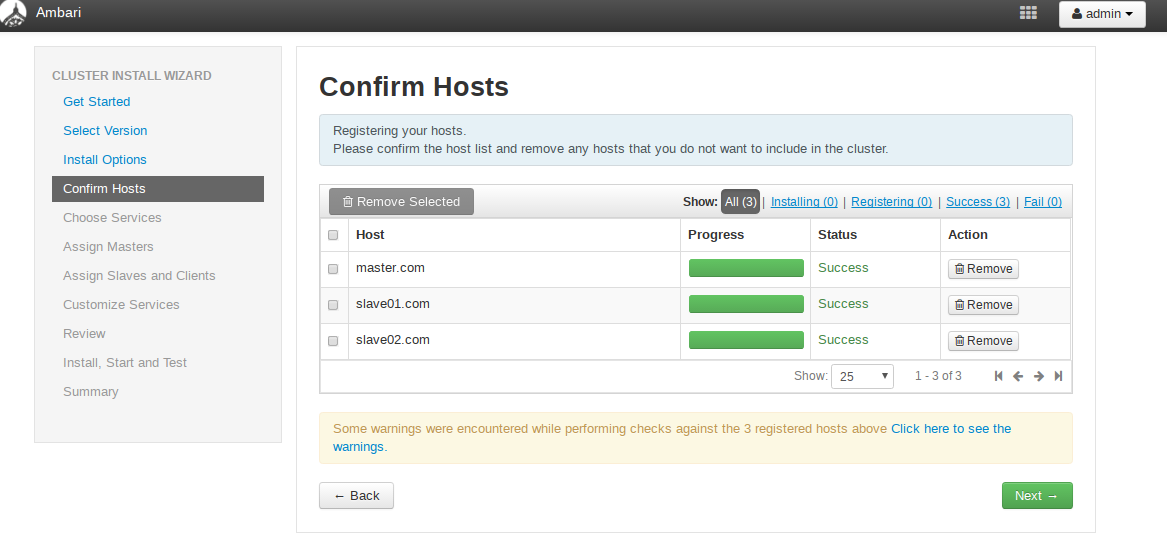
Host 确认
确认前面配置集群中hosts列表 中的机器是否都可用,也可以移除相关机器,集群中机器Success后进行下一步操作。
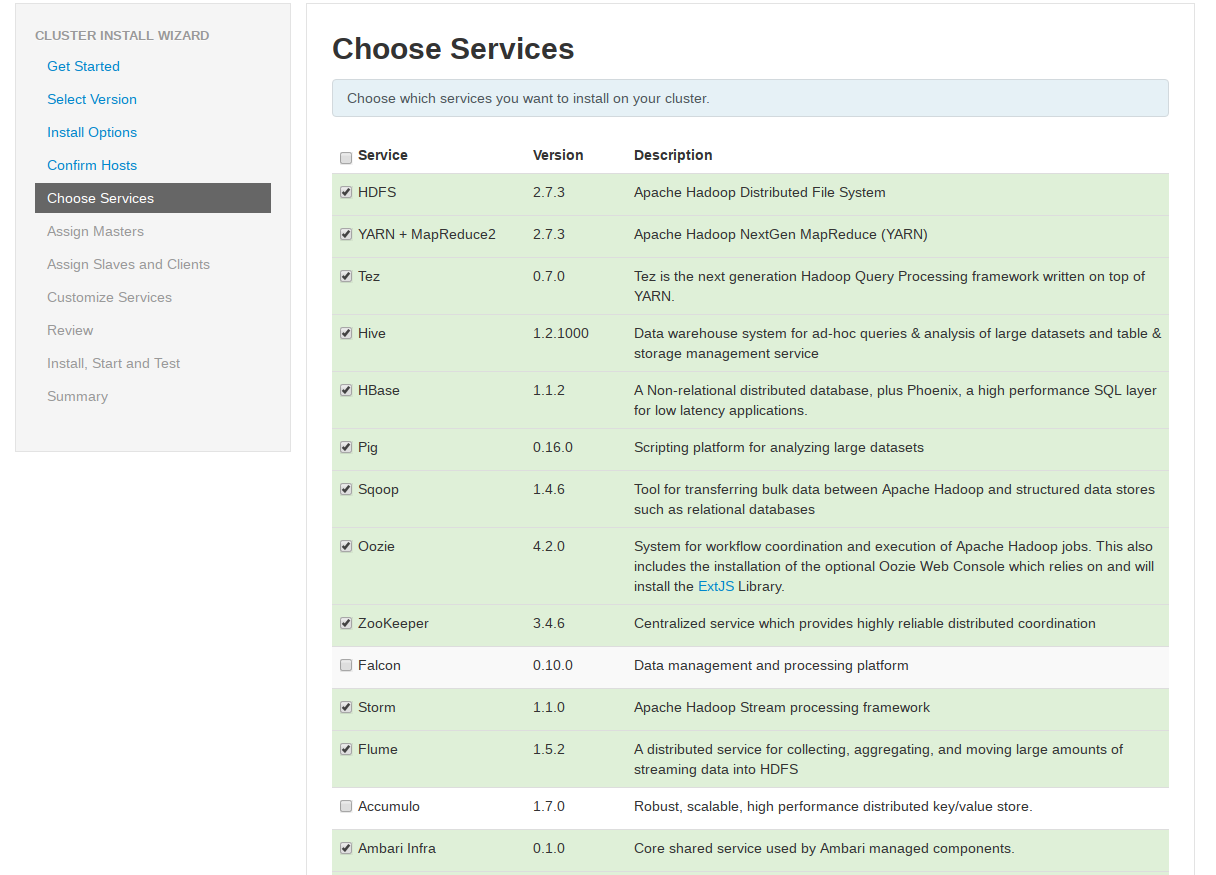
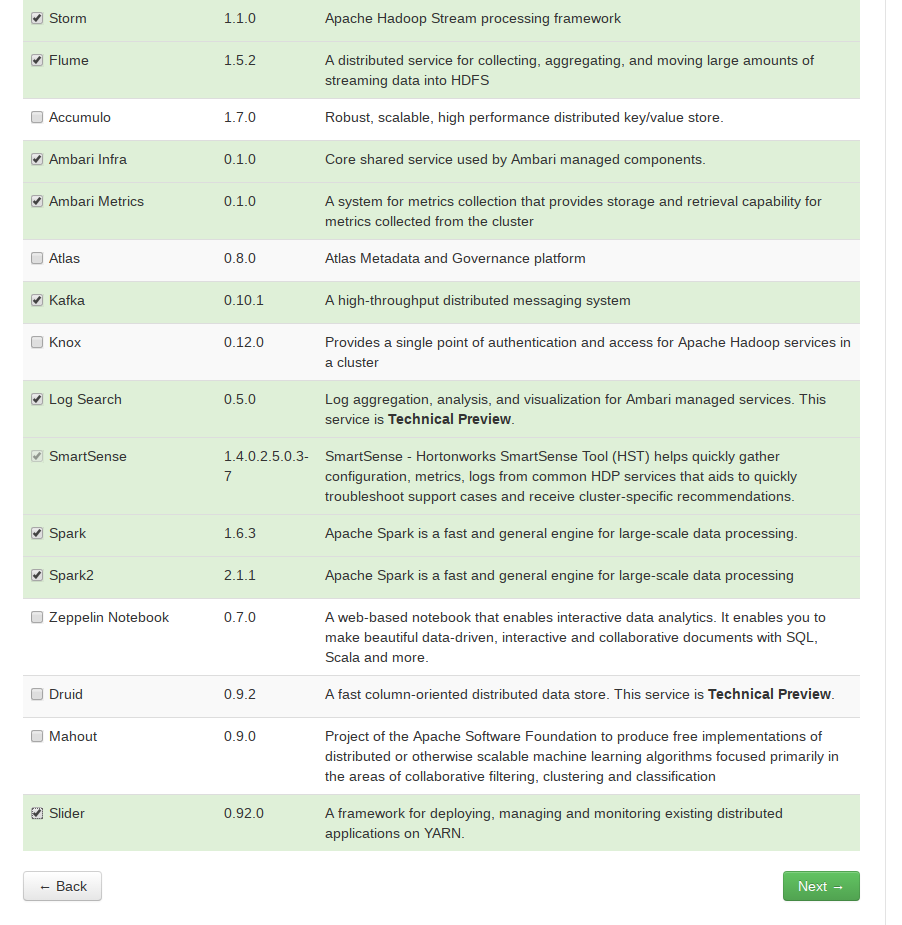
选择要安装的服务
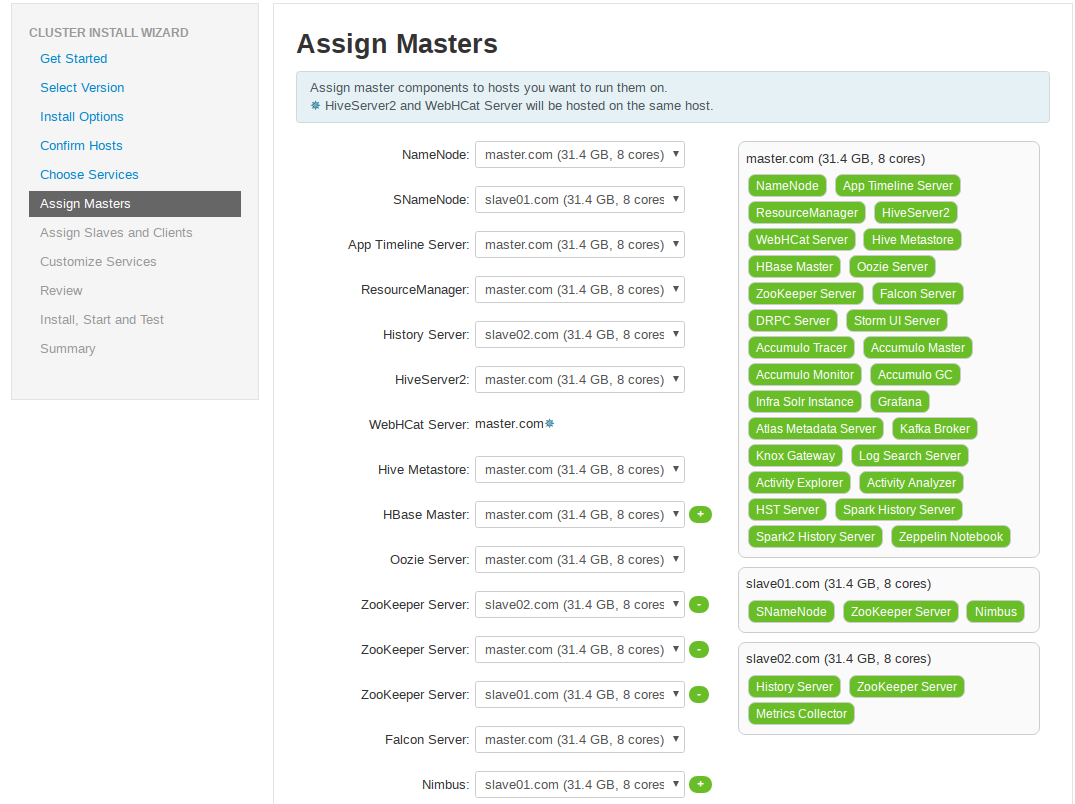
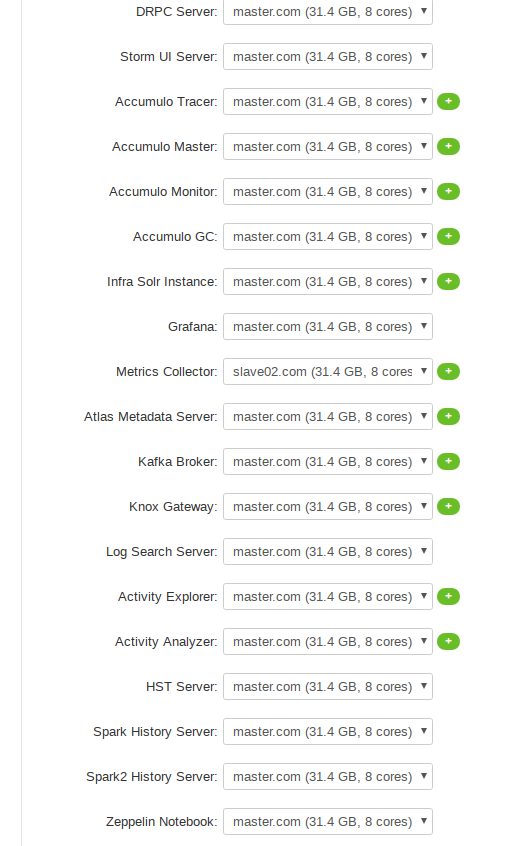
各个服务Master配置
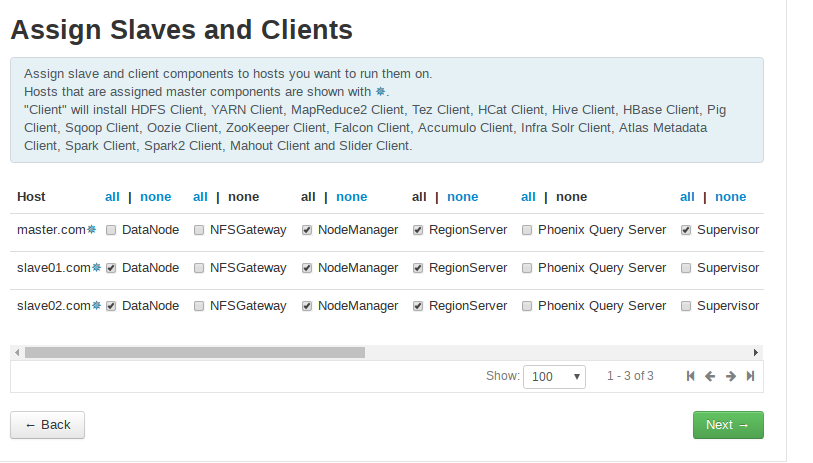
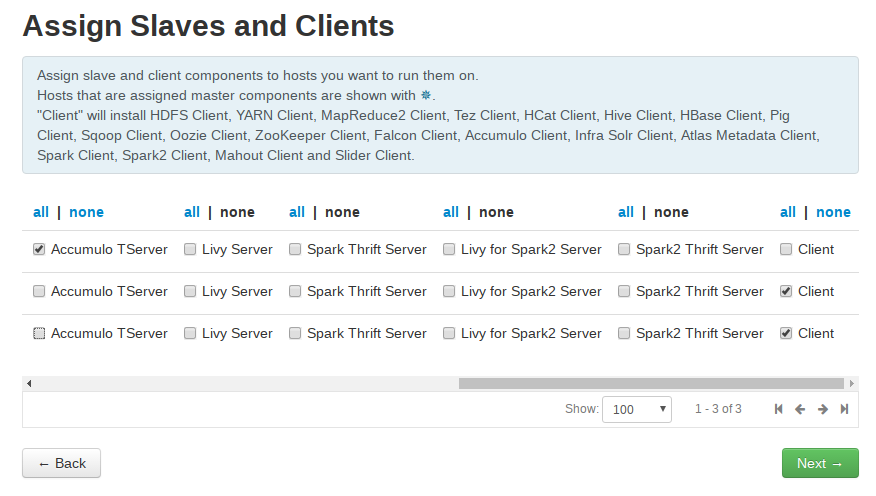
服务的Slaves 和 Clients节配置

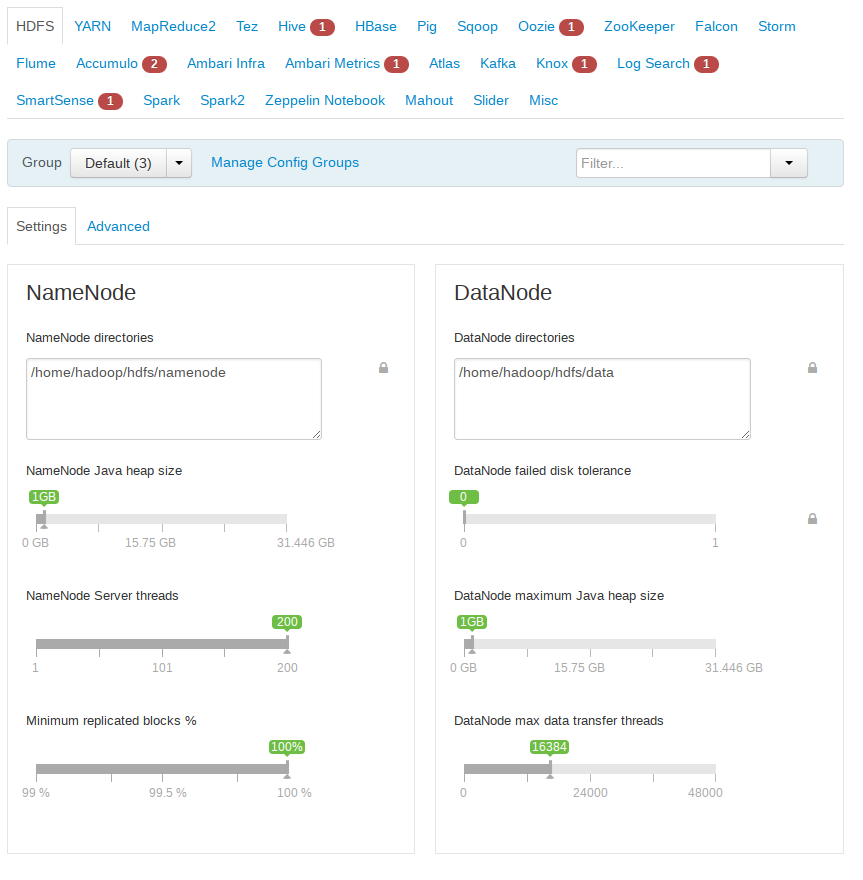
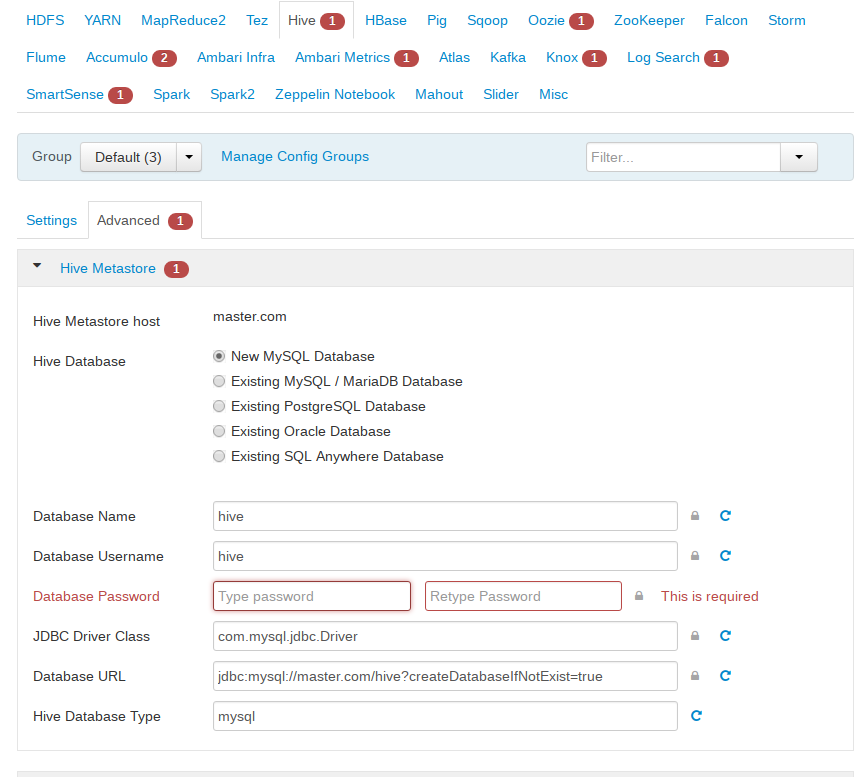
服务的定制化配置
说明:
- 带上标的问题都需要解决才能进行下一步。
- 如果提示“目录不能以/home开始”,可以修改如下
在如下代码中修改一个判断把returm false改城return true,然后重启服务器重新开始。
vim /usr/lib/ambari-server/web/javascripts/app.js
isAllowedDir: function(value) {
var dirs = value.replace(/,/g,’ ‘).trim().split(new RegExp("\s+", “g”));
for(var i = 0; i < dirs.length; i++){
if(dirs[i].startsWith(’/home’) || dirs[i].startsWith(’/homes’)) {
return true;
//return false;
}
}
return true;
}
- hive和oozie需要选择数据库
a、如果没有前面没有创建对应的数据库,这里可以选择新建。
b、如果前面已经创建了数据库,这里可以选择对应数据库,并执行如下操作后点击验证。
选择已有数据库时需要验证:
[root@localhost home]# find / -name mysql-connector-java.jar
/usr/share/java/mysql-connector-java.jar
/var/lib/ambari-agent/cache/mysql-connector-java.jar
/var/lib/ambari-server/resources/mysql-connector-java.jar
[root@localhost home]# ambari-server setup --jdbc-db=mysql --jdbc-driver=/usr/share/java/mysql-connector-java.jar
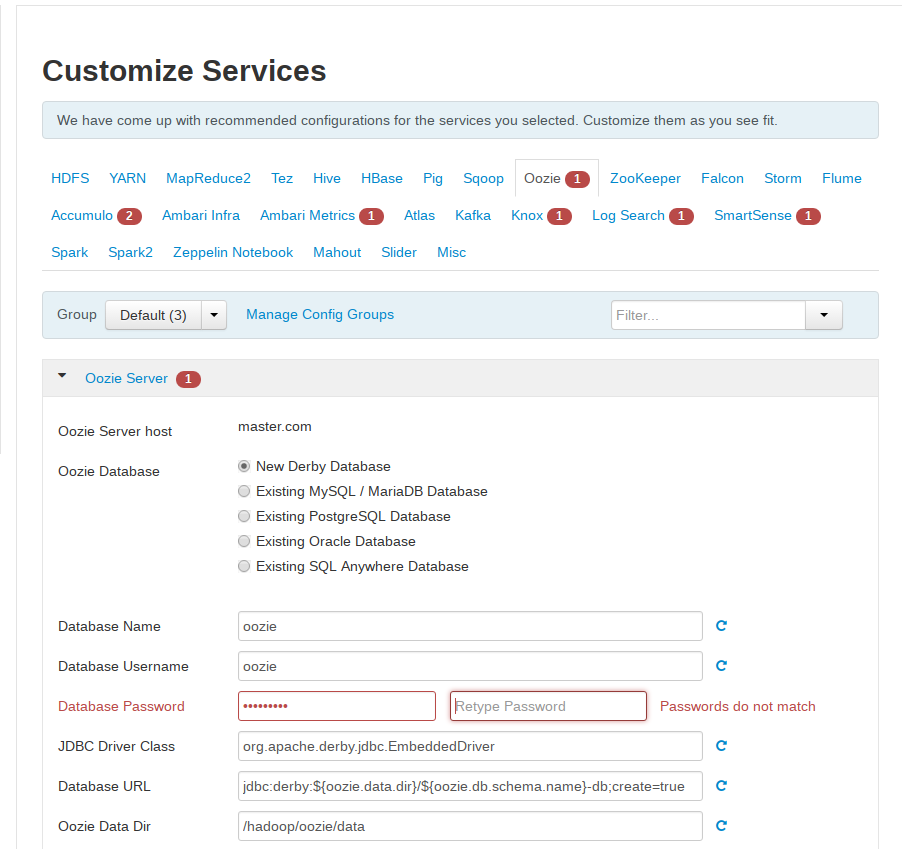
- 其他都是需要设置数据库密码和服务密码的,这里一致设置为“bigdata”
显示总体配置信息
安装完成后页面如下:
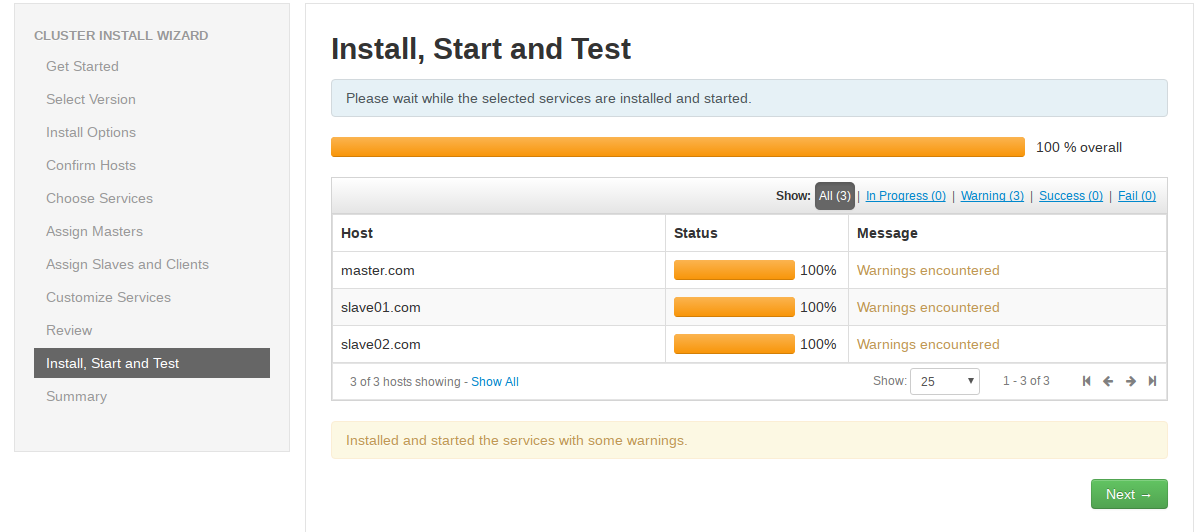
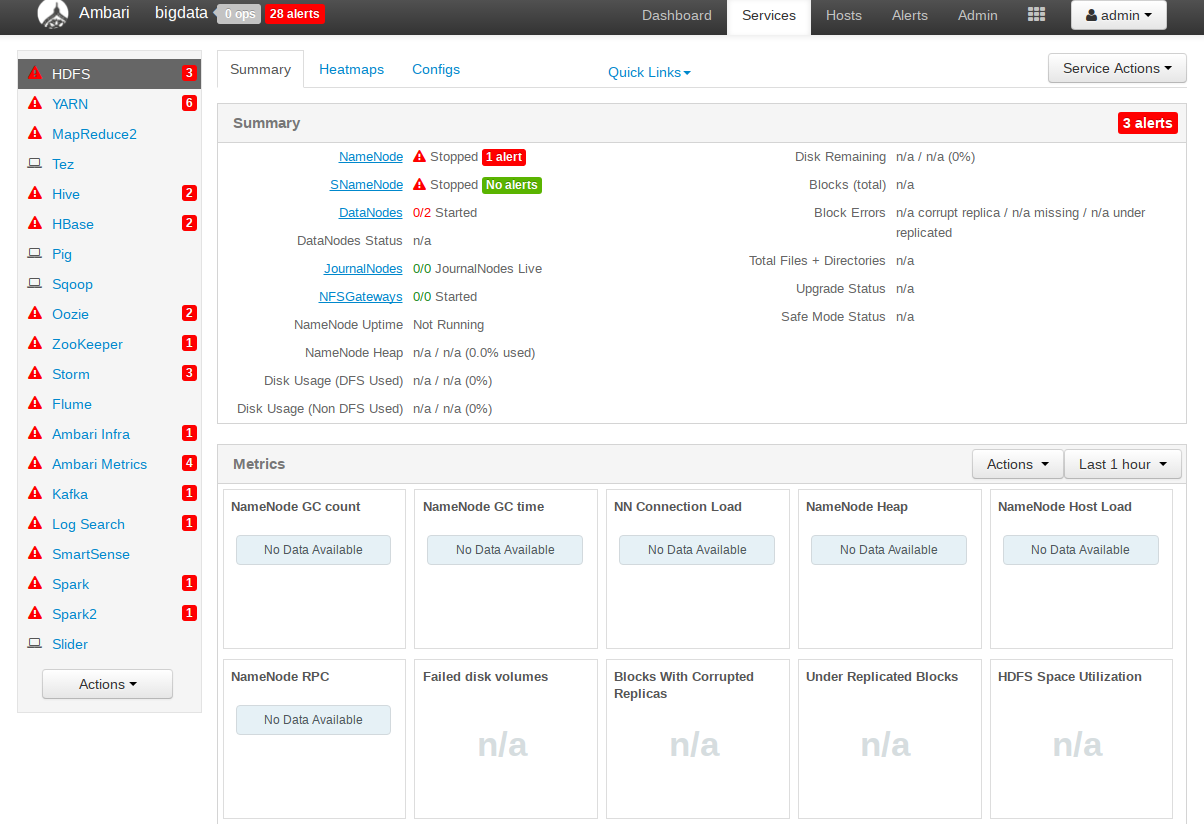
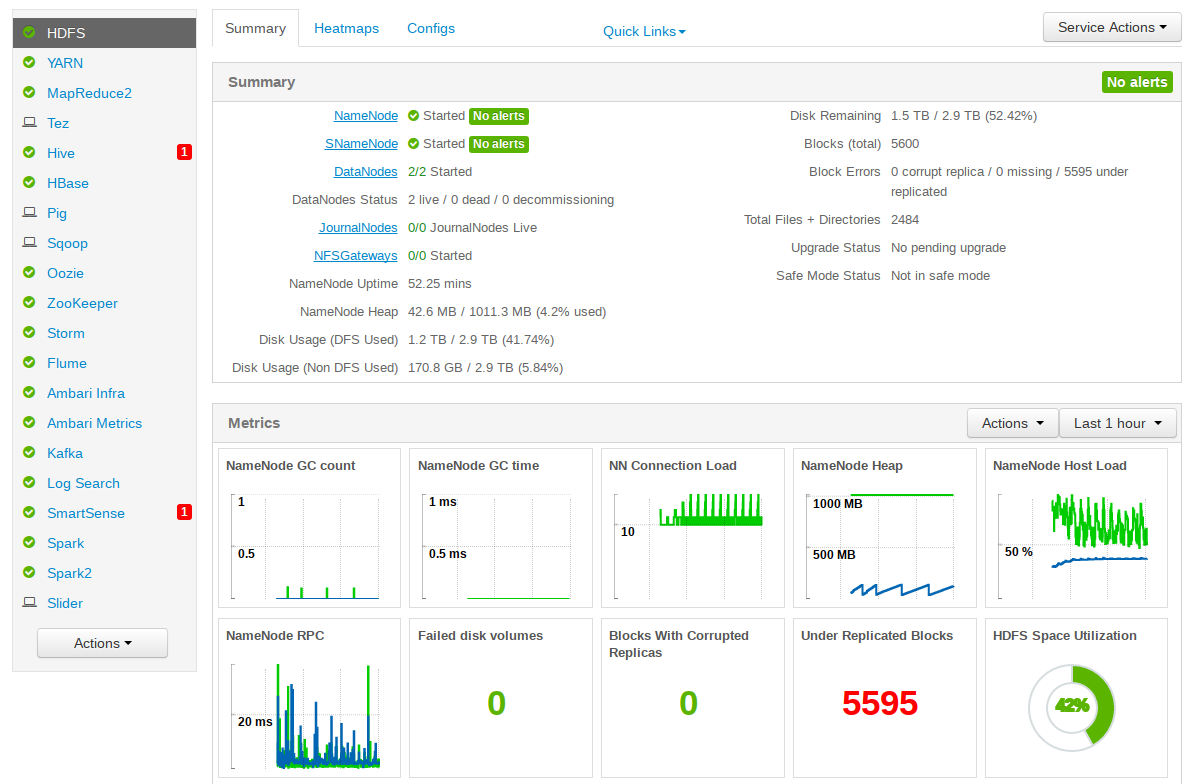
说明:
警告是服务没有起来,可以继续下一步,在后面的页面手动起,如下图
添加datanode节点
实际生产环境下都会是多机部署,且会根据集群压力来选择添加或减少节点。本节讲解怎么在现有hadoop集群里添加新的节点。本例中需要新加入的datanode节点主机IP为10.40.22.17,hostname为test3。
步骤1:安装前的环境准备
就在上面搭建的基础上
步骤2:安装ambari-agent
yum install ambari-agent
步骤3:配置hostname
打开/etc/ambari-agent/conf/ambari-agent.ini文件,
[server]
hostname=master
步骤4:启动ambari-agent
systemctl start ambari-agent
systemctl enable ambari-agent
步骤5:添加datanode节点
登录之前的ambari页面(在浏览器中输入 http://master的IP:8080),添加datanode节点操作。点击“Hosts->点击“Add New Hosts”
之后的页面配置类似前面的master。在“Assign Slaves and Clinets”页面时,根据需要选择相应的组件。
最后的效果页面如下:
附录:
问题1:
由于slave端没有安装bigtop-jsvc-1.0.15-8.mips64el.rpm,在安装用yum安装时是有问题的,会有如下报错,
[外链图片转存失败,源站可能有防盗链机制,建议将图片保存下来直接上传(img-GadPp1L4-1640485021081)(https://lh3.googleusercontent.com/p39PmBAMvkgqxk9PceDQ5sJ-3un3nVh41rb9FmN1NZNTpQ9m8ws9H0i8XxcR_c4Dzv9ICg5fNuY=s1500 “12”)]
解决:将master的rpm包考出来,放道slave中手动安装
rpm -i bigtop-jsvc-1.0.15-8.mips64el.rpm
[root@localhost home]# find / -name bigtop-jsvc-1.0.15-8.mips64el.rpm
/var/www/html/ambari/HDP-2.6.0.3/bigtop-jsvc/bigtop-jsvc-1.0.15-8.mips64el.rpm
[root@localhost home]# scp /var/www/html/ambari/HDP-2.6.0.3/bigtop-jsvc/bigtop-jsvc-1.0.15-8.mips64el.rpm
usage: scp [-12346BCpqrv] [-c cipher] [-F ssh_config] [-i identity_file][-l limit] [-o ssh_option] [-P port] [-S program][[user@]host1:]file1 ... [[user@]host2:]file2
[root@localhost home]# scp /var/www/html/ambari/HDP-2.6.0.3/bigtop-jsvc/bigtop-jsvc-1.0.15-8.mips64el.rpm root@slave01:/home
bigtop-jsvc-1.0.15-8.mips64el.rpm                                                100%   33KB  32.5KB/s   00:00
[root@localhost home]# scp /var/www/html/ambari/HDP-2.6.0.3/bigtop-jsvc/bigtop-jsvc-1.0.15-8.mips64el.rpm root@slave02:/home
bigtop-jsvc-1.0.15-8.mips64el.rpm                                                100%   33KB  32.5KB/s   00:00
[root@localhost home]#
问题2:
slave01节点报出
failed, parent directory /usr/hdp/current/hadoop-client/conf doesn’t exist
解决:从slave02中拷贝一份过去
问题3:
slave01和slave02节点报出
gcc -O3 -g -march=loongson3a -mabi=64 -pthread -fno-strict-aliasing -O3 -g -march=loongson3a -mabi=64 -D_GNU_SOURCE -fPIC -fwrapv -DNDEBUG -O3 -g -march=loongson3a -mabi=64 -D_GNU_SOURCE -fPIC -fwrapv -fPIC -I/usr/include/python2.7 -c psutil/_psutil_linux.c -o build/temp.linux-mips64-2.7/psutil/_psutil_linux.o
gcc: error trying to exec ‘cc1’: execvp: 权限不够
error: command ‘gcc’ failed with exit status 1
解决:
yum reinstall gcc
问题四:AttributeError: ‘module’ object has no attribute ‘linux_sysinfo’
slave01和slave02
无法启动 Ambari Metrics,报错如下:
Starting ambari-metrics-monitor
Verifying ambari-metrics-monitor process status with PID : 11188
Output of PID check :
ERROR: ambari-metrics-monitor start failed. For more details, see /var/log/ambari-metrics-monitor/ambari-metrics-monitor.out:
====================hostinfo = HostInfo(config)File "/usr/lib/python2.6/site-packages/resource_monitoring/core/host_info.py", line 49, in __init__self.__host_static_info = self.get_host_static_info()File "/usr/lib/python2.6/site-packages/resource_monitoring/core/host_info.py", line 228, in get_host_static_infoswap_stats = psutil.swap_memory()File "/usr/lib/python2.6/site-packages/resource_monitoring/psutil/build/lib.linux-mips64-2.7/psutil/__init__.py", line 1678, in swap_memoryreturn _psplatform.swap_memory()File "/usr/lib/python2.6/site-packages/resource_monitoring/psutil/build/lib.linux-mips64-2.7/psutil/_pslinux.py", line 177, in swap_memory_, _, _, _, total, free = cext.linux_sysinfo()
AttributeError: 'module' object has no attribute 'linux_sysinfo'
====================
Monitor out at: /var/log/ambari-metrics-monitor/ambari-metrics-monitor.out
解决:
是由于python模块的问题
python-psutil.mips64el
模块中有调用c语言的动态库,但模块没有编译生成相应的动态库导致的。
1、前题python-psutil.mips64el需要安装
yum install python-psutil.mips64el
2、到如下目录执行make或执行./build.py
cd /usr/lib/python2.6/site-packages/resource_monitoring/psutil
3、执行完后会生成如下:
/usr/lib/python2.6/site-packages/resource_monitoring/psutil/build/lib.linux-mips64-2.7/_psutil_linux.so
4、最后验证OK
问题4:
initialize KafkaConsumerSpout faile
报错信息
java.lang.UnsatisfiedLinkError: Could not load library. Reasons: [no leveldbjni in
java.library.path, /var/lib/ambari-agent/tmp/hadoop_java_io_tmpdir/libleveldbjni-64-
7449287964367173036.so: libleveldb.so.1: 无法打开共享对象文件: 没有那个文件或目录]
解决办法
yum install leveldb
问题六 ambari collector 无法启动:
解决办法:把保存监控数据的/var/lib/ambari-metrics-collector/目录下的三个文件夹
checkpoint 、hbase 和 hbase-tmp 删除(可以先备份),然后重启 Metrics Collector。
问题5:storm 报错:Could not find leader nimbus from seed hosts
[“127.0.0.1”]
解决办法:删除 zookeeper 下的 storm 节点数据,重启 zookeeper,重新发布 topology 到
storm 集群即可。
1.zk 操作方式:
cd /usr/hdp/2.6.0.3-8/zookeeper
./bin/zkCli.sh -server 172.16.0.132:2181
#如果在本机且端口默认是 2181,可直接输入
./bin/zkCli.sh
2.然后输入命令:
ls /
3.显示[zookeeper,storm]
4.执行命令删除:
rmr /storm
问题6:安装确认主机 “SSLError“ 错误 终极解决方案
Ambari 安装过程中,确认主机步骤(Confirm Hosts) 遇到如下错误:
ERROR 2018-08-02 11:25:09,300 NetUtil.py:96 - EOF occurred in violation of protocol (_ssl.c:579)
ERROR 2018-08-02 11:25:09,300 NetUtil.py:97 - SSLError: Failed to connect. Please check openssl library versions.
Refer to: https://bugzilla.redhat.com/show_bug.cgi?id=1022468 for more details.
根本原因是 openssl 和 ambi-agent 默认配置所致。下面总结的方案可以解决绝大部分状况:
终极解决方案:
① 查看 openssl 版本:
[root@ambari ~]# openssl versionOpenSSL 1.0.2k-fips 26 Jan 2017[root@ambari ~]# rpm -qa | grep opensslopenssl-libs-1.0.2k-12.el7.x86_64openssl-1.0.2k-12.el7.x86_64
如果低于 openssl-1.0.1e-16.el6.x86_64 版本,则需要更新到 openssl-1.0.1e-16.el6.x86_64 及以上版本
② 查看 Python 版本:
[root@ambari ~]# python -VPython 2.7.5
如果低于 Python 2.7 版本,则升级 Python 到 2.7 及以上版本。
③ 编辑 /etc/python/cert-verification.cfg 配置文件,将 [https] 节的 verify 项设为禁用:
[root@ambari ~]# vi /etc/python/cert-verification.cfg# Possible values are:# 'enable' to ensure HTTPS certificate verification is enabled by default# 'disable' to ensure HTTPS certificate verification is disabled by default# 'platform_default' to delegate the decision to the redistributor providing this particular Python version# For more info refer to https://www.python.org/dev/peps/pep-0493/[https]verify=disable
④ 编辑 /etc/ambari-agent/conf/ambari-agent.ini 配置文件,在 [security] 节部分,确保设置如下两个值,其它值保持不变:
[root@ambari ~]# vi /etc/ambari-agent/conf/ambari-agent.ini[security]ssl_verify_cert=0force_https_protocol=PROTOCOL_TLSv1_2
保存退出,重启 ambari-agent:
ambari-agent restart
重新执行确认主机步骤(Confirm Hosts),即可通过确认主机并完成注册。
问题7
2019-11-15 18:14:40,571 - Skipping installation of existing package hdp-select
2019-11-15 18:14:41,337 - checked_call['rpm -q --queryformat '%{version}-%{release}' hdp-select | sed -e 's/\.el[0-9]//g''] {'stderr': -1}
2019-11-15 18:14:41,579 - checked_call returned (0, '2.6.0.3-8', '')
2019-11-15 18:14:41,582 - Package['hadoop_2_6_0_3_8-yarn'] {'retry_on_repo_unavailability': False, 'retry_count': 5}
2019-11-15 18:14:42,013 - Installing package hadoop_2_6_0_3_8-yarn ('/usr/bin/yum -d 0 -e 0 -y install hadoop_2_6_0_3_8-yarn')
2019-11-15 18:14:49,320 - Execution of '/usr/bin/yum -d 0 -e 0 -y install hadoop_2_6_0_3_8-yarn' returned 1. Error: Package: hadoop_2_6_0_3_8-2.7.3.2.6.0.3-8.mips64el (HDP-2.6.0.3)Requires: redhat-lsb-coreYou could try using --skip-broken to work around the problemYou could try running: rpm -Va --nofiles --nodigest
2019-11-15 18:14:49,321 - Failed to install package hadoop_2_6_0_3_8-yarn. Executing '/usr/bin/yum clean metadata'
2019-11-15 18:14:50,006 - Retrying to install package hadoop_2_6_0_3_8-yarn after 30 secondsCommand failed after 1 tries
解决
https://www.showdoc.cc/p/edbe1165dc0419e772443efda8702be1
问题8
2019-11-25 14:54:24,084 - Installing package hadoop_2_6_0_3_8-hdfs ('/usr/bin/yum -d 0 -e 0 -y install hadoop_2_6_0_3_8-hdfs')
2019-11-25 14:54:31,422 - Execution of '/usr/bin/yum -d 0 -e 0 -y install hadoop_2_6_0_3_8-hdfs' returned 1. Error: Package: hadoop_2_6_0_3_8-hdfs-2.7.3.2.6.0.3-8.mips64el (HDP-2.6.0.3)Requires: libtirpc-develYou could try using --skip-broken to work around the problemYou could try running: rpm -Va --nofiles --nodigest
2019-11-25 14:54:31,423 - Failed to install package hadoop_2_6_0_3_8-hdfs. Executing '/usr/bin/yum clean metadata'
2019-11-25 14:54:32,021 - Retrying to install package hadoop_2_6_0_3_8-hdfs after 30 secondsCommand failed after 1 tries
解决
中标的yum源上有这个包
[外链图片转存失败,源站可能有防盗链机制,建议将图片保存下来直接上传(img-53Qg3u4y-1640485021082)(https://www.showdoc.cc/server/api/common/visitfile/sign/f132bfc4146b8cb89cbdaf69f246fc10?showdoc=.jpg “问题十”)]
下载
[root@node1 libtir]# wget http://download.cs2c.com.cn/neokylin/server/everything/7.0/ls_64/RPMS/libtirpc-devel-0.2.4-0.10.ns7_4.mips64el.rpm
手动安装
[root@node1 libtir]# rpm -iv libtirpc-devel-0.2.4-0.10.ns7_4.mips64el.rpm
警告:libtirpc-devel-0.2.4-0.10.ns7_4.mips64el.rpm: 头V3 RSA/SHA1 Signature, 密钥 ID 7a486d9f: NOKEY
软件包准备中...
libtirpc-devel-0.2.4-0.10.ns7_4.mips64el
[root@node1 libtir]#
问题9
Package: snappy-devel-1.1.0-3.el7.mips64el (HDP-UTILS-1.1.0.21)Requires: snappy(ppc-64) = 1.1.0-3.el7Available: snappy-1.1.0-3.el7.mips64el (HDP-UTILS-1.1.0.21)snappy(ppc-64) = 1.1.0-3.el7Installed: snappy-1.1.3-2.ns7_4.mips64el (@anaconda/rawhide)Not found
解决同问题十
snappy-1.1.3-2.ns7_4.mips64el
wget http://download.cs2c.com.cn/neokylin/server/everything/7.0/ls_64/RPMS/snappy-1.1.3-2.ns7_4.mips64el.rpm
wget http://download.cs2c.com.cn/neokylin/server/everything/7.0/ls_64/RPMS/snappy-devel-1.1.3-2.ns7_4.mips64el.rpm
问题10
MySQL Server Install
2019-11-25 16:40:16,572 - Package['mysql-community-release'] {'retry_on_repo_unavailability': False, 'retry_count': 5}
2019-11-25 16:40:16,983 - Skipping installation of existing package mysql-community-release
2019-11-25 16:40:16,991 - Package['mysql-community-server'] {'retry_on_repo_unavailability': False, 'retry_count': 5}
2019-11-25 16:40:17,038 - Installing package mysql-community-server ('/usr/bin/yum -d 0 -e 0 -y install mysql-community-server')
2019-11-25 16:40:19,183 - Execution of '/usr/bin/yum -d 0 -e 0 -y install mysql-community-server' returned 1. Error: Nothing to do
2019-11-25 16:40:19,184 - Failed to install package mysql-community-server. Executing '/usr/bin/yum clean metadata'
2019-11-25 16:40:19,807 - Retrying to install package mysql-community-server after 30 seconds
是由于在安装中hive选择的新建mysql,而我们的平台yum源没有mysql的包,所会有报错,使用mariedb代替,提前建立数据库,安装中选择已存在的数据库
这篇关于龙芯-大数据平台搭建(ambari+hdp)的文章就介绍到这儿,希望我们推荐的文章对编程师们有所帮助!


