本文主要是介绍OpenWrt 23.05 安装之后默认空间小 磁盘扩容 教程 软路由实测 系列六,希望对大家解决编程问题提供一定的参考价值,需要的开发者们随着小编来一起学习吧!
1 安装fdisk
opkg update
opkg install fdisk
#查看磁盘
root@OpenWrt:~# fdisk -l
GPT PMBR size mismatch (246303 != 250069679) will be corrected by write.
The backup GPT table is not on the end of the device.
Disk /dev/sda: 119.24 GiB, 128035676160 bytes, 250069680 sectors
Disk model: ASUS-S-128G1BYB0
Units: sectors of 1 * 512 = 512 bytes
Sector size (logical/physical): 512 bytes / 512 bytes
I/O size (minimum/optimal): 512 bytes / 512 bytes
Disklabel type: gpt
Disk identifier: 7117DB1B-5559-E8FA-6528-E16757565D00Device      Start    End Sectors  Size Type
/dev/sda1     512  33279   32768   16M Linux filesystem
/dev/sda2   33280 246271  212992  104M Linux filesystem
/dev/sda128    34    511     478  239K BIOS bootPartition table entries are not in disk order.
2 安装parted
opkg install parted
#修复
root@OpenWrt:~# parted -l
Warning: Not all of the space available to /dev/sda appears to be used, you can
fix the GPT to use all of the space (an extra 249823375 blocks) or continue with
the current setting?
Fix/Ignore? fix
Model: ATA ASUS-S-128G1BYB0 (scsi)
Disk /dev/sda: 128GB
Sector size (logical/physical): 512B/512B
Partition Table: gpt
Disk Flags: Number  Start   End     Size    File system  Name  Flags
128     17.4kB  262kB   245kB                      bios_grub1      262kB   17.0MB  16.8MB  fat16              legacy_boot2      17.0MB  126MB   109MB   ext2
#查看磁盘
root@OpenWrt:~# parted -l
Model: ATA ASUS-S-128G1BYB0 (scsi)
Disk /dev/sda: 128GB
Sector size (logical/physical): 512B/512B
Partition Table: gpt
Disk Flags: Number  Start   End     Size    File system  Name  Flags
128     17.4kB  262kB   245kB                      bios_grub1      262kB   17.0MB  16.8MB  fat16              legacy_boot2      17.0MB  126MB   109MB   ext2
3 安装cfdisk ,分配剩余磁盘空间
opkg  update
opkg install cfdisk
#开始分区,未分配的磁盘空间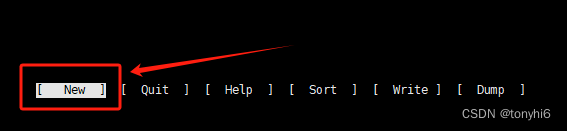
cfdisk /dev/sda 
# 选择NEW --.输入空间大小


4 分区查看格式
root@OpenWrt:~# fdisk -l
Disk /dev/sda: 119.24 GiB, 128035676160 bytes, 250069680 sectors
Disk model: ASUS-S-128G1BYB0
Units: sectors of 1 * 512 = 512 bytes
Sector size (logical/physical): 512 bytes / 512 bytes
I/O size (minimum/optimal): 512 bytes / 512 bytes
Disklabel type: gpt
Disk identifier: 7117DB1B-5559-E8FA-6528-E16757565D00Device       Start       End   Sectors   Size Type
/dev/sda1      512     33279     32768    16M Linux filesystem
/dev/sda2    33280    246271    212992   104M Linux filesystem
/dev/sda3   247808 250068991 249821184 119.1G Linux filesystem
/dev/sda128     34       511       478   239K BIOS bootPartition table entries are not in disk order.
root@OpenWrt:~# df -h
Filesystem                Size      Used Available Use% Mounted on
/dev/root               102.3M     57.1M     43.1M  57% /
tmpfs                     3.8G     11.5M      3.8G   0% /tmp
/dev/sda1                16.0M      6.1M      9.8M  38% /boot
/dev/sda1                16.0M      6.1M      9.8M  38% /boot
tmpfs                   512.0K         0    512.0K   0% /dev
#新分区格式化
root@OpenWrt:~# mkfs.ext4 /dev/sda3
mke2fs 1.47.0 (5-Feb-2023)
Discarding device blocks: done
Creating filesystem with 31227648 4k blocks and 7806976 inodes
Filesystem UUID: 5f4ddd57-cf95-4953-b292-8a7b37cebc4b
Superblock backups stored on blocks: 32768, 98304, 163840, 229376, 294912, 819200, 884736, 1605632, 2654208, 4096000, 7962624, 11239424, 20480000, 23887872Allocating group tables: done
Writing inode tables: done
Creating journal (131072 blocks): done
Writing superblocks and filesystem accounting information: done
5 OpenWrt web 导航菜单中没有,挂载点,需要安装
opkg update
opkg install block-mount
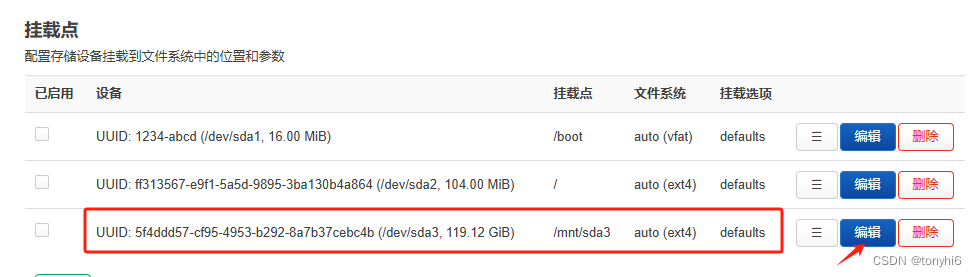
reboot#web 登录openwrt 选择 系统-->挂载点 找到新创建的分区
#ssh 登录openwrt
#逐条执行,确保成功
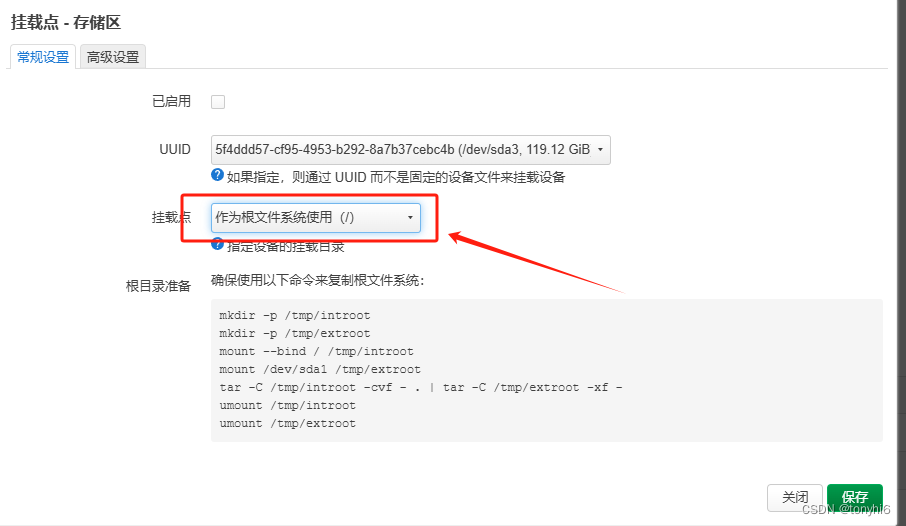
mkdir -p /tmp/introot
mkdir -p /tmp/extroot
mount --bind / /tmp/introot
mount /dev/sda3 /tmp/extroot #注意挂载新分区(⊙﹏⊙)
tar -C /tmp/introot -cvf - . | tar -C /tmp/extroot -xf -
umount /tmp/introot
umount /tmp/extroot#WEB 页面 --挂载点--保存

6 重新启动openwrt服务器,查看磁盘
root@OpenWrt:~# df  -hT
Filesystem           Type            Size      Used Available Use% Mounted on
/dev/root            ext4          102.3M     57.9M     42.4M  58% /rom
tmpfs                tmpfs           3.8G      3.6M      3.8G   0% /tmp
/dev/sda3            ext4          116.7G     59.9M    110.7G   0% /
/dev/sda1            vfat           16.0M      6.1M      9.8M  38% /boot
/dev/sda1            vfat           16.0M      6.1M      9.8M  38% /boot
tmpfs                tmpfs         512.0K         0    512.0K   0% /dev

这篇关于OpenWrt 23.05 安装之后默认空间小 磁盘扩容 教程 软路由实测 系列六的文章就介绍到这儿,希望我们推荐的文章对编程师们有所帮助!


