1. 前言
按照我自己设计的物联网框架,对于MQTT集群中的所有消息,是要持久化到磁盘的,这里采用一个消息队列中间件Kafka作为数据缓冲,缓冲结果存到数据仓库中,以供后续作为数据分析。由于MQTT集群中的消息都是比较分散的,所以使用Kafka来聚合、采集消息。
2. 下载&编译&安装
Kafka依赖ZooKeeper
在这里下载 http://mirrors.shuosc.org/apache/zookeeper/zookeeper-3.4.11/zookeeper-3.4.11.tar.gz
http://mirrors.shuosc.org/apache/kafka/1.0.0/kafka-1.0.0-src.tgz
http://mirror.bit.edu.cn/apache/kafka/1.0.0/kafka_2.12-1.0.0.tgz
学习的话, 可以参考这个文档 http://orchome.com/kafka/index
配置使用过程可以参考官网的 http://kafka.apache.org/quickstart http://zookeeper.apache.org/doc/current/zookeeperStarted.html ,有些资料因为版本升级的原因,已经不是以前的那种启动方式了。https://cwiki.apache.org/confluence/display/KAFKA/Clients
3. 启动Zookeeper
1 cp ./conf/zoo_sample.cfg ./conf/zoo.cfg
2 ./bin/zkServer.sh start
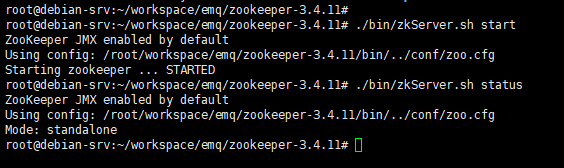
上图,就表示启动单机模式。
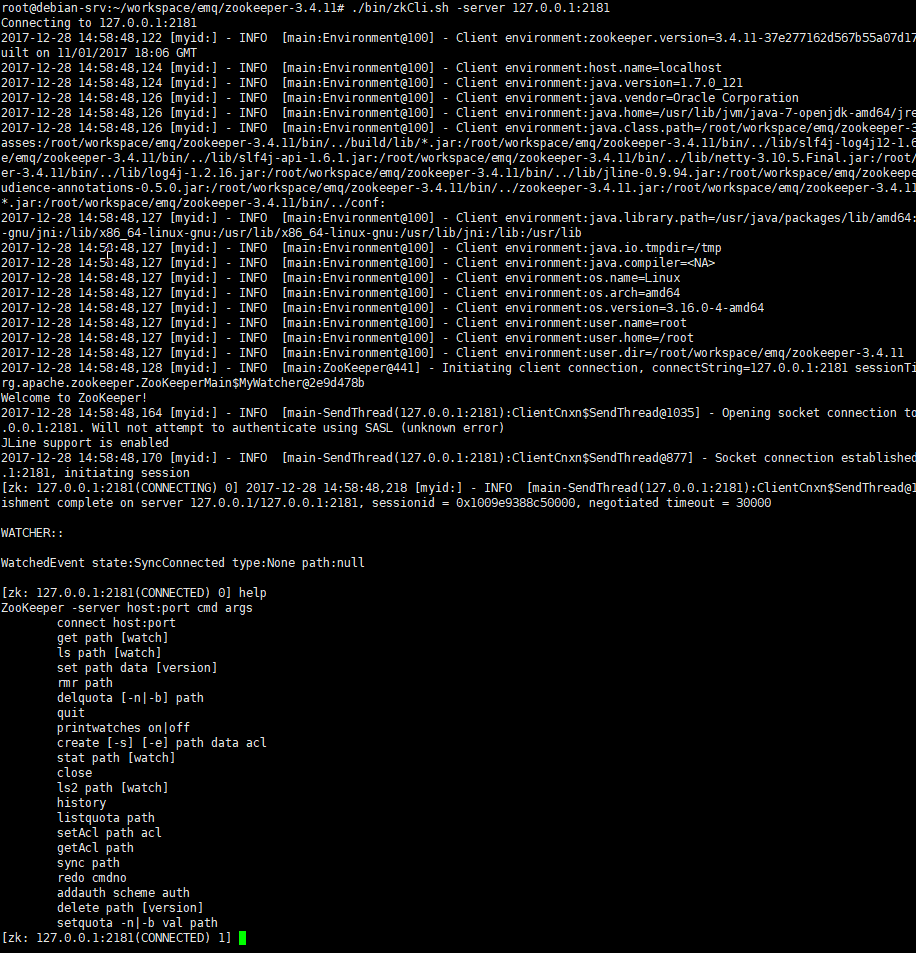
./bin/zkCli.sh -server 127.0.0.1:2181 进行连接
然后进入命令行模式,可以慢慢玩了
单击模式就没有什么要配置的。最多修改zoo.cfg中的dataDir文件
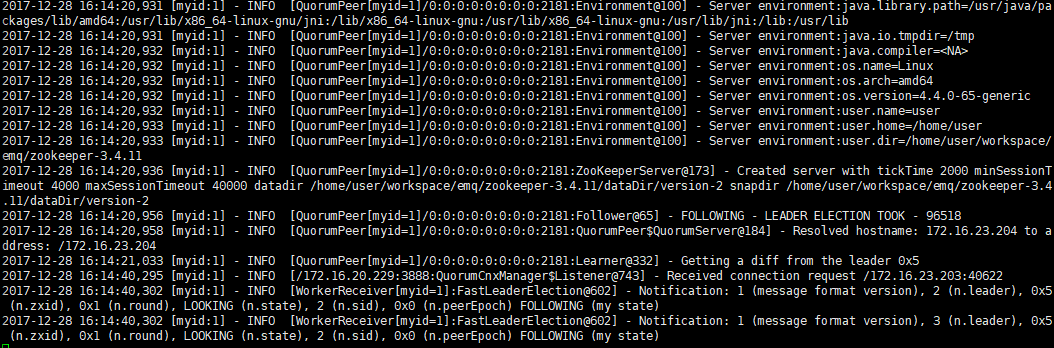
ZooKeeper启动replicated模式,集群模式
zoo.cfg 增加服务器集群信息
1 server.1=172.16.20.229:2888:3888
2 server.2=172.16.23.203:2888:3888
3 server.3=172.16.23.204:2888:3888
1 ./bin/zkServer.sh start-foreground #启动
注意在echo “1” > %dataDir%/myid 对于每个服务器都要创建一个myid文件
启动都是会有一些奇奇怪怪的问题,上网找资料就可以了。
一般第一台ZooKeeper启动是会有Connection refused 出错,这个是正常的,后面的两台还没有启动,不过后面也一个一个启动了。
如果过程中,有一个断开了,然后修改数据,然后这个断开的又连上了,那么ZooKeeper集群内部会镜像diff
1 2017-12-28 16:30:38,570 [myid:3] - INFO [QuorumPeer[myid=3]/0.0.0.0:2181:Learner@332] - Getting a diff from the leader 0x100000005
然后就用客户端A
1 ./bin/zkCli.sh -server 172.16.20.229:2181
2 ls /
3 create /zk_test my_data
4 ls /
然后用客户端B
1 ./bin/zkCli.sh -server 172.16.23.203:2181
2 ls /
3 get /zk_test
4 ls /
可以看到ZooKeeper信息在内部进行了共享
具体可以参考这篇博客 http://www.cnblogs.com/sunddenly/p/4018459.html
4. 启动 Kafka
由于kafka以来ZooKeeper,所以有了上面一步的ZooKeeper了解。
实际中,可以直接下载kafka的二进制包,直接使用,http://mirror.bit.edu.cn/apache/kafka/1.0.0/kafka_2.12-1.0.0.tgz
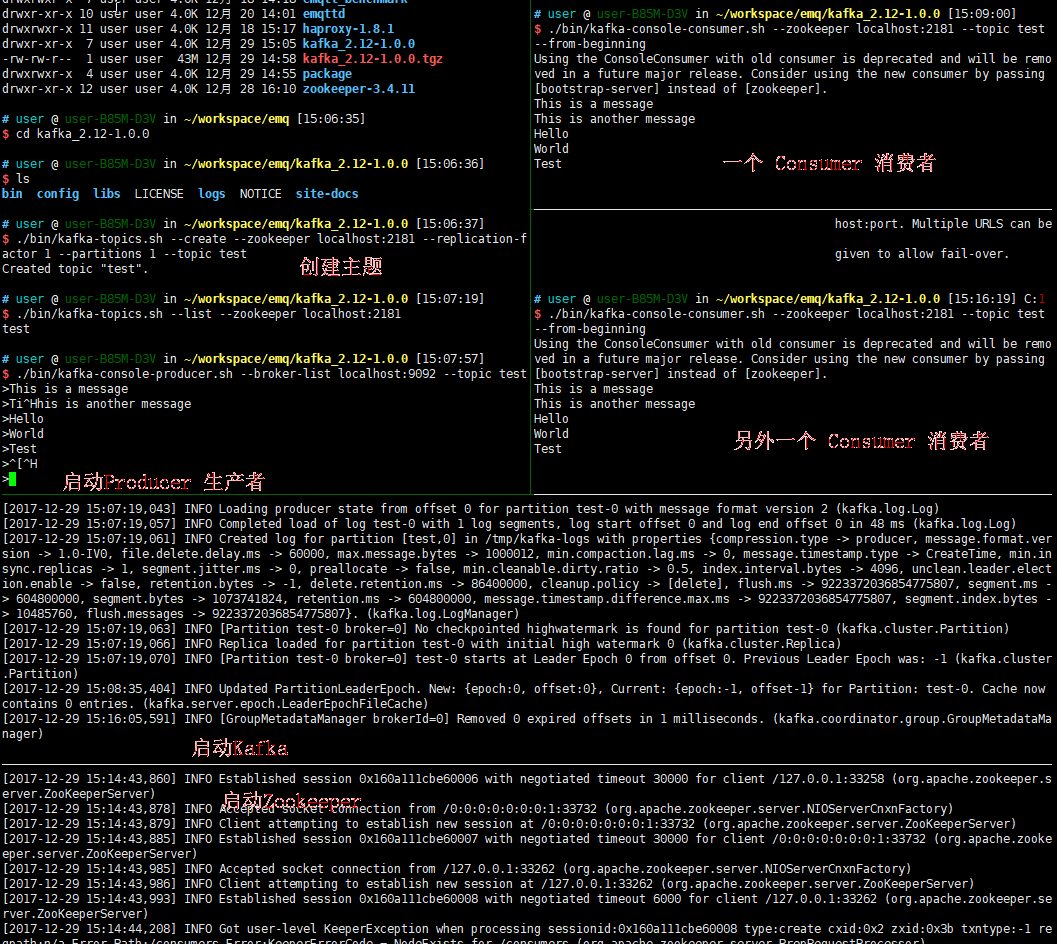
启动Zookeeper
1 ./bin/zookeeper-server-start.sh config/zookeeper.properties
启动Kafka
1 ./bin/kafka-server-start.sh config/server.properties
创建主题
1 ./bin/kafka-topics.sh --create --zookeeper localhost:2181 --replication-factor 1 --partitions 1 --topic test
查看主题
1 ./bin/kafka-topics.sh --list --zookeeper localhost:2181
发送消息
1 ./bin/kafka-console-producer.sh --broker-list localhost:9092 --topic test
消费消息
1 ./bin/kafka-console-consumer.sh --zookeeper localhost:2181 --topic test --from-beginning
5. Erlang 连接 kafka
主要参考这个 https://github.com/msdevanms/emqttd_plugin_kafka_bridge
增加依赖 https://github.com/helpshift/ekaf.git
首先在Makefile增加
1 DEPS = eredis ecpool clique ekaf
2 dep_ekaf = git https://github.com/helpshift/ekaf master
然后在rebar.config 增加
1 {ekaf, “.*”, {git, “https://github.com/helpshift/ekaf”, “master”}} 在etc/emq_plugin_wunaozai.conf 中增加
1 ## kafka config
2 wunaozai.msg.kafka.server = 127.0.0.1:9092
3 wunaozai.msg.kafka.topic = test
在priv/emq_plugin_wunaozai.schema 中增加

 1 %% wunaozai.msg.kafka.server = 127.0.0.1:90922 {3     mapping,4     "wunaozai.msg.kafka.server",5     "emq_plugin_wunaozai.kafka",6     [7         {default, {"127.0.0.1", 9092}},8         {datatype, [integer, ip, string]}9     ]
10 }.
11
12 %% wunaozai.msg.kafka.topic = test
13 {
14     mapping,
15     "wunaozai.msg.kafka.topic",
16     "emq_plugin_wunaozai.kafka",
17     [
18         {default, "test"},
19         {datatype, string},
20         hidden
21     ]
22 }.
23
24 %% translation
25 {
26     translation,
27     "emq_plugin_wunaozai.kafka",
28     fun(Conf) ->
29             {RHost, RPort} = case cuttlefish:conf_get("wunaozai.msg.kafka.server", Conf) of
30                                  {Ip, Port} -> {Ip, Port};
31                                  S          -> case string:tokens(S, ":") of
32                                                    [Domain]       -> {Domain, 9092};
33                                                    [Domain, Port] -> {Domain, list_to_integer(Port)}
34                                                end
35                              end,
36             Topic = cuttlefish:conf_get("wunaozai.msg.kafka.topic", Conf),
37             [
38              {host, RHost},
39              {port, RPort},
40              {topic, Topic}
41             ]
42     end
43 }.
6. 数据发往Kafka
接下来,由于功能基本上是基于EMQ框架的Hook钩子设计,在EMQ接收到客户端上下线、主题订阅或消息发布确认时,触发钩子顺序执行回调函数,所以大部分功能在 src/emq_plugin_wunaozai.erl 文件进行修改。
  1 -module(emq_plugin_wunaozai).2 3 -include("emq_plugin_wunaozai.hrl").4 5 -include_lib("emqttd/include/emqttd.hrl").6 7 -export([load/1, unload/0]).8 9 %% Hooks functions10 11 -export([on_client_connected/3, on_client_disconnected/3]).12 13 -export([on_client_subscribe/4, on_client_unsubscribe/4]).14 15 -export([on_session_created/3, on_session_subscribed/4, on_session_unsubscribed/4, on_session_terminated/4]).16 17 -export([on_message_publish/2, on_message_delivered/4, on_message_acked/4]).18 19 %% Called when the plugin application start20 load(Env) ->21     ekaf_init([Env]),22     emqttd:hook('client.connected', fun ?MODULE:on_client_connected/3, [Env]),23     emqttd:hook('client.disconnected', fun ?MODULE:on_client_disconnected/3, [Env]),24     emqttd:hook('client.subscribe', fun ?MODULE:on_client_subscribe/4, [Env]),25     emqttd:hook('client.unsubscribe', fun ?MODULE:on_client_unsubscribe/4, [Env]),26     emqttd:hook('session.created', fun ?MODULE:on_session_created/3, [Env]),27     emqttd:hook('session.subscribed', fun ?MODULE:on_session_subscribed/4, [Env]),28     emqttd:hook('session.unsubscribed', fun ?MODULE:on_session_unsubscribed/4, [Env]),29     emqttd:hook('session.terminated', fun ?MODULE:on_session_terminated/4, [Env]),30     emqttd:hook('message.publish', fun ?MODULE:on_message_publish/2, [Env]),31     emqttd:hook('message.delivered', fun ?MODULE:on_message_delivered/4, [Env]),32     emqttd:hook('message.acked', fun ?MODULE:on_message_acked/4, [Env]),33     io:format("start wunaozai Test Reload.~n", []).34 35 on_client_connected(ConnAck, Client = #mqtt_client{client_id = ClientId}, _Env) ->36     io:format("client ~s connected, connack: ~w~n", [ClientId, ConnAck]),37     ekaf_send(<<"connected">>, ClientId, {}, _Env),38     {ok, Client}.39 40 on_client_disconnected(Reason, _Client = #mqtt_client{client_id = ClientId}, _Env) ->41     io:format("client ~s disconnected, reason: ~w~n", [ClientId, Reason]),42     ekaf_send(<<"disconnected">>, ClientId, {}, _Env),43     ok.44 45 on_client_subscribe(ClientId, Username, TopicTable, _Env) ->46     io:format("client(~s/~s) will subscribe: ~p~n", [Username, ClientId, TopicTable]),47     {ok, TopicTable}.48     49 on_client_unsubscribe(ClientId, Username, TopicTable, _Env) ->50     io:format("client(~s/~s) unsubscribe ~p~n", [ClientId, Username, TopicTable]),51     {ok, TopicTable}.52 53 on_session_created(ClientId, Username, _Env) ->54     io:format("session(~s/~s) created.", [ClientId, Username]).55 56 on_session_subscribed(ClientId, Username, {Topic, Opts}, _Env) ->57     io:format("session(~s/~s) subscribed: ~p~n", [Username, ClientId, {Topic, Opts}]),58     ekaf_send(<<"subscribed">>, ClientId, {Topic, Opts}, _Env),59     {ok, {Topic, Opts}}.60 61 on_session_unsubscribed(ClientId, Username, {Topic, Opts}, _Env) ->62     io:format("session(~s/~s) unsubscribed: ~p~n", [Username, ClientId, {Topic, Opts}]),63     ekaf_send(<<"unsubscribed">>, ClientId, {Topic, Opts}, _Env),64     ok.65 66 on_session_terminated(ClientId, Username, Reason, _Env) ->67     io:format("session(~s/~s) terminated: ~p.~n", [ClientId, Username, Reason]),68     stop.69 70 %% transform message and return71 on_message_publish(Message = #mqtt_message{topic = <<"$SYS/", _/binary>>}, _Env) ->72     {ok, Message};73 on_message_publish(Message, _Env) ->74     io:format("publish ~s~n", [emqttd_message:format(Message)]),75     ekaf_send(<<"public">>, {}, Message, _Env),76     {ok, Message}.77 78 on_message_delivered(ClientId, Username, Message, _Env) ->79     io:format("delivered to client(~s/~s): ~s~n", [Username, ClientId, emqttd_message:format(Message)]),80     {ok, Message}.81 82 on_message_acked(ClientId, Username, Message, _Env) ->83     io:format("client(~s/~s) acked: ~s~n", [Username, ClientId, emqttd_message:format(Message)]),84     {ok, Message}.85 86 %% Called when the plugin application stop87 unload() ->88     emqttd:unhook('client.connected', fun ?MODULE:on_client_connected/3),89     emqttd:unhook('client.disconnected', fun ?MODULE:on_client_disconnected/3),90     emqttd:unhook('client.subscribe', fun ?MODULE:on_client_subscribe/4),91     emqttd:unhook('client.unsubscribe', fun ?MODULE:on_client_unsubscribe/4),92     emqttd:unhook('session.created', fun ?MODULE:on_session_created/3),93     emqttd:unhook('session.subscribed', fun ?MODULE:on_session_subscribed/4),94     emqttd:unhook('session.unsubscribed', fun ?MODULE:on_session_unsubscribed/4),95     emqttd:unhook('session.terminated', fun ?MODULE:on_session_terminated/4),96     emqttd:unhook('message.publish', fun ?MODULE:on_message_publish/2),97     emqttd:unhook('message.delivered', fun ?MODULE:on_message_delivered/4),98     emqttd:unhook('message.acked', fun ?MODULE:on_message_acked/4).99
100 %% ==================== ekaf_init STA.===============================%%
101 ekaf_init(_Env) ->
102     % clique 方式读取配置文件
103     Env = application:get_env(?APP, kafka),
104     {ok, Kafka} = Env,
105     Host = proplists:get_value(host, Kafka),
106     Port = proplists:get_value(port, Kafka),
107     Broker = {Host, Port},
108     Topic = proplists:get_value(topic, Kafka),
109     io:format("~w ~w ~w ~n", [Host, Port, Topic]),
110
111     % init kafka
112     application:set_env(ekaf, ekaf_partition_strategy, strict_round_robin),
113     application:set_env(ekaf, ekaf_bootstrap_broker, Broker),
114     application:set_env(ekaf, ekaf_bootstrap_topics, list_to_binary(Topic)),
115     %application:set_env(ekaf, ekaf_bootstrap_broker, {"127.0.0.1", 9092}),
116     %application:set_env(ekaf, ekaf_bootstrap_topics, <<"test">>),
117
118     %io:format("Init ekaf with ~s:~b~n", [Host, Port]),
119     %%ekaf:produce_async_batched(<<"test">>, list_to_binary(Json)),
120     ok.
121 %% ==================== ekaf_init END.===============================%%
122
123
124 %% ==================== ekaf_send STA.===============================%%
125 ekaf_send(Type, ClientId, {}, _Env) ->
126     Json = mochijson2:encode([
127                               {type, Type},
128                               {client_id, ClientId},
129                               {message, {}},
130                               {cluster_node, node()},
131                               {ts, emqttd_time:now_ms()}
132                              ]),
133     ekaf_send_sync(Json);
134 ekaf_send(Type, ClientId, {Reason}, _Env) ->
135     Json = mochijson2:encode([
136                               {type, Type},
137                               {client_id, ClientId},
138                               {cluster_node, node()},
139                               {message, Reason},
140                               {ts, emqttd_time:now_ms()}
141                              ]),
142     ekaf_send_sync(Json);
143 ekaf_send(Type, ClientId, {Topic, Opts}, _Env) ->
144     Json = mochijson2:encode([
145                               {type, Type},
146                               {client_id, ClientId},
147                               {cluster_node, node()},
148                               {message, [
149                                          {topic, Topic},
150                                          {opts, Opts}
151                                         ]},
152                               {ts, emqttd_time:now_ms()}
153                              ]),
154     ekaf_send_sync(Json);
155 ekaf_send(Type, _, Message, _Env) ->
156     Id = Message#mqtt_message.id,
157     From = Message#mqtt_message.from, %需要登录和不需要登录这里的返回值是不一样的
158     Topic = Message#mqtt_message.topic,
159     Payload = Message#mqtt_message.payload,
160     Qos = Message#mqtt_message.qos,
161     Dup = Message#mqtt_message.dup,
162     Retain = Message#mqtt_message.retain,
163     Timestamp = Message#mqtt_message.timestamp,
164
165     ClientId = c(From),
166     Username = u(From),
167
168     Json = mochijson2:encode([
169                               {type, Type},
170                               {client_id, ClientId},
171                               {message, [
172                                          {username, Username},
173                                          {topic, Topic},
174                                          {payload, Payload},
175                                          {qos, i(Qos)},
176                                          {dup, i(Dup)},
177                                          {retain, i(Retain)}
178                                         ]},
179                               {cluster_node, node()},
180                               {ts, emqttd_time:now_ms()}
181                              ]),
182     ekaf_send_sync(Json).
183
184 ekaf_send_async(Msg) ->
185     Topic = ekaf_get_topic(),
186     ekaf_send_async(Topic, Msg).
187 ekaf_send_async(Topic, Msg) ->
188     ekaf:produce_async_batched(list_to_binary(Topic), list_to_binary(Msg)).
189 ekaf_send_sync(Msg) ->
190     Topic = ekaf_get_topic(),
191     ekaf_send_sync(Topic, Msg).
192 ekaf_send_sync(Topic, Msg) ->
193     ekaf:produce_sync_batched(list_to_binary(Topic), list_to_binary(Msg)).
194
195 i(true) -> 1;
196 i(false) -> 0;
197 i(I) when is_integer(I) -> I.
198 c({ClientId, Username}) -> ClientId;
199 c(From) -> From.
200 u({ClientId, Username}) -> Username;
201 u(From) -> From.
202 %% ==================== ekaf_send END.===============================%%
203
204
205 %% ==================== ekaf_set_host STA.===============================%%
206 ekaf_set_host(Host) ->
207     ekaf_set_host(Host, 9092).
208 ekaf_set_host(Host, Port) ->
209     Broker = {Host, Port},
210     application:set_env(ekaf, ekaf_bootstrap_broker, Broker),
211     io:format("reset ekaf Broker ~s:~b ~n", [Host, Port]),
212     ok.
213 %% ==================== ekaf_set_host END.===============================%%
214
215 %% ==================== ekaf_set_topic STA.===============================%%
216 ekaf_set_topic(Topic) ->
217     application:set_env(ekaf, ekaf_bootstrap_topics, list_to_binary(Topic)),
218     ok.
219 ekaf_get_topic() ->
220     Env = application:get_env(?APP, kafka),
221     {ok, Kafka} = Env,
222     Topic = proplists:get_value(topic, Kafka),
223     Topic.
224 %% ==================== ekaf_set_topic END.===============================%%
上面是所有源代码,下面对其进行简单说明
ekaf_init 函数,主要对配置文件的读取和解析并存放到application的环境变量中
ekaf_send 函数,主要是封装成对应的JSON数据,然后发到Kafka中
ekaf_send_async 函数,主要是异步发送JSON数据,不确保发往Kafka的顺序与Kafka消费者的接收时的顺序
ekaf_send_sync 函数,是同步发送JSON数据,确保按照顺序发往kafka与Kafka消费者有序接收数据
ekaf_set_host 函数,设置kafka的域名与端口
ekaf_set_topic 函数,设置发往kafka时的主题
ekaf_get_topic 函数,获取当前主题
load函数增加ekaf_init调用
剩下的在每个钩子回调中调用 ekaf_send函数
7. 测试
(1)启动Zookeeper ./bin/zookeeper-server-start.sh config/zookeeper.properties
(2)启动Kafka ./bin/kafka-server-start.sh config/server.properties
(3)启动消费者 ./bin/kafka-console-consumer.sh --zookeeper localhost:2181 --topic test --from-beginning
(4)启动一个生产者 ./bin/kafka-console-producer.sh --broker-list localhost:9092 --topic test
(5)启动EMQ ./_rel/emqttd/bin/emqttd console
(6)打开MQTT客户端并连接、订阅、发布等操作
(7)可以在消费者界面上看到获取到的信息

8. 插件源码
最后给出本次插件开发的所有源码
https://files.cnblogs.com/files/wunaozai/emq_plugin_wunaozai.zip


