testng专题
TestNG 入门教程
阅读目录 TestNG介绍在Eclipse中在线安装TestNG在Eclipse中离线安装TestngTestNG最简单的测试TestNG的基本注解TestNG中如何执行测试使用testtng.xml 文件执行 case TestNG按顺序执行CaseTestNG异常测试TestNG组测试TestNG参数化测试TestNG忽略测试TestNG 依赖测试TestNG测试结果报告 Test
转:TestNG官方文档中文版(02)—— Annotation
如下就是在TestNG中可以使用的annotation的速查预览,并且其中给出了属性: @BeforeSuite @AfterSuite @BeforeTest @AfterTest @BeforeGroups @AfterGroups @BeforeClass @AfterClass @BeforeMethod @AfterMethodTestNG 类的配置信息: @BeforeSuite:
TestNG离线安装步骤
1.下载testNG 离线安装包【eclipse-testng离线包】,并解压。资源可以在下载:http://download.csdn.net/detail/u012100968/9623613;(官方把下载积分调的出乎意料的高,还不能改,大家另外找资源吧) 2.将解压后的文件..\eclipse-testng离线包\features\目录下的文件夹org.testng.eclipse_6.9
TestNG入门教程-15-Java语言的断言和Junit的断言
前面几篇,我们差不多都是围绕测试失败来介绍,这篇来补充一下测试结果的一些知识。在TestNG的测试报告中有,成功,失败,跳过的三种状态。成功指的是用例执行完了没有抛出异常或者抛出的异常是期待的异常,没有任何报错,我们一般写断言语句来验证测试检查点是成功的。测试失败,就是指用例运行后遇到了报错,跳过是指,由于前面失败了,后面的用例无法执行就标记跳过的状态。这篇,我们来讨论下写测试用例的
使用reportNG替换testNG的默认报告
reportNG替换testNG reportng的官网介绍:http://reportng.uncommons.org/ 1.下载reportNG的jar包:http://pan.baidu.com/s/1hq5znLU 2.reprotNG的源码:https://github.com/dwdyer/reportng 3.在项目中导入reportNG的jar包 Maven 库配置地址 <d
基于Java+HttpClient+TestNG的接口自动化测试框架(四)-------参数存取处理
在真正开始接口测试之前,我们需要对参数的处理进行梳理。这里所说的“参数”,既包含之前在xml中的配置(我们称之为全局参数),也包含在每一条用例中书写的param。全局参数为固定不变的,而根据接口相应获取的数据是动态变化的。 之前我们已经用${param_name}的形式,定义了如何从公共参数池中调用所需要的参数。 并且当一个接口的请求发送完成,进行下一个接口操作的时候,我们也需要对相应
单元测试之TestNG知识点总结及代码示例
TestNG 是一个测试框架,用于自动化测试 Java 和 Scala 应用程序,它是 JUnit 和 NUnit 的一个强大替代品。TestNG 支持数据驱动测试、参数化测试、测试套件、依赖管理、多线程测试等特性。TestNG官网:TestNG Documentation 目录 1.TestNG 基本注解 2.TestNG 测试分组 3.TestNG 参数化测试 4.Test
Java自动化测试框架--TestNG详解
一. 什么是TestNG TestNG是一个开源的自动化测试框架,它受JUnit和NUnit启发,其中“NG”即表示Next Generation,其功能更强大使用更方便。 二. TestNG配置 2.1 POM文件配置 在maven工程的pom.xml文件中加入以下依赖: <dependency><groupId>org.testng</groupId><artifactId>test
testng传递参数
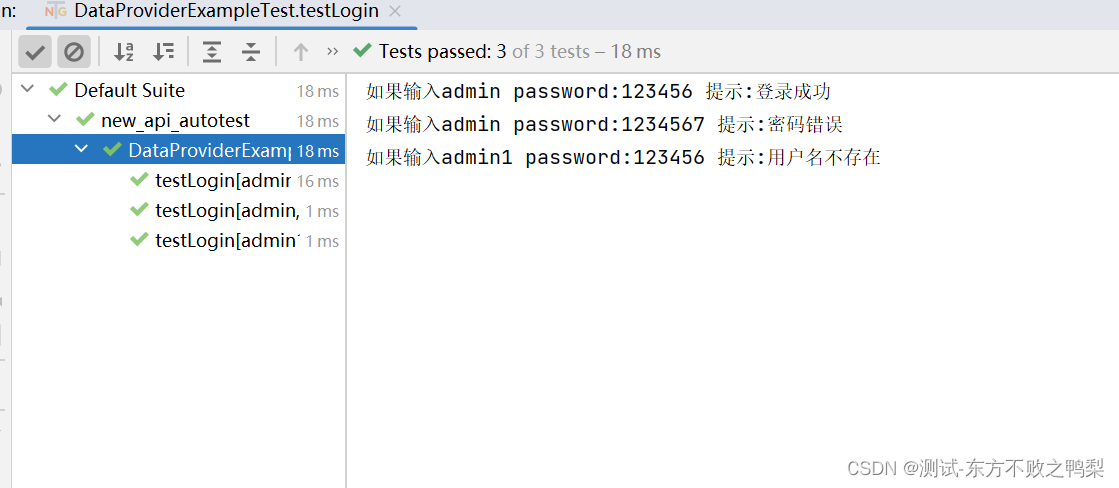
TestNG可以通过两种不同的方式将参数直接传递给测试方法: 使用testng.xml使用数据提供者 1.通过@DataProvider传递参数(支持传递对象参数) 注意:a,传递的参数类型和接收的参数类型需要一致,不然报错类型不匹配 b,dataProvider作为数据提供者只能返回Object[][]和Iterator<Object[]>类型的数据 2.通过testng.
testng 依赖测试
1.dependsOnMethods=({方法名})或者dependsOnMethods=(方法名),依赖的方法执行通过后,才会执行接下来的方法 a,方法lesson抛出异常,因此方法review不会被执行: b,方法lesson正常执行,方法review依赖方法lesson,因此继续执行 2. dependsOnGroups=group名,当依赖的group执行结束后,当前gr
testng 分组测试
1.方法上的分组 @BeforeGroups配置方法将在之前运行组列表。 此方法保证在调用属于这些组中的任何一个的第一个测试方法之前不久运行。@AfterGroups此配置方法将在之后运行组列表。该方法保证在调用属于任何这些组的最后一个测试方法之后不久运行。 使用<groups>标记在testng.xml文件中指定分组。 它可以在<test>或<suite>标签下找到。<suite>标签中指定
testng超时测试,预期异常测试,忽略测试
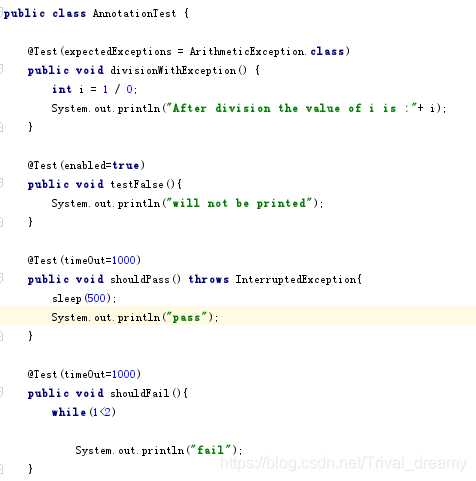
1.预期异常测试:如果符合异常,则执行通过;如果不符合,则抛出异常(如分母=1,不符合异常设置的条件,则抛出异常) 2.超时测试:如果测试未超时则通过,反之则自动停止并置为运行失败; 3.忽略测试:enabled默认=true,表示需要运行;设置为false则不执行
TestNG-分组groups
第一个例子: java代码: package com.kdzwy.practice; import org.testng.annotations.Test; /* *包名:com.kdzwy.practice *作者:Adien_cui *时间:2017-3-28 下午5:41:26 *描述:testng分组 **/ package com.kdzwy.practice; impo
TestNG的分析二
这章我们主要是自己构建testng的一些xmlclass,xmlsuite,xmltest,includemethod等对象来运行一个testng程序。 首先上一章testng的流测成图 相关代码: public class test3 {public static void main(String[] args) {DynamicGraph<ISuite> suiteGraph = new
testng的分析一
运行的代码是 自己设置listener, test class 设置是.class, 看看这个是testng run的路线 TestListenerAdapter testListenerAdapter = new TestListenerAdapter();TestNG testNG = new TestNG();testNG.setTestClasses(new Class[]{test2
TestNG的ITestListener
testng listener 类图 主要是继承 ItestListener里面的方法。当自定义listener 时候,主要是使用这些方法与运行时的testng交互获取结果。invoke 方法的定义见下面所示。后续开发者可编写自己的Listener进行对结果的再处理。 for example,testng类中有一个ExitCodeListener,其代码如下。 定义于 SuiteRunne
TestNG中的方法拦截器(重新排序测试方法)
在本文中,我们将讨论如何在TestNG中使用方法拦截器。TestNG按照方法名称的字母顺序运行我们的测试用例。如果TestNG已经决定了调用测试方法的顺序,那么我们可以将其分为两组: 方法以特定的顺序运行因此,依赖方法将在依赖方法之前运行。该方法的运行顺序不特别为了给予更多的控制权,TestNG为我们提供了方法拦截器。 public interface IMethodInterceptor e
Selenium+TestNG学习笔记
------------------TestNG-------------------- 1.层级 suite -》test-》class-》method 建议层级 class对应一个测试用例,suite对应一个测试集 2. testNG中的PO模式 3.运行多个测试类的测试用例 通过suite来进行管理;suite在testNG中可以通过xml 来进行编写管理。Cretae t
Testng测试框架(3)-数据驱动TestNG@DataProvider
TestNG 是一个强大的 Java 测试框架,它提供了许多高级功能,如参数化测试、依赖注入、分组等。其中,@DataProvider 是 TestNG 中一个非常有用的注解,用于为测试方法提供数据。 @DataProvider 的作用 使用 @DataProvider 注解的方法可以为测试方法提供多组数据。这样,你就可以用同一组测试逻辑来测试不同的输入数据。 如何使用 @DataProvi
Testng测试框架(5)--依赖
有时候,你需要按照特定的顺序调用测试方法。这里有几个例子: 在运行更多测试方法之前,确保一定数量的测试方法已经完成且成功。 在初始化你的测试时,同时希望这些初始化方法也是测试方法(用@Before/@After标记的方法不会成为最终报告的一部分)。 TestNG允许你使用注解或XML来指定依赖关系。 Dependencies with annotations 你可以使用@Test注解中的
Testng测试框架(4)-数据驱动
数据驱动 Testng使用 @Parameters注释传递任意参数给测试用例 There are three ways to set these parameters 有三种方法设置参数: 1、testng.xml文件 2、Programmatically 3、Java system properties testng.xml文件中的参数 @Parameters({ "first-name
java结合testng,利用XML做数据源的数据驱动示例
原文地址:http://www.cnblogs.com/zhangfei/archive/2012/10/10/2718989.html testng的功能很强大,利用@DataProvider可以做数据驱动,数据源文件可以是EXCEL,XML,YAML,甚至可以是TXT文本。在这以XML为例: 备注:@DataProvider的返回值类型只能是Object[][]与Iterator<O
有关在运行时生成testng.xml的更多信息
在这篇文章中,我们将重点介绍一些新的和令人兴奋的事情,我们可以在运行时或以编程方式制作testng.xml。 我们将涵盖以下内容。 在运行时生成testng.xml时是否包含方法功能?在运行时生成testng.xml时排除方法功能?是否在运行时将报表的输出目录更改为特定目录?我们如何以编程方式并行运行案例? 首先,让我们创建一个测试类(比如CodekruTest)和一些案例,我们将在整个帖子
如何在运行时或以编程方式生成testng.xml
我们可能会遇到一些场景,我们必须在运行时或以编程方式创建testng.xml文件。所以,在这篇文章中,我们将学习如何在运行时创建一个testng.xml文件并执行它。 让我们首先创建一个我们想要以编程方式执行的测试用例 package Test;import org.testng.Assert;import org.testng.annotations.Test;public class
testng xml 示例
testng.xml文件结构: <?xml version="1.0" encoding="UTF-8"?><!DOCTYPE suite SYSTEM "http://testng.org/testng-1.0.dtd"><suite name="suitename" junit="false" verbose="3" parallel="false" thread-count="5" a
如何将Maven与TestNG集成
我们已经讨论了如何在maven中执行单元测试用例,但那些是JUnit测试用例,而不是TestNG。当maven使用“mvn test”命令进入测试阶段时,这些用例被执行。 本文将介绍如何将Maven与TestNG集成,并在maven进入测试阶段时执行TestNG测试。 默认情况下,Maven执行src/test/java目录中的单元测试用例,我们将只遵循这个规范,并在src/test/java


