本文主要是介绍菜鸟江涛带你学最小物联网系统(外篇)——NB-IoT服务器搭建,基于CoAP协议的初次运行,希望对大家解决编程问题提供一定的参考价值,需要的开发者们随着小编来一起学习吧!
转眼2018已经过去了10来天了,因为一直在忙工作上的事情,没有精力来更新博客了,对于关注我的人说声抱歉,由于工作的转变,开始接触后台开发,因此新的一年我会鞭策自己,与大家分享和共同学习。
开始正文,公司的项目是物联网相关的终端产品,近期公司的项目中用到了NB-IoT技术,因此我也跟着学了点皮毛,拿在这里跟大家交流交流,如题所示,本文讨论的主题是使用NB通讯模块,基于CoAP协议与服务器进行通讯。
1.参考资料
(1)eclipse/californium 这个是Eclipse的coap框架Californium的Github地址
(2)放出我参考的大神的主页,大家其实也可以去他的博客中多多学习和借鉴。
【物联网 IoT 经验分享小站】三傻大闹宝莱坞——追求卓越 - CSDN博客 https://blog.csdn.net/xukai871105
2.物联网协议和实现

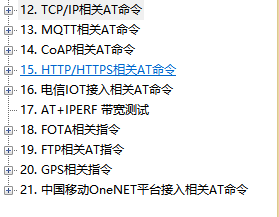
物联网NB-IoT网络通讯协议有很多种,上图中是我使用的物联网模块的说明书,可以看出该模块支持很多通讯传输协议,但受限于底层设备的性能和功耗要求,常常被拿出来讨论的也就数MQTT和CoAP最多,其中MQTT是基于TCP优化的协议,CoAP是基于UDP优化的协议。

关于CoAP的多语言实现,我在上图中也给大家列举了出来,因为我使用的Java开发服务端,所以只了解自己所需要的Californium框架,如果大家想了解其他的话,可以自行查找资料进行学习和总结。
3.实战例子以及注意事项
-
3.1 coap服务器端
/*** @Package com.cjt.coap* @author Cao Jiangtao* @Date 2019年1月11日*/
public class CoPServer {/*** @param args*/public static void main(String[] args) {CoapServer server = new CoapServer();// 资源1server.add(new CoapResource("hello") {@Overridepublic void handleGET(CoapExchange exchange) {
//				super.handleGET(exchange);System.out.println("hello -- "+exchange.toString());exchange.respond(ResponseCode.CONTENT , "Hello CoAP !! ");}});// 资源2server.add(new CoapResource("test",true) {@Overridepublic void handleGET(CoapExchange exchange) {
//				super.handleGET(exchange);SimpleDateFormat sdf = new SimpleDateFormat("YYYY-MM-DD HH:mm:ss");System.out.println("time -port- "+exchange.getSourcePort());System.out.println("time -code- "+exchange.getRequestCode());
//				exchange.respond(ResponseCode.CREATED, "create !");exchange.respond(ResponseCode.CONTENT ,"response time : " + sdf.format(new Date()));}@Overridepublic void handlePOST(CoapExchange exchange) {
//				super.handlePOST(exchange);String payload = exchange.getRequestText();System.out.println("客户端发送数据 --- string --- :"+payload);byte[] payloadBytes = exchange.getRequestPayload();System.out.println("客户端发送数据 ---  byte  --- :" + new String(payloadBytes));exchange.respond("msg hava received !");}});	// 启动server.start();System.out.println("COAP 服务器启动……");}
}
服务器端创建了两个资源,分别是hello和test,当coap客户端使用GET方法分别访问者两个资源的时候,会返回相应的提示。
两个注意事项:(1)依赖包的引入要注意,我稍后会放出我使用的依赖包的链接。
(2)如果是自己敲代码,在handleXXX方法重写的时候,要注意屏蔽super方法,或者挪到自己写的代码之后,我就是放到了前面,然后一直返回4.05--客户端错误代码。
-
3.2 coap客户端
import java.io.FileOutputStream;
import java.io.IOException;
import java.net.URI;
import java.net.URISyntaxException;import org.eclipse.californium.core.CoapClient;
import org.eclipse.californium.core.CoapResponse;
import org.eclipse.californium.core.Utils;/*** @Package com.cjt.client* @author Cao Jiangtao* @Date 2019年1月18日*/
public class GETClient {/** Application entry point.* */	public static void main(String args[]) {URI uri = null; // URI parameter of the requestif (args.length > 0) {// input URI from command line argumentstry {uri = new URI(args[0]);} catch (URISyntaxException e) {System.err.println("Invalid URI: " + e.getMessage());System.exit(-1);}CoapClient client = new CoapClient(uri);CoapResponse response = client.get();if (response!=null) {System.out.println(response.getCode());System.out.println(response.getOptions());if (args.length > 1) {try (FileOutputStream out = new FileOutputStream(args[1])) {out.write(response.getPayload());} catch (IOException e) {e.printStackTrace();}} else {System.out.println(response.getResponseText());System.out.println(System.lineSeparator() + "ADVANCED" + System.lineSeparator());// access advanced API with access to more details through// .advanced()System.out.println(Utils.prettyPrint(response));}} else {System.out.println("No response received.");}} else {// display helpSystem.out.println("Californium (Cf) GET Client");System.out.println("(c) 2014, Institute for Pervasive Computing, ETH Zurich");System.out.println();System.out.println("Usage : " + GETClient.class.getSimpleName() + " URI [file]");System.out.println("  URI : The CoAP URI of the remote resource to GET");System.out.println("  file: optional filename to save the received payload");}}}
我的coap客户端使用的访问方式是GET方式,外界传入的URI(IP或URL+资源路径)创建客户端实例,然后调用client.get()方法 ,表示客户端使用GET方法进行资源访问,当然你也可以按照需要改成自己想要的访问方法,coap一共支持四种访问方式,分写是GET , POST ,PUT , DELETE。
4.看下运行的效果
我是直接在电脑上运行的,客户端我直接打包成了可运行的jar包,这样可以很方便的进行测试,随时可以修改访问的服务端的资源。

访问的结果信息如下:
C:\Users\XYSM>java -jar C:\Users\XYSM\Desktop\client.jar coap://127.0.0.1/hello
2.05
{"Content-Format":"text/plain"}
Hello CoAP !!ADVANCED==[ CoAP Response ]============================================
MID    : 29674
Token  : [d26e24b54d9f1b7c]
Type   : ACK
Status : 2.05
Options: {"Content-Format":"text/plain"}
RTT    : 9 ms
Payload: 14 Bytes
---------------------------------------------------------------
Hello CoAP !!
===============================================================C:\Users\XYSM>java -jar C:\Users\XYSM\Desktop\client.jar coap://127.0.0.1/test
2.05
{"Content-Format":"text/plain"}
response time : 2019-01-21 12:12:02ADVANCED==[ CoAP Response ]============================================
MID    : 49012
Token  : [42dfc6b47ef26c16]
Type   : ACK
Status : 2.05
Options: {"Content-Format":"text/plain"}
RTT    : 10 ms
Payload: 35 Bytes
---------------------------------------------------------------
response time : 2019-01-21 12:12:02
===============================================================
客户端访问的运行结果,2.05表示客户端访问成功。
好了,到此coap服务器的初步搭建工作算是基本完成了!
相关资料下载:
coap相关的jar包和资源-CSDN下载
这篇关于菜鸟江涛带你学最小物联网系统(外篇)——NB-IoT服务器搭建,基于CoAP协议的初次运行的文章就介绍到这儿,希望我们推荐的文章对编程师们有所帮助!


