本文主要是介绍基于FFmpeg的H265编码器,希望对大家解决编程问题提供一定的参考价值,需要的开发者们随着小编来一起学习吧!
H265编码器仍旧采用变换和预测的混合编码方法。输入帧以宏块为单位被编码器处理,首先按照帧内或帧间预测编码的方法进行处理;接着,预测值与当前块相减,相减后得到的残差块经变换、量化后产生一组量化后的变换系数;最后,这组量化后的变换系数经过熵编码,与解码所需的一些头信息(如预测模式量化参数、运动矢量等)一起组成一个压缩后的码流,经NAL(网络自适应层)供传输和存储用。为了提供进一步预测用的参考图像,编码器必须有重建的功能。为了去除编解码环路中产生的噪声,提高参考帧的图像质量,从而提高图像压缩性能,设置了一个环路滤波器,滤波后的输出即是重建图像,可用作参考图像。
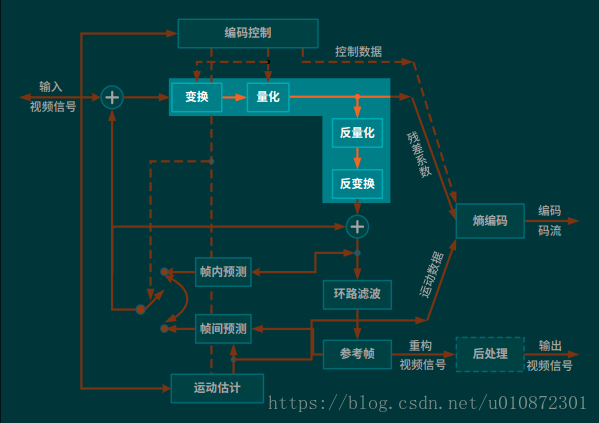
H265的编解码流程主要功能:
帧间和帧内预测 (Estimation):图像经过帧内预测和帧间预测后,与原始视频帧进行相减形成预测残差。
变换(Transform)和反变换 :将图像的时域信号变换为频域的信号,在频域中信号的能量集中在低频区域,并使其码率相对于空间信号有大幅下降。
量化(Quantization)和反量化 :不降低视觉效果的前提下,保留图像的细节,确定量化参数(QP),减少图像的编码长度。
环路滤波(Loop Filter) :对块边界处的像素进行滤波以平滑像素值的突变,消除视频图像中的块效应,同时可以达到降低噪音的效果。
熵编码(Entropy Coding) :利用信息的统计冗余进行数据压缩的无损编码方法。
FFmpeg编码的流程图
如下图是基于FFMPEG的H265视频编码器流程图,该编码器实现了YUV420P的像素数据编码为H265(H264,MPEG2,VP8)的压缩编码数据。
首先用函数avcodec_find_encoder()查找编码器;然后用函数avcodec_alloc_context()申请CODEC,函数avcodec_alloc_frame()申请编码器中的图像帧空间;设置编码器参数,包括宽度、高度等;avcodec_open()打开编码器CODEC;获取图像数据;编码当前图像avcodec_encode_video();写入码流文件;编码完毕后,销毁各种资源,关闭编码器avcodec_close()等。

(1)av_register_all():注册FFmpeg 的H265编码器。调用了avcodec_register_all(),avcodec_register_all()注册了H265编码器有关的组件:硬件加速器,编码器,Parser,Bitstream Filter等;
(2)avformat_alloc_output_context2():初始化输出码流的AVFormatContext,获取输出文件的编码格式;
(3)avio_open():打开输出文件,调用了2个函数:ffurl_open()和ffio_fdopen()。其中ffurl_open()用于初始化URLContext,ffio_fdopen()用于根据URLContext初始化AVIOContext。URLContext中包含的URLProtocol完成了具体的协议读写等工作。AVIOContext则是在URLContext的读写函数外面加上了一层“包装”;
(4)av_new_stream():创建输出码流的AVStream结构体,为输出文件设置编码所需要的参数和格式;
(5)avcodec_find_encoder():通过 codec_id查找H265编码器
HEVC解码器对应的AVCodec结构体ff_hevc_decoder:
AVCodec ff_hevc_decoder = {.name                  = "hevc",.long_name             = NULL_IF_CONFIG_SMALL("HEVC (High Efficiency Video Coding)"),.type                  = AVMEDIA_TYPE_VIDEO,.id                    = AV_CODEC_ID_HEVC,.priv_data_size        = sizeof(HEVCContext),.priv_class            = &hevc_decoder_class,.init                  = hevc_decode_init,.close                 = hevc_decode_free,.decode                = hevc_decode_frame,.flush                 = hevc_decode_flush,.update_thread_context = hevc_update_thread_context,.init_thread_copy      = hevc_init_thread_copy,.capabilities          = AV_CODEC_CAP_DR1 | AV_CODEC_CAP_DELAY |AV_CODEC_CAP_SLICE_THREADS | AV_CODEC_CAP_FRAME_THREADS,.caps_internal         = FF_CODEC_CAP_INIT_THREADSAFE | FF_CODEC_CAP_EXPORTS_CROPPING,.profiles              = NULL_IF_CONFIG_SMALL(ff_hevc_profiles),.hw_configs            = (const AVCodecHWConfigInternal*[]) {
#if CONFIG_HEVC_DXVA2_HWACCELHWACCEL_DXVA2(hevc),
#endif
#if CONFIG_HEVC_D3D11VA_HWACCELHWACCEL_D3D11VA(hevc),
#endif
#if CONFIG_HEVC_D3D11VA2_HWACCELHWACCEL_D3D11VA2(hevc),
#endif
#if CONFIG_HEVC_NVDEC_HWACCELHWACCEL_NVDEC(hevc),
#endif
#if CONFIG_HEVC_VAAPI_HWACCELHWACCEL_VAAPI(hevc),
#endif
#if CONFIG_HEVC_VDPAU_HWACCELHWACCEL_VDPAU(hevc),
#endif
#if CONFIG_HEVC_VIDEOTOOLBOX_HWACCELHWACCEL_VIDEOTOOLBOX(hevc),
#endifNULL
(6)avcodec_open2():打开编码器。调用AVCodec的libx265_encode_init()初始化H265解码器 avcodec_open2()函数;
avcodec_open2() -> libx265_encode_init() -> x265_param_alloc(), x265_param_default_preset(), x265_encoder_open()
(7)avformat_write_header():写入编码的H265码流的文件头;
(8)avcodec_encode_video2():编码一帧视频。将AVFrame(存储YUV像素数据)编码为AVPacket(存储H265格式的码流数据)。调用H265编码器的libx265_encode_frame()函数;
avcodec_encode_video2() -> libx265_encode_frame() -> x265_encoder_encode()
(9)av_write_frame():将编码后的视频码流写入文件中;
(10)flush_encoder():输入的像素数据读取完成后调用此函数,用于输出编码器中剩余的AVPacket;
(11)av_write_trailer():写入编码的H265码流的文件尾;
(12)close():释放 AVFrame和图片buf,关闭H265编码器,调用AVCodec的libx265_encode_close()函数
avcodec_close() -> libx265_encode_close() -> x265_param_free(), x265_encoder_close()
源码
/*** 基于FFmpeg的视频编码器* 功能:实现了YUV420像素数据编码为视频码流(H264,H265,MPEG2,VP8)。* ffmpeg编码yuv文件的命令:* H264:ffmpeg -s cif -i foreman_cif.yuv -vcodec libx264 -level 40 -profile baseline -me_method epzs -qp 23 -i_qfactor 1.0  -g 12 -refs 1 -frames 50 -r 25 output.264 * H265:ffmpeg -s cif -foreman_cif.yuv -vcodec libx265  -frames 100  output.265*/#include <stdio.h>#define __STDC_CONSTANT_MACROS#ifdef _WIN32
//Windows
extern "C"
{
#include "libavutil/opt.h"
#include "libavcodec/avcodec.h"
#include "libavformat/avformat.h"
};
#else
//Linux...
#ifdef __cplusplus
extern "C"
{
#endif
#include <libavutil/opt.h>
#include <libavcodec/avcodec.h>
#include <libavformat/avformat.h>
#ifdef __cplusplus
};
#endif
#endif//H.265码流与YUV输入的帧数不同。经过观察对比其他程序后发现需要调用flush_encoder()将编码器中剩余的视频帧输出。当av_read_frame()循环退出的时候,实际上解码器中可能还包含剩余的几帧数据。
//因此需要通过“flush_decoder”将这几帧数据输出。“flush_decoder”功能简而言之即直接调用avcodec_decode_video2()获得AVFrame,而不再向解码器传递AVPacket
int flush_encoder(AVFormatContext *fmt_ctx, unsigned int stream_index){int ret;int got_frame;AVPacket enc_pkt;if (!(fmt_ctx->streams[stream_index]->codec->codec->capabilities &CODEC_CAP_DELAY))return 0;while (1) {enc_pkt.data = NULL;enc_pkt.size = 0;av_init_packet(&enc_pkt);ret = avcodec_encode_video2(fmt_ctx->streams[stream_index]->codec, &enc_pkt,NULL, &got_frame);av_frame_free(NULL);if (ret < 0)break;if (!got_frame){ret = 0;break;}printf("Flush Encoder: Succeed to encode 1 frame!\tsize:%5d\n", enc_pkt.size);/* mux encoded frame */ret = av_write_frame(fmt_ctx, &enc_pkt);if (ret < 0)break;}return ret;
}int main(int argc, char* argv[])
{AVFormatContext* pFormatCtx = NULL;AVOutputFormat* fmt;AVStream* video_st;AVCodecContext* pCodecCtx;AVCodec* pCodec;AVPacket pkt;uint8_t* picture_buf;AVFrame* pFrame;int picture_size;int y_size;int framecnt = 0;FILE *in_file = fopen("chezaiyundong_1280x720_30_300.yuv", "rb");int in_w = 1280, in_h = 720;int framenum = 10;const char* out_file = "chezaiyundong_1280x720_30_300.hevc";av_register_all();//注册FFmpeg所有编解码器avformat_alloc_output_context2(&pFormatCtx, NULL, NULL, out_file);//初始化输出码流的AVFormatContext(获取输出文件的编码格式)fmt = pFormatCtx->oformat;// 打开文件的缓冲区输入输出,flags 标识为  AVIO_FLAG_READ_WRITE ,可读写;将输出文件中的数据读入到程序的 buffer 当中,方便之后的数据写入fwriteif (avio_open(&pFormatCtx->pb, out_file, AVIO_FLAG_READ_WRITE) < 0){printf("Failed to open output file! \n");return -1;}video_st = avformat_new_stream(pFormatCtx, 0);//创建输出码流的AVStream。// 设置 码率25 帧每秒(fps=25)video_st->time_base.num = 1;video_st->time_base.den = 25;if (video_st == NULL){return -1;}//为输出文件设置编码的参数和格式pCodecCtx = video_st->codec;// 从媒体流中获取到编码结构体,一个 AVStream 对应一个  AVCodecContextpCodecCtx->codec_id = fmt->video_codec;// 设置编码器的 id,例如 h265 的编码 id 就是 AV_CODEC_ID_H265pCodecCtx->codec_type = AVMEDIA_TYPE_VIDEO;//编码器视频编码的类型pCodecCtx->pix_fmt = AV_PIX_FMT_YUV420P;//设置像素格式为 yuv 格式pCodecCtx->width = in_w; //设置视频的宽高pCodecCtx->height = in_h;pCodecCtx->time_base.num = 1;pCodecCtx->time_base.den = 25;pCodecCtx->bit_rate = 400000;  //采样的码率;采样码率越大,视频大小越大pCodecCtx->gop_size = 250;//每250帧插入1个I帧,I帧越少,视频越小pCodecCtx->qmin = 10;最大和最小量化系数 //(函数输出的延时仅仅跟max_b_frames的设置有关,想进行实时编码,将max_b_frames设置为0便没有编码延时了)pCodecCtx->max_b_frames = 3;// 设置 B 帧最大的数量,B帧为视频图片空间的前后预测帧, B 帧相对于 I、P 帧来说,压缩率比较大,采用多编码 B 帧提高清晰度//设置编码速度AVDictionary *param = 0;//preset的参数调节编码速度和质量的平衡。//tune的参数值指定片子的类型,是和视觉优化的参数,//zerolatency: 零延迟,用在需要非常低的延迟的情况下,比如电视电话会议的编码if (pCodecCtx->codec_id == AV_CODEC_ID_H264) {av_dict_set(¶m, "preset", "slow", 0);av_dict_set(¶m, "tune", "zerolatency", 0);//av_dict_set(¶m, "profile", "main", 0);}//H.265if (pCodecCtx->codec_id == AV_CODEC_ID_H265){av_dict_set(¶m, "preset", "ultrafast", 0);av_dict_set(¶m, "tune", "zero-latency", 0);}//输出格式的信息,例如时间,比特率,数据流,容器,元数据,辅助数据,编码,时间戳av_dump_format(pFormatCtx, 0, out_file, 1);pCodec = avcodec_find_encoder(pCodecCtx->codec_id);//查找编码器if (!pCodec){printf("Can not find encoder! \n");return -1;}// 打开编码器,并设置参数 paramif (avcodec_open2(pCodecCtx, pCodec, ¶m) < 0){printf("Failed to open encoder! \n");return -1;}//设置原始数据 AVFramepFrame = av_frame_alloc();if (!pFrame) {printf("Could not allocate video frame\n");return -1;}pFrame->format = pCodecCtx->pix_fmt;pFrame->width = pCodecCtx->width;pFrame->height = pCodecCtx->height;// 获取YUV像素格式图片的大小picture_size = avpicture_get_size(pCodecCtx->pix_fmt, pCodecCtx->width, pCodecCtx->height);// 将 picture_size 转换成字节数据picture_buf = (uint8_t *)av_malloc(picture_size);// 设置原始数据 AVFrame 的每一个frame 的图片大小,AVFrame 这里存储着 YUV 非压缩数据avpicture_fill((AVPicture *)pFrame, picture_buf, pCodecCtx->pix_fmt, pCodecCtx->width, pCodecCtx->height);//写封装格式文件头avformat_write_header(pFormatCtx, NULL);//创建编码后的数据 AVPacket 结构体来存储 AVFrame 编码后生成的数据  //编码前:AVFrame  //编码后:AVPacketav_new_packet(&pkt, picture_size);// 设置 yuv 数据中Y亮度图片的宽高,写入数据到 AVFrame 结构体中y_size = pCodecCtx->width * pCodecCtx->height;for (int i = 0; i<framenum; i++){//Read raw YUV dataif (fread(picture_buf, 1, y_size * 3 / 2, in_file) <= 0){printf("Failed to read raw data! \n");return -1;}else if (feof(in_file)){break;}pFrame->data[0] = picture_buf;              // 亮度YpFrame->data[1] = picture_buf + y_size;      // U pFrame->data[2] = picture_buf + y_size * 5 / 4;  // V//顺序显示解码后的视频帧pFrame->pts = i;// 设置这一帧的显示时间//pFrame->pts=i*(video_st->time_base.den)/((video_st->time_base.num)*25);int got_picture = 0;int ret = avcodec_encode_video2(pCodecCtx, &pkt, pFrame, &got_picture);//编码一帧视频。即将AVFrame(存储YUV像素数据)编码为AVPacket(存储H.264等格式的码流数据)if (ret < 0){printf("Failed to encode! \n");return -1;}if (got_picture == 1){printf("Succeed to encode frame: %5d\tsize:%5d\n", framecnt, pkt.size);framecnt++;pkt.stream_index = video_st->index;printf("video_st->index = %d\n", video_st->index);av_write_frame(pFormatCtx, &pkt);//将编码后的视频码流写入文件(fwrite)av_free_packet(&pkt);//释放内存}}//输出编码器中剩余的AVPacketint ret = flush_encoder(pFormatCtx, 0);if (ret < 0) {printf("Flushing encoder failed\n");return -1;}// 写入数据流尾部到输出文件当中,表示结束并释放文件的私有数据av_write_trailer(pFormatCtx);if (video_st){// 关闭编码器avcodec_close(video_st->codec);// 释放 AVFrameav_free(pFrame);// 释放图片 bufav_free(picture_buf);}// 关闭输入数据的缓存avio_close(pFormatCtx->pb);// 释放 AVFromatContext 结构体avformat_free_context(pFormatCtx);// 关闭输入文件fclose(in_file);return 0;
}
运行结果

通过Elecard HEVC Analyzer 1.14,查看HEVC码流中的帧内预测、运动补偿相关的信息:

这篇关于基于FFmpeg的H265编码器的文章就介绍到这儿,希望我们推荐的文章对编程师们有所帮助!


