本文主要是介绍山寨web服务器,希望对大家解决编程问题提供一定的参考价值,需要的开发者们随着小编来一起学习吧!
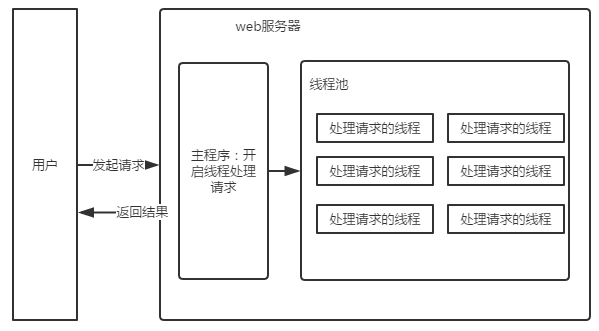
这是及其简单的web服务器,只实现从请求到处理请求的过程。基本架构如下
主程序:使用socket监听端口,等待用户连接,一旦有用户连接,创建一个线程放入线程池。代码如下:
package com.web.tomdog;import java.io.IOException;
import java.net.ServerSocket;
import java.net.Socket;
import java.util.concurrent.ExecutorService;
import java.util.concurrent.Executors;public class Tomdog {public static void main(String[] args) {new Tomdog().start();}/*** 启动服务器*/public void start(){try {//启动服务ServerSocket ss = new ServerSocket(Properties.PORT);System.out.println("服务器启动....端口:"+Properties.PORT);while(true){//等待连接Socket socket = ss.accept();//一旦有连接,使用并发量100的线程池处理请求ExecutorService pool = Executors.newFixedThreadPool(100);pool.submit(new RequestHandlerThread(socket));}} catch (IOException e) {e.printStackTrace();}}}
处理请求的线程:使用IO流,读取用户想要访问的资源,然后输出给用户
package com.web.tomdog;import java.io.BufferedInputStream;
import java.io.File;
import java.io.FileInputStream;
import java.io.IOException;
import java.io.PrintStream;
import java.net.Socket;public class RequestHandlerThread implements Runnable{private HttpRequest request = null;private HttpResponse response = null;public RequestHandlerThread(Socket socket) {request = new HttpRequest(socket);response = new HttpResponse(socket);}@Overridepublic void run() {String url = request.getRequestUrl();File file = new File(Properties.WEB_ROOT+url);PrintStream out = response.getWriter();if (file.exists()) {try {//根据用户请求的路径,读取文件byte[] bs = new byte[(int)file.length()];BufferedInputStream bis = new BufferedInputStream(new FileInputStream(file));bis.read(bs);//将文件输出给用户//使用println输出状态,使用write输出内容out.println(Properties.STATUS_200);//必须换行,否则浏览器无法解析out.println();out.write(bs);out.flush();out.close();} catch (IOException e) {e.printStackTrace();}}else{//找不到资源,返回404out.println(Properties.STATUS_404);out.println();try {out.write("<h1>404 ERROR...</h1>".getBytes());out.flush();out.close();} catch (IOException e) {e.printStackTrace();}}}}
封装request和response
package com.web.tomdog;import java.io.BufferedReader;
import java.io.IOException;
import java.io.InputStream;
import java.io.InputStreamReader;
import java.net.Socket;public class HttpRequest {private InputStream in = null;private String requestUrl;public HttpRequest(Socket socket) {try {in = socket.getInputStream();this.requestUrl = parseRequestUrl();} catch (IOException e) {e.printStackTrace();}}public String getRequestUrl(){return this.requestUrl;}/*** 解析请求信息,得到访问路径* @return*/private String parseRequestUrl(){BufferedReader reader = new BufferedReader(new InputStreamReader(in));String url = "";try {String head = reader.readLine();System.out.println(head);if (head != null) {url = head.split(" ")[1];}} catch (IOException e) {e.printStackTrace();}if(url.equals("/")){url = Properties.INDEX;}return url;}}
package com.web.tomdog;import java.io.IOException;
import java.io.PrintStream;
import java.net.Socket;public class HttpResponse {private PrintStream out = null;public HttpResponse(Socket socket){try {out = new PrintStream(socket.getOutputStream());} catch (IOException e) {e.printStackTrace();}}public PrintStream getWriter(){return out;}
}
自定义Properties类来替代读取配置文件的过程
package com.web.tomdog;import java.io.File;
/*** 服务器配置信息(实际上应该从配置文件读取)* @author 周**/
public class Properties {/*** 默认端口号*/public static final int PORT = 8080;/*** web资源文件根目录,相当于tomcat的webapps,此处指定为D:\webapps\*/public static final String WEB_ROOT = "D:"+File.separator+"webapps"+File.separator;/*** 默认页面,当访问/路径时,即访问index.html*/public static final String INDEX = "/index.html";/*** 状态码200*/public static final String STATUS_200 = "HTTP/1.1 200 OK";/*** 状态码404*/public static final String STATUS_404 = "HTTP/1.1 404 NOT FOUND";
}
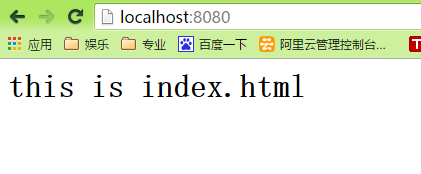
在Properties 中定义的WEB_ROOT目录下,放一些图片,文本,html,使用localhost:8080/xxx访问试试看
这篇关于山寨web服务器的文章就介绍到这儿,希望我们推荐的文章对编程师们有所帮助!


