本文主要是介绍使用RN的kitten框架的日历组件的修改,希望对大家解决编程问题提供一定的参考价值,需要的开发者们随着小编来一起学习吧!
官方网页地址
下面就是我参考官方封装的时间日期组件(主要是功能和使用方法,页面粗略做了下,不好看勿怪)
import React, {useState} from 'react';
import {StyleSheet, View, TouchableOpacity, SafeAreaView} from 'react-native';
import {Calendar, NativeDateService, Text} from '@ui-kitten/components';// 切换月和日的语言的配置
const i18n = {dayNames: {short: ['周一', '周二', '周三', '周四', '周五', '周六', '周日'], // 设置周几的文字语言long: ['1', '2', '3', '4', '5', '6', '7'],},monthNames: {// 设置某月的月份语言short: [ // 选中的当前月的展示文字'Jan1','Feb2','Mar3','Apr4','May5','Jun6','Jul7','Aug8','Sep9','Oct10','Nov11','Dec12',],long: [  // 选择月份的月份列表的文字'January1','February2','March3','April4','May5','June6','July7','August8','September9','October10','November11','December12',],},
};// 切换语言的配置
const localeDateService = new NativeDateService('en', {i18n,startDayOfWeek: 1,
});const LeftArrow = ({onPress}) => (// 设置左侧切换月份的组件样式,默认有个onpress代表切换的时间,直接调用就行<TouchableOpacity style={styles.arrow} onPress={onPress}><Text>PREV</Text></TouchableOpacity>
);const RightArrow = ({onPress}) => (// 设置右侧切换月份的组件样式,默认有个onpress代表切换的时间,直接调用就行<TouchableOpacity style={styles.arrow} onPress={onPress}><Text>NEXT</Text></TouchableOpacity>
);const CalendarCustomDayShowcase = () => {const [selectedDate, setSelectedDate] = useState(new Date()); // 设置默认选中日期为今天const handleSelect = date => {// 点击某个日期触发的方法,获取年月日等信息直接使用时间日期api就可以,这里的date本质就是时间对象setSelectedDate(date);};const renderDay = ({date}, style) => {// 默认接收两个参数,我这里只需要将第一个参数的时间拿来用,因此我解构了一下// 第二个参数就是默认的单元格内容样式,这里有以下注意点,打印下style就知道了// 注意点:页面刷新会打印所有单元格的style样式,后面每次点击切换都会打印两次style,第一次打印是离开前的单元格样式,第二次打印是离开后的单元格样式console.log(' style', style);let container = {}; // 这是我自定义的样式// 但是自定义样式完了,我不知道怎么设置当前点击的样式和离开后的样式,以及点击后如果日期是当天还要有的当天的样式// 因此我这里使用了一个笨方法,通过官方的样式表去判断当前是什么样式,是什么状态,然后根据这个官方的样式判断我该动态渲染什么样的状态// 1.当我点击非当天的时间后,官方样式表给的背景色是rgba开头的,并且当天日期肯定只有一个,因此我使用了判断开头的rgba,又因为刷新页面初始化时有的背景色是undefined,因此这里要判断背景色存在再去渲染if (style.container.backgroundColor &&style.container.backgroundColor.startsWith('rgba')) {container = {backgroundColor: '#cccccc',borderColor: 'black',borderRadius: 4,borderWidth: 1,};} else if (style.container.backgroundColor) {// 2.点击某个日期,如果当前日期不是当前日期,当点击后这个会有个蓝色背景,也就是代表当前点击的日期样式container = {backgroundColor: 'blue',borderColor: 'black',borderRadius: 4,borderWidth: 1,};} else {// 3.日期非当天日期,又不是点击的当前日期,也就是剩余的所有日期的颜色值container = {backgroundColor: 'pink',borderColor: 'red',borderRadius: 4,borderWidth: 1,};}return (<Viewstyle={{flexDirection: 'row',justifyContent: 'center',alignItems: 'center',flex: 1, // 定义的块居中显示}}><View style={[styles.dayContainer, container]}>{/* 显示的日 */}<Text style={[styles.dayText]}>{date.getDate()}</Text>{/* 底部小圆点 */}<View style={styles.dot} /></View></View>);};return (<SafeAreaView><CalendardateService={localeDateService} // 使用自定义语言的月份和周date={selectedDate} // 默认显示的时间onSelect={handleSelect} // 设置当前选中的时间renderArrowLeft={LeftArrow} // 左边切换月份的按钮renderArrowRight={RightArrow} // 右边切换月份的按钮renderDay={renderDay} // renderDay 自定义的单元格内容,可以将我们的自定义的单元格样式加入进来覆盖掉原有样式/></SafeAreaView>);
};const styles = StyleSheet.create({arrow: {justifyContent: 'center',alignItems: 'center',},dayContainer: {justifyContent: 'center',alignItems: 'center',width: 32,height: 32,},dayText: {fontSize: 16,},selectedDay: {backgroundColor: '#3366FF',borderRadius: 16,},selectedDayText: {color: '#FFFFFF',},dot: {width: 6,height: 6,borderRadius: 3,backgroundColor: 'red',marginTop: 2,},
});export default CalendarCustomDayShowcase;
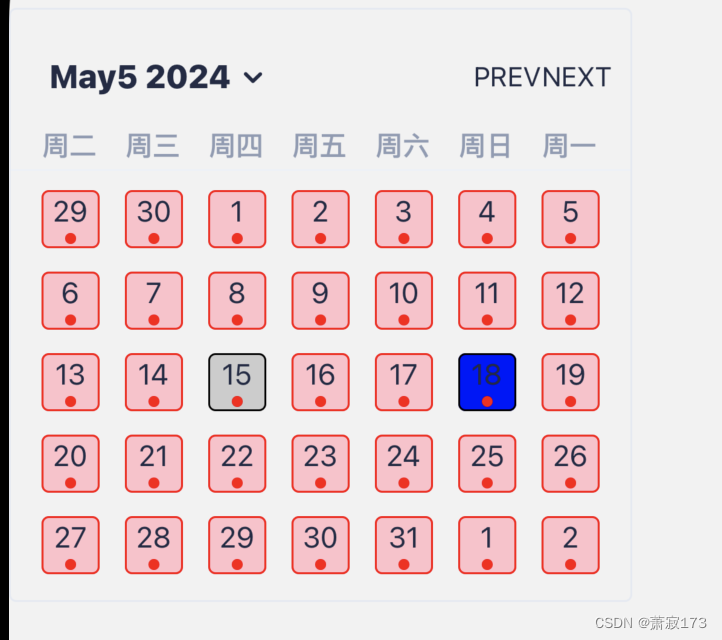
效果图

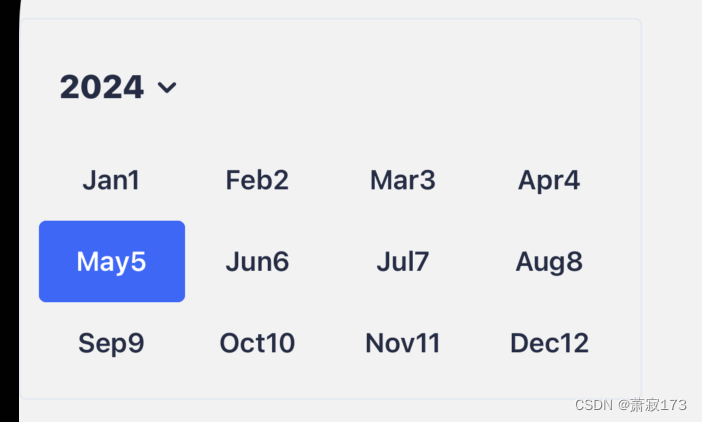
自定义的月份效果(周的效果上图有以及当前月的展示效果)

这篇关于使用RN的kitten框架的日历组件的修改的文章就介绍到这儿,希望我们推荐的文章对编程师们有所帮助!


