本文主要是介绍# 从浅入深 学习 SpringCloud 微服务架构(十八),希望对大家解决编程问题提供一定的参考价值,需要的开发者们随着小编来一起学习吧!
从浅入深 学习 SpringCloud 微服务架构(十八)
一、开源配置中心 Apollo:概述
1、开源配置中心 Apollo
Apollo -A reliable configuration management system
Apollo(阿波罗)是携程框架部门研发的分布式配置中心,能够集中化管理应用不同环境、不同集群的配置,配置修改后能够实时推送到应用端,并且具备规范的权限、流程治理等特性,适用于微服务配置管理场景。服务端基于 Spring Boot 和SpringCloud 开发,打包后可以直接运行,不需要额外安装 Tomcat 等应用容器。
2、Apolo 概述
Apollo(阿波罗)是携程框架部门研发的开源配置管理中心,能够集中化管理应用不同环境、不同集群的配置,配置修改后能够实时推送到应用端,并且具备规范的权限、流程治理等特性。
3、正是基于配置的特殊性,所以 Apoll0 从设计之初就立志于成为一个有治理能力的配置发布平台,目前提供了以下的特性:
-
统一管理不同环境、不同集群的配置
- Apollo提供了一个统一界面集中式管理不同环境(environment)、不同集群(cluster)、
不同命名空间(namespace)的配置。 - 同一份代码部署在不同的集群,可以有不同的配置,比如zookeeper的地址等
- 通过命名空间(namespace)可以很方便地支持多个不同应用共享同一份配置,同时还允许0应用对共享的配置进行覆盖。
- Apollo提供了一个统一界面集中式管理不同环境(environment)、不同集群(cluster)、
-
配置修改实时生效(热发布)
用户在Apollo修改完配置并发布后,客户端能实时(1秒)接收到最新的配置,并通知到应用。程序
-
版本发布管理
所有的配置发布都有版本概念,从而可以方便地支持配置的回滚。
-
灰度发布
支持配置的灰度发布,比如点了发布后,只对部分应用实例生效,等观察一段时间没问题后。再推给所有应用实例。
-
权限管理、发布审核、操作审计。
应用和配置的管理都有完善的权限管理机制,对配置的管理还分为了编辑和发布两个环节。
从而减少人为的错误。
所有的操作都有审计日志,可以方便地追踪问题。 -
客户端配置信息监控。
可以在界面上方便地看到配置在被哪些实例使用。
-
提供 Java 和 .Net 原生客户端
提供了 Java 和 .Net 的原生客户端,方便应用集成
支持 Spring Placeholder,Annotation 和 Spring Boot的ConfigurationProperties,方便应用使用(需要Spring 3.1.1+)。
同时提供了 Http 接口,非 java 和 .Net 应用也可以方便地使用 -
提供开放平台 API
Apollo自身提供了比较完善的统一配置管理界面,支持多环境、多数据中心配置管理、权限、流程治理等特性。不过Apollo出于通用性考虑,不会对配置的修改做过多限制,只要符合基本的格式就能保存,不会针对不同的配置值进行针对性的校验,如数据库用户名、密码,Redis服务地址等。
对于这类应用配置,Apollo支持应用方通过开放平台API在Apollo进行配置的修改和发布,并。且具备完善的授权和权限控制。 -
部署简单
配置中心作为基础服务,可用性要求非常高,这就要求Apollo对外部依赖尽可能地少0目前唯一的外部依赖是MySQL,所以部署非常简单,只要安装好Java和MySQL就可以让Apollo跑起来
Apollo还提供了打包脚本,一键就可以生成所有需要的安装包,并且支持自定义运行时参数
二、开源配置中心 Apollo:实现过程
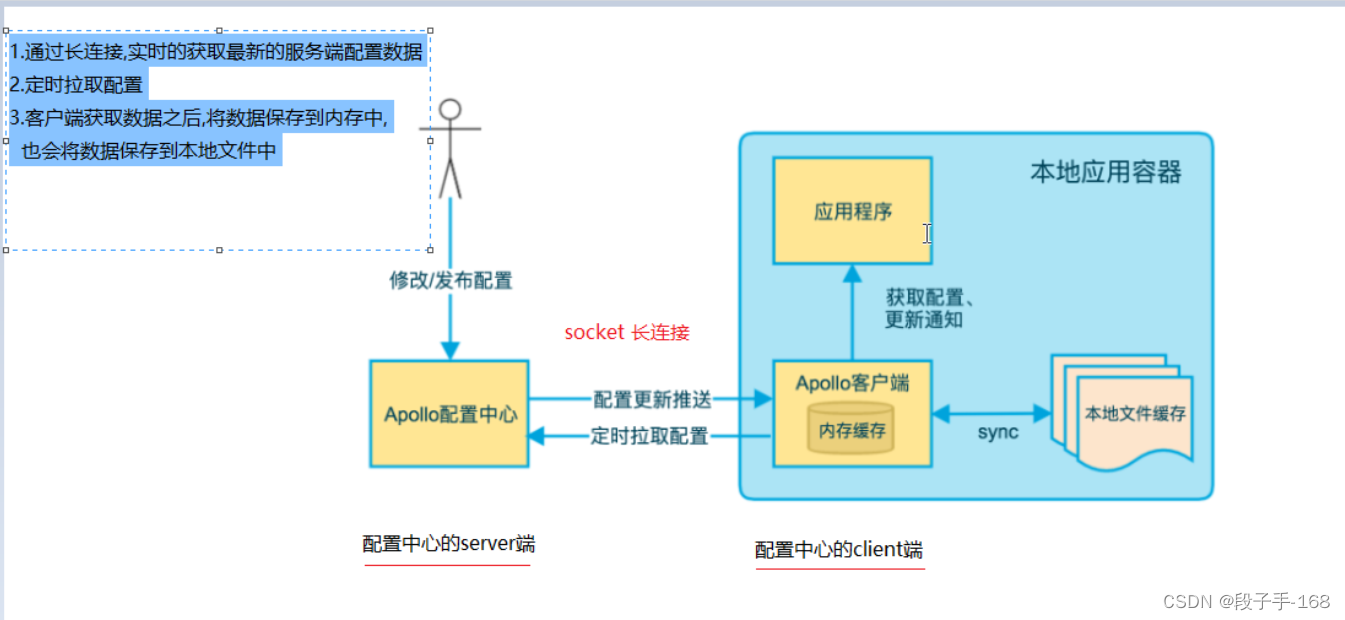
1、通过长连接,实时的获取最新的服务端配置数据。
2、定时拉取配置信息。
3、客户端获取数据之后,将数据保存到内存中,也会将数据保存到本地文件中。
三、开源配置中心 Apollo:搭建服务端
1、搭建 开源配置中心 Apolo 服务端 — 环境要求
1)Java
- Apollo 服务端 : 1.8+
- Apollo 客户端 : 1.7+
由于需要同时运行服务端和客户端,所以建议安装 Java1.8+。
2)MySQL
版本要求 : 5.6.5+
Apollo 的表结构对 timestamp 使用了多个 default 声明,所以需要 5.6.5 以上版本。
2、搭建 开源配置中心 Apolo 服务端 — 环境搭建
2.1 下载安装 Apollo(apollo-quick-start-1.5.0.zip)
1)apollo 下载地址:
-
Apollo 下载地址:https://github.com/ctripcorp/apollo/releases
-
Apollo Github 地址:https://github.com/ctripcorp/apollo
-
Apollo 官方安装教程:https://github.com/ctripcorp/apollo/wiki/Quick-Start
-
Apollo 分布式部署官方指南:https://github.com/ctripcorp/apollo/wiki/%E5%88%86%E5%B8%83%E5%BC%8F%E9%83%A8%E7%BD%B2%E6%8C%87%E5%8D%97
2)解压即安装,如:D:\Program Files\apollo-quick-start-1.5.0
2.2 配置 mysql 数据库
Apollo 服务端共需要两个数据库 : Apo11oPorta1D8 和 Apo11oconfigDB,
数据库、表的创建使用 sql 文件导入数据库即可。
- 打开 SQLyog 连接 mysql
- 右键 【root@localhost】 --》执行 SQL 脚本。
- 找到 apollo 解压包下的 sql 文件夹下的两个 sql 脚本。
- 点击执行即可。
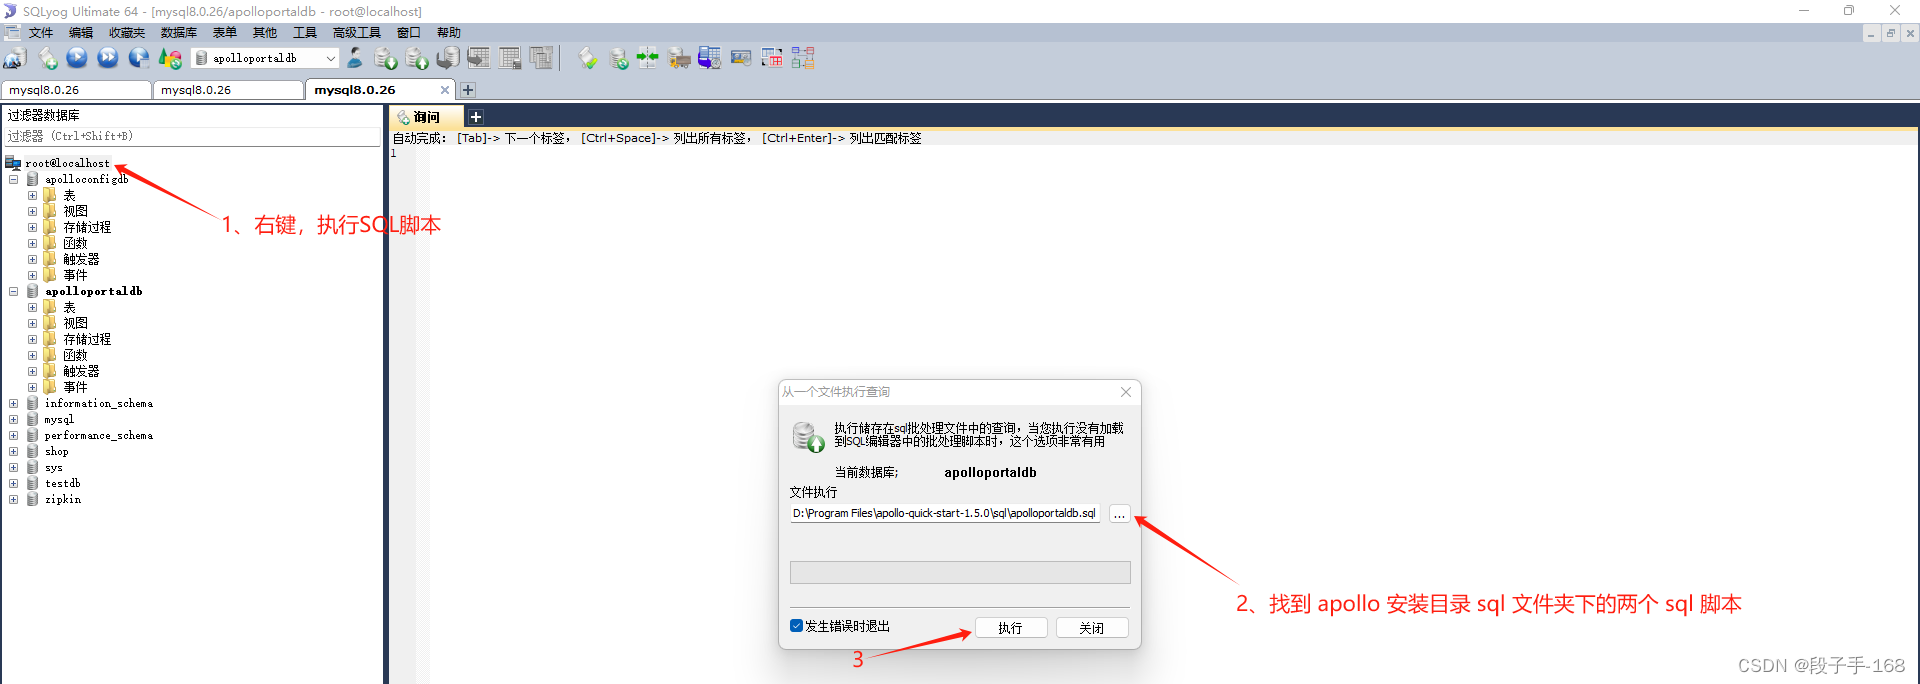
注意:如果你本地已经创建过 Apollo 数据库,请注意备份数据。我们准备的 sql 文件会清空 Apollo 相关的表。
2.3 启动 apollo 服务 ./demo.sh start 。
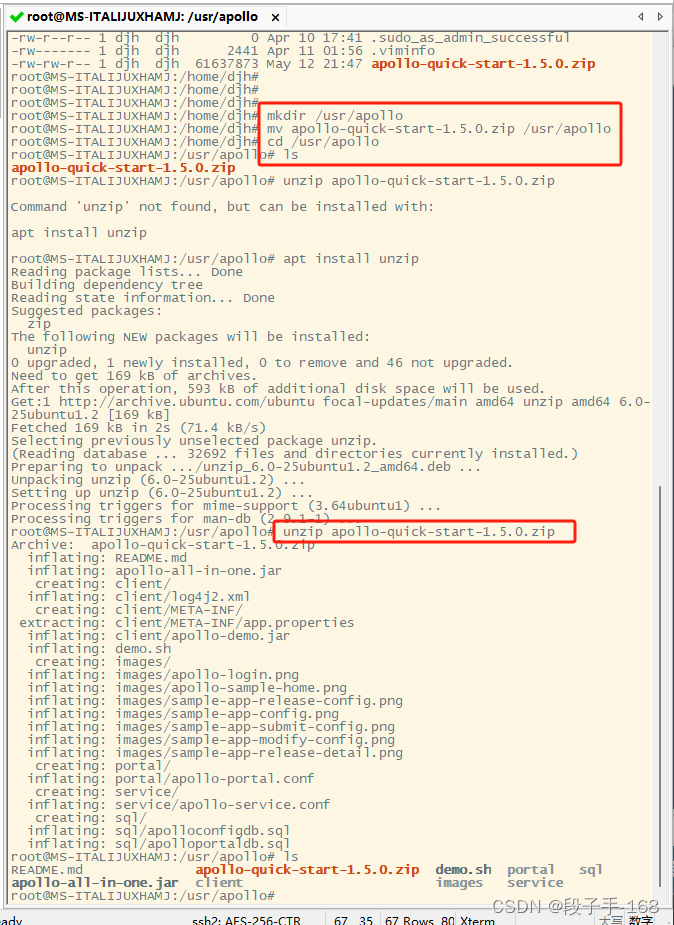
1)使用 SecureCRT 软件连接一台 linux 虚拟机 。点击 SecureCRT 软件工具栏 SecureFX 上传文件 apollo-quick-start-1.5.0.zip 到 linux 虚拟机。
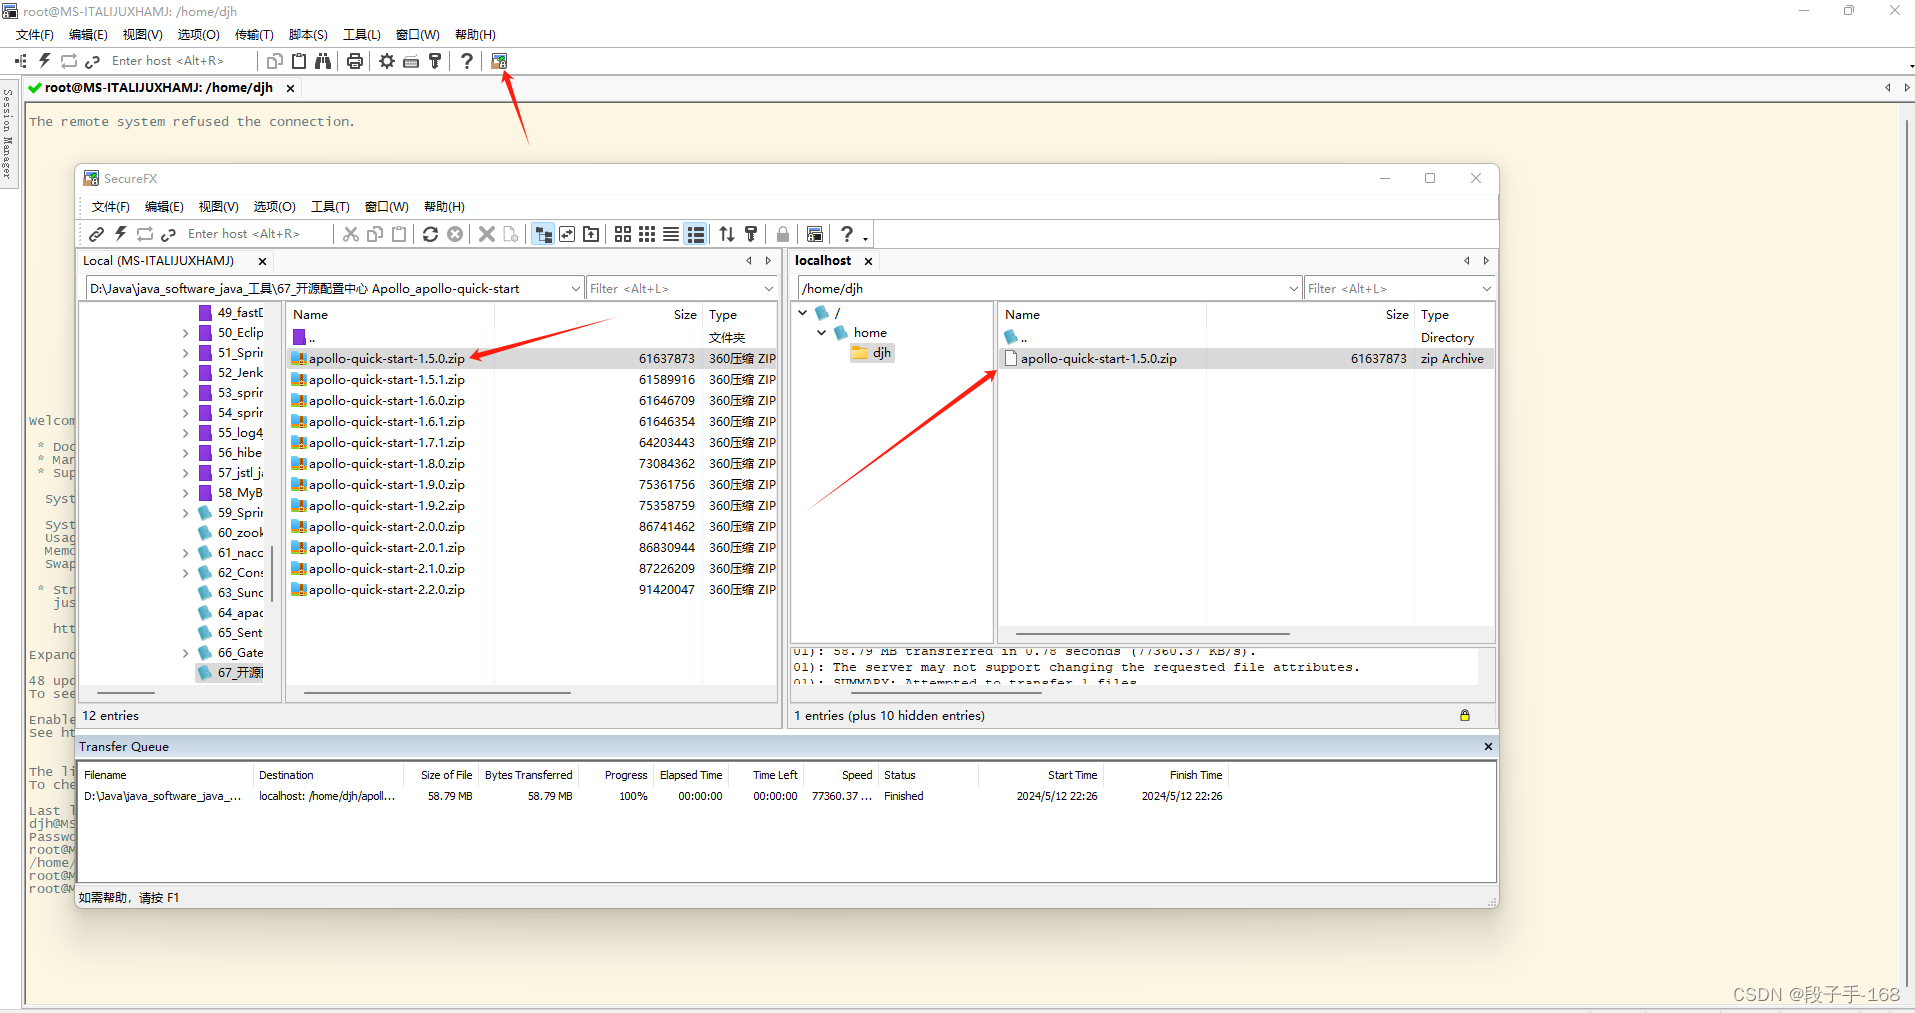
2)创建一个新目录 /usr/apollo/ 把 apollo-quick-start-1.5.0.zip 移动到 /usr/apollo 解压。
unzip apollo-quick-start-1.5.0.zip
3)修改 demo.sh 文件,配置好 连接 mysql 数据库的参数和用户名和密码,保存文件。
vim demo.sh
#!/bin/bash# apollo config db info
apollo_config_db_url=jdbc:mysql://localhost:3306/apolloconfigdb?characterEncoding=utf8
apollo_config_db_username=root
apollo_config_db_password=12311# apollo portal db info
apollo_portal_db_url=jdbc:mysql://localhost:3306/apolloportaldb?characterEncoding=utf8
apollo_portal_db_username=root
apollo_portal_db_password=12311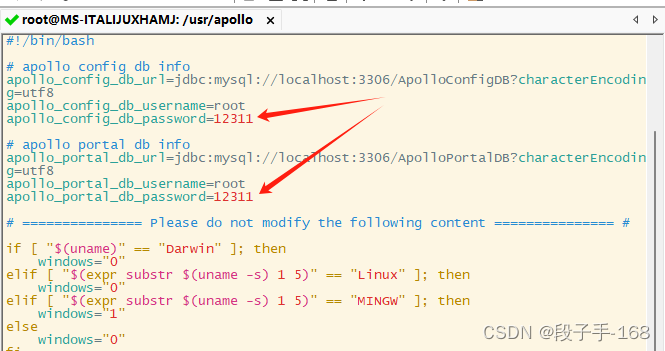
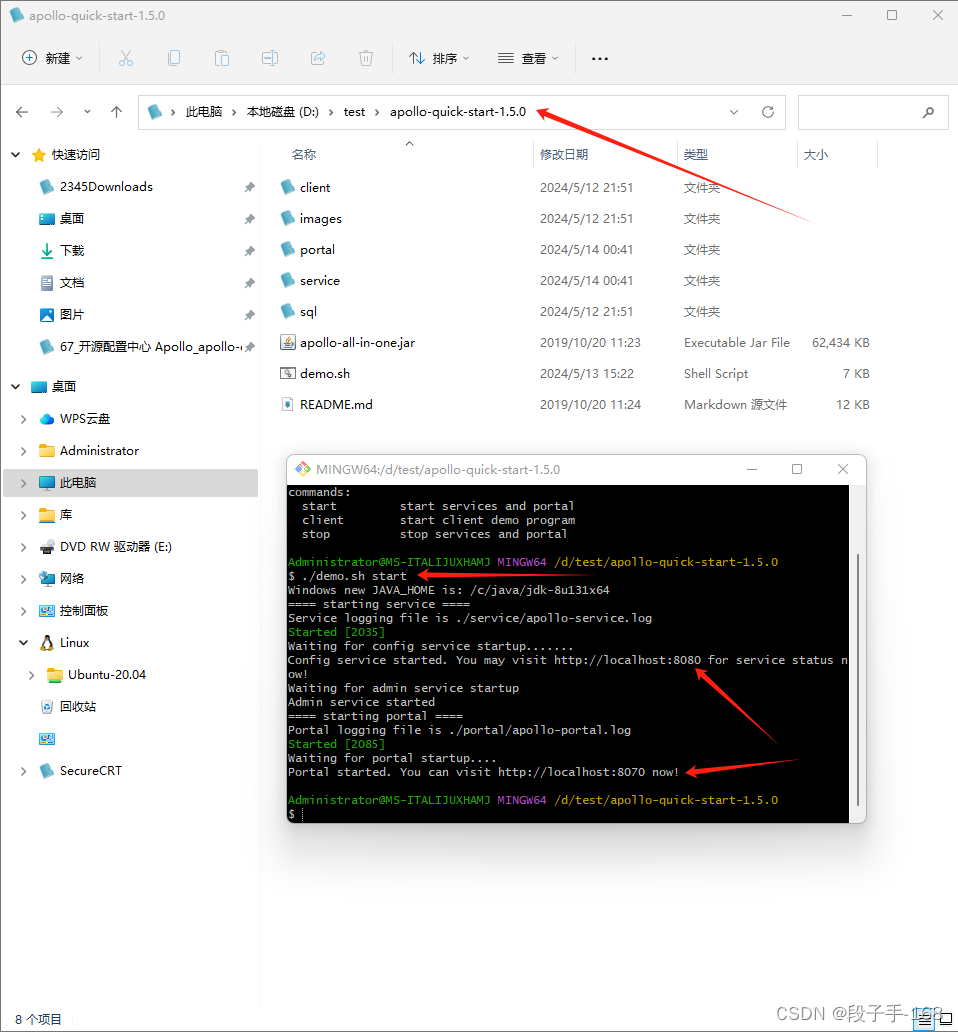
4)也可以使用 Git Bash 在 windows 系统下,apollo 的安装目录下,直接启动 apollo 服务。
./demo.sh start
四、开源配置中心 Apollo:管理后台介绍
1、启动 Apollo 服务成功后(./demo.sh start)
1)浏览器地址输入:localhost:8080 登录 到 eureka 服务后台。
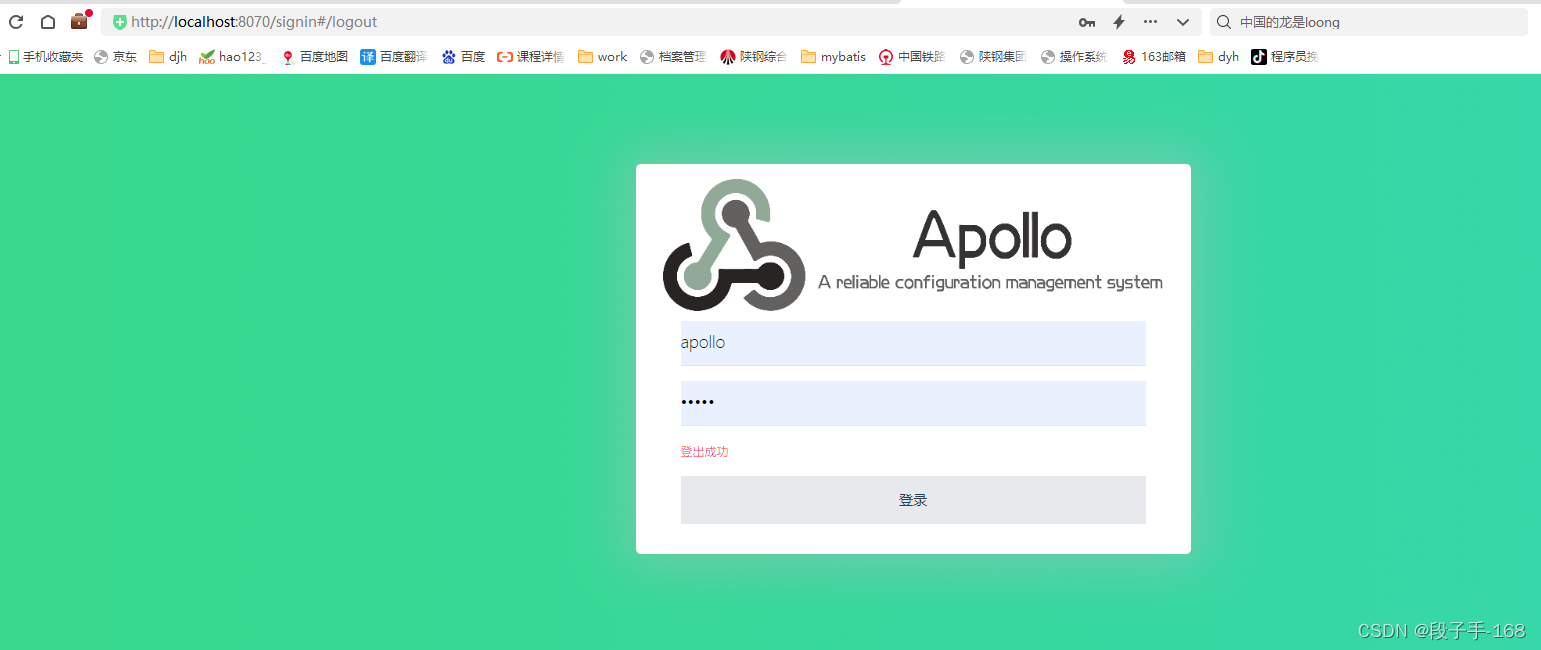
2)浏览器地址输入:localhost:8070 登录 到 apollo 服务后台。
默认用户名:apollo 默认密码:admin
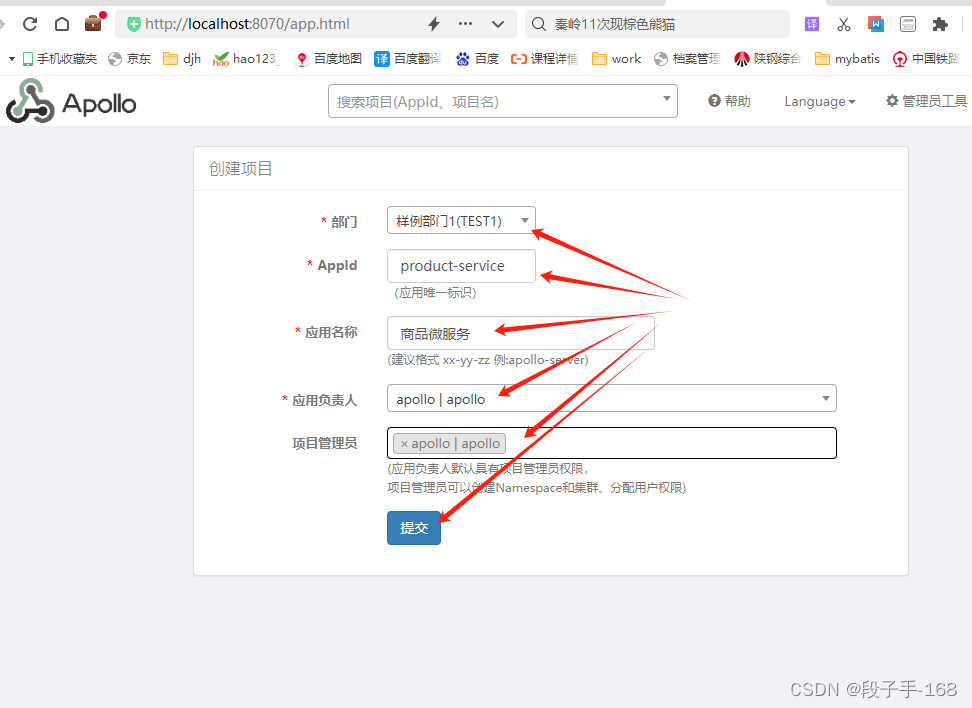
2、在 apollo 服务后台,创建项目:
部门:【样例部门】
AppId: 【product-service】
启用名称:【商品微服务】
应用负责人:【apollo】
项目管理员:【apollo】
点击【提交】。
五、开源配置中心 Apollo:客户端集成开发
1、开源配置中心 Apollo:客户端集成开发案例搭建–准备数据库。
— 创建数据库:
create database shop;
— 使用数据库:
use shop;
— 创建数据表:
CREATE TABLE `tb_product` (`id` int NOT NULL AUTO_INCREMENT,`product_name` varchar(40) DEFAULT NULL COMMENT '名称',`status` int DEFAULT NULL COMMENT '状态',`price` decimal(10,2) DEFAULT NULL COMMENT '单价',`product_desc` varchar(255) CHARACTER SET utf8 COLLATE utf8_general_ci DEFAULT NULL COMMENT '描述',`caption` varchar(255) DEFAULT NULL COMMENT '标题',`inventory` int DEFAULT NULL COMMENT '库存',PRIMARY KEY (`id`)) ENGINE=InnoDB AUTO_INCREMENT=3 DEFAULT CHARSET=utf8mb3
— 插入数据:
insert into `tb_product` (`id`, `product_name`, `status`, `price`, `product_desc`, `caption`, `inventory`) values('1','iPhone 15 Pro','1','7999.00','iPhone 15 Pro 6.7 英寸或 6.1 英寸, 超视网膜 XDR 显示屏,ProMotion 自适应刷新率技术,钛金属搭配亚光质感玻璃背板, 灵动岛功能, A17 Pro 芯片,配备 6 核图形处理器, Pro 级摄像头系统,主摄 4800 万像素 | 超广角 | 长焦, 10 倍, 支持 USB 3, 视频播放最长可达 29 小时。 ','iPhone 15 Pro 巅峰之作','99');2、开源配置中心 Apollo:客户端集成开发案例搭建–打开 idea 创建父工程
2.1 创建 artifactId 名为 spring_cloud_demo 的 maven 工程。
--> idea --> File --> New --> Project --> Maven Project SDK: ( 1.8(java version "1.8.0_131" ) --> Next --> Groupld : ( djh.it )Artifactld : ( spring_cloud_demo )Version : 1.0-SNAPSHOT--> Name: ( spring_cloud_demo )Location: ( ...\spring_cloud_demo\ ) --> Finish2.2 开源配置中心 Apollo:客户端集成开发案例搭建–在父工程 spring_cloud_demo 的 pom.xml 文件中导入依赖坐标。
<?xml version="1.0" encoding="UTF-8"?>
<project xmlns="http://maven.apache.org/POM/4.0.0"xmlns:xsi="http://www.w3.org/2001/XMLSchema-instance"xsi:schemaLocation="http://maven.apache.org/POM/4.0.0 http://maven.apache.org/xsd/maven-4.0.0.xsd"><modelVersion>4.0.0</modelVersion><groupId>djh.it</groupId><artifactId>spring_cloud_demo</artifactId><packaging>pom</packaging><version>1.0-SNAPSHOT</version><modules><module>product_service</module><module>order_service</module><module>eureka_service</module><module>import_eurekaserver_test</module><module>api_zuul_service</module></modules><parent><groupId>org.springframework.boot</groupId><artifactId>spring-boot-starter-parent</artifactId><version>2.1.6.RELEASE</version></parent><properties><project.build.sourceEncoding>UTF-8</project.build.sourceEncoding><project.reporting.outputEncoding>UTF-8</project.reporting.outputEncoding><java.version>1.8</java.version></properties><dependencies><dependency><groupId>org.springframework.boot</groupId><artifactId>spring-boot-starter-web</artifactId></dependency><dependency><groupId>org.springframework.boot</groupId><artifactId>spring-boot-starter-logging</artifactId></dependency><dependency><groupId>org.springframework.boot</groupId><artifactId>spring-boot-starter-test</artifactId><scope>test</scope></dependency><dependency><groupId>org.projectlombok</groupId><artifactId>lombok</artifactId><version>1.18.4</version><scope>provided</scope></dependency></dependencies><dependencyManagement><dependencies><dependency><groupId>org.springframework.cloud</groupId><artifactId>spring-cloud-dependencies</artifactId><version>Greenwich.RELEASE</version><type>pom</type><scope>import</scope></dependency></dependencies></dependencyManagement><repositories><repository><id>spring-snapshots</id><name>Spring Snapshots</name><url>http://repo.spring.io/libs-snapshot-local</url><snapshots><enabled>true</enabled></snapshots></repository><repository><id>spring-milestones</id><name>Spring Milestones</name><url>http://repo.spring.io/libs-milestone-local</url><snapshots><enabled>false</enabled></snapshots></repository><repository><id>spring-releases</id><name>Spring Releases</name><url>http://repo.spring.io/libs-release-local</url><snapshots><enabled>false</enabled></snapshots></repository></repositories><pluginRepositories><pluginRepository><id>spring-snapshots</id><name>Spring Snapshots</name><url>http://repo.spring.io/libs-snapshot-local</url><snapshots><enabled>true</enabled></snapshots></pluginRepository><pluginRepository><id>spring-milestones</id><name>Spring Milestones</name><url>http://repo.spring.io/libs-milestone-local</url><snapshots><enabled>false</enabled></snapshots></pluginRepository></pluginRepositories><build><plugins><plugin><groupId>org.springframework.boot</groupId><artifactId>spring-boot-maven-plugin</artifactId></plugin></plugins></build></project>
<!-- spring_cloud_demo\pom.xml -->
3、开源配置中心 Apollo:客户端集成开发案例搭建–在父工程 spring_cloud_demo 下,创建子工程 product_server (子模块)。
3.1 创建 product_server 子工程(子模块)
--> 右键 spring_cloud_demo 父工程--> Modules --> Maven --> Groupld : ( djh.it )Artifactld : ( product_server )Version : 1.0-SNAPSHOT--> Next --> Module name: ( product_server )Content root : ( \spring_cloud_demo\product_server )Module file location: ( \spring_cloud_demo\product_server )--> Finish3.2 在子工程 product_server (子模块)中的 pom.xml 中导入依赖
<?xml version="1.0" encoding="UTF-8"?>
<project xmlns="http://maven.apache.org/POM/4.0.0"xmlns:xsi="http://www.w3.org/2001/XMLSchema-instance"xsi:schemaLocation="http://maven.apache.org/POM/4.0.0 http://maven.apache.org/xsd/maven-4.0.0.xsd"><parent><artifactId>spring_cloud_demo</artifactId><groupId>djh.it</groupId><version>1.0-SNAPSHOT</version></parent><modelVersion>4.0.0</modelVersion><artifactId>product_server</artifactId><dependencies><dependency><groupId>org.springframework.boot</groupId><artifactId>spring-boot-starter-web</artifactId></dependency><dependency><groupId>mysql</groupId><artifactId>mysql-connector-java</artifactId><version>8.0.26</version></dependency><dependency><groupId>org.springframework.boot</groupId><artifactId>spring-boot-starter-data-jpa</artifactId></dependency><dependency><groupId>org.springframework.cloud</groupId><artifactId>spring-cloud-netflix-eureka-client</artifactId><version>2.1.0.RELEASE</version><scope>compile</scope></dependency><dependency><groupId>com.ctrip.framework.apollo</groupId><artifactId>apollo-client</artifactId><version>1.1.0</version></dependency></dependencies>
</project>
<!-- C:\java-test\idea2019\spring_cloud_demo\product_server\pom.xml -->
3.3 在子工程 product_server (子模块)中,创建 商品实体类 Product.java
/***   spring_cloud_demo\product_server\src\main\java\djh\it\product\domain\Product.java**  2024-5-14 商品实体类 Product.java*/
package djh.it.product.domain;import lombok.Data;import javax.persistence.Entity;
import javax.persistence.Id;
import javax.persistence.Table;
import java.math.BigDecimal;@Data
@Entity
@Table(name="tb_product")  //对应数据库中的数据表
public class Product {@Idprivate Long id;private String productName;private Integer status;private BigDecimal price;private String productDesc;private String caption;private Integer inventory;
}
3.4 在子工程 product_server (子模块)中,创建 dao 持久层接口 ProductDao.java
/***   spring_cloud_demo\product_server\src\main\java\djh\it\product\dao\ProductDao.java**  2024-5-14  dao 持久层接口 ProductDao.java*/
package djh.it.product.dao;import djh.it.product.domain.Product;
import org.springframework.data.jpa.repository.JpaRepository;
import org.springframework.data.jpa.repository.JpaSpecificationExecutor;public interface ProductDaoextends JpaRepository<Product, Long>, JpaSpecificationExecutor<Product> {}
3.5 在子工程 product_server (子模块)中,创建 service 服务层 接口类 ProductService.java
/***   spring_cloud_demo\product_server\src\main\java\djh\it\product\service\ProductService.java**  2024-5-14  service 服务层 接口 ProductService.java*/
package djh.it.product.service;import djh.it.product.domain.Product;public interface ProductService {//根据id查询Product findById(Long id);//保存void save(Product product);//更新void update(Product product);//删除void delete(Long id);
}
3.6 在子工程 product_server (子模块)中,创建 service 服务层 实现类 ProductServiceImpl.java
/***   spring_cloud_demo\product_server\src\main\java\djh\it\product\service\impl\ProductServiceImpl.java**  2024-5-14  service 服务层 实现类*/
package djh.it.product.service.impl;import djh.it.product.dao.ProductDao;
import djh.it.product.domain.Product;
import djh.it.product.service.ProductService;
import org.springframework.beans.factory.annotation.Autowired;
import org.springframework.stereotype.Service;@Service
public class ProductServiceImpl implements ProductService {@Autowiredprivate ProductDao productDao;@Overridepublic Product findById(Long id) {return productDao.findById(id).get();}@Overridepublic void save(Product product) {productDao.save(product);}@Overridepublic void update(Product product) {productDao.save(product);}@Overridepublic void delete(Long id) {productDao.deleteById(id);}
}
3.7 在子工程 product_server (子模块)中,创建 商品的 controller 类 ProductController.java
/***  spring_cloud_demo\product_server\src\main\java\djh\it\product\controller\ProductController.java**  2024-5-14 商品的 controller 类 ProductController.java*/
package djh.it.product.controller;import djh.it.product.domain.Product;
import djh.it.product.service.ProductService;
import org.springframework.beans.factory.annotation.Autowired;
import org.springframework.beans.factory.annotation.Value;
import org.springframework.web.bind.annotation.PathVariable;
import org.springframework.web.bind.annotation.RequestMapping;
import org.springframework.web.bind.annotation.RequestMethod;
import org.springframework.web.bind.annotation.RestController;@RestController
@RequestMapping("/product")
public class ProductController {@Autowiredprivate ProductService productService;@Value("${name}")private String name;@RequestMapping(value = "/{id}", method = RequestMethod.GET)public Product findById(@PathVariable Long id){return productService.findById(id);}@RequestMapping(value = "/test")public String test (){return name;}}
3.8 在子工程 product_server (子模块)中,创建配置文件 application.yml 配置文件。
##  spring_cloud_demo\product_server\src\main\resources\application.ymlserver:port: 6001  #服务端口
spring:application:nmae: server-product  #指定服务名datasource:driver-class-name: com.mysql.jdbc.Driverurl: jdbc:mysql://localhost:3306/shop?useUnicode=true&characterEncoding=utf8username: rootpassword: 12311jpa:database: MySQLshow-sql: trueopen-in-view: true
name: zhangsanfeng
apollo:bootstrap:   # 开启 apolloenabled: truemeta: http://localhost:8080
app:id: product-service  # 指定 apollo 配置中心的名称 appId
3.9 在子工程 product_server (子模块)中,创建 启动类 ProductServerApplication.java
/***   spring_cloud_demo\product_server\src\main\java\djh\it\product\ProductApplication.java**   2024-5-14  启动类 ProductApplication.java*/
package djh.it.product;import org.springframework.boot.SpringApplication;
import org.springframework.boot.autoconfigure.SpringBootApplication;
import org.springframework.boot.autoconfigure.domain.EntityScan;
import org.springframework.cloud.netflix.eureka.EnableEurekaClient;import java.io.Serializable;@SpringBootApplication
@EntityScan("djh.it.product.domain")
@EnableEurekaClient  //激活 EurekaClient, 同 @EnableDiscoveryClient 注解相同。
public class ProductApplication implements Serializable {//运行启动类,浏览器地址栏输入:localhost:9001/product/1  进行访问测试。public static void main(String[] args) {SpringApplication.run(ProductApplication.class, args);}
}
3.10 在子工程 product_server (子模块)中,运行启动类,同时 保留 apollo 服务在启动状态,进行测试
1)浏览器地址栏输入:http://localhost:9001/product/test 输出:zhangsanfeng
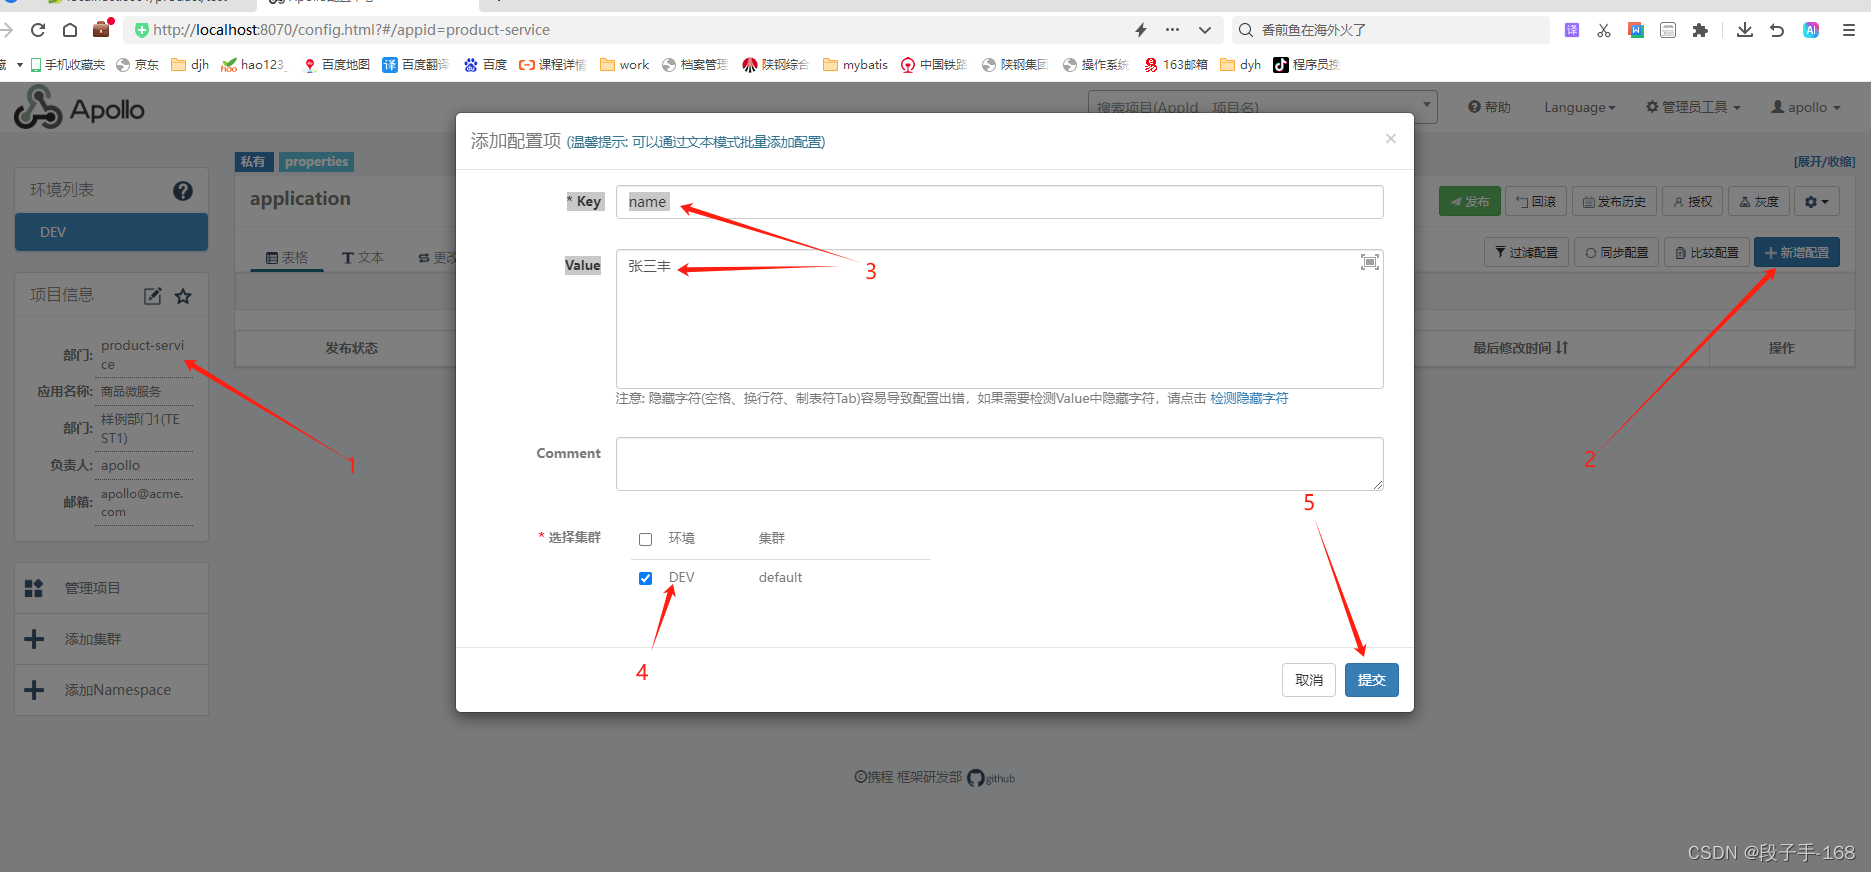
2)览器地址栏输入:http://localhost:8070/ 登录 apollo 服务后台,
找到我们创建的微服务 【product-service 】,点击【新增】
【添加配置项】:
Key: name
Value: 如:修改为:张三丰
点击【提交】。
3)浏览器地址栏输入:http://localhost:9001/product/test 发现 name 值无变化。
4)览器地址栏输入:http://localhost:8070/ 登录 apollo 服务后台,
点击 【发布】
5)浏览器地址栏输入:http://localhost:9001/product/test name 值已经同步更新。
上一节关联链接请点击:
# 从浅入深 学习 SpringCloud 微服务架构(十七)–Spring Cloud config(2)
这篇关于# 从浅入深 学习 SpringCloud 微服务架构(十八)的文章就介绍到这儿,希望我们推荐的文章对编程师们有所帮助!


