本文主要是介绍从头开始学Spring—02基于XML管理bean,希望对大家解决编程问题提供一定的参考价值,需要的开发者们随着小编来一起学习吧!
目录
1.实验一:入门案例
2.实验二:获取bean
3.实验三:依赖注入之setter注入
4.实验四:依赖注入之构造器注入
5.实验五:特殊值处理
6.实验六:为类类型属性赋值
7.实验七:为数组类型属性赋值
8.实验八:为集合类型属性赋值
9.实验九:p命名空间
10.实验十:引入外部属性文件(以jdbc为例)
11.实验十一:bean的作用域
12.实验十二:bean的生命周期
13.实验十三:FactoryBean
14.实验十四:基于xml的自动装配
1.实验一:入门案例
①创建Maven Module

②引入依赖
<?xml version="1.0" encoding="UTF-8"?>
<project xmlns="http://maven.apache.org/POM/4.0.0"xmlns:xsi="http://www.w3.org/2001/XMLSchema-instance"xsi:schemaLocation="http://maven.apache.org/POM/4.0.0 http://maven.apache.org/xsd/maven-4.0.0.xsd"><modelVersion>4.0.0</modelVersion><groupId>org.example</groupId><artifactId>spring01</artifactId><version>1.0-SNAPSHOT</version><packaging>jar</packaging><dependencies><!-- 基于Maven依赖传递性,导入spring-context依赖即可导入当前所需所有jar包 --><dependency><groupId>org.springframework</groupId><artifactId>spring-context</artifactId><version>5.3.1</version></dependency><!-- junit测试 --><dependency><groupId>junit</groupId><artifactId>junit</artifactId><version>4.12</version><scope>test</scope></dependency></dependencies></project>
③创建类
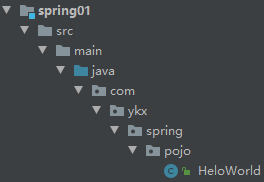
public class HeloWorld {public void sayHello(){System.out.println("test spring~~~");}
}
④创建Spring的配置文件
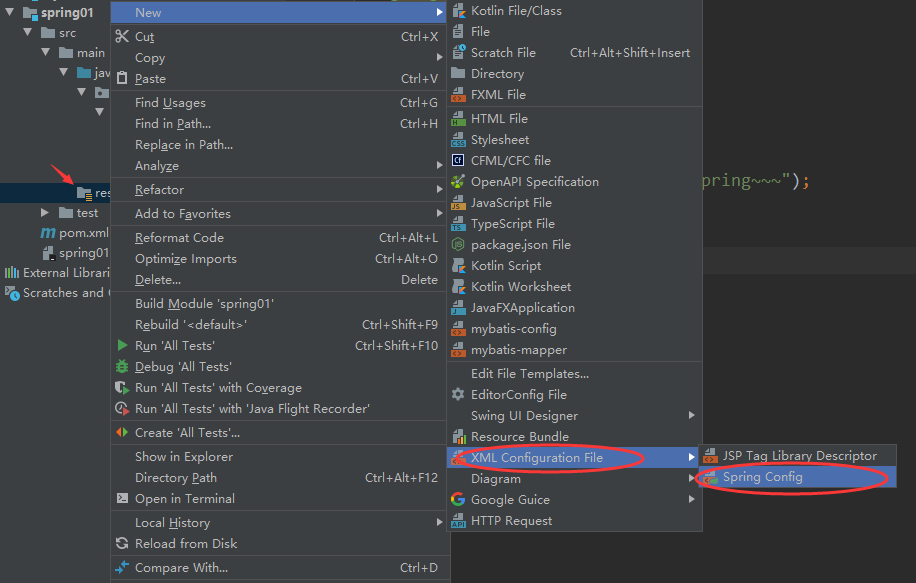
⑤在Spring的配置文件中配置bean
<!--配置HelloWorld所对应的bean,即将HelloWorld的对象交给Spring的IOC容器管理通过bean标签配置IOC容器所管理的bean属性:id:设置bean的唯一标识class:设置bean所对应类型的全类名
-->
<bean id="helloworld" class="com.ykx.spring.pojo.HelloWorld"></bean>
⑥创建测试类对象
@Test
public void test(){//获取IOC容器ApplicationContext ioc = new ClassPathXmlApplicationContext("applicationContext.xml");HelloWorld helloWorld = (HelloWorld) ioc.getBean("helloworld");helloWorld.sayHello();
}
⑦思路

⑧注意

2.实验二:获取bean
①方式一:根据id获取

@Test
public void test(){//获取IOC容器ApplicationContext ioc = new ClassPathXmlApplicationContext("spring-ioc.xml");//获取BeanStudent studentOne = (Student) ioc.getBean("studentOne");System.out.println(studentOne);
}
②方式二:根据类型获取
@Test
public void test2(){//获取IOC容器ApplicationContext ioc = new ClassPathXmlApplicationContext("spring-ioc.xml");//获取BeanStudent student = ioc.getBean(Student.class);System.out.println(student);
}
③方式三:根据id和类型
@Test
public void test3(){//获取IOC容器ApplicationContext ioc = new ClassPathXmlApplicationContext("spring-ioc.xml");//获取BeanStudent student = ioc.getBean("studentOne",Student.class);System.out.println(student);
}
④注意

⑤扩展

⑥结论

3.实验三:依赖注入之setter注入
①创建Student类
public class Student {private Integer sid;private String sname;private Integer age;private String gender;public Student() {}public Student(Integer sid, String sname, Integer age, String gender) {this.sid = sid;this.sname = sname;this.age = age;this.gender = gender;}public Integer getSid() {return sid;}public void setSid(Integer sid) {this.sid = sid;}public String getSname() {return sname;}public void setSname(String sname) {this.sname = sname;}public Integer getAge() {return age;}public void setAge(Integer age) {this.age = age;}public String getGender() {return gender;}public void setGender(String gender) {this.gender = gender;}@Overridepublic String toString() {return "Student{" +"sid=" + sid +", sname='" + sname + '\'' +", age=" + age +", gender='" + gender + '\'' +'}';}
}
②配置bean时为属性赋值
<bean id="studentTwo" class="com.ykx.spring.pojo.Student"><!-- property标签:通过组件类的setXxx()方法给组件对象设置属性 --><!-- name属性:指定属性名(这个属性名是getXxx()、setXxx()方法定义的,和成员变量无关)--><!-- value属性:指定属性值 --><property name="sid" value="1001"></property><property name="sname" value="张三"></property><property name="age" value="23"></property><property name="gender" value="男"></property>
</bean>
③测试
@Test
public void test(){//获取IOC容器ApplicationContext ioc = new ClassPathXmlApplicationContext("spring-ioc.xml");//获取BeanStudent student = ioc.getBean("studentTwo",Student.class);System.out.println(student);
}
4.实验四:依赖注入之构造器注入
①在Student类中添加有参构造
public Student() {
}public Student(Integer sid, String sname, Integer age, String gender) {this.sid = sid;this.sname = sname;this.age = age;this.gender = gender;
}
②配置bean
<bean id="studentThree" class="com.ykx.spring.pojo.Student"><constructor-arg value="1002"></constructor-arg><constructor-arg value="李四"></constructor-arg><constructor-arg value="33"></constructor-arg><constructor-arg value="女"></constructor-arg>
</bean>
③测试
@Test
public void test5(){//获取IOC容器ApplicationContext ioc = new ClassPathXmlApplicationContext("spring-ioc.xml");//获取BeanStudent student = ioc.getBean("studentThree",Student.class);System.out.println(student);
}
5.实验五:特殊值处理
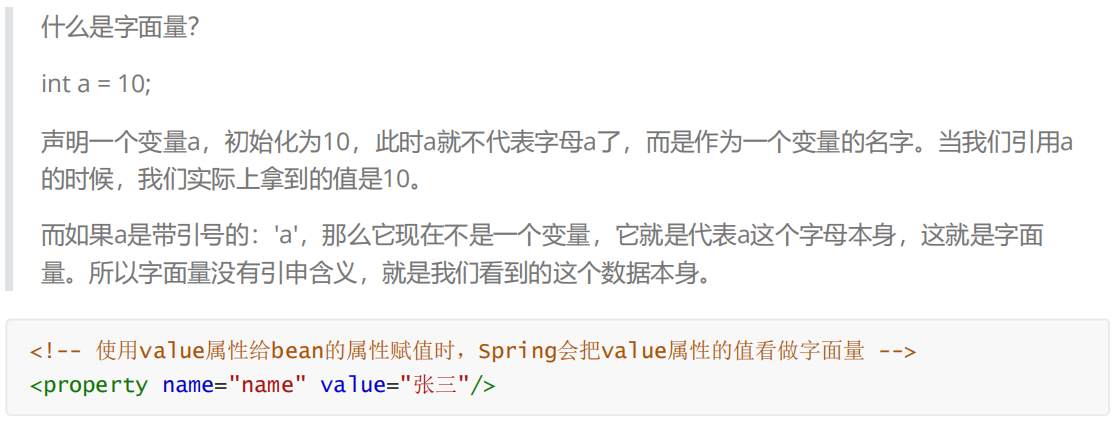
①字面量赋值
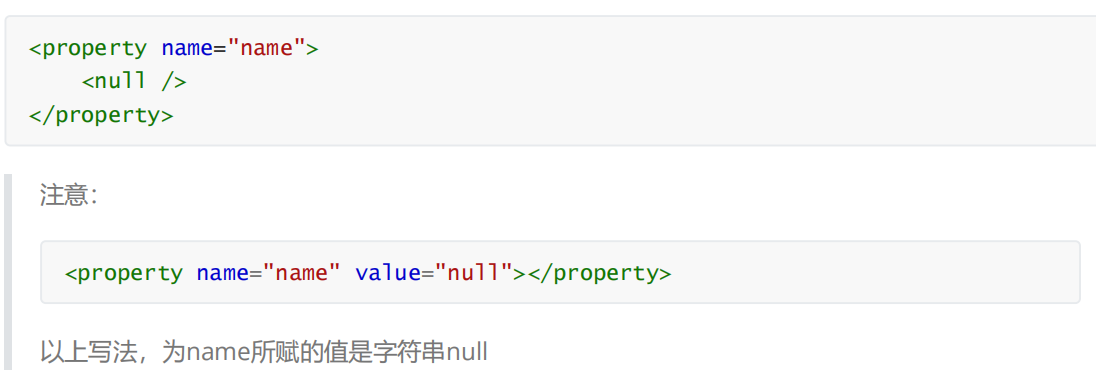
②null值
③xml实体

④CDATA节

6.实验六:为类类型属性赋值
①创建班级类Clazz
public class Clazz {private Integer clazzId;private String clazzName;public Clazz() {}public Clazz(Integer clazzId, String clazzName) {this.clazzId = clazzId;this.clazzName = clazzName;}public Integer getClazzId() {return clazzId;}public void setClazzId(Integer clazzId) {this.clazzId = clazzId;}public String getClazzName() {return clazzName;}public void setClazzName(String clazzName) {this.clazzName = clazzName;}@Overridepublic String toString() {return "Clazz{" +"clazzId=" + clazzId +", clazzName='" + clazzName + '\'' +'}';}}②修改Student类
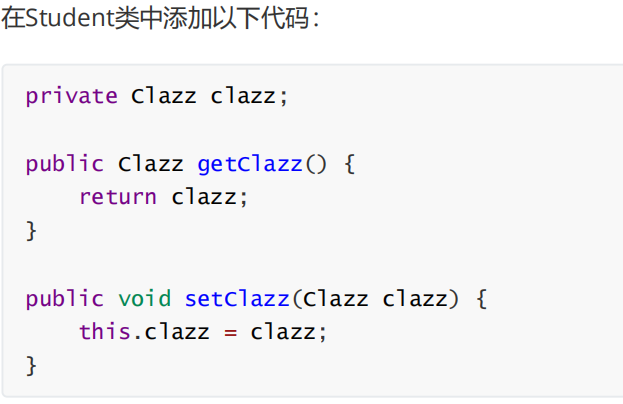
③方式一:引用外部已声明的bean
<bean id="clazzOne" class="com.ykx.spring.pojo.Clazz"><property name="clazzId" value="1111"></property><property name="clazzName" value="财源滚滚班"></property>
</bean><bean id="studentFive" class="com.ykx.spring.pojo.Student"><property name="sid" value="1004"></property><property name="sname" value="赵六"></property><property name="age" value="26"></property><property name="gender" value="女"></property><!-- ref属性:引用IOC容器中某个bean的id,将所对应的bean为属性赋值 --><property name="clazz" ref="clazzOne"></property>
</bean>
测试
@Test
public void test6(){//获取IOC容器ApplicationContext ioc = new ClassPathXmlApplicationContext("spring-ioc.xml");//获取BeanStudent student = ioc.getBean("studentFive",Student.class);System.out.println(student);
}
④方式二:内部bean
<bean id="studentSix" class="com.ykx.spring.pojo.Student"><property name="sid" value="1004"></property><property name="sname" value="赵六"></property><property name="age" value="26"></property><property name="gender" value="女"></property><property name="clazz"><!-- 在一个bean中再声明一个bean就是内部bean --><!-- 内部bean只能用于给属性赋值,不能在外部通过IOC容器获取,因此可以省略id属性 --><bean id="clazzInner" class="com.ykx.spring.pojo.Clazz"><property name="clazzId" value="2222"></property><property name="clazzName" value="远大前程班"></property></bean></property>
</bean>
⑤方式三:级联属性赋值
<bean id="studentSeven" class="com.ykx.spring.pojo.Student"><property name="sid" value="1004"></property><property name="sname" value="赵六"></property><property name="age" value="26"></property><property name="gender" value="女"></property><!-- 一定先引用某个bean为属性赋值,才可以使用级联方式更新属性 --><property name="clazz" ref="clazzOne"></property><property name="clazz.clazzId" value="3333"></property><property name="clazz.clazzName" value="最强王者班"></property>
</bean>
7.实验七:为数组类型属性赋值
①修改Student类
在Student类中添加以下代码:
private String[] hobbies;public String[] getHobbies() {return hobbies;
}public void setHobbies(String[] hobbies) {this.hobbies = hobbies;
}
②配置bean
<bean id="studentFour" class="com.ykx.spring.pojo.Student"><property name="sid" value="1004"></property><property name="sname" value="赵六"></property><property name="age" value="26"></property><property name="gender" value="女"></property><!-- ref属性:引用IOC容器中某个bean的id,将所对应的bean为属性赋值 --><property name="clazz" ref="clazzOne"></property><property name="hobbies"><array><value>lol</value><value>cf</value><value>云顶之弈</value><value>金铲铲之战</value></array></property>
</bean>
8.实验八:为集合类型属性赋值
①为List集合类型属性赋值
在Clazz类中添加以下代码:
private List<Student> students;public List<Student> getStudents() {return students;
}public void setStudents(List<Student> students) {this.students = students;
}
配置bean:.
<bean id="clazzTwo" class="com.ykx.spring.pojo.Clazz"><property name="clazzId" value="4444"></property><property name="clazzName" value="Javaee0222"></property><property name="students"><list><ref bean="studentOne"></ref><ref bean="studentTwo"></ref></list></property>
</bean>
测试结果:
@Test
public void test7(){//获取IOC容器ApplicationContext ioc = new ClassPathXmlApplicationContext("spring-ioc.xml");//获取BeanClazz clazz = ioc.getBean("clazzTwo", Clazz.class);System.out.println(clazz);
}
②为Map集合类型属性赋值
创建教师类
public class Teacher {private Integer teacherId;private String teacherName;public Teacher() {}public Teacher(Integer teacherId, String teacherName) {this.teacherId = teacherId;this.teacherName = teacherName;}public Integer getTeacherId() {return teacherId;}public void setTeacherId(Integer teacherId) {this.teacherId = teacherId;}public String getTeacherName() {return teacherName;}public void setTeacherName(String teacherName) {this.teacherName = teacherName;}@Overridepublic String toString() {return "Teacher{" +"teacherId=" + teacherId +", teacherName='" + teacherName + '\'' +'}';}
}
在Student类中添加以下代码:
private Map<String, Teacher> teacherMap;public Map<String, Teacher> getTeacherMap() {return teacherMap;
}public void setTeacherMap(Map<String, Teacher> teacherMap) {this.teacherMap = teacherMap;
}
配置bean:
<bean id="teacherOne" class="com.ykx.spring.pojo.Teacher"><property name="teacherId" value="10010"></property><property name="teacherName" value="大宝"></property>
</bean>
<bean id="teacherTwo" class="com.ykx.spring.pojo.Teacher"><property name="teacherId" value="10086"></property><property name="teacherName" value="二宝"></property>
</bean>
<bean id="studentEight" class="com.ykx.spring.pojo.Student">
<property name="sid" value="1004"></property>
<property name="sname" value="赵六"></property>
<property name="age" value="26"></property>
<property name="gender" value="女"></property>
<!-- ref属性:引用IOC容器中某个bean的id,将所对应的bean为属性赋值 -->
<property name="clazz" ref="clazzOne"></property>
<property name="hobbies"><array><value>lol</value><value>cf</value><value>云顶之弈</value></array>
</property>
<property name="teacherMap">
<map>
<entry>
<key><value>10010</value>
</key><ref bean="teacherOne"></ref>
</entry><entry><key><value>10086</value></key><ref bean="teacherTwo"></ref></entry>
</map>
</property>
</bean>
③引用集合类型的bean
使用util:list、util:map标签必须引入相应的命名空间,可以通过idea的提示功能选择
<!--list集合类型的bean-->
<util:list id="students"><ref bean="studentOne"></ref><ref bean="studentTwo"></ref><ref bean="studentThree"></ref>
</util:list>
<!--map集合类型的bean-->
<util:map id="teacherMap"><entry><key><value>10010</value></key><ref bean="teacherOne"></ref></entry><entry><key><value>10086</value></key><ref bean="teacherTwo"></ref></entry>
</util:map><bean id="clazzTwo" class="com.atguigu.spring.bean.Clazz"><property name="clazzId" value="4444"></property><property name="clazzName" value="Javaee0222"></property><property name="students" ref="students"></property>
</bean><bean id="studentFour" class="com.atguigu.spring.bean.Student">
<property name="id" value="1004"></property>
<property name="name" value="赵六"></property>
<property name="age" value="26"></property>
<property name="sex" value="女"></property>
<!-- ref属性:引用IOC容器中某个bean的id,将所对应的bean为属性赋值 -->
<property name="clazz" ref="clazzOne"></property>
<property name="hobbies"><array><value>抽烟</value><value>喝酒</value><value>烫头</value></array>
</property>
<property name="teacherMap" ref="teacherMap"></property>
</bean>
9.实验九:p命名空间

10.实验十:引入外部属性文件(以jdbc为例)
①加入依赖
<!-- MySQL驱动 -->
<dependency><groupId>mysql</groupId><artifactId>mysql-connector-java</artifactId><version>8.0.16</version>
</dependency>
<!-- 数据源 -->
<dependency><groupId>com.alibaba</groupId><artifactId>druid</artifactId><version>1.0.31</version>
</dependency>
②创建外部属性文件
![]()
jdbc.user=root
jdbc.password=ykxykx
jdbc.url=jdbc:mysql://localhost:3306/ssm?serverTimezone=UTC
jdbc.driver=com.mysql.cj.jdbc.Driver
③引入属性文件

④配置bean
<bean id="druidDataSource" class="com.alibaba.druid.pool.DruidDataSource"><property name="url" value="${jdbc.url}"/><property name="driverClassName" value="${jdbc.driver}"/><property name="username" value="${jdbc.user}"/><property name="password" value="${jdbc.password}"/>
</bean>
⑤测试
@Test
public void test() throws Exception {//获取IOC容器ApplicationContext ioc = new ClassPathXmlApplicationContext("spring-datasource.xml");//获取BeanDruidDataSource ds = ioc.getBean(DruidDataSource.class);Connection connection = ds.getConnection();System.out.println(connection);
}
11.实验十一:bean的作用域
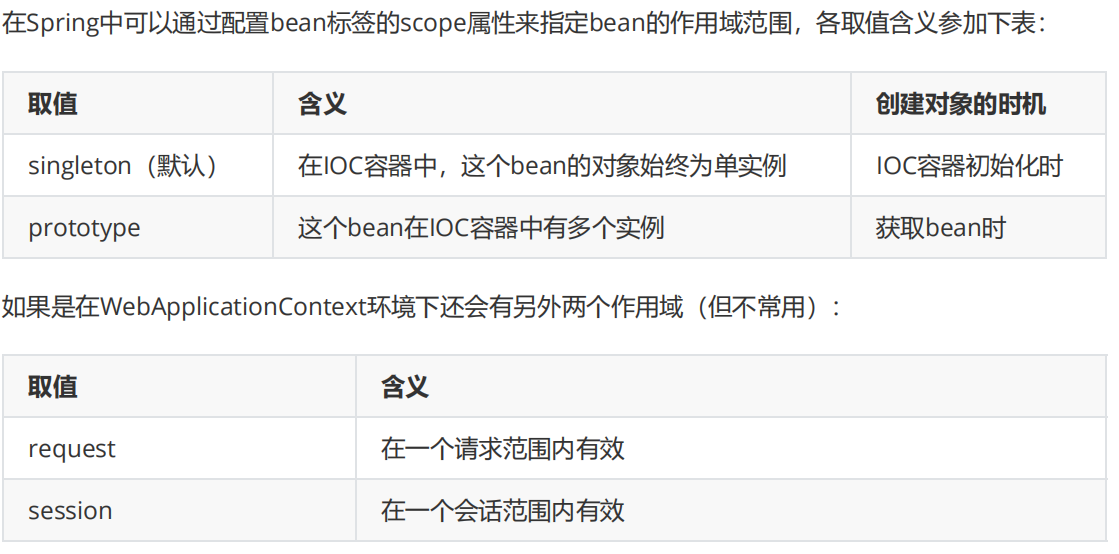
12.实验十二:bean的生命周期
①具体的生命周期过程
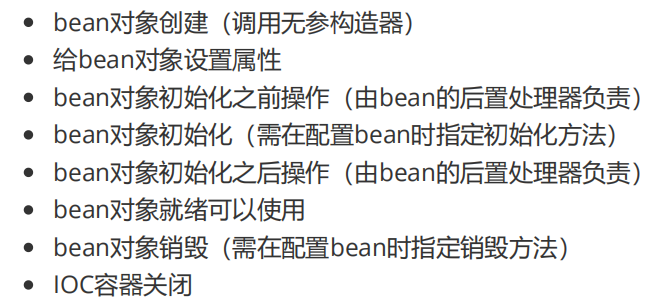

②bean的后置处理器


13.实验十三:FactoryBean
①简介

②创建类UserFactoryBean
public class UserFactoryBean implements FactoryBean<User> {@Overridepublic User getObject() throws Exception {return new User();}@Overridepublic Class<?> getObjectType() {return User.class;}}
③配置bean
<bean id="user" class="com.ykx.spring.factory.UserFactoryBean"></bean>④测试
@Test
public void testUserFactoryBean(){//获取IOC容器ApplicationContext ac = new ClassPathXmlApplicationContext("spring-factory.xml");User user = (User) ac.getBean("user");System.out.println(user);
}
14.实验十四:基于xml的自动装配

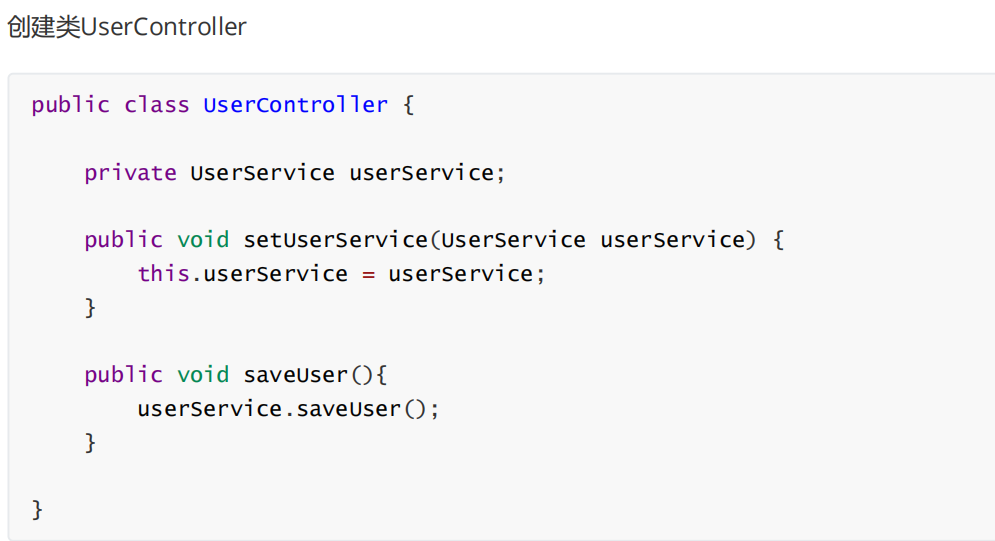
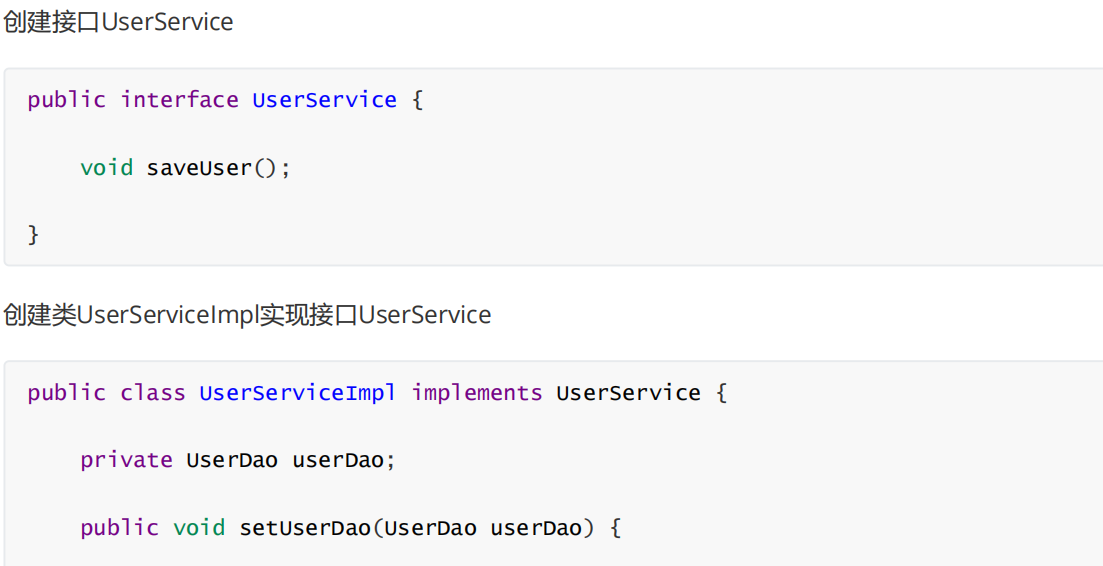
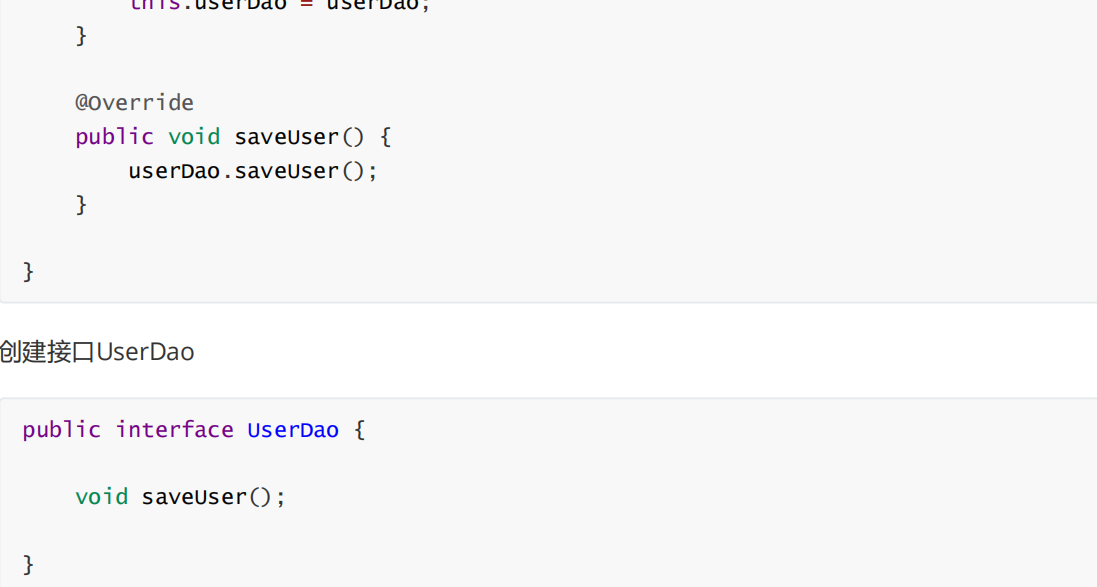
①场景模拟
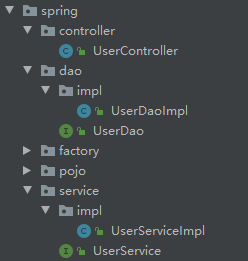

②配置bean
 byType
<bean id="userController"class="com.ykx.spring.controller.UserController" autowire="byType">
</bean>
<bean id="userService"class="com.ykx.spring.service.impl.UserServiceImpl" autowire="byType">
</bean>
<bean id="userDao" class="com.ykx.spring.dao.impl.UserDaoImpl"></bean>
byName
<bean id="userController"class="com.ykx.spring.controller.UserController" autowire="byName">
</bean>
<bean id="userService"class="com.ykx.spring.service.impl.UserServiceImpl" autowire="byName">
</bean>
<bean id="userServiceImpl"class="com.ykx.spring.service.impl.UserServiceImpl" autowire="byName">
</bean>
<bean id="userDao" class="com.ykx.spring.dao.impl.UserDaoImpl"></bean>
<bean id="userDaoImpl" class="com.ykx.spring.dao.impl.UserDaoImpl">
</bean>
③测试
@Test
public void test(){ApplicationContext ioc = new ClassPathXmlApplicationContext("spring-autowire.xml");UserController userController = ioc.getBean(UserController.class);userController.saveUser();}
内容来源于黑马程序员SSM课程的笔记,仅作为学习笔记参考

这篇关于从头开始学Spring—02基于XML管理bean的文章就介绍到这儿,希望我们推荐的文章对编程师们有所帮助!


