本文主要是介绍第四步->手撕spring源码之bena注入实现和依赖,希望对大家解决编程问题提供一定的参考价值,需要的开发者们随着小编来一起学习吧!
本步骤目标
上述几个步骤 定义和注册Bean (opens new window)、实例化Bean (opens new window),按照是否包含构造函数实现不同的实例化策略 (opens new window),那么在创建对象实例化这我们还缺少什么?其实还缺少一个关于类中是否有属性的问题,如果有类中包含属性那么在实例化的时候就需要把属性信息填充上,这样才是一个完整的对象创建。
设计原理
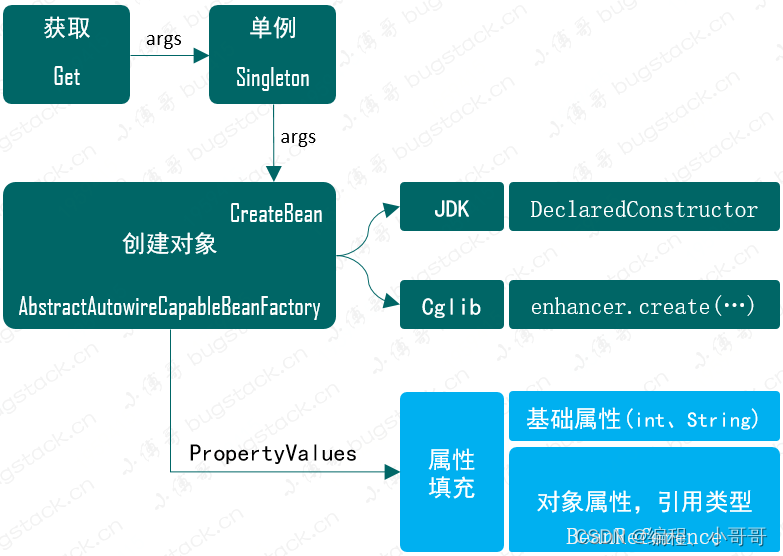
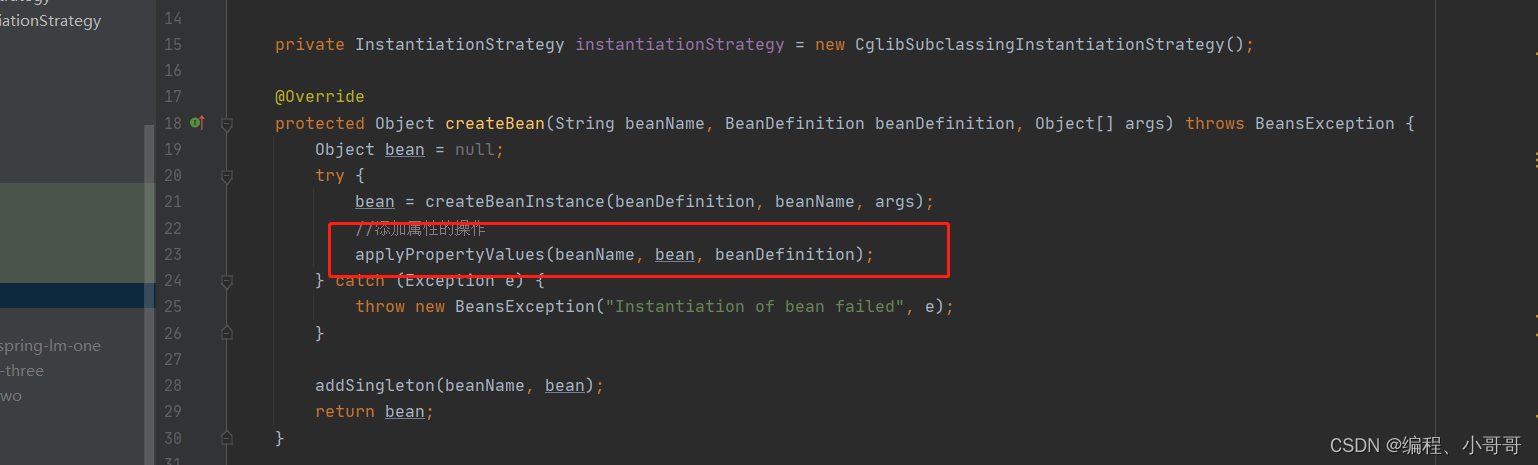
1:属性填充要在类实例化创建之后,也就是需要在 AbstractAutowireCapableBeanFactory 的 createBean 方法中添加 applyPropertyValues 操作。
2:由于我们需要在创建Bean时候填充属性操作,那么就需要在 bean 定义 BeanDefinition 类中,添加 PropertyValues 信息。
3:另外是填充属性信息还包括了 Bean 的对象类型,也就是需要再定义一个 BeanReference,里面其实就是一个简单的 Bean 名称,在具体的实例化操作时进行递归创建和填充,与 Spring 源码实现一样。
以下开始实战
定义属性
package beans;public class PropertyValue {private String name;private Object value;public PropertyValue(String name, Object value) {this.name = name;this.value = value;}public String getName() {return name;}public void setName(String name) {this.name = name;}public Object getValue() {return value;}public void setValue(Object value) {this.value = value;}
}public class PropertyValues {private List<PropertyValue> propertyValueArrayList = new ArrayList<>();public void addPropertyValue(PropertyValue propertyValue) {propertyValueArrayList.add(propertyValue);}public PropertyValue[] getPropertyValues() {return this.propertyValueArrayList.toArray(new PropertyValue[0]);}public PropertyValue getPropertyValue(String propertyName) {for (PropertyValue pv : this.propertyValueArrayList) {if (pv.getName().equals(propertyName)) {return pv;}}return null;}
}
Bean定义补全
public class BeanDefinition {private Class classBean;private PropertyValues propertyValues;public BeanDefinition(Class classBean) {this.classBean = classBean;}public BeanDefinition(Class beanClass, PropertyValues propertyValues) {this.classBean = beanClass;this.propertyValues = propertyValues != null ? propertyValues : new PropertyValues();}public Class getClassBean() {return classBean;}public void setClassBean(Class classBean) {this.classBean = classBean;}
}
上述补充主要是把属性一定交给 Bean 定义,所以这里填充了 PropertyValues 属性,同时把两个构造函数做了一些简单的优化,避免后面 for 循环时还得判断属性填充是否为空。
Bean 属性填充
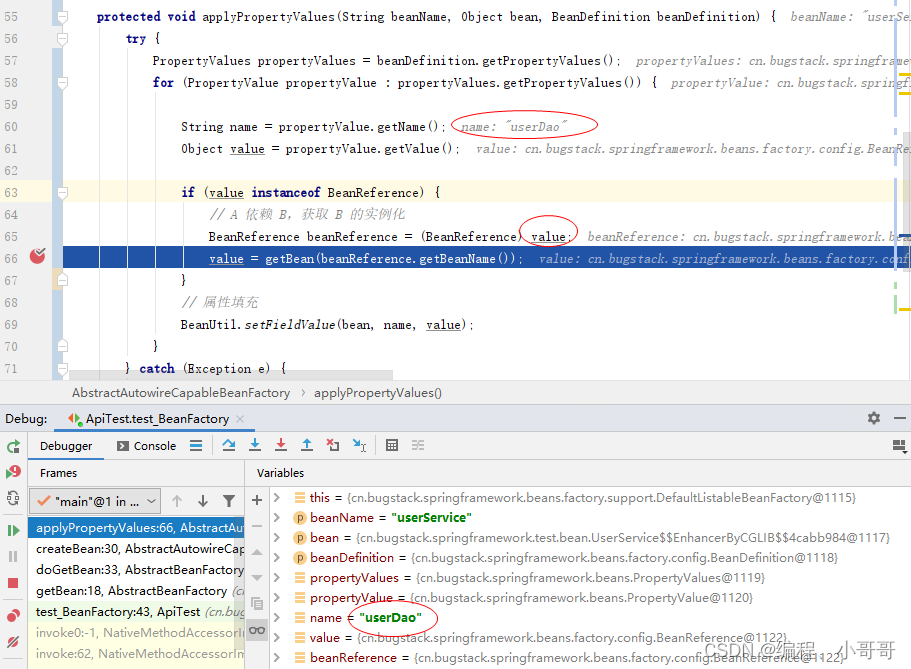
/*** bean属性添加** @param beanName* @param bean* @param beanDefinition*/protected void applyPropertyValues(String beanName, Object bean, BeanDefinition beanDefinition) {try {PropertyValues propertyValues = beanDefinition.getPropertyValues();for (PropertyValue propertyValue : propertyValues.getPropertyValues()) {String name = propertyValue.getName();Object value = propertyValue.getValue();if (value instanceof BeanReference) {// A 依赖 B,获取 B 的实例化BeanReference beanReference = (BeanReference) value;value = getBean(beanReference.getBeanName());}// 属性填充BeanUtil.setFieldValue(bean, name, value);}} catch (Exception e) {throw new BeansException("Error setting property values:" + beanName);}}
测试结果
package test;import beans.PropertyValue;
import beans.PropertyValues;
import beans.factory.config.BeanDefinition;
import beans.factory.config.BeanReference;
import beans.factory.support.DefaultListableBeanFactory;
import org.junit.Test;public class TestFour {@Testpublic void test_BeanFactory() {// 1.初始化 BeanFactoryDefaultListableBeanFactory beanFactory = new DefaultListableBeanFactory();// 2. UserDao 注册beanFactory.registerBeanDefinition("userDao", new BeanDefinition(UserDao.class));// 3. UserService 设置属性[id、userDao]PropertyValues propertyValues = new PropertyValues();propertyValues.addPropertyValue(new PropertyValue("id", "1"));propertyValues.addPropertyValue(new PropertyValue("userDao", new BeanReference("userDao")));// 4. UserService 注入beanBeanDefinition beanDefinition = new BeanDefinition(UserService.class, propertyValues);beanFactory.registerBeanDefinition("userService", beanDefinition);// 5. UserService 获取beanUserService userService = (UserService) beanFactory.getBean("userService");userService.queryUserInfo();}}
测试结果截图
以上是第四步->手撕spring源码之bena注入实现和依赖 关注老哥带你上高速 后续继续完成手写spring源码。

这篇关于第四步->手撕spring源码之bena注入实现和依赖的文章就介绍到这儿,希望我们推荐的文章对编程师们有所帮助!


