本文主要是介绍iOS个人整理19-UITableViewController和UITableView的编辑,希望对大家解决编程问题提供一定的参考价值,需要的开发者们随着小编来一起学习吧!
一、UITableViewController
UITableViewController是继承于UIViewController中的一个类,只不过比UIViewController中多了一个属性tableView。
也就是说UITableViewController是自带table的视图控制器。
它的self.view 是UITableView而不是UIView。
dataSource和delegate都默认是self。
总而言之,省了不少事情,相当于创建了一个UIViewController并在上面声明了完整的UITableView。
二、UITableView的编辑
对于UITableView来说,经常需要删除或者添加一条信息,比如,通讯录中的滑动删除和添加信息。
简单来说就是对单元格进行删除,添加,插入,以及调换顺序的操作。
这些操作主要通过各种代理方法来实现
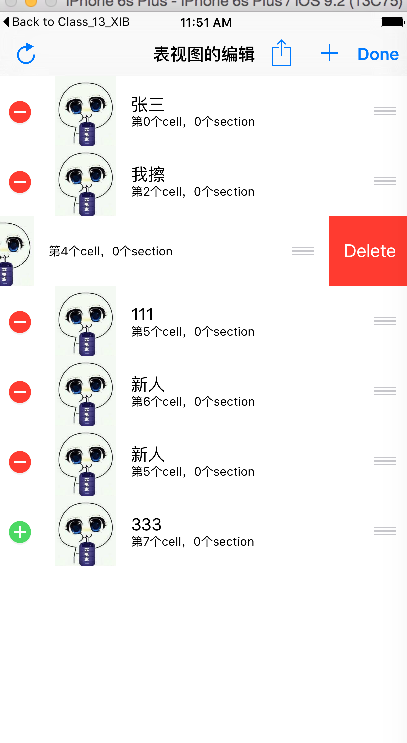
1.让tableView处于编辑状态
//系统提供的方法按钮会调用此方法,让tableView处于编辑状态
-(void)setEditing:(BOOL)editing animated:(BOOL)animated
{//设置父类进入编辑状态[super setEditing:editing animated:animated];//开启表视图的编辑状态UITableView *tempTableView = [self.view viewWithTag:1000];[tempTableView setEditing:editing animated:animated];}//确定cell是否可以进入编辑状态,为NO就不能进入编辑状态
-(BOOL)tableView:(UITableView *)tableView canEditRowAtIndexPath:(NSIndexPath *)indexPath
{return YES;
}
2.设置编辑状态的style,决定插入或删除
//设置编辑的样式
-(UITableViewCellEditingStyle)tableView:(UITableView *)tableView editingStyleForRowAtIndexPath:(NSIndexPath *)indexPath
{//如果是最后一行,编辑模式为插入if (indexPath.row == _allDataMutableArray.count-1) {return UITableViewCellEditingStyleInsert;}elsereturn UITableViewCellEditingStyleDelete;
}
3.编辑状态的提交,对tableView进行改变
//编辑状态的提交
-(void)tableView:(UITableView *)tableView commitEditingStyle:(UITableViewCellEditingStyle)editingStyle forRowAtIndexPath:(NSIndexPath *)indexPath
{UITableView *tempTableView = [self.view viewWithTag:1000];//如果编辑模式为删除if (editingStyle == UITableViewCellEditingStyleDelete) {//先删除数据源,也就是数组中的内容[_allDataMutableArray removeObjectAtIndex:indexPath.row];//再删除单元格//这里要特别注意,必须先操作数据再操作单元格,不然崩的不要不要的[tempTableView deleteRowsAtIndexPaths:@[indexPath] withRowAnimation:UITableViewRowAnimationTop];}//如果编辑模式为插入if (editingStyle == UITableViewCellEditingStyleInsert) {//先插入到数组[_allDataMutableArray insertObject:@"新人" atIndex:indexPath.row];//再创建单元格[tempTableView insertRowsAtIndexPaths:@[indexPath] withRowAnimation:UITableViewRowAnimationLeft];}
}
下面是移动单元格的方法
1.首先还是要进入编辑状态,与上面第一步相同
2.设置是否可以移动
//实现协议,告诉tableView是否能移动
-(BOOL)tableView:(UITableView *)tableView canMoveRowAtIndexPath:(NSIndexPath *)indexPath
{return YES;
}
3.检测移动的过程,可以对移动的源位置和目的位置进行限制
//监测移动过程,限制最后一行不能移动
-(NSIndexPath *)tableView:(UITableView *)tableView targetIndexPathForMoveFromRowAtIndexPath:(NSIndexPath *)sourceIndexPath toProposedIndexPath:(NSIndexPath *)proposedDestinationIndexPath
{//设置,如果要移动最后一行或者移动到最后一行,是不允许的if (sourceIndexPath.row == _allDataMutableArray.count - 1 || proposedDestinationIndexPath.row == _allDataMutableArray.count - 1) {return sourceIndexPath;}elsereturn proposedDestinationIndexPath;
}
4.进行移动的数据操作,如果不添加这一步,就没有修改数据源,重新加载后会复原
//移动
-(void)tableView:(UITableView *)tableView moveRowAtIndexPath:(NSIndexPath *)sourceIndexPath toIndexPath:(NSIndexPath *)destinationIndexPath
{//先得到单元格上的数据NSString *tempStr = [self.allDataMutableArray objectAtIndex:sourceIndexPath.row];//把原位置的数据删除[_allDataMutableArray removeObjectAtIndex:sourceIndexPath.row];//把新数据添加到数组中对应的位置[_allDataMutableArray insertObject:tempStr atIndex:destinationIndexPath.row];}
5.让tableView重新加载数据
//刷新数据
-(void)refreshAction:(UIBarButtonItem*)sender
{UITableView *tempTableView = [self.view viewWithTag:1000];[tempTableView reloadData];
}
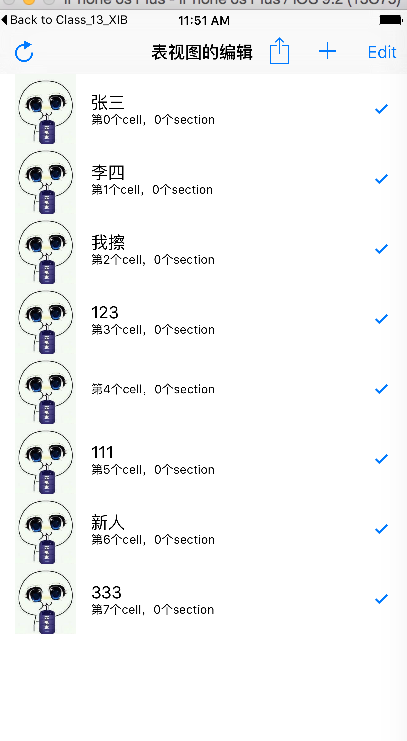
这里再贴上完整的代码和效果
//
#import "RootViewController.h"@interface RootViewController ()<UITableViewDataSource,UITableViewDelegate>@property (nonatomic,retain)NSMutableArray* allDataMutableArray;@end@implementation RootViewController- (void)viewDidLoad {[super viewDidLoad];//标题self.navigationItem.title = @"表视图的编辑";//添加右侧按钮//添加按钮UIBarButtonItem* addBarButton = [[UIBarButtonItem alloc]initWithBarButtonSystemItem:UIBarButtonSystemItemAdd target:self action:@selector(addAction:)];//编辑按钮UIBarButtonItem* editBarButton = [[UIBarButtonItem alloc]initWithBarButtonSystemItem:UIBarButtonSystemItemAction target:self action:@selector(editAction:)];//添加到右侧self.navigationItem.rightBarButtonItems = @[self.editButtonItem,addBarButton,editBarButton];//添加左侧刷新按钮self.navigationItem.leftBarButtonItem = [[UIBarButtonItem alloc]initWithBarButtonSystemItem:UIBarButtonSystemItemRefresh target:self action:@selector(refreshAction:)];//初始化UITableView *myTableView = [[UITableView alloc]initWithFrame:self.view.bounds style:UITableViewStylePlain];myTableView.tag = 1000;//代理myTableView.delegate = self;myTableView.dataSource = self;//添加到父视图[self.view addSubview:myTableView];//显示相关的属性//行高myTableView.rowHeight = 70;//分割线myTableView.separatorColor = [UIColor blueColor];myTableView.separatorStyle = UITableViewCellSeparatorStyleSingleLine;//置顶视图myTableView.tableHeaderView = [[UIView alloc]init];//置底视图myTableView.tableFooterView = [[UIView alloc]init];//初始化数组数据self.allDataMutableArray = [[NSMutableArray alloc]initWithObjects:@"张三",@"李四",@"我擦",@"123",@"",@"111",@"333", nil];}//行数
-(NSInteger)tableView:(UITableView *)tableView numberOfRowsInSection:(NSInteger)section
{return _allDataMutableArray.count;
}//cell填充
-(UITableViewCell *)tableView:(UITableView *)tableView cellForRowAtIndexPath:(NSIndexPath *)indexPath
{//cell重用机制//定义重用标示符static NSString* cellId = @"CELL";//每次需要使用单元格的是,先根据重用标识符从重用队列中获取单元格,如果队列中没有,再进行初始化新的单元格//每次都会先创建一屏幕的cell,当有cell出屏幕,就会根据重用标识符添加到对应的重用队列中,当屏幕外的cell要进入屏幕,先从队列中获取,如果没有,则初始化cell//当重用cell时,需要对上面的控件程序赋值UITableViewCell *cell = [tableView dequeueReusableCellWithIdentifier:cellId];//如果从重用队列中未获取cell,也就是Cell为空if (!cell) {cell = [[UITableViewCell alloc]initWithStyle:UITableViewCellStyleSubtitle reuseIdentifier:cellId];//系统提供的控件要配合不同的样式来使用
//        cell.detailTextLabel.text = [NSString stringWithFormat:@"创建的第%d个单元格",self.index++];}//UITableViewCell的属性//选中效果cell.selectionStyle = UITableViewCellSelectionStyleBlue;//辅助视图的样式cell.accessoryType = UITableViewCellAccessoryCheckmark;//设置左侧图片cell.imageView.image = [UIImage imageNamed:@"ck.jpg"];//标题视图cell.detailTextLabel.text = [NSString stringWithFormat:@"第%ld个cell,%ld个section",indexPath.row,indexPath.section];//副标题视图cell.textLabel.text = _allDataMutableArray[indexPath.row];//为相应位置返回定制好的单元格return cell;}
#pragma mark -- 按钮触发方法
//点击添加触发的方法
-(void)addAction:(UIBarButtonItem*)sender
{}
//进入编辑状态
-(void)editAction:(UIBarButtonItem*)sender
{[self setEditing:YES animated:NO];
}
//刷新数据
-(void)refreshAction:(UIBarButtonItem*)sender
{UITableView *tempTableView = [self.view viewWithTag:1000];[tempTableView reloadData];
}#pragma mark -- 编辑相关代理方法//系统提供的方法按钮会调用此方法,让tableView处于编辑状态
-(void)setEditing:(BOOL)editing animated:(BOOL)animated
{[super setEditing:editing animated:animated];//开启表视图的编辑状态UITableView *tempTableView = [self.view viewWithTag:1000];[tempTableView setEditing:editing animated:animated];}
//协议设定
//确定cell是否处于编辑状态,为NO就不能进入编辑状态
-(BOOL)tableView:(UITableView *)tableView canEditRowAtIndexPath:(NSIndexPath *)indexPath
{return YES;
}//编辑状态的提交
-(void)tableView:(UITableView *)tableView commitEditingStyle:(UITableViewCellEditingStyle)editingStyle forRowAtIndexPath:(NSIndexPath *)indexPath
{UITableView *tempTableView = [self.view viewWithTag:1000];//如果编辑模式为删除if (editingStyle == UITableViewCellEditingStyleDelete) {//先删除数据源,也就是数组中的内容[_allDataMutableArray removeObjectAtIndex:indexPath.row];//再删除单元格//这里要特别注意,必须先操作数据再操作单元格,不然崩的不要不要的[tempTableView deleteRowsAtIndexPaths:@[indexPath] withRowAnimation:UITableViewRowAnimationTop];}//如果编辑模式为插入if (editingStyle == UITableViewCellEditingStyleInsert) {//先插入到数组[_allDataMutableArray insertObject:@"新人" atIndex:indexPath.row];//再创建单元格[tempTableView insertRowsAtIndexPaths:@[indexPath] withRowAnimation:UITableViewRowAnimationLeft];}
}//设置编辑的样式
-(UITableViewCellEditingStyle)tableView:(UITableView *)tableView editingStyleForRowAtIndexPath:(NSIndexPath *)indexPath
{//如果是最后一行,编辑模式为插入if (indexPath.row == _allDataMutableArray.count-1) {return UITableViewCellEditingStyleInsert;}elsereturn UITableViewCellEditingStyleDelete;
}//移动相关
//实现协议,告诉tableView是否能移动
-(BOOL)tableView:(UITableView *)tableView canMoveRowAtIndexPath:(NSIndexPath *)indexPath
{return YES;
}//移动
-(void)tableView:(UITableView *)tableView moveRowAtIndexPath:(NSIndexPath *)sourceIndexPath toIndexPath:(NSIndexPath *)destinationIndexPath
{//先得到单元格上的数据NSString *tempStr = [self.allDataMutableArray objectAtIndex:sourceIndexPath.row];//把原位置的数据删除[_allDataMutableArray removeObjectAtIndex:sourceIndexPath.row];//把新数据添加到数组中对应的位置[_allDataMutableArray insertObject:tempStr atIndex:destinationIndexPath.row];}//监测移动过程,限制最后一行不能移动
-(NSIndexPath *)tableView:(UITableView *)tableView targetIndexPathForMoveFromRowAtIndexPath:(NSIndexPath *)sourceIndexPath toProposedIndexPath:(NSIndexPath *)proposedDestinationIndexPath
{if (sourceIndexPath.row == _allDataMutableArray.count - 1 || proposedDestinationIndexPath.row == _allDataMutableArray.count - 1) {return sourceIndexPath;}elsereturn proposedDestinationIndexPath;
}@end
效果如下
这篇关于iOS个人整理19-UITableViewController和UITableView的编辑的文章就介绍到这儿,希望我们推荐的文章对编程师们有所帮助!


