本文主要是介绍IPC机制(三)--ContentProvider、Socket和Binder池,希望对大家解决编程问题提供一定的参考价值,需要的开发者们随着小编来一起学习吧!
1.ContentProvider
ContentProvider的底层实现是基于Binder,系统为我们做了深度的封装,让我们使用起来非常容易。
// 第一步
// 实现一个内容提供者,每个CURD方法中实现对数据的提供,可以是大多是从数据库加载数据
public class BookProvider extends ContentProvider {private static final String AUTHORITY = "com.gacrnd.gcs.ipc.BookProvider";public static final Uri BOOK_CONTENT_URI = Uri.parse("content://" + AUTHORITY + "/book");public static final Uri USER_CONTENT_URI = Uri.parse("content://" + AUTHORITY + "/user");public static final int BOOK_URI_CODE = 0;public static final int USER_URI_CODE = 1;private Context mContext;private SQLiteDatabase mDatabase;private static final UriMatcher sUriMatcher = new UriMatcher(UriMatcher.NO_MATCH);static {sUriMatcher.addURI(AUTHORITY,"book",BOOK_URI_CODE);sUriMatcher.addURI(AUTHORITY,"user",USER_URI_CODE);}// 通过uri获取表名private String getTableName(Uri uri) {String tableName = null;switch (sUriMatcher.match(uri)) {case BOOK_URI_CODE:tableName = DbOpenHelper.BOOK_TABLE_NAME;break;case USER_URI_CODE:tableName = DbOpenHelper.USER_TABLE_NAME;break;default:break;}return tableName;}@Overridepublic boolean onCreate() {mContext = getContext();//以下应该在子线程中加载数据库initDatabase();return true;}// 初始化数据库private void initDatabase() {mDatabase = new DbOpenHelper(mContext).getWritableDatabase();mDatabase.execSQL("DELETE FROM " + DbOpenHelper.BOOK_TABLE_NAME);mDatabase.execSQL("DELETE FROM " + DbOpenHelper.USER_TABLE_NAME);mDatabase.execSQL("INSERT INTO book VALUES(1,'ANDROID 1');");mDatabase.execSQL("INSERT INTO book VALUES(2,'ANDROID 2');");mDatabase.execSQL("INSERT INTO book VALUES(3,'ANDROID 3');");mDatabase.execSQL("INSERT INTO user VALUES(1,'JackOu',0);");mDatabase.execSQL("INSERT INTO user VALUES(2,'DY',1);");}@Overridepublic Cursor query(Uri uri, String[] projection, String selection, String[] selectionArgs, String sortOrder) {Log.i("JackOu","query:" + Thread.currentThread().getName());String tableName = getTableName(uri);if (tableName == null) {throw new IllegalArgumentException("uri illegal!");}return mDatabase.query(tableName,projection,selection,selectionArgs,null,sortOrder,null);}......//需要基于数据库实现对应的CURD操作
}
// 第二步 在manifest中声明该Provider
<providerandroid:authorities="com.gacrnd.gcs.ipc.BookProvider"android:name=".BookProvider"android:permission="com.gacrnd.gcs.PROVIDER"android:process=":provider"/>
// 第三步
public class DbOpenHelper extends SQLiteOpenHelper {private static final String DB_NAME = "book_provider.db";public static final String BOOK_TABLE_NAME = "book";public static final String USER_TABLE_NAME = "user";private String CREATE_BOOK_TABLE = "CREATE TABLE IF NOT EXISTS " + BOOK_TABLE_NAME+ "(_id INTEGER PRIMARY KEY, name TEXT)";private String CREATE_USER_TABLE = "CREATE TABLE IF NOT EXISTS " + USER_TABLE_NAME+ "(_id INTEGER PRIMARY KEY, name TEXT, sex INT)";private static final int DB_VERSION = 1;public DbOpenHelper(Context context) {super(context, DB_NAME, null, DB_VERSION);}@Overridepublic void onCreate(SQLiteDatabase db) {db.execSQL(CREATE_BOOK_TABLE);db.execSQL(CREATE_USER_TABLE);}@Overridepublic void onUpgrade(SQLiteDatabase db, int oldVersion, int newVersion) {// 忽略数据库版本升级}
}
// 第四步在需要使用的地方获取数据即可
Uri uri = Uri.parse("content://com.gacrnd.gcs.ipc.BookProvider");
getContentResolver().query(uri,null,null,null,null); // 写两个主要是想打印工作线程信息
getContentResolver().query(uri,null,null,null,null);
2. Socket
Socket称为“套接字”,是网络通信中的概念,分为流式套接字和用户数据报套接字两种,分别对应网络传输控制层的TCP和UDP协议。TCP协议是面向连接的协议,提供稳定的双向通信功能,TCP连接的建立需要经过“三次握手”才能完成,为了提供稳定的数据传输功能,其本身提供了超时重传机制,因此具有很高的稳定性。而UDP是无连接的,提供不稳定的单向/双向通信功能,在性能上,UDP协议不需要握手和挥手,效率会更高
2.1 Socket服务端
public class TCPServerService extends Service {private boolean mDestory = false;@Overridepublic IBinder onBind(Intent intent) {return null;}@Overridepublic void onCreate() {// 正常应该用一个线程池来处理客户端来的请求的,但是作为demo,就暴力的新开一个线程处理new Thread(new TcpServer()).start();super.onCreate();}private class TcpServer implements Runnable {@Overridepublic void run() {ServerSocket serverSocket = null;try {serverSocket = new ServerSocket(10000);} catch (IOException e) {e.printStackTrace();return;}// 死循环处理客户端的请求while (!mDestory) {try {// 接收客户端final Socket client = serverSocket.accept();new Thread() {@Overridepublic void run() {try {//处理客户端发来的内容并且回复客户端responseClient(client);} catch (IOException e) {e.printStackTrace();}}}.start();} catch (IOException e) {e.printStackTrace();}}}}private void responseClient(Socket client) throws IOException{//接收客户端的消息BufferedReader in = new BufferedReader(new InputStreamReader(client.getInputStream()));//发送数据到客户端PrintWriter out = new PrintWriter(new BufferedWriter(new OutputStreamWriter(client.getOutputStream())));while (!mDestory) {String fromClient = in.readLine();System.out.println("msg from client:" + fromClient);if (fromClient == null) {//客户端断开,直接返回break;}out.println("收到你的消息");}//交流完毕in.close();out.close();client.close();}@Overridepublic void onDestroy() {mDestory = true;super.onDestroy();}
}
2.2 Socket客户端
//很粗暴的连接服务端,接收并且发送,主要是演示socket通信过程
private void connectServerSocket() {PrintWriter pw = null;BufferedReader br= null;Socket socket = null;try {while (!mDestory) {socket = new Socket("localhost",10000);pw = new PrintWriter(new BufferedWriter(new OutputStreamWriter(socket.getOutputStream())),true);pw.println("client send msg");br = new BufferedReader(new InputStreamReader(socket.getInputStream()));System.out.println("receive from server:" + br.readLine());}pw.close();br.close();socket.close();} catch (IOException e) {e.printStackTrace();}
}
3. Binder池
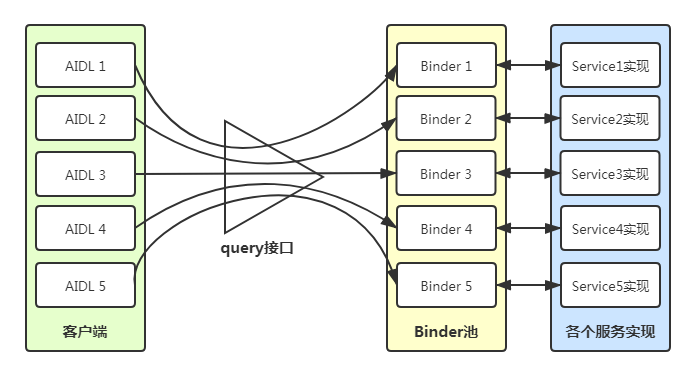
由于项目业务逻辑越来越服务,需要和多个AIDL交互,如果一个一个绑定,调用,这样显得比较麻烦,所以就有了Binder池的概念出来。所有要请求服务端都放在Binder池中,客户端通过Binder池拿到自己需要服务的客户端。

3.1 binder池服务端
public class BinderPoolService extends Service {private Binder mBinderPool = new BinderPoolImpl();@Overridepublic IBinder onBind(Intent intent) {return mBinderPool;}
}public class BinderPoolImpl extends IBinderPool.Stub {private static final int SECURITY_SERVICE_PROXY = 0;private static final int COMPUTE_SERVICE_PROXY = 1;public BinderPoolImpl() {super();}@Overridepublic IBinder queryBinder(int binderCode) throws RemoteException {IBinder binder = null;switch (binderCode) {case SECURITY_SERVICE_PROXY:// 此处用伪代码实现,返回SecurityCenterImpl,他继承ISecurityCenter.Stub(),实现了对应接口//binder = new SecurityCenterImpl();break;case COMPUTE_SERVICE_PROXY://binder = new ComputerImpl();break;default:break;}return binder;}
}
3.2 Binder池客户端
public class BinderPool {private static volatile BinderPool sInstance = null;private IBinderPool mBinderPool = null;// 用于等待连接BinderPool,如果没有连接就一直阻塞等待private CountDownLatch mCountDownLatch;private ServiceConnection mServiceConnection = new BinderPoolServiceConnection();private IBinder.DeathRecipient mDeathRecipient = new BinderPoolDeathRecipient();private Context mContext;public BinderPool(Context context) {this.mContext = context.getApplicationContext();connectBinderPoolService();}public static BinderPool getInstance(Context context) {if (sInstance == null) {synchronized (BinderPool.class) {if (sInstance == null) {sInstance = new BinderPool(context);}}}return sInstance;}private synchronized void connectBinderPoolService() {mCountDownLatch = new CountDownLatch(1);Intent intent = new Intent(mContext, BinderPoolService.class);mContext.bindService(intent, mServiceConnection, Context.BIND_AUTO_CREATE);try {mCountDownLatch.await();} catch (InterruptedException e) {e.printStackTrace();}}/*** 查询binder接口*/public IBinder queryBinder(int binderCode) {IBinder binder = null;if (mBinderPool != null) {try {// 从Binder服务端查询需要的接口binder = mBinderPool.queryBinder(binderCode);} catch (RemoteException e) {e.printStackTrace();}}return binder;}private class BinderPoolServiceConnection implements ServiceConnection {@Overridepublic void onServiceConnected(ComponentName name, IBinder service) {mBinderPool = IBinderPool.Stub.asInterface(service);try {mBinderPool.asBinder().linkToDeath(mDeathRecipient, 0);} catch (RemoteException e) {e.printStackTrace();}//绑定成功,释放线程继续执行mCountDownLatch.countDown();}@Overridepublic void onServiceDisconnected(ComponentName name) {}}private class BinderPoolDeathRecipient implements IBinder.DeathRecipient {@Overridepublic void binderDied() {mBinderPool.asBinder().unlinkToDeath(mDeathRecipient, 0);mBinderPool = null;connectBinderPoolService();}}
}
这篇关于IPC机制(三)--ContentProvider、Socket和Binder池的文章就介绍到这儿,希望我们推荐的文章对编程师们有所帮助!


