本文主要是介绍Springboot整合飞书向群组/指定个人发送消息/飞书登录,希望对大家解决编程问题提供一定的参考价值,需要的开发者们随着小编来一起学习吧!
Springboot整合飞书向群组发送消息
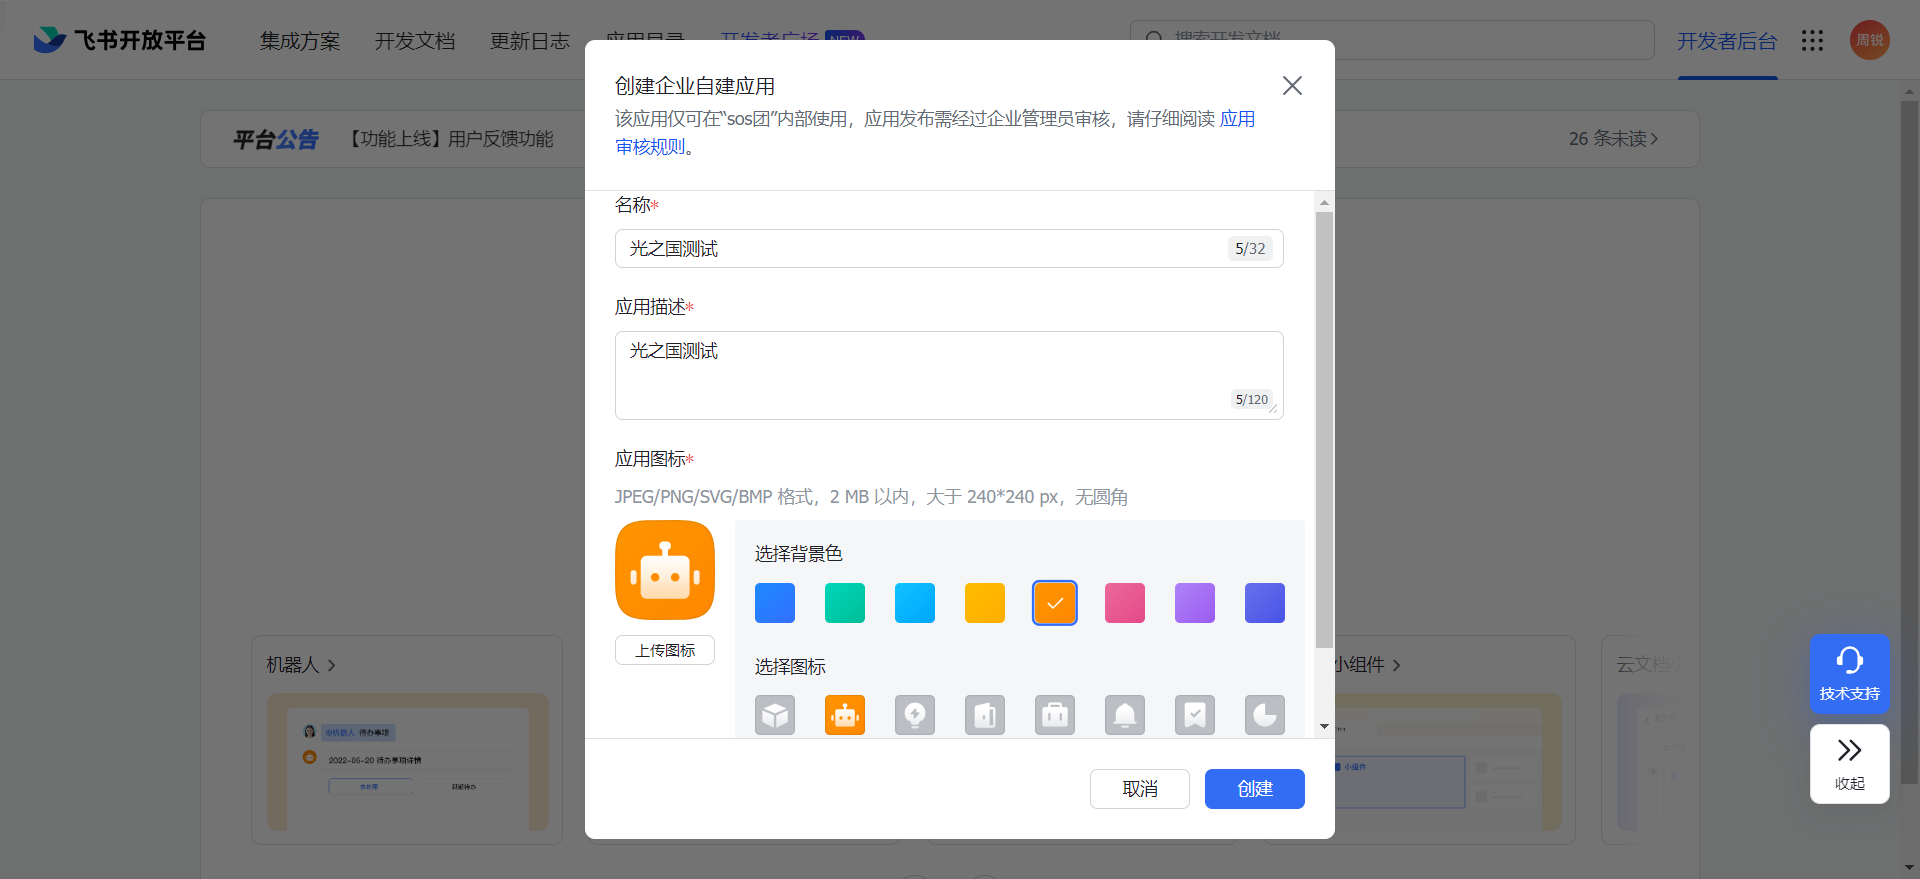
- 飞书开放平台创建企业自建应用
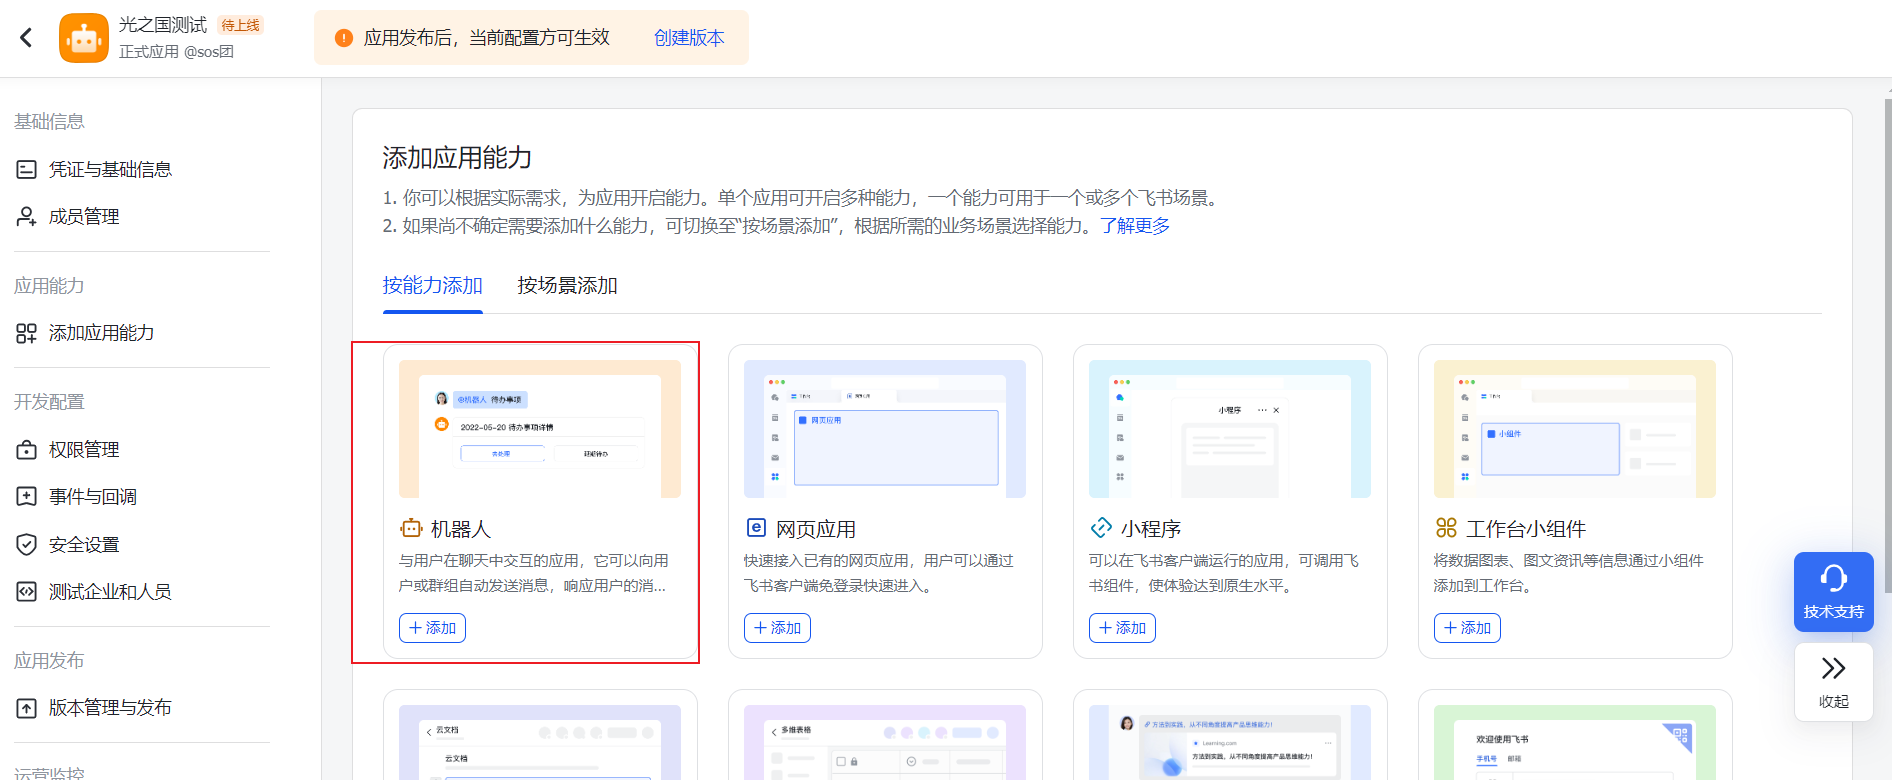
- 添加应用能力-机器人
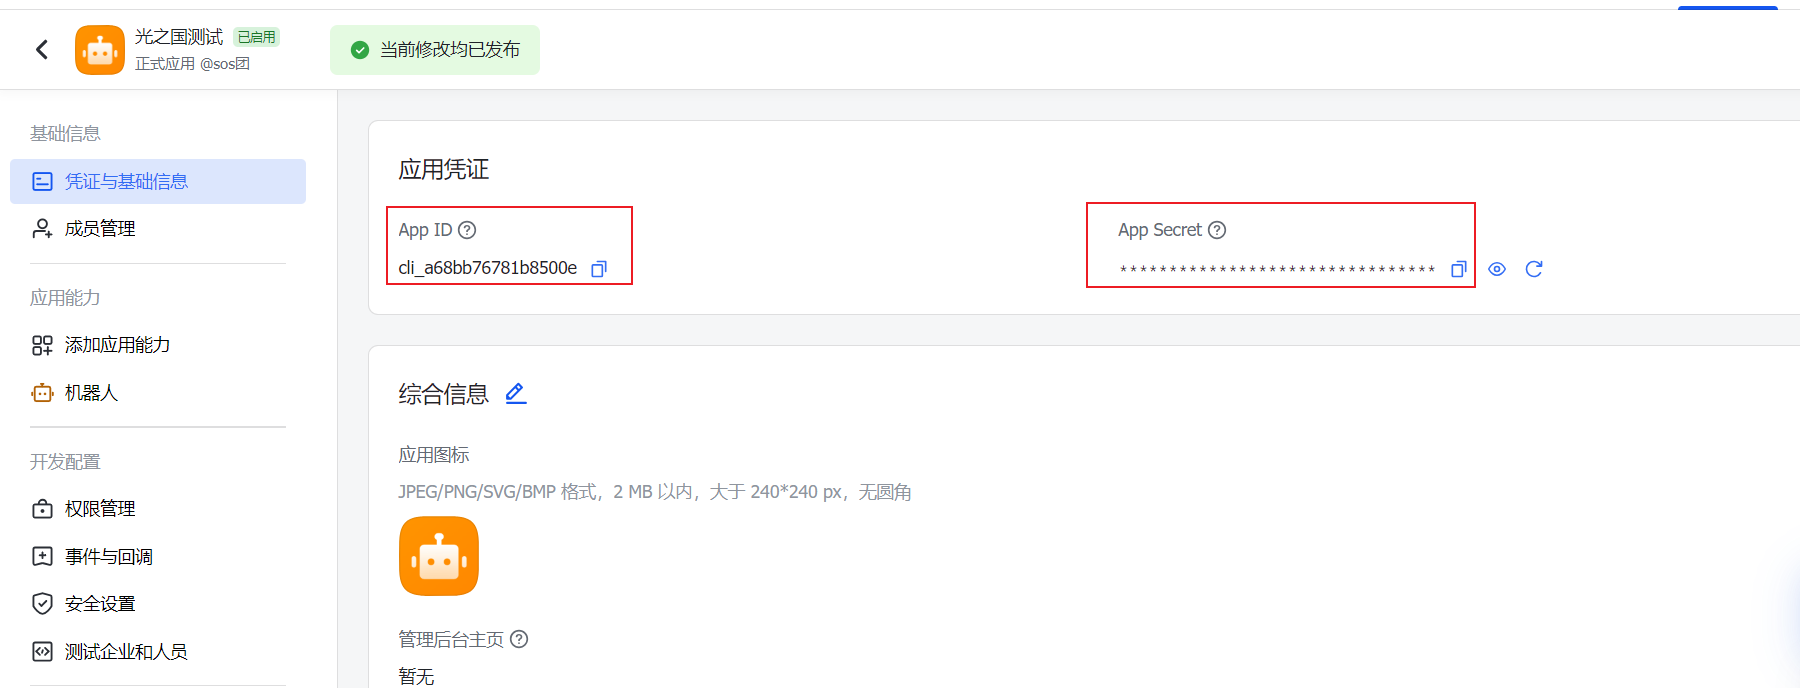
- 创建完成后,进入应用详情页,可以在首页看到 App Id 和 App Secret
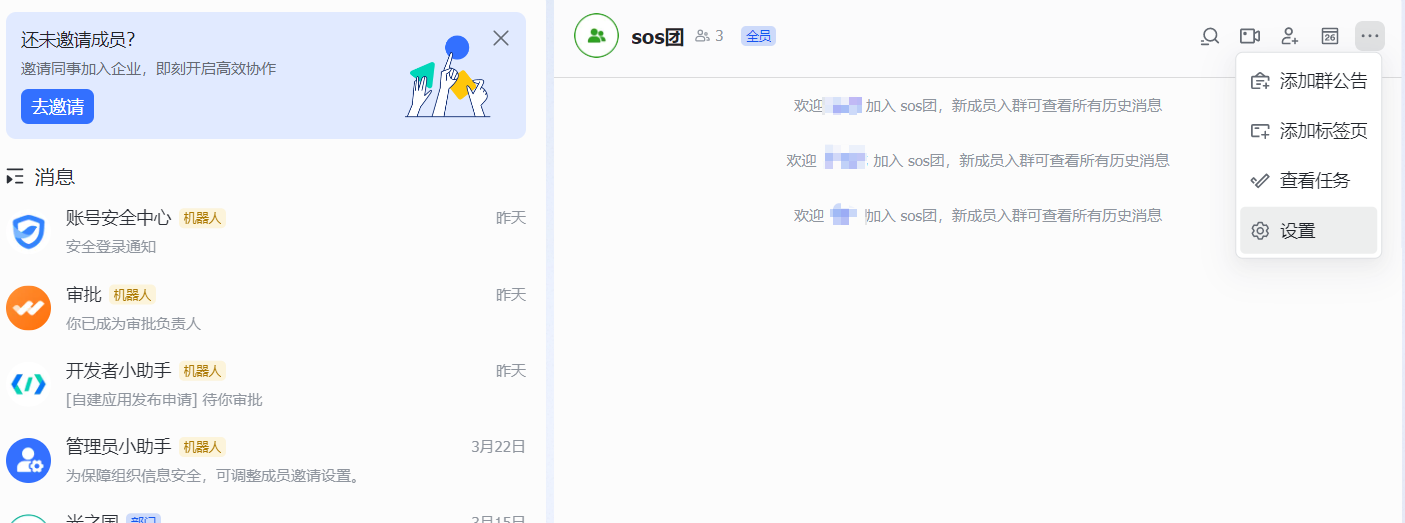
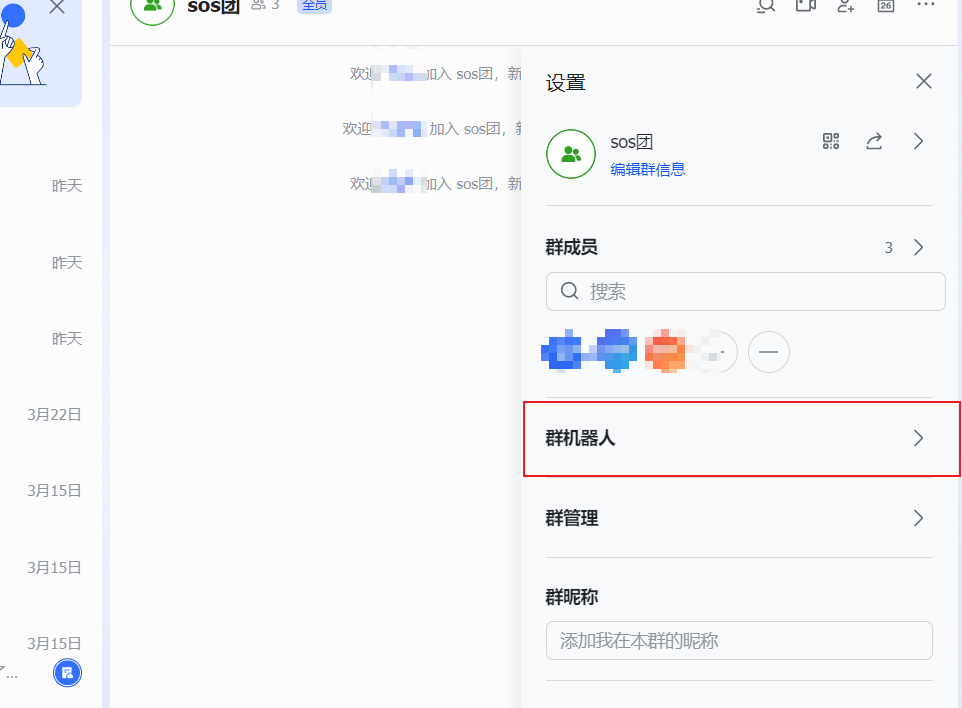
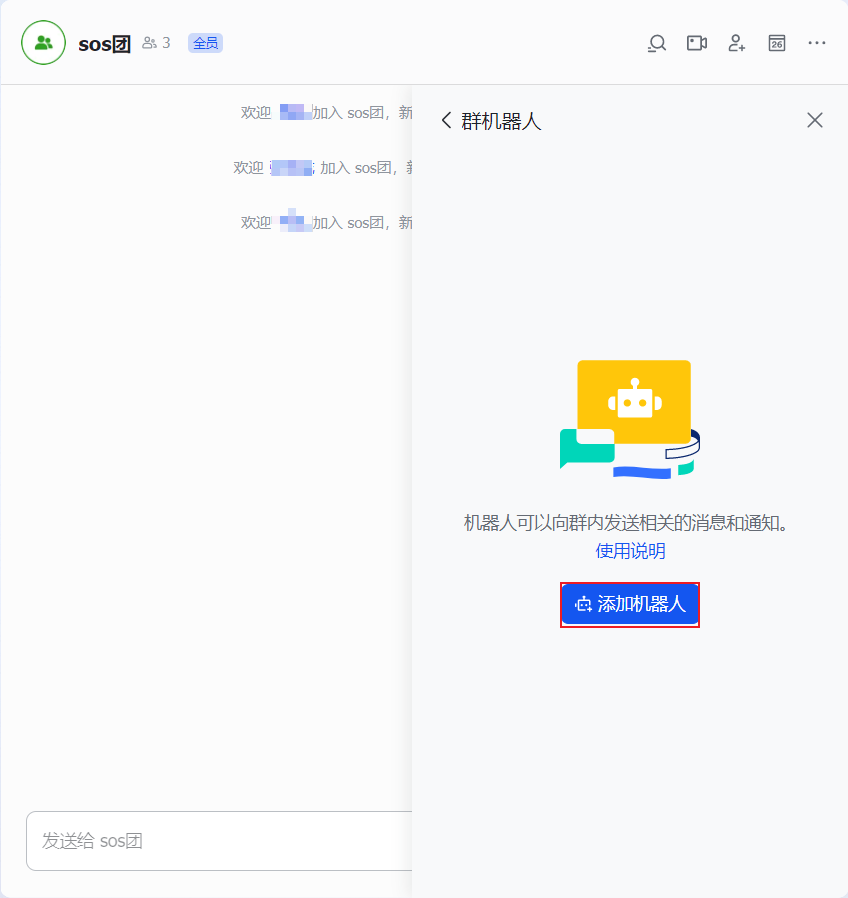
- 在飞书pc端创建一群机器人

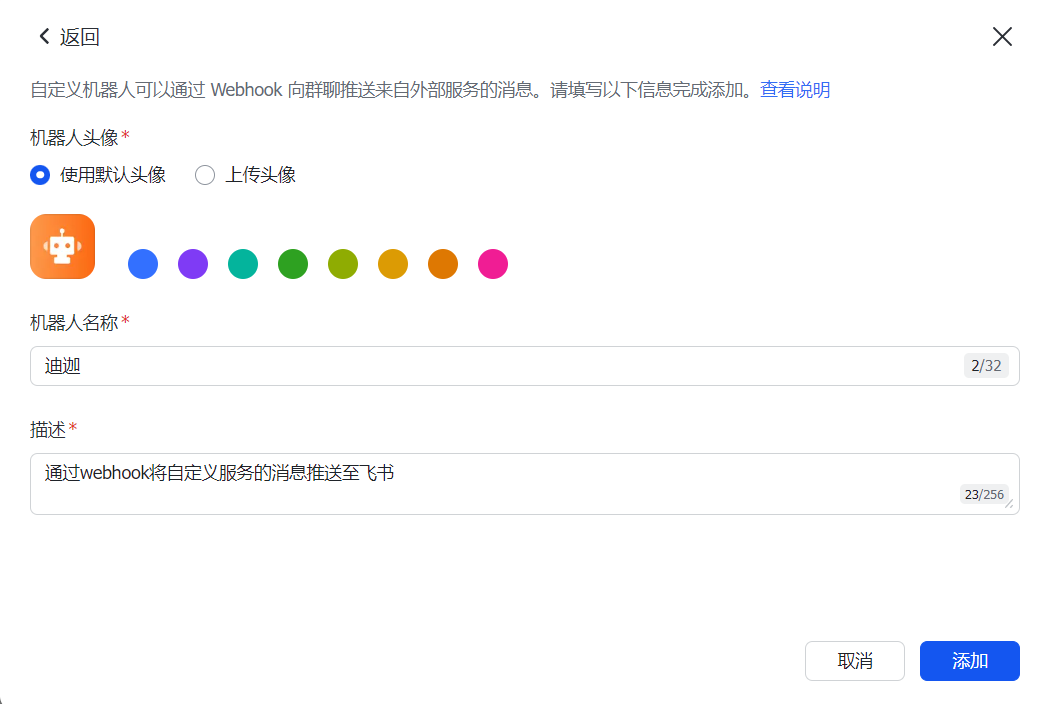
- 此处可以拿到该机器人的webhook地址,通过https的方式,也可以调用发送消息
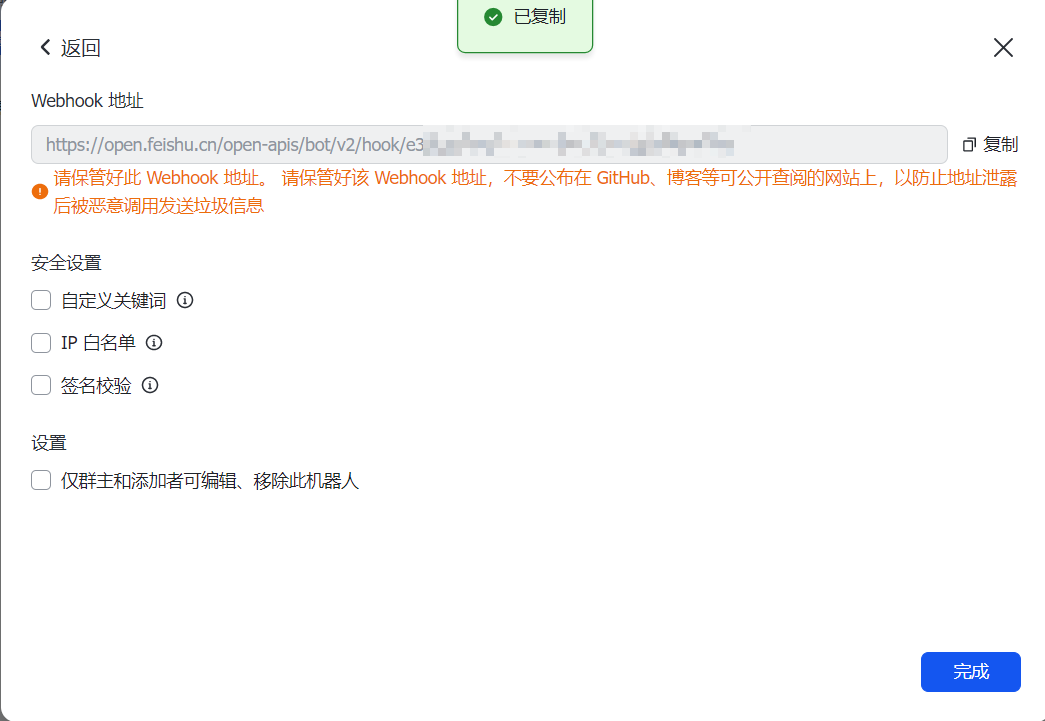
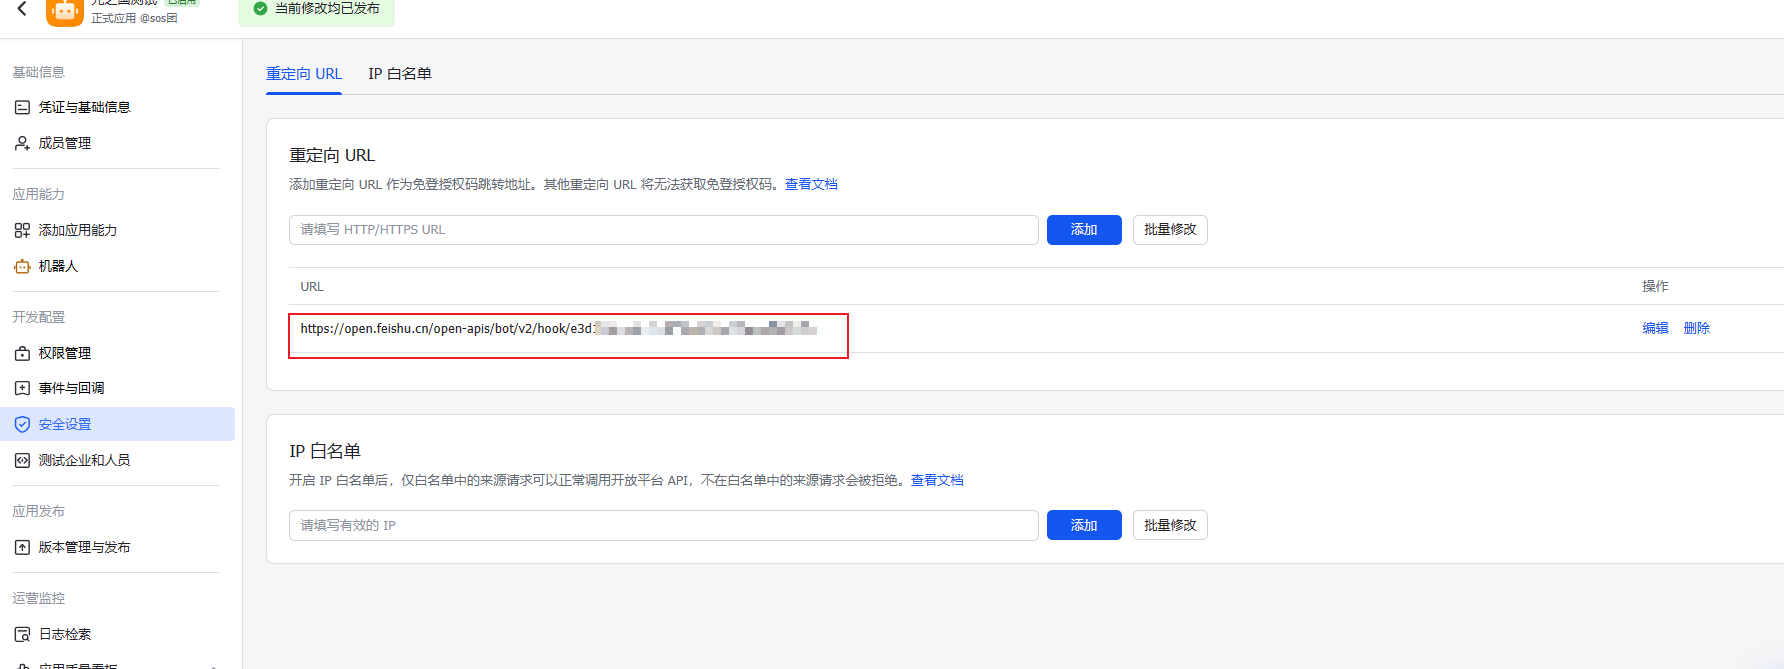
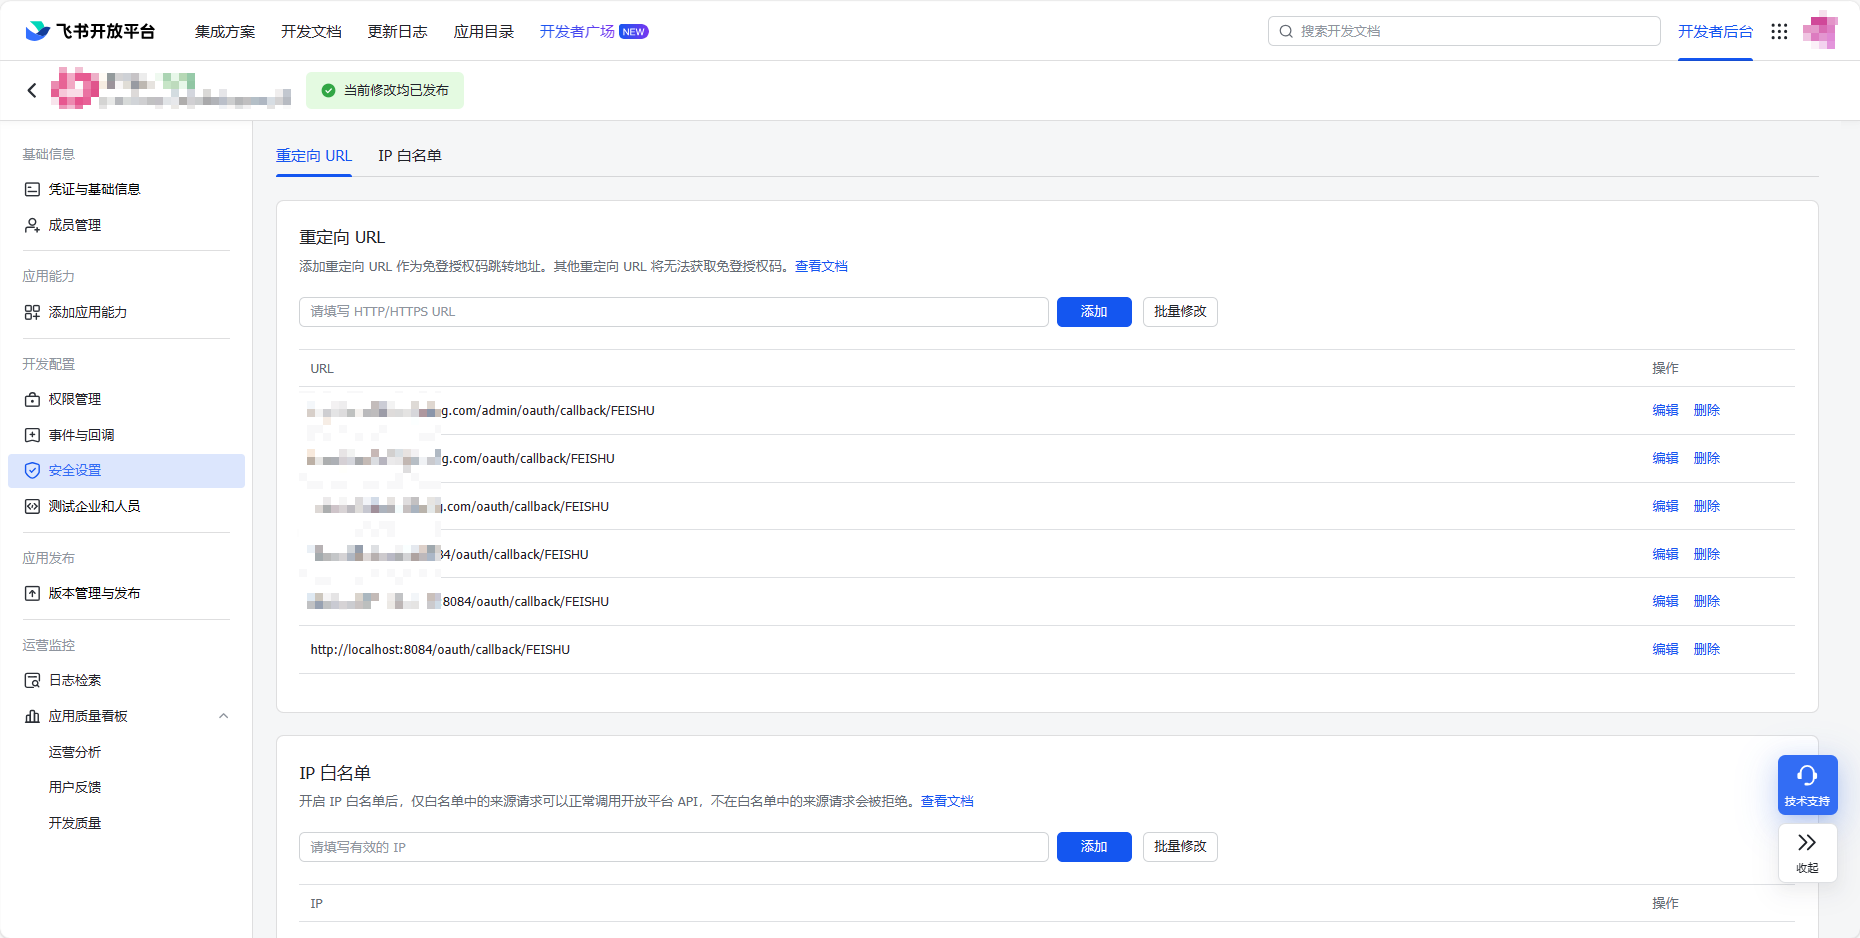
- 从右侧菜单中,进入“安全设置”页面,配置回调地址
- Springboot进行整合通过发送http请求
package com.admin.manager.core;import cn.hutool.http.HttpRequest;
import cn.hutool.http.HttpResponse;
import cn.hutool.http.HttpUtil;
import com.admin.manager.api.StartApplication;
import com.alibaba.fastjson.JSON;
import com.alibaba.fastjson.JSONObject;
import com.alibaba.fastjson.TypeReference;
import com.fasterxml.jackson.core.JsonProcessingException;
import com.fasterxml.jackson.databind.JsonNode;
import com.fasterxml.jackson.databind.ObjectMapper;
import lombok.Data;
import lombok.extern.slf4j.Slf4j;
import me.zhyd.oauth.config.AuthConfig;
import me.zhyd.oauth.request.AuthFeishuRequest;
import me.zhyd.oauth.request.AuthRequest;
import me.zhyd.oauth.utils.AuthStateUtils;
import org.junit.Test;
import org.junit.runner.RunWith;
import org.springframework.boot.test.context.SpringBootTest;
import org.springframework.http.HttpEntity;
import org.springframework.http.HttpHeaders;
import org.springframework.http.HttpMethod;
import org.springframework.http.ResponseEntity;
import org.springframework.test.context.junit4.SpringRunner;import java.util.Collections;
import java.util.HashMap;
import java.util.List;
import java.util.Map;/*** @author zr 2024/3/25*/
@RunWith(SpringRunner.class)
@SpringBootTest(classes = StartApplication.class)
@Slf4j
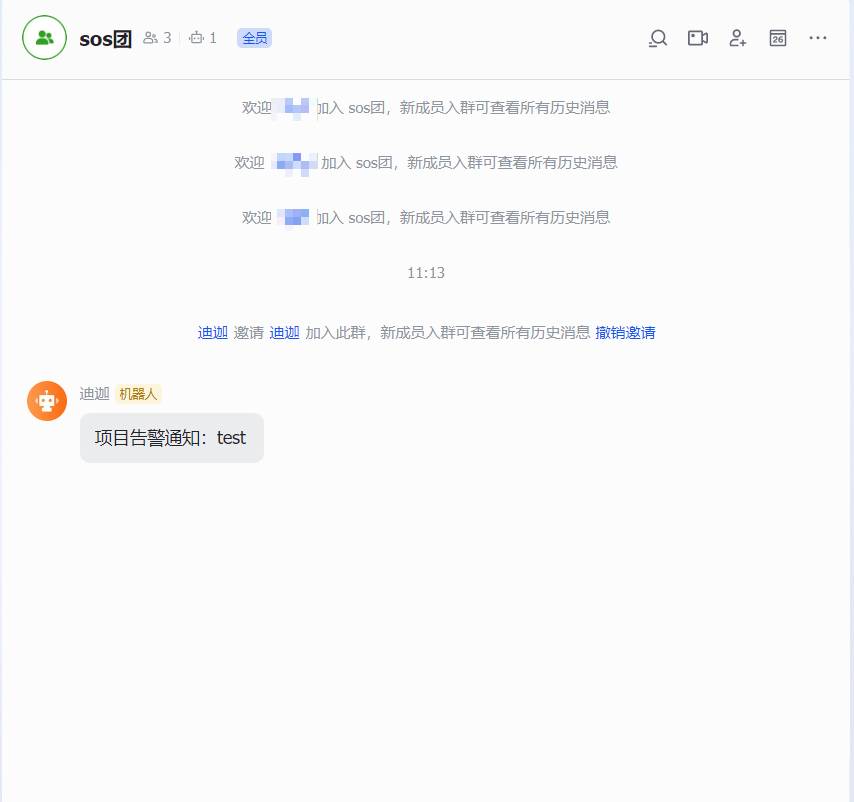
public class LarkTest {@Testpublic void name() {sendMessage("test");}public static void sendMessage(String msg){String webHookUrl = "https://open.feishu.cn/open-apis/bot/v2/hook/e3d13a69-e777-4499-a1c9-e1ae0580a248";//请求的JSON数据,这里用map在工具类里转成json格式Map<String,Object> json=new HashMap();Map<String,Object> text=new HashMap();json.put("msg_type", "text");text.put("text", "项目告警通知:" + msg);json.put("content", text);//发送post请求String result = HttpRequest.post(webHookUrl).body(JSON.toJSONString(json), "application/json;charset=UTF-8").execute().body();System.out.println(result);}
}
- 测试通过,后续可以自行封装工具类或service
Springboot整合飞书向指定人员发送消息
其实这个就是两个步骤
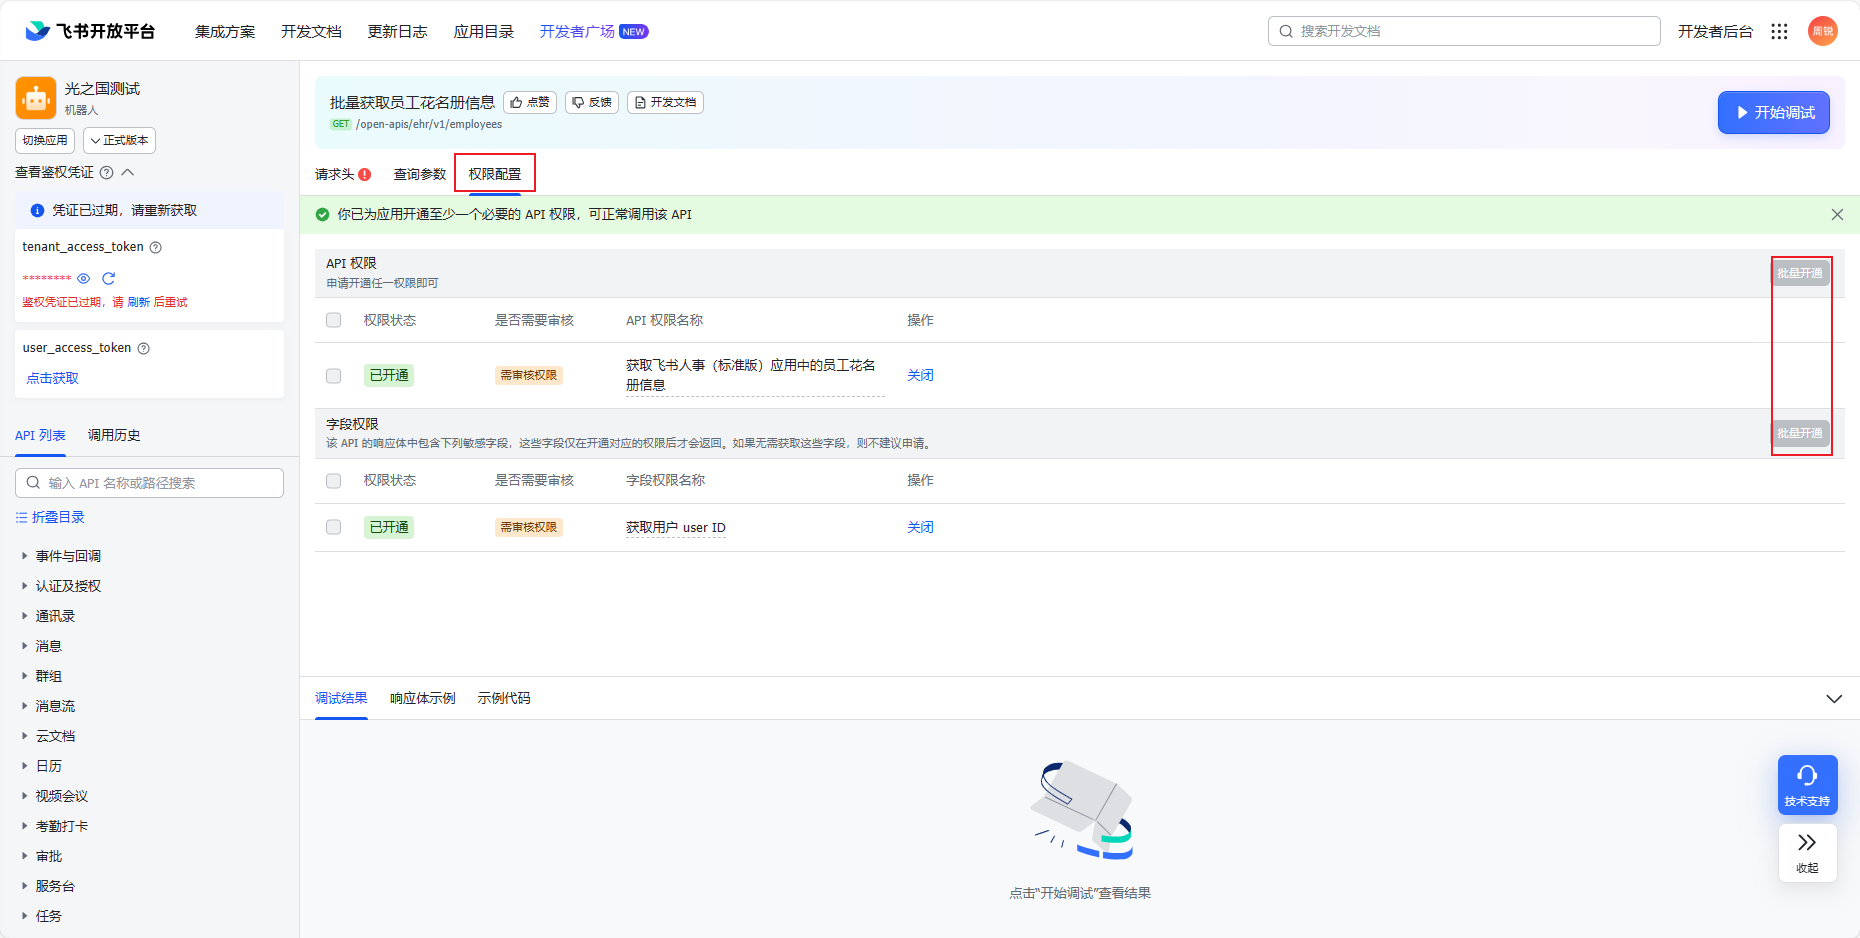
- 获取人员列表信息
- 从人员列表中选出一个人员,拿到userId,发送对应消息即可
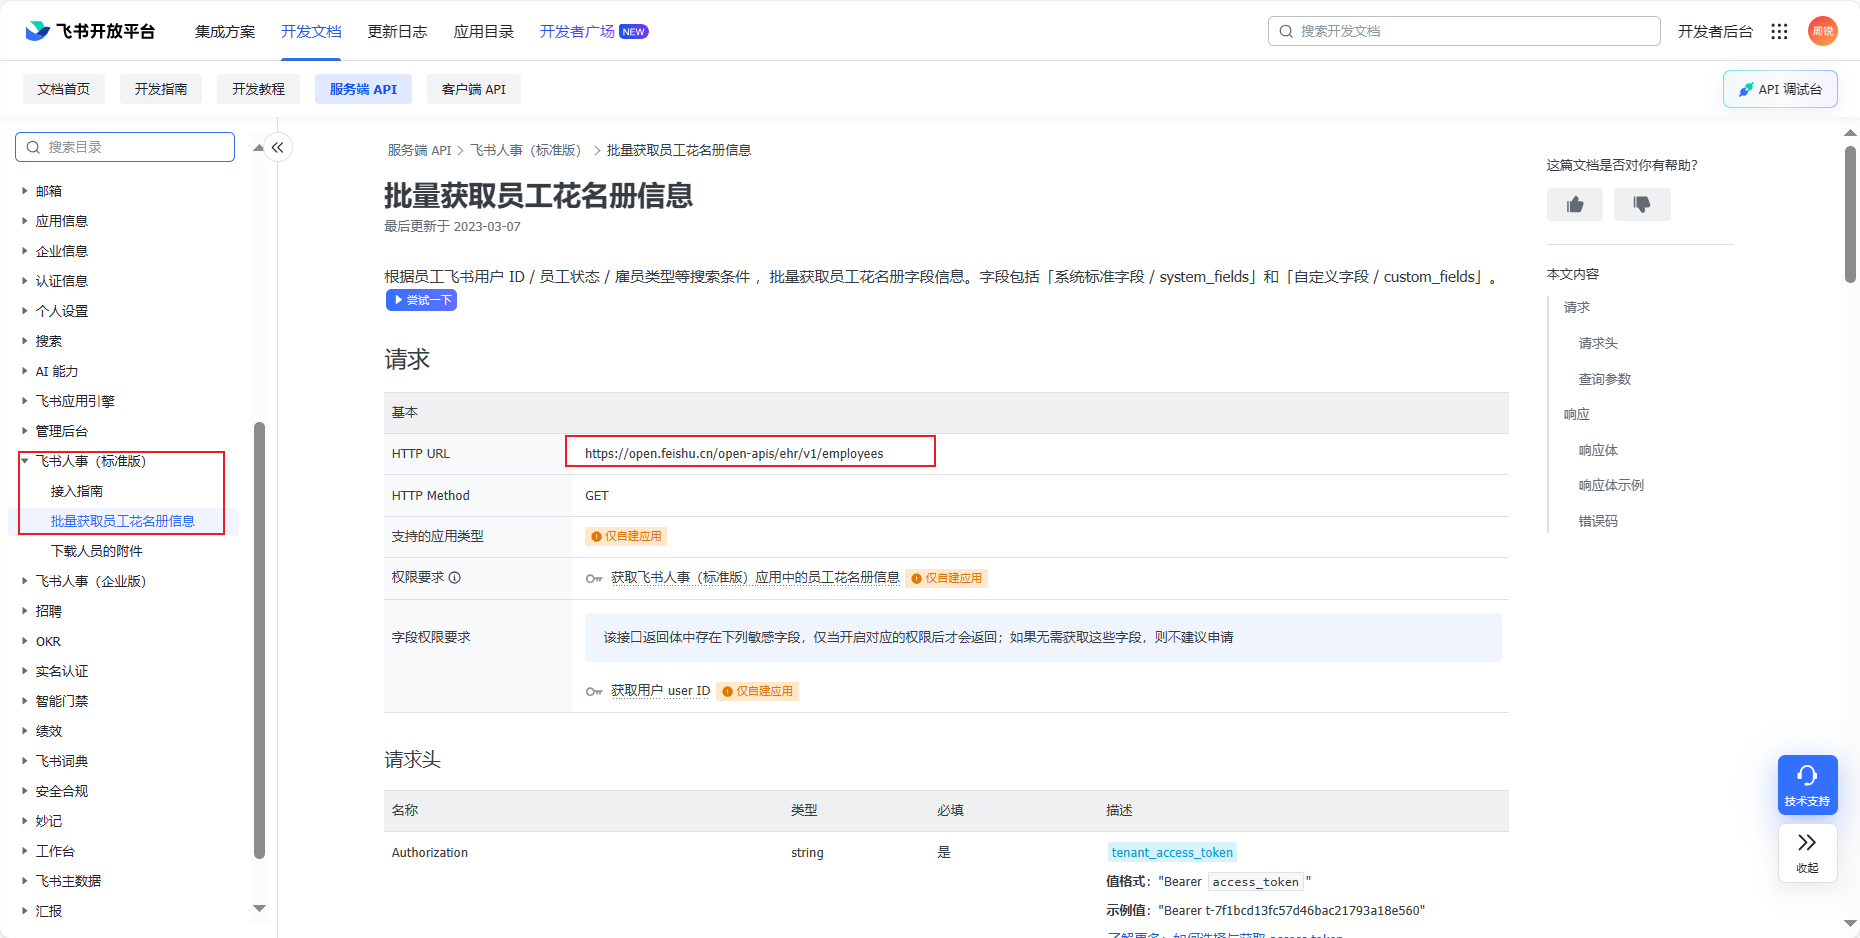
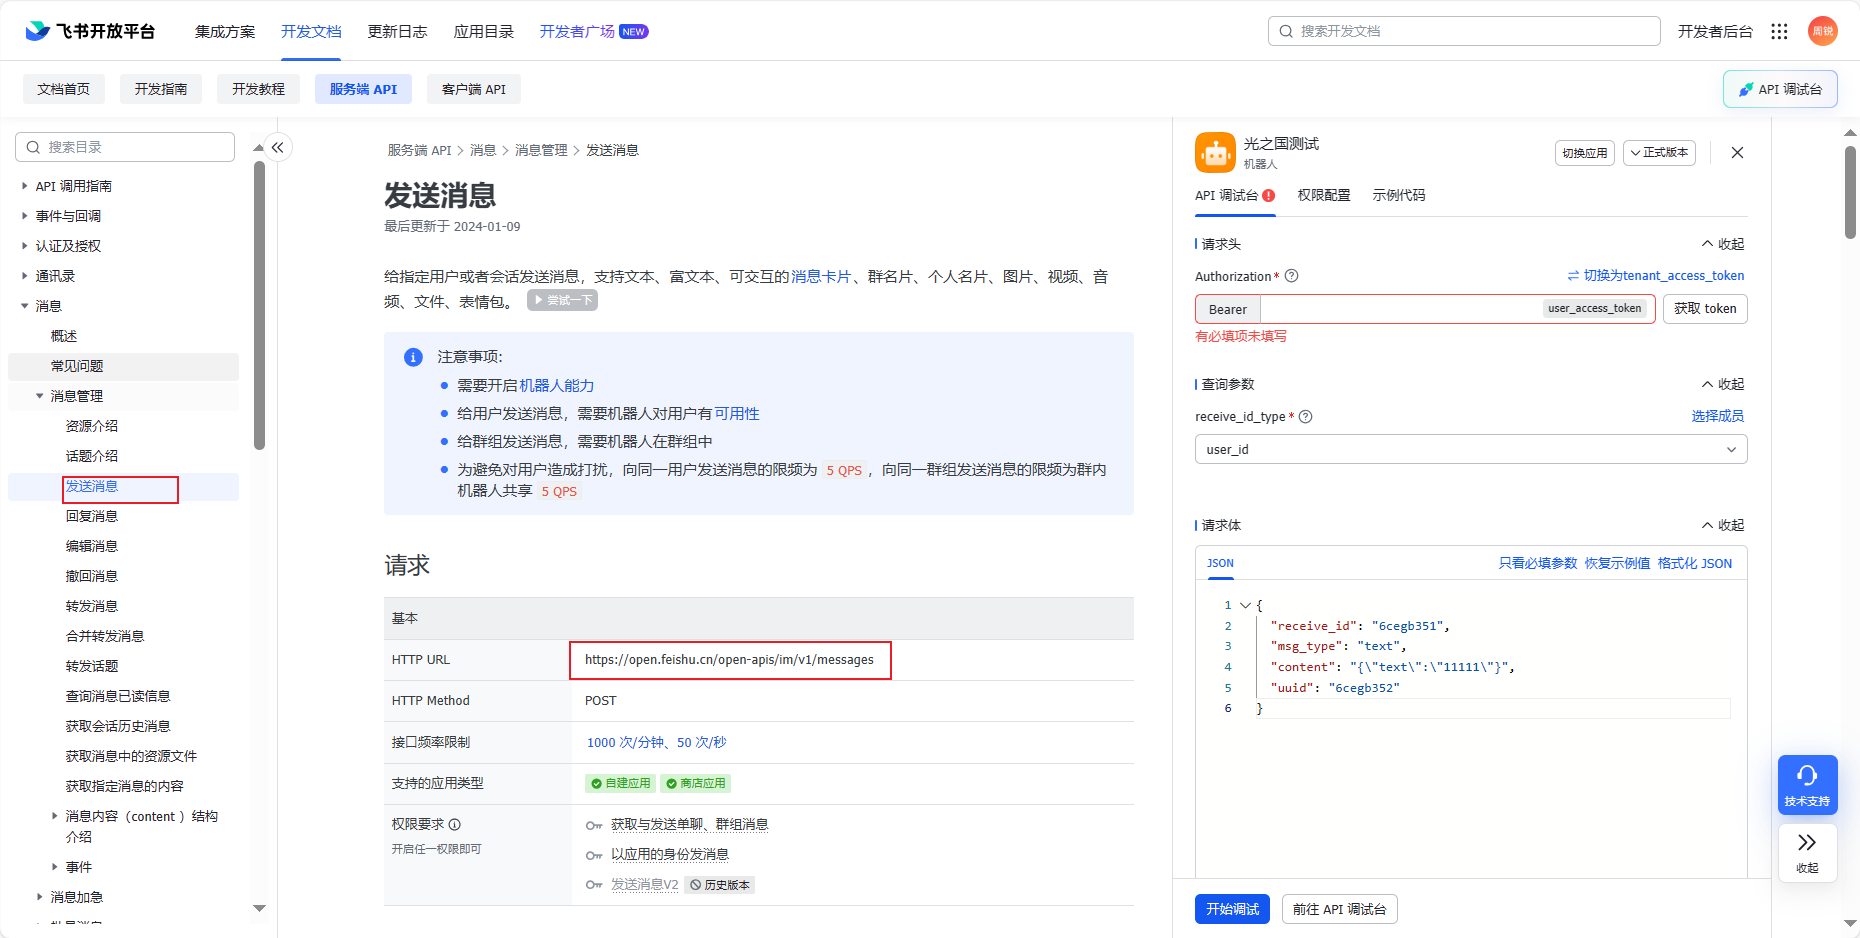
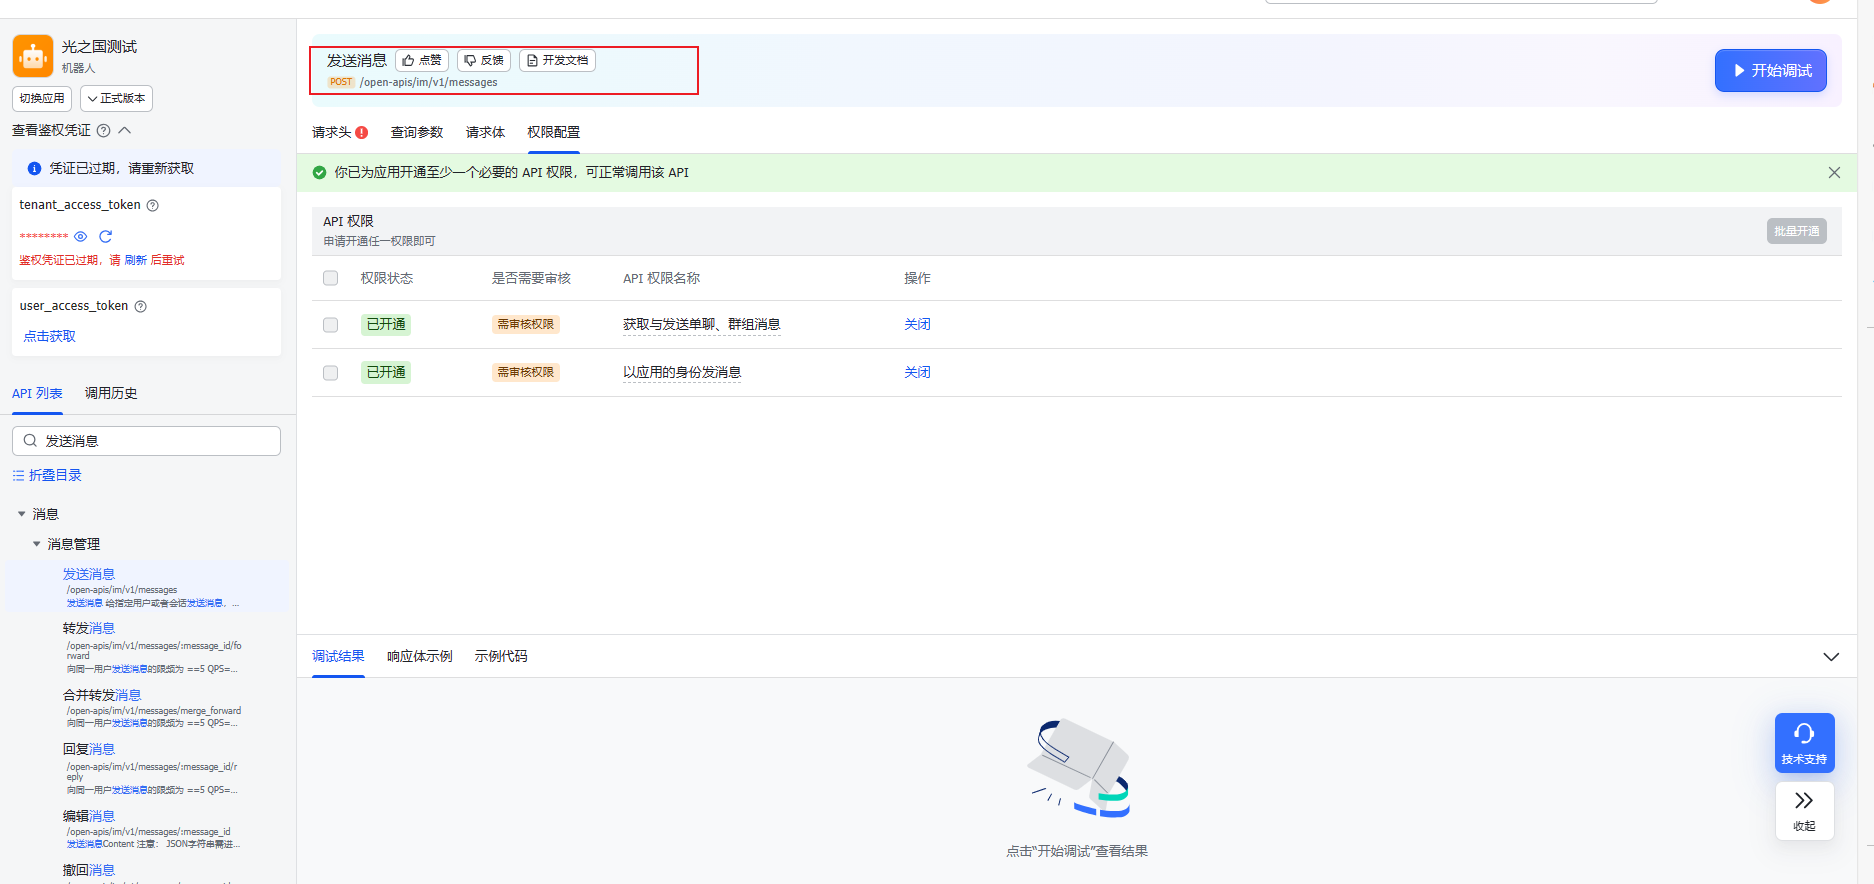
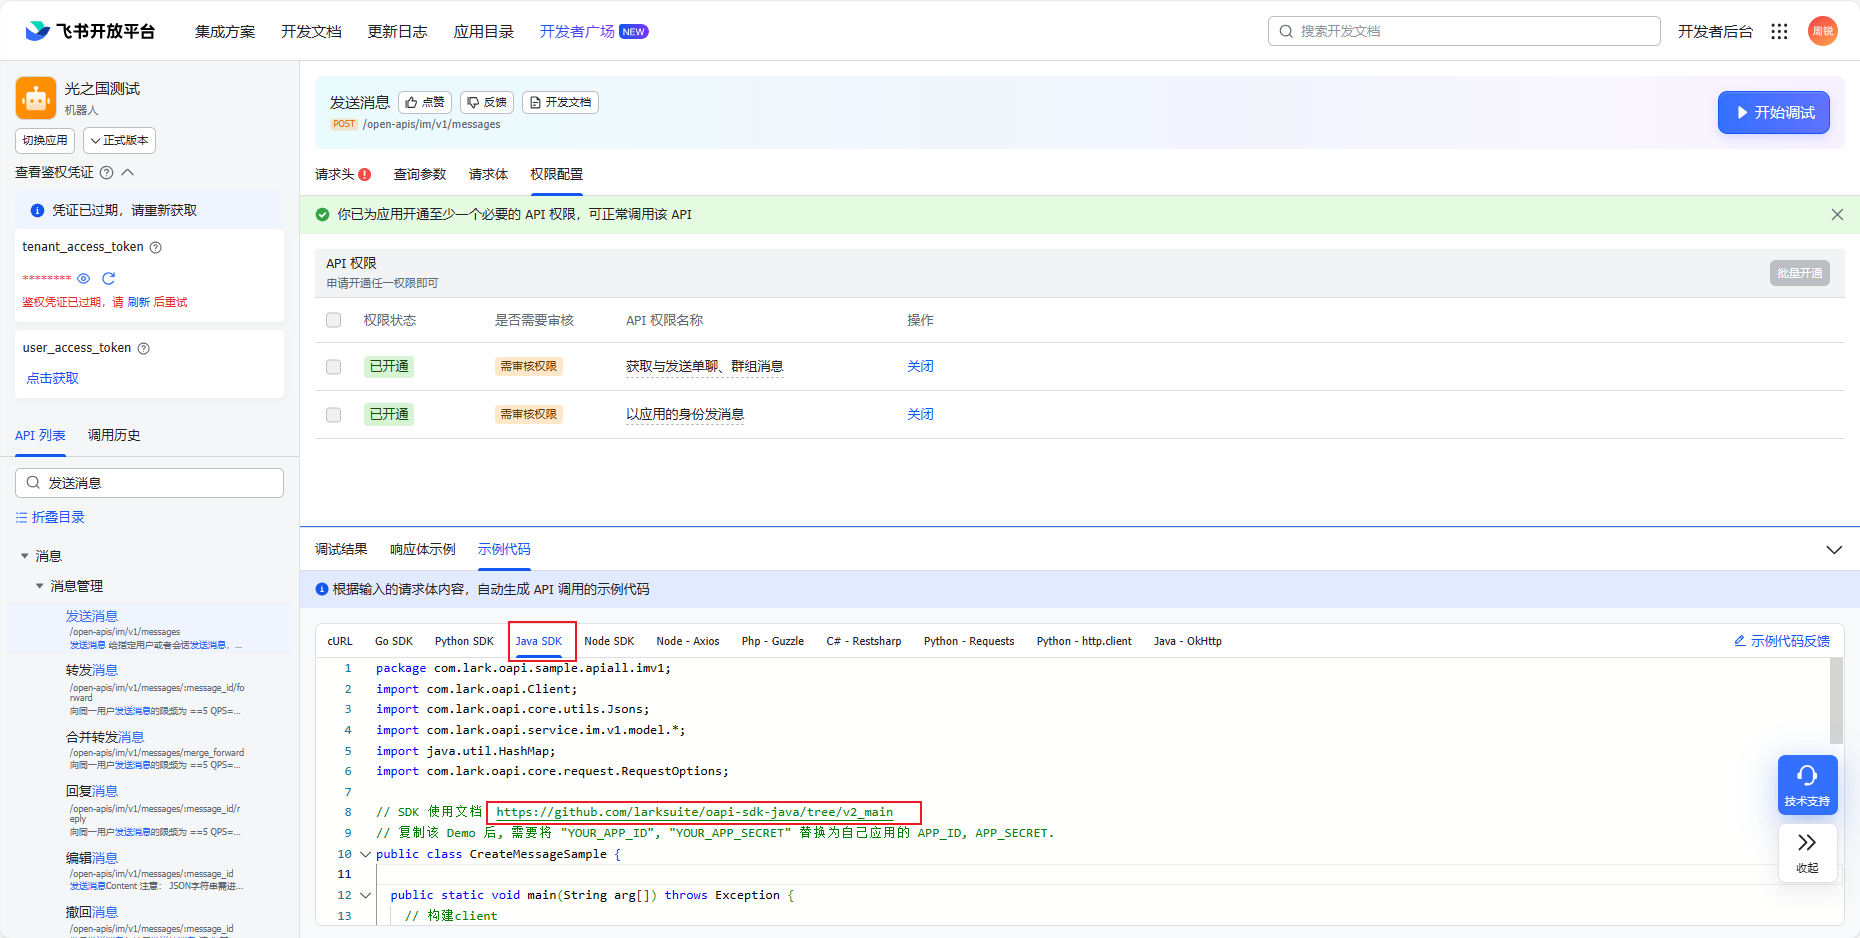
飞书开放平台-接口列表
飞书开放平台-接口调试平台
SDK 使用文档:https://github.com/larksuite/oapi-sdk-java/tree/v2_main
如果不需要通过机器人给群发送消息可以先不用webHookUrl
lark:webHookUrl: https://open.feishu.cn/open-apis/bot/v2/hook/xxxxappId: cli_xxxxappSecret: oiB2zcxxxx
- getEmployees原飞书接口的返回对象属性很多,我只取了userId和name封装为LarkUser,有需要的可以自行参照文档取出自己需要的值,具体字段在Employee中
- Client client = Client.newBuilder(“YOUR_APP_ID”, “YOUR_APP_SECRET”).build();是飞书官方提供的sdk,可以通过client直接对接口进行操作
package com.admin.manager.core.service;import cn.hutool.http.HttpRequest;
import cn.hutool.http.HttpUtil;
import com.admin.manager.core.exception.BusinessException;
import com.alibaba.fastjson.JSON;
import com.alibaba.fastjson.JSONObject;
import com.lark.oapi.Client;
import com.lark.oapi.service.ehr.v1.model.Employee;
import com.lark.oapi.service.ehr.v1.model.ListEmployeeReq;
import com.lark.oapi.service.ehr.v1.model.ListEmployeeResp;
import com.lark.oapi.service.im.v1.model.CreateMessageReq;
import com.lark.oapi.service.im.v1.model.CreateMessageReqBody;
import com.lark.oapi.service.im.v1.model.CreateMessageResp;
import lombok.Data;
import lombok.extern.slf4j.Slf4j;
import org.springframework.beans.factory.annotation.Value;
import org.springframework.stereotype.Service;import javax.annotation.PostConstruct;
import java.util.*;
import java.util.stream.Collectors;/*** 飞书工具** @author zr 2024/3/26*/
@Service
@Slf4j
public class LarkService {public static Client client;@Value("${lark.appId}")private String appId;@Value("${lark.appSecret}")private String appSecret;@Value("${lark.webHookUrl}")private String webHookUrl;@PostConstructpublic void init() {this.client =  Client.newBuilder(appId, appSecret).build();}/**** @param msg*/public  void sendMessageToGroup(String msg) {//请求的JSON数据,这里用map在工具类里转成json格式Map<String, Object> json = new HashMap();Map<String, Object> text = new HashMap();text.put("text", "要素修改通知:" + msg);json.put("msg_type", "text");json.put("content", text);//发送post请求String result = HttpRequest.post(webHookUrl).body(JSON.toJSONString(json), "application/json;charset=UTF-8").execute().body();JSONObject res = JSON.parseObject(result);Integer code = (Integer) res.get("code");}/*** 发送消息给指定userid的员工* @param userId* @param msg* @return* @throws Exception*/public  Boolean sendMessageToPerson(String userId, String msg) throws Exception {HashMap<String, String> content = new HashMap<>();content.put("text", msg);// 创建请求对象CreateMessageReq req = CreateMessageReq.newBuilder().receiveIdType("user_id").createMessageReqBody(CreateMessageReqBody.newBuilder().receiveId(userId).msgType("text").content(JSON.toJSONString(content)).uuid(UUID.randomUUID().toString()).build()).build();// 发起请求CreateMessageResp resp = client.im().message().create(req);// 处理服务端错误if (!resp.success()) {log.info(String.format("code:%s,msg:%s,reqId:%s", resp.getCode(), resp.getMsg(), resp.getRequestId()));throw new BusinessException("飞书接口调用失败");}return true;}/*** 获取飞书员工列表** @return*/public  List<LarkUser> getEmployees() throws Exception {// 创建请求对象ListEmployeeReq req = ListEmployeeReq.newBuilder().userIdType("user_id").build();// 发起请求ListEmployeeResp resp = client.ehr().employee().list(req);// 处理服务端错误if (!resp.success()) {log.info(String.format("code:%s,msg:%s,reqId:%s", resp.getCode(), resp.getMsg(), resp.getRequestId()));throw new BusinessException("飞书接口调用失败");}Employee[] items = resp.getData().getItems();List<LarkUser> larkUsers = Arrays.stream(items).map(x -> {LarkUser larkUser = new LarkUser();larkUser.setUserId(x.getUserId());larkUser.setName(x.getSystemFields().getName());return larkUser;}).collect(Collectors.toList());return larkUsers;}/*** 获取tenantAccessToken** @return 返回null代表失败*/public  String getAccessToken() {String url = "https://open.feishu.cn/open-apis/auth/v3/tenant_access_token/internal/";HashMap<String, Object> query = new HashMap<>();query.put("app_id", "cli_a68bb76781b8500e");query.put("app_secret", "oiB2zcIy3MVno2JjWRLBxgJqU2xZ5qWi");String res = HttpUtil.post(url, query);JSONObject resObject = JSON.parseObject(res);Integer code = (Integer) resObject.get("code");if (code == 0) {String appAccessToken = (String) resObject.get("app_access_token");String tenantAccessToken = (String) resObject.get("tenant_access_token");return tenantAccessToken;} else {return null;}}@Datapublic static class LarkUser{public String userId;public String name;}}
此处是需要userId,应该是选择指定的人来进行发送,因为是测试而我的账号刚好最后一个,所以我取集合的最后一个元素
package com.admin.manager.core;import cn.hutool.http.HttpRequest;
import cn.hutool.http.HttpResponse;
import cn.hutool.http.HttpUtil;
import com.admin.manager.api.StartApplication;
import com.admin.manager.core.service.LarkService;
import com.alibaba.fastjson.JSON;
import com.alibaba.fastjson.JSONObject;import lombok.extern.slf4j.Slf4j;import org.junit.Test;
import org.junit.runner.RunWith;
import org.springframework.beans.factory.annotation.Autowired;
import org.springframework.boot.test.context.SpringBootTest;
import org.springframework.test.context.junit4.SpringRunner;import java.util.*;/*** @author zr 2024/3/25*/
@RunWith(SpringRunner.class)
@SpringBootTest(classes = StartApplication.class)
@Slf4j
public class LarkTest {@Autowiredprivate LarkService larkService;@Testpublic void name() {try {List<LarkService.LarkUser> employees = larkService.getEmployees();System.out.println(employees);LarkService.LarkUser larkUser = employees.get(employees.size() - 1);larkService.sendMessageToPerson(larkUser.getUserId(), "test");} catch (Exception e) {throw new RuntimeException(e);}}}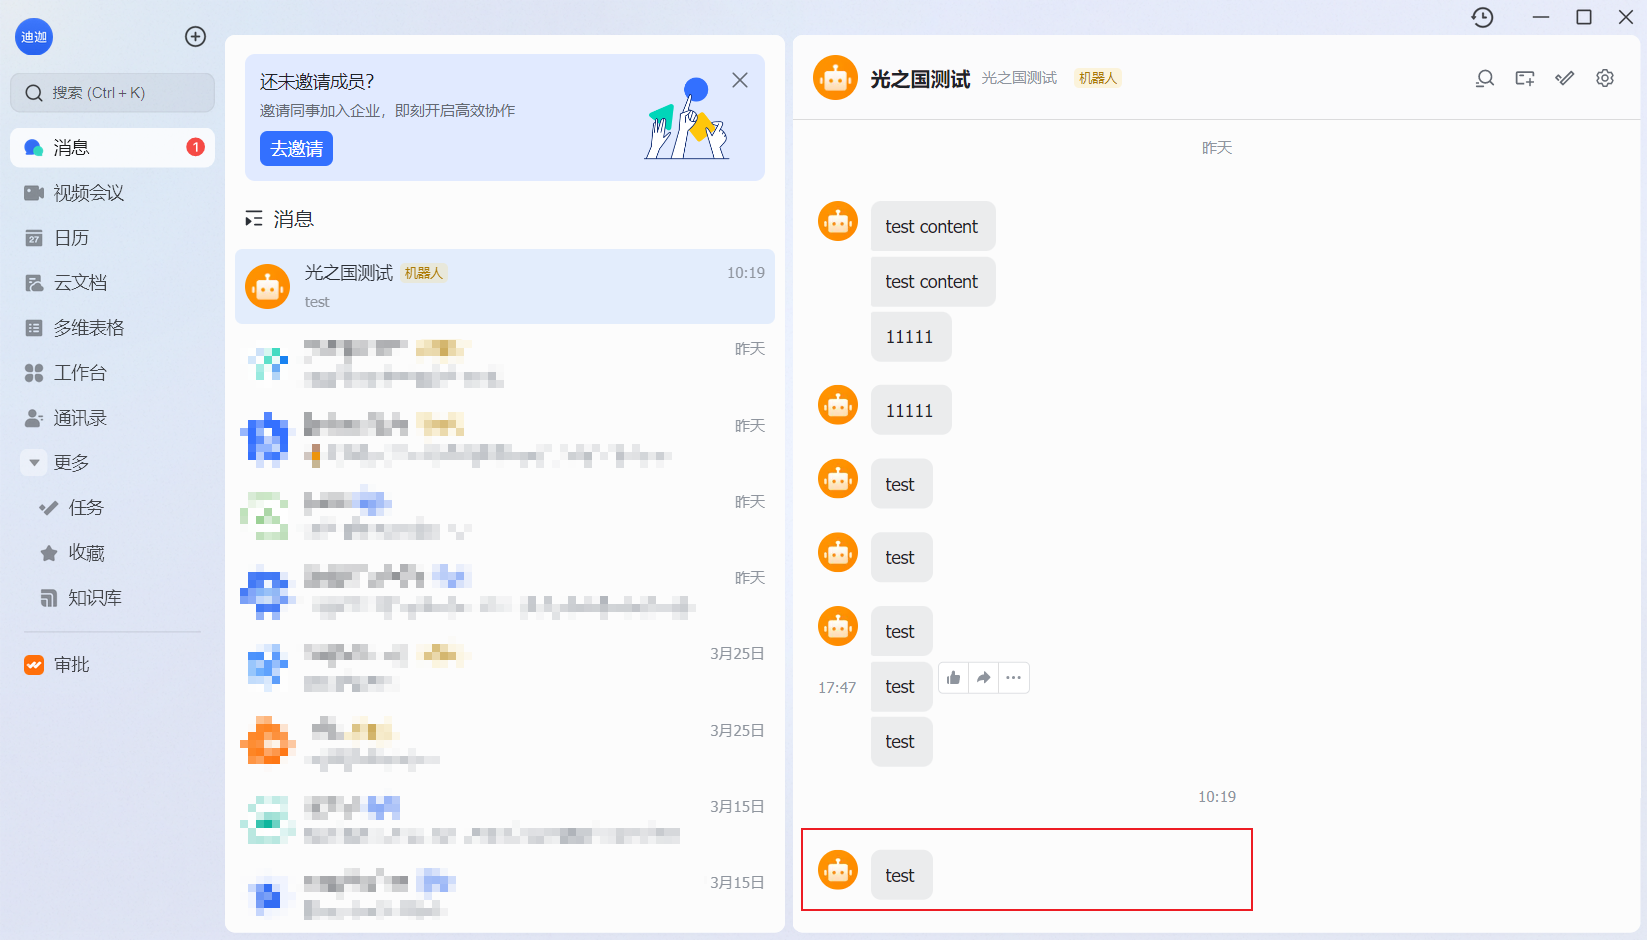
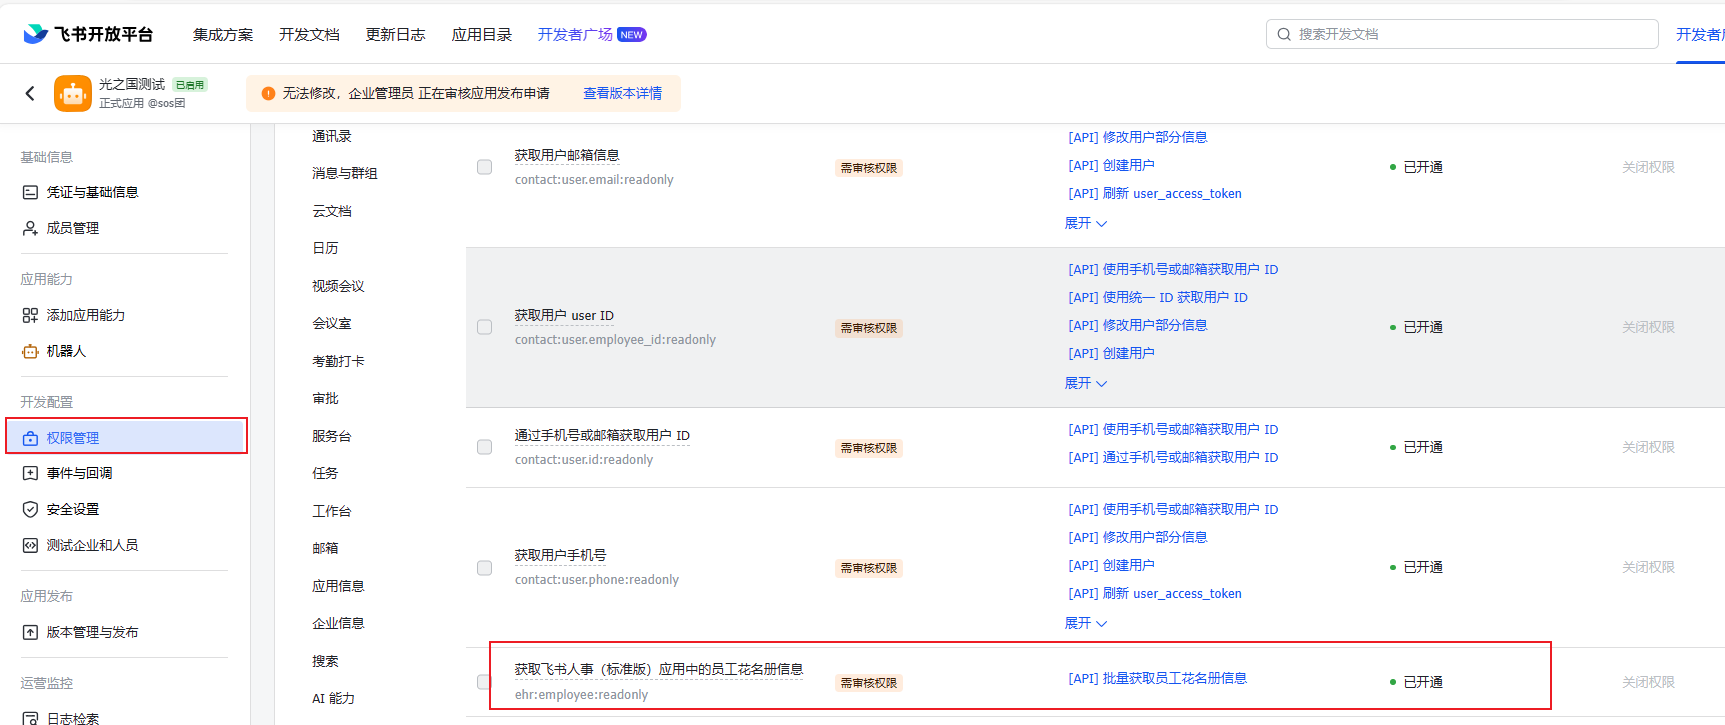
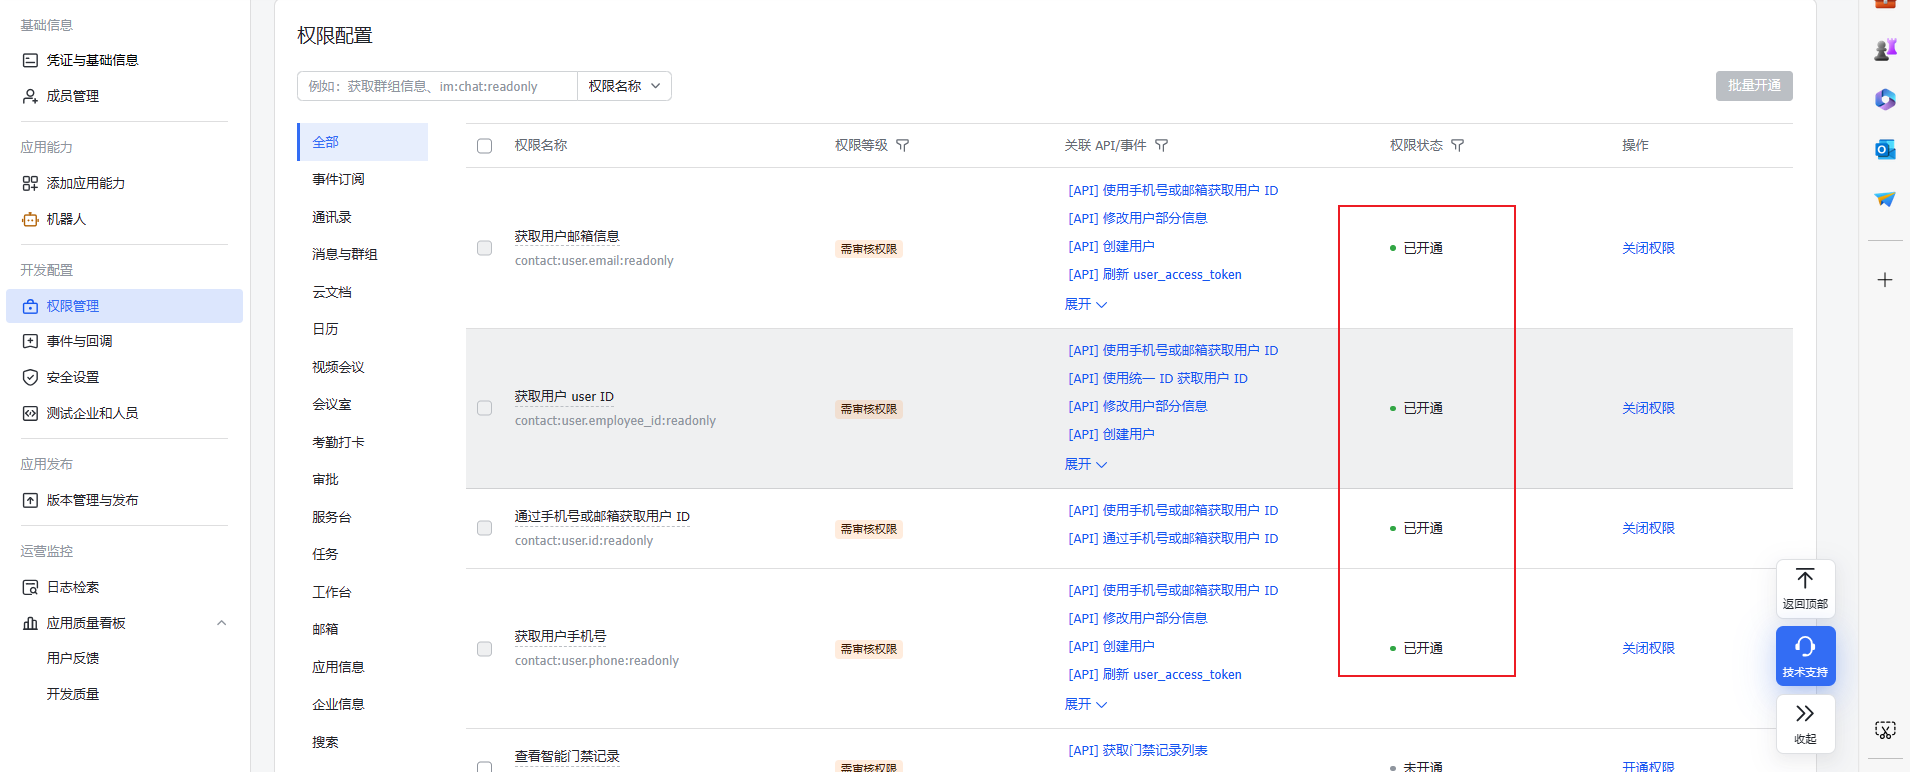
从右侧菜单中,进入“权限管理”页面,配置应用权限(选择自己所需的权限)
注:
- 如需获取用户邮箱,请添加“获取用户邮箱”权限
- 如需获取用户手机号,请添加“获取用户手机号”权限
- 其他必选如“获取用户 userid”、“获取用户统一ID”、“获取用户基本信息”
- 其他权限,请开发者根据自身要求添加
Springboot-JustAuth整合飞书登录
- 配置飞书回调地址http://localhost:8084/oauth/callback/FEISHU可以本地调试,其他环境需要更换ip或域名
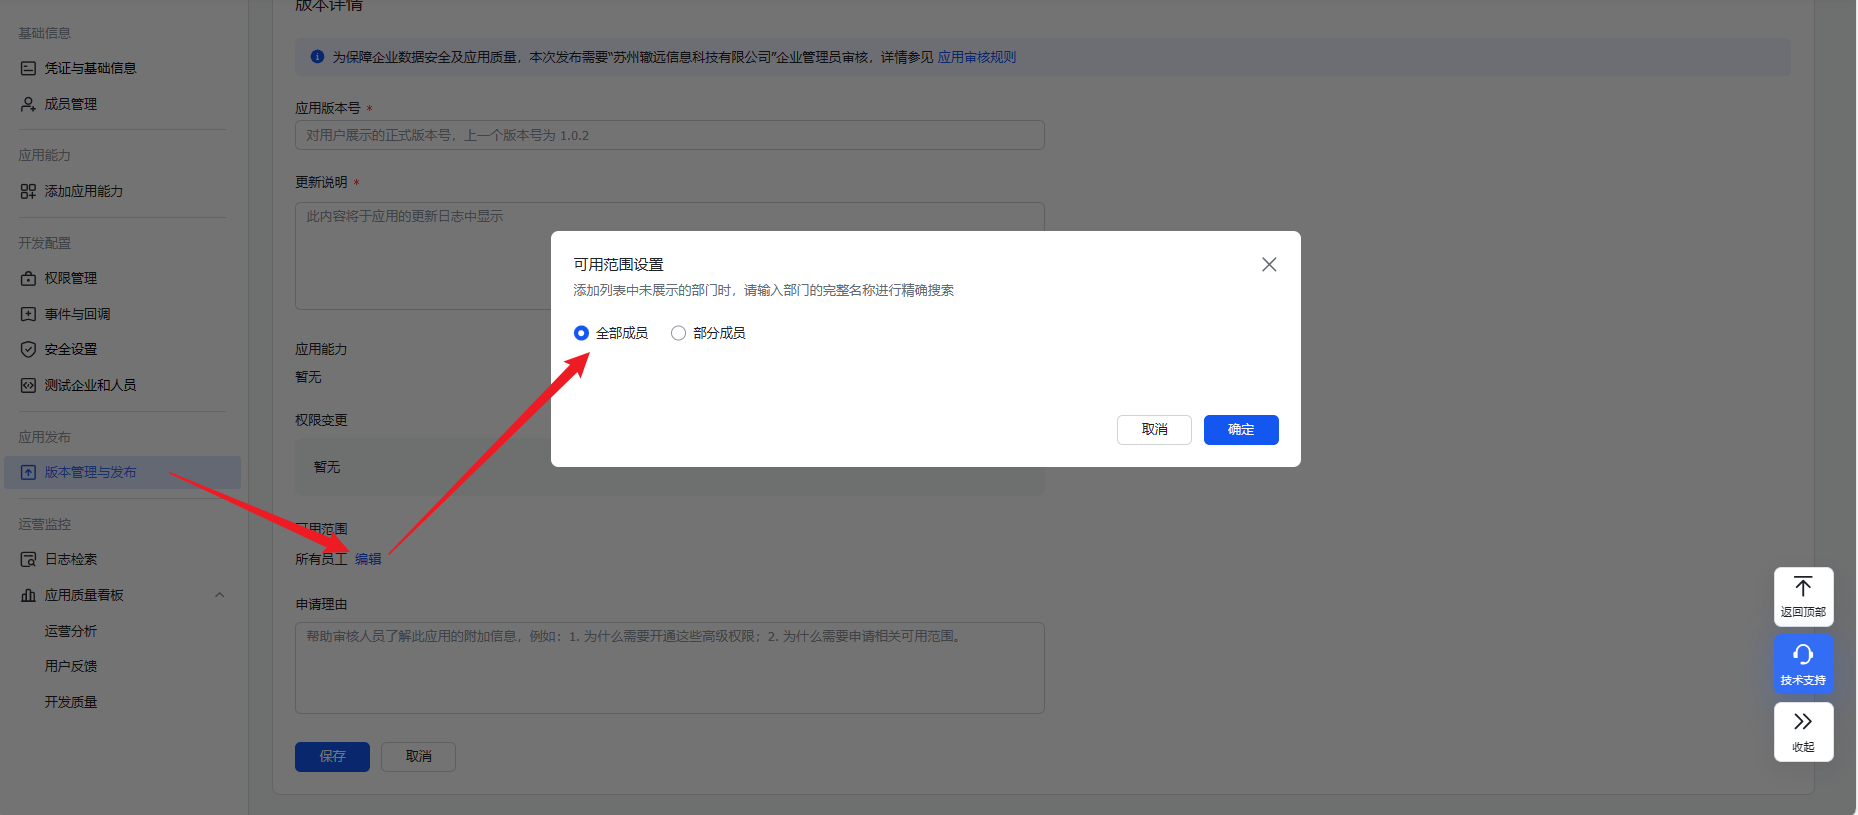
- 配置人员(配置可以登录的人员,我这里设置的是全部人员,就不用手动加人了,也可以指定人员)
- 引入依赖
<dependency><groupId>me.zhyd.oauth</groupId><artifactId>JustAuth</artifactId><version> 1.16.4</version></dependency>
- 配置
lark:#机器人地址(自己创建的)webHookUrl: https://open.feishu.cn/open-apis/bot/v2/hook/e3dxxxx#飞书回调地址loginHookUrl: http://localhost:8084/oauth/callback/FEISHU#登录成功重定向地址(根据自己需要配置)redirectUrl: http://localhost:9528/dashboard#token有效期expiry: 12#飞书appIdappId: cli_a69e5b6e0xxxx#飞书appSecretappSecret: ZQ1nqsQ4i4FovYxxxxx
- 对应service
package com.admin.manager.core.service;import cn.hutool.http.HttpRequest;
import cn.hutool.http.HttpUtil;
import com.admin.manager.core.exception.BusinessException;
import com.admin.manager.core.model.Result;
import com.admin.manager.core.model.dto.LarkUserInfo;
import com.admin.manager.core.model.dto.SsoResultResDto;
import com.alibaba.fastjson.JSON;
import com.alibaba.fastjson.JSONObject;
import com.lark.oapi.Client;
import com.lark.oapi.service.ehr.v1.model.Employee;
import com.lark.oapi.service.ehr.v1.model.ListEmployeeReq;
import com.lark.oapi.service.ehr.v1.model.ListEmployeeResp;
import com.lark.oapi.service.im.v1.model.CreateMessageReq;
import com.lark.oapi.service.im.v1.model.CreateMessageReqBody;
import com.lark.oapi.service.im.v1.model.CreateMessageResp;
import lombok.Data;
import lombok.extern.slf4j.Slf4j;
import me.zhyd.oauth.config.AuthConfig;
import me.zhyd.oauth.model.AuthCallback;
import me.zhyd.oauth.model.AuthResponse;
import me.zhyd.oauth.model.AuthToken;
import me.zhyd.oauth.model.AuthUser;
import me.zhyd.oauth.request.AuthFeishuRequest;
import me.zhyd.oauth.request.AuthRequest;
import org.springframework.beans.factory.annotation.Autowired;
import org.springframework.beans.factory.annotation.Value;
import org.springframework.stereotype.Service;import javax.annotation.PostConstruct;
import java.util.*;
import java.util.stream.Collectors;/*** 飞书工具** @author zr 2024/3/26*/
@Service
@Slf4j
public class LarkService {public static Client client;@Value("${lark.appId}")private String appId;@Value("${lark.appSecret}")private String appSecret;@Value("${lark.redirectUrl}")public String redirectUrl;@Value("${lark.expiry}")public Integer expiry;@Value("${lark.webHookUrl}")private String webHookUrl;@Value("${lark.loginHookUrl}")private String loginHookUrl;@Autowired//此处ssoService是获取用户信息,可以改成自己所需要的用户信息服务private SsoService ssoService;@PostConstructpublic void init() {this.client =  Client.newBuilder(appId, appSecret).build();}/**** @param msg*/public  void sendMessageToGroup(String msg) {//请求的JSON数据,这里用map在工具类里转成json格式Map<String, Object> json = new HashMap();Map<String, Object> text = new HashMap();text.put("text", "要素修改通知:" + msg);json.put("msg_type", "text");json.put("content", text);//发送post请求String result = HttpRequest.post(webHookUrl).body(JSON.toJSONString(json), "application/json;charset=UTF-8").execute().body();JSONObject res = JSON.parseObject(result);Integer code = (Integer) res.get("code");}/*** 发送消息给指定userid的员工* @param userId* @param msg* @return* @throws Exception*/public  Boolean sendMessageToPerson(String userId, String msg) throws Exception {HashMap<String, String> content = new HashMap<>();content.put("text", msg);// 创建请求对象CreateMessageReq req = CreateMessageReq.newBuilder().receiveIdType("union_id").createMessageReqBody(CreateMessageReqBody.newBuilder().receiveId(userId).msgType("text").content(JSON.toJSONString(content)).uuid(UUID.randomUUID().toString()).build()).build();// 发起请求CreateMessageResp resp = client.im().message().create(req);// 处理服务端错误if (!resp.success()) {log.info(String.format("code:%s,msg:%s,reqId:%s", resp.getCode(), resp.getMsg(), resp.getRequestId()));throw new BusinessException("飞书接口调用失败");}return true;}/*** 获取飞书员工列表** @return*/public  List<LarkUser> getEmployees() throws Exception {// 创建请求对象ListEmployeeReq req = ListEmployeeReq.newBuilder().userIdType("open_id").build();// 发起请求ListEmployeeResp resp = client.ehr().employee().list(req);// 处理服务端错误if (!resp.success()) {log.info(String.format("code:%s,msg:%s,reqId:%s", resp.getCode(), resp.getMsg(), resp.getRequestId()));throw new BusinessException("飞书接口调用失败");}Employee[] items = resp.getData().getItems();List<LarkUser> larkUsers = Arrays.stream(items).map(x -> {LarkUser larkUser = new LarkUser();larkUser.setUserId(x.getUserId());larkUser.setName(x.getSystemFields().getName());return larkUser;}).collect(Collectors.toList());return larkUsers;}/*** 获取tenantAccessToken** @return 返回null代表失败*/public  String getAccessToken() {String url = "https://open.feishu.cn/open-apis/auth/v3/tenant_access_token/internal/";HashMap<String, Object> query = new HashMap<>();query.put("app_id", "cli_a68bb76781b8500e");query.put("app_secret", "oiB2zcIy3MVno2JjWRLBxgJqU2xZ5qWi");String res = HttpUtil.post(url, query);JSONObject resObject = JSON.parseObject(res);Integer code = (Integer) resObject.get("code");if (code == 0) {String appAccessToken = (String) resObject.get("app_access_token");String tenantAccessToken = (String) resObject.get("tenant_access_token");return tenantAccessToken;} else {return null;}}public AuthRequest getAuthRequest() {return  new AuthFeishuRequest(AuthConfig.builder().clientId(appId).clientSecret(appSecret).redirectUri(loginHookUrl).build());}
//    http://127.0.0.1:8084/oauth/renderpublic Result<SsoResultResDto.SsoUserInfo> login(AuthCallback callback) {AuthRequest authRequest = getAuthRequest();AuthResponse<AuthUser> authResponse = authRequest.login(callback);log.info("飞书登录返回:{}",JSON.toJSONString(authResponse));if (authResponse.ok()){JSONObject  data = (JSONObject) authResponse.getData().getRawUserInfo().get("data");log.info(JSON.toJSONString(data));LarkUserInfo larkUserInfo = data.toJavaObject(LarkUserInfo.class);AuthToken token = authResponse.getData().getToken();//此处ssoService是获取用户信息,可以改成自己所需要的用户信息服务Result<SsoResultResDto.SsoUserInfo> ssoUserInfo = ssoService.getSsoUserInfoByOpenId(larkUserInfo.getUnionId());log.info("SsoUserInfo 返回:{}",JSON.toJSONString(authResponse));return ssoUserInfo;}else {return Result.failure(authResponse.getMsg());}}@Datapublic static class LarkUser{public String userId;public String name;}
}- 对应Controller
package com.admin.manager.api.controller;import cn.hutool.core.util.RandomUtil;
import cn.hutool.core.util.ReUtil;
import com.admin.manager.core.model.Result;
import com.admin.manager.core.model.dto.SsoResultResDto;
import com.admin.manager.core.service.LarkService;
import com.admin.manager.core.util.RedisUtil;
import com.alibaba.fastjson.JSON;
import io.swagger.annotations.Api;
import io.swagger.annotations.ApiOperation;
import me.zhyd.oauth.config.AuthConfig;
import me.zhyd.oauth.model.AuthCallback;
import me.zhyd.oauth.model.AuthResponse;
import me.zhyd.oauth.request.AuthFeishuRequest;
import me.zhyd.oauth.request.AuthRequest;
import me.zhyd.oauth.utils.AuthStateUtils;
import org.apache.commons.lang3.ObjectUtils;
import org.apache.commons.lang3.StringUtils;
import org.springframework.beans.factory.annotation.Autowired;
import org.springframework.beans.factory.annotation.Value;
import org.springframework.web.bind.annotation.*;import javax.servlet.http.HttpServletResponse;
import java.io.IOException;
import java.util.concurrent.TimeUnit;/*** @author zr 2024/3/28*/
@RestController
@Api(tags = "认证")
@RequestMapping("/oauth")
public class RestAuthController {@Autowiredprivate LarkService larkService;@GetMapping("/render")@ApiOperation(value = "飞书登录")public void renderAuth(HttpServletResponse response) throws IOException {AuthRequest authRequest = larkService.getAuthRequest();response.sendRedirect(authRequest.authorize(AuthStateUtils.createState()));}@GetMapping("/callback/FEISHU")@ApiOperation(value = "飞书回调")public void  callback(AuthCallback callback, HttpServletResponse response) throws IOException {Result<SsoResultResDto.SsoUserInfo> res = larkService.login(callback);//此处生成一个12位的tokenString token = RandomUtil.randomString(12);//重定向携带该tokenString redirectUrl = larkService.redirectUrl + "?token=" + token;//将token存入redisRedisUtil.StringOps.setEx("admin:"+token, JSON.toJSONString(res.getResult()), larkService.expiry, TimeUnit.HOURS);response.sendRedirect(redirectUrl);}//重定向后前端拿到token访问这个接口拿到用户信息@GetMapping("/auth")@ApiOperation(value = "获取用户信息")public Result<SsoResultResDto.SsoUserInfo> auth(@RequestParam("token") String token) {String userInfo = RedisUtil.StringOps.get("admin:" + token);if (StringUtils.isNotEmpty(userInfo)){SsoResultResDto.SsoUserInfo ssoUserInfo = JSON.parseObject(userInfo, SsoResultResDto.SsoUserInfo.class);return Result.success(ssoUserInfo);}else {return Result.failure("未登录");}}
}- 测试
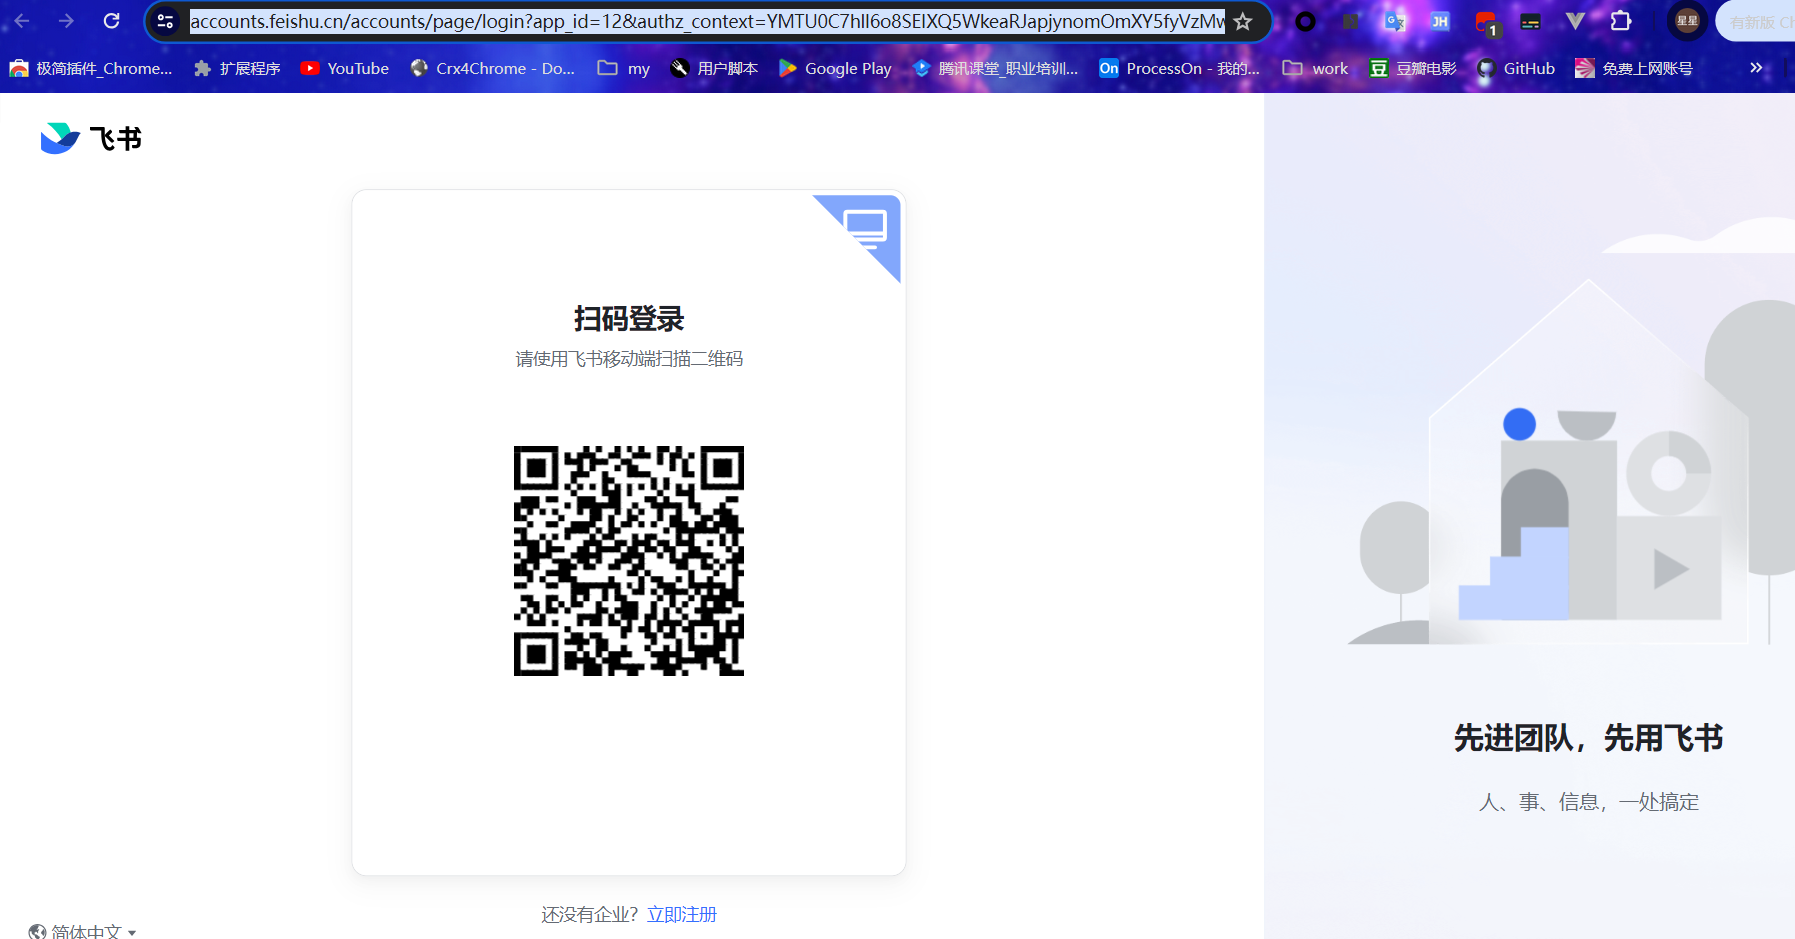
http://localhost:8084/oauth/render(记得换端口)
登录成功后,飞书会回调/oauth/callback/FEISHU接口,我这里是示范地址记得修改
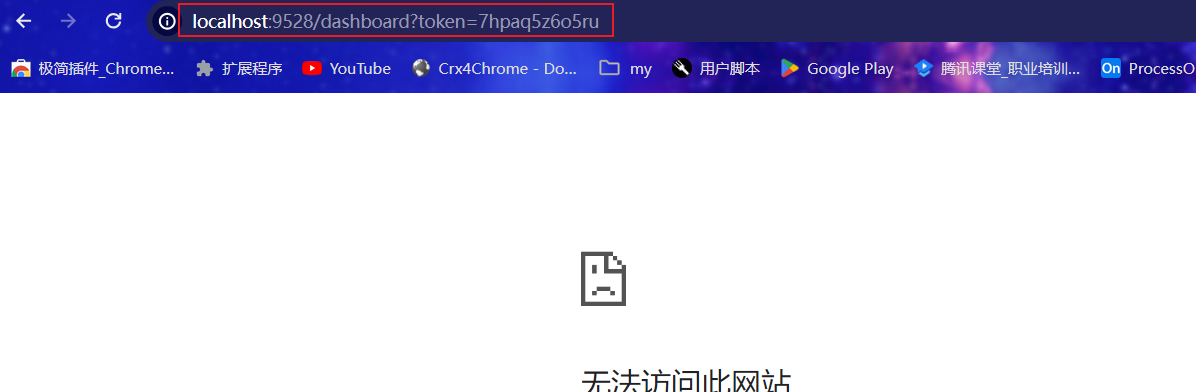
之后前端就可以调用/oauth/auth接口拿token换用户信息了
这篇关于Springboot整合飞书向群组/指定个人发送消息/飞书登录的文章就介绍到这儿,希望我们推荐的文章对编程师们有所帮助!


