本文主要是介绍基于POSIX标准库的读者-写者问题的简单实现,希望对大家解决编程问题提供一定的参考价值,需要的开发者们随着小编来一起学习吧!
文章目录
- 实验要求
- 分析
- 保证读写、写写互斥
- 保证多个读者同时进行读操作
- 读者优先
- 实例代码
- 分析
- 写者优先
- 示例代码
- 分析
实验要求
- 创建一个控制台进程,此进程包含
n个线程。用这n个线程来表示n个读者或写者。- 每个线程按相应
测试数据文件的要求进行读写操作。- 用信号量机制分别实现
读者优先和写者优先的读者-写者问题。
分析
由于只有一个共享文件, 而有n个读线程, n个写者线程需要互斥地对该文件进行读写操作
读者写者问题需要保证
- 读读不互斥、允许多个读者同时进行读操作
- 读写、写写互斥
保证读写、写写互斥
由于临界资源(共享文件)只有一个, 所以创建一个互斥信号量(资源数量只有1份)mutex_file来对进行对文件地互斥操作
保证多个读者同时进行读操作
由于需要保证多个读者不互斥地对文件进行读操作, 所以设置一个进程内的全局变量(线程共享) reading_count, 表示正在对文件进行读操作的线程的数量.
每当有一个读线程进入临界区后, 对该变量的数值+1.
由于有多个读线程, 所以对该全局变量的访问也需要互斥, 因此增加一个互斥信号量mutex_count
如果读线程判断到reading_count != 0, 则不用对信号量mutex_file做P操作, 可以直接进入临界区. 否则, 即该读线程是第一个读线程, 该读线程首先要对信号量mutex_file做P操作.
读者优先
-
主函数
- 打开要互斥访问的文件
- 初始化信号量
- 创建
N个读者线程,N个写者线程mutex_file信号量代表的
-
读者线程
不断地请求对文件的操作(对信号量mutex_file进行P操作).- 打印读者线程id, 用于后续分析.
- 如果成功的进入临界区, 读取文件的大小, 并打印到标准输出.
-
写者线程
不断地请求对文件的操作(对信号量mutex_file进行P操作).- 打印写者线程id, 用于后续分析.
- 如果成功的进入临界区, 则对文件写一行文本, 这里为
hello world\n.
实例代码
#include <iostream>
#include <vector>
#include <unistd.h>
#include <sys/file.h>
#include <pthread.h>
#include <semaphore.h>
// convient to code
#define P(x) sem_wait(x);
#define V(x) sem_post(x);
sem_t mutex_count;
sem_t mutex_file;
sem_t mutex_print; // make the print info correct
int reading_count = 0; // the amount of the reading thread
int fd; // the shared file descriptor
const int N = 5;// the thread of the writer
char writer_str[] = "hello world\n";
void* writer_thread(void* arg) {while (true) {// try to operate the fileP(&mutex_file);P(&mutex_print);printf("the writer %d is writing\n", arg);fflush(stdout);V(&mutex_print);// write into the filewrite(fd, writer_str, sizeof(writer_str) - 1);sleep(1);// release the fileV(&mutex_file);}
}
// the thread of the reader
void* reader_thread(void* arg) {while (true) {// Firstly, we need to check and plus the reading_count// so, we try to catch the mutex_countP(&mutex_count);// if the reader is the first reader// if mutex_file = 0, if (reading_count == 0) {P(&mutex_file);}reading_count++;V(&mutex_count);P(&mutex_print);printf("the reader %d is reading  #", arg);char buf[1024];// move file pointer to left 0, to read all content of filelseek(fd, 0, SEEK_SET);int len = read(fd, buf, sizeof(buf));printf("len = %d\n", len);fflush(stdout);// printf("str = \n%.*s\n", len, buf);// fflush(stdout);sleep(1);V(&mutex_print);// after reading, the reader leave, count--P(&mutex_count);reading_count--;// if the reader is the last readerif (reading_count == 0) {V(&mutex_file);}V(&mutex_count);}
}
int main(int argc, char const *argv[]) {// if use the cmd// if (argc < 2) {//     printf("usage : %s <n>\n", argv[0]);//     exit(1);// } // int N = atoi(argv[1]);// open a file "data.txt", which can written and read,// if not exists, crate it, if already have sth, clear it.fd = open("data.txt", O_RDWR | O_CREAT | O_TRUNC);if (fd == -1) {char msg[] = "error to open the file\n";write(2, msg, sizeof(msg) - 1);return 1;}printf("file descriptor = %d\n", fd);/*** initialize the semaphores*  arg1 : the semaphore*  arg2: 0 means share in processes*  arg3: 1 means initial value of the semaphore, there 1 means mutual-sema*/sem_init(&mutex_count, 0, 1); sem_init(&mutex_file, 0, 1); sem_init(&mutex_print, 0, 1); /*** initialize the threads*/std::vector<pthread_t> writer(N), reader(N);// create N writer thread, N reader threadfor (int i = 0; i < N; i++) {pthread_create(&writer[i], nullptr, writer_thread, (void*) i + 1);pthread_create(&reader[i], nullptr, reader_thread, (void*) (N + i + 1));}// main thread waiting 2*N threadsfor (int i = 0; i < N; i++) {pthread_join(writer[i], nullptr);pthread_join(writer[i], nullptr);}// destory semaphoressem_destroy(&mutex_count);sem_destroy(&mutex_file);sem_destroy(&mutex_print);return 0;
}
分析
假设读写线程都有N = 5个, 如果尝试运行一下该程序
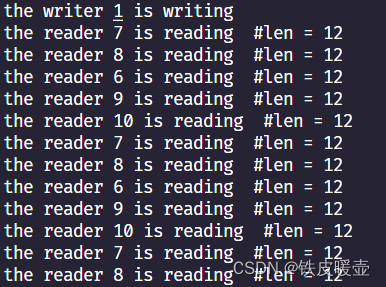
由于第一个创建的线程是写线程, 所以writer1会对文件进行写操作
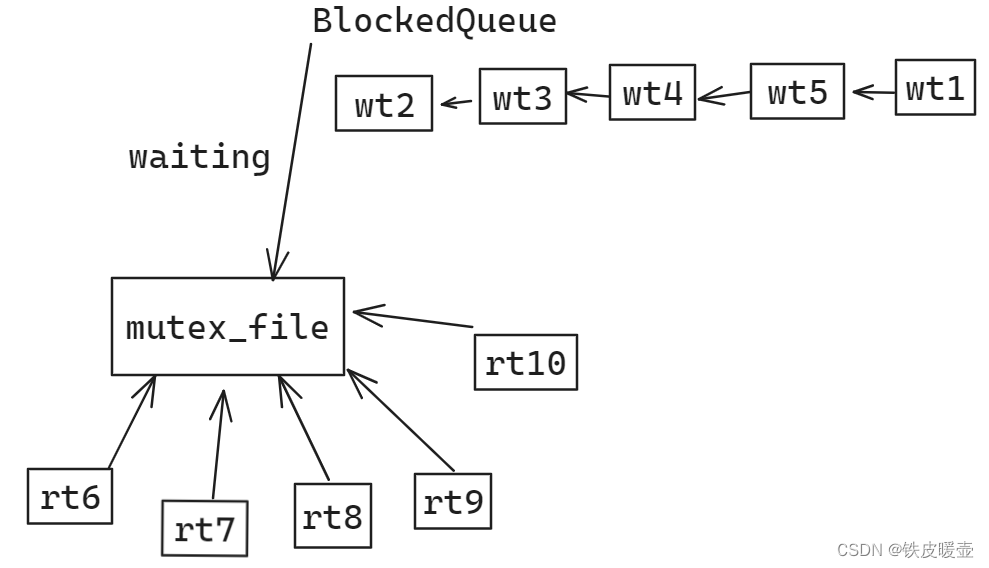
后续当第一个读线程获取到文件的操作权后, 此时后续的读写线程都已经就绪, 因为此时reading_count=1, 所以其余读线程不会执行对信号量mutex_file的P操作, 而直接进入临界区, 但是写线程执行了对信号量mutex_file的P操作, 从而被阻塞, 加如到了该信号量的阻塞队列中. 接着, 其余读线程也顺势进入临界区, 并且由于一个线程内是持续(while(true))对共享文件做P操作的, 所以一个读线程完成读操作后会立即再次对文件发起读请求. 从而使得可能在后续读线程就绪前, 就准备好的写线程一直被阻塞. 从而引起了这些写线程出现饥饿现象.
当然, 如果线程中不加入死循环, 则每个线程只对文件操作一次, 则所有的线程都有机会操作文件.此时写线程只会饥饿, 但不至于饿死. 而加入死循环, 可能会导致线程饿死.
写者优先
这里的写者优先并不是写者的优先级高于读者, 更不会导致读者出现饥饿情况.
实际上, 这里的读者和写者的优先级是一样的
前面读者优先的实现问题在于: 当读线程在占用文件时, 其它读线程直接进入临界区, 则不被阻塞, 仅有后续的写线程被阻塞
一种解决办法就是设置一个信号量让两类线程都可以因为请求文件被阻塞, 但是同时保证读-读不被阻塞
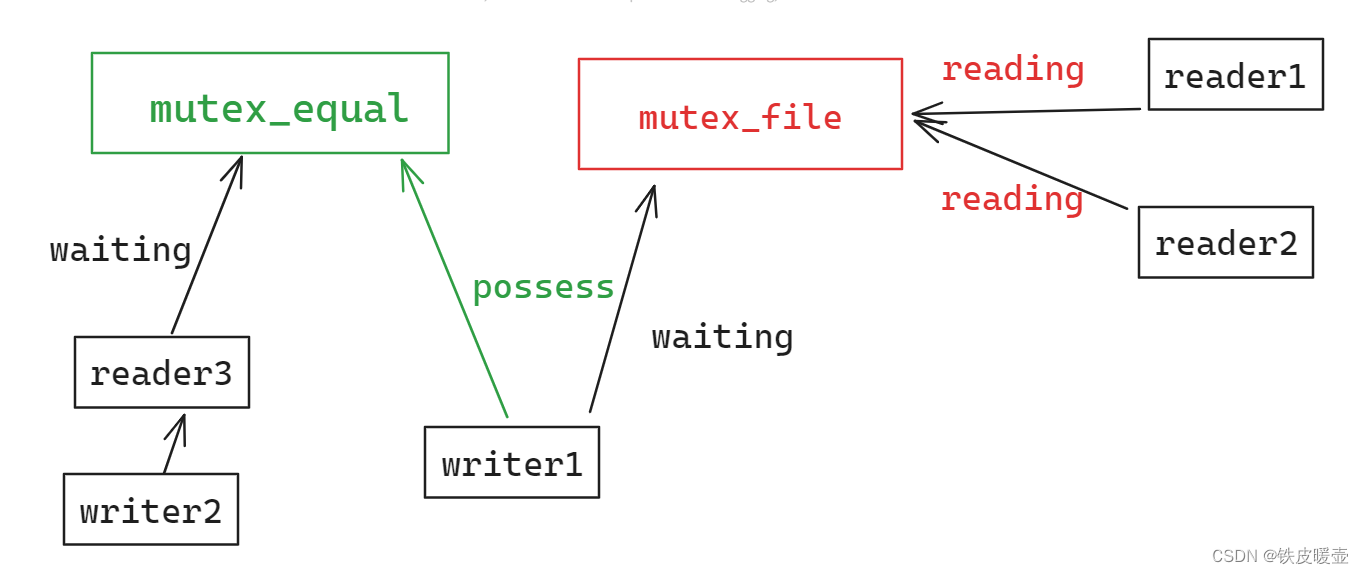
我们在原先的读者优先的实现中, 在最外层增加一个互斥信号量mutex_equal
为了保证会因请求文件而阻塞, 所以在对mutex_file进行P操作之前, 对mutex_equal执行P操作
由于要保证多个读者同时读取文件, 则当读者进入临界区后, 对mutex_wprivilege进行V操作
表示可以获得写者优先的线程数. 初始值为1表示当前读线程谦让最多1个写线程执行
在写线程执行时, 先对mutex_equal进行P操作, 如果此时mutex_equal= 1, 表示该写线程是第一个就绪且请求写文件的写线程, 则继续对mutex_file信号量进行P操作. 如果mutex_equal= 0, 表明该写线程不是第一个请求文件而被阻塞的写线程, 不应该享有让读线程谦让的资格. 此时被mutex_equal阻塞.
在读线程执行时, 先对mutex_wprivilege进行P操作, 如果被阻塞, 则说明此时有写线程正在请求文件(即被信号量mutex_file阻塞), 此时读线程被信号量mutex_wprivilege阻塞
示例代码
#include <iostream>
#include <vector>
#include <sys/file.h>
#include <unistd.h>
#include <pthread.h>
#include <semaphore.h>
using namespace std;
sem_t mutex_count;
sem_t mutex_print;
sem_t mutex_file;
sem_t mutex_equal;
int reading_count = 0;
int fd;
const int N = 5;
#define P(x) sem_wait(x);
#define V(x) sem_post(x);
/*** P -> sem_wait -1* V -> sem_post +1
*/
// the thread of the writer
char writer_str[] = "hello world\n";
void* writer_thread(void* arg) {while (true) {// the first thread try to catch the file P(&mutex_equal);P(&mutex_file);P(&mutex_print);printf("the writer %d is writing\n", arg);fflush(stdout);V(&mutex_print);write(fd, writer_str, sizeof(writer_str) - 1);sleep(1);V(&mutex_file);// the first blocking-thread of mutex_file leave the critical zoneV(&mutex_equal);}
}
// the thread of the reader
void* reader_thread(void* arg) {while (true) {// check if the first thread of blocked-queue of mutex_file is the writer// if there is writer blocking, the write can't go into critcal zone P(&mutex_equal);P(&mutex_count);// if the reader is the first readerif (reading_count == 0) {P(&mutex_file);}reading_count++;// read_count++;// printf("%d %d\n", write_count, read_count);V(&mutex_count);P(&mutex_print);printf("the reader %d is reading  #", arg);char buf[1024];// move file pointer to left 0 lseek(fd, 0, SEEK_SET);int len = read(fd, buf, sizeof(buf));printf("len = %d\n", len);fflush(stdout);// fflush(stdout);// printf("str = \n%.*s\n", len, buf);sleep(1);V(&mutex_print);V(&mutex_equal);// after reading, the reader leave, count--P(&mutex_count);reading_count--;// if the reader is the last readerif (reading_count == 0) {V(&mutex_file);}V(&mutex_count);}
}
int main(int argc, char const *argv[]) {// if (argc < 2) {//     printf("usage : %s <n>\n", argv[0]);//     exit(1);// } // int N = atoi(argv[1]);fd = open("data.txt", O_RDWR | O_CREAT | O_TRUNC);/*** initialize the semaphores*  arg1 : the semaphore*  arg2: 0 means share in processes*  arg3: 1 means initial value of the semaphore*/sem_init(&mutex_count, 0, 1); sem_init(&mutex_file, 0, 1); sem_init(&mutex_print, 0, 1); sem_init(&mutex_equal, 0, 1); /*** initialize the threads* */printf("file descriptor = %d\n", fd);vector<pthread_t> writer(N), reader(N);for (int i = 0; i < N; i++) {pthread_create(&writer[i], nullptr, writer_thread, (void*) i + 1);pthread_create(&reader[i], nullptr, reader_thread, (void*) (N + i + 1));}// main thread waiting 2*N threadsfor (int i = 0; i < N; i++) {pthread_join(writer[i], nullptr);pthread_join(writer[i], nullptr);}// destory semaphoressem_destroy(&mutex_count);sem_destroy(&mutex_file);sem_destroy(&mutex_print);sem_destroy(&mutex_equal);return 0;
}
分析
修改后的程序的输出结果: 读者和写者较为平均的访问了文件.

对于mutex_equal的阻塞队列的队首.
- 当
mutex_file的阻塞队列为空(这种情况下mutex_equal= 1), 此时mutex_equal的阻塞队列队首的读者线程, 会直接进入临界区. - 当
mutex_file的阻塞队列有一个写者线程时, 此时mutex_equal的阻塞队列队首的读/写线程都不会进入mutex_file的阻塞队列.
很明显, mutex_file的阻塞队列最多只会有一个线程(只可能是写线程)
这篇关于基于POSIX标准库的读者-写者问题的简单实现的文章就介绍到这儿,希望我们推荐的文章对编程师们有所帮助!


