本文主要是介绍学习TensorFlow,保存学习到的网络结构参数并调用,希望对大家解决编程问题提供一定的参考价值,需要的开发者们随着小编来一起学习吧!
在深度学习中,不管使用那种学习框架,我们会遇到一个很重要的问题,那就是在训练完之后,如何存储学习到的深度网络的参数?在测试时,如何调用这些网络参数?针对这两个问题,本篇博文主要探索TensorFlow如何解决他们?本篇博文分为三个部分,第一是讲解tensorflow相关的函数,第二是代码例程,第三是运行结果。
一 tensorflow相关的函数
我们说的这两个功能主要由一个类来完成,class tf.train.Saver
- saver = tf.train.Saver()
- save_path = saver.save(sess, model_path)
- load_path = saver.restore(sess, model_path)
save_path = saver.save(sess, model_path) 保存学习到的网络参数到model_path路径中
load_path = saver.restore(sess, model_path) 调用model_path路径中的保存的网络参数到graph中
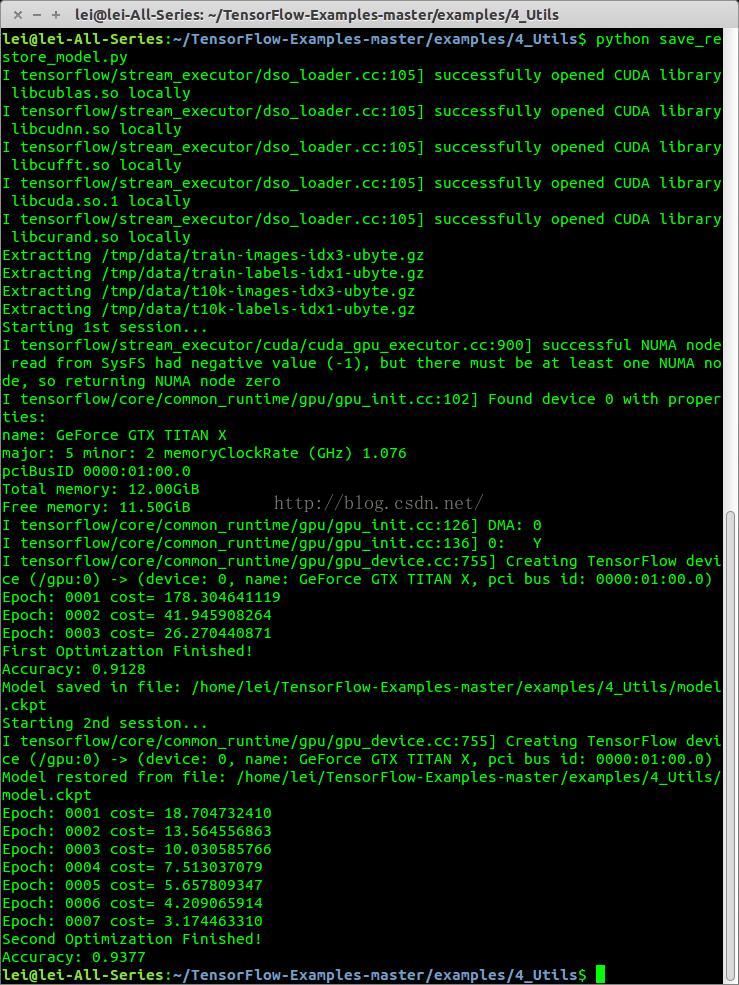
二 代码例程
- '''''
- Save and Restore a model using TensorFlow.
- This example is using the MNIST database of handwritten digits
- (http://yann.lecun.com/exdb/mnist/)
- Author: Aymeric Damien
- Project: https://github.com/aymericdamien/TensorFlow-Examples/
- '''
- # Import MINST data
- from tensorflow.examples.tutorials.mnist import input_data
- mnist = input_data.read_data_sets("/tmp/data/", one_hot=True)
- import tensorflow as tf
- # Parameters
- learning_rate = 0.001
- batch_size = 100
- display_step = 1
- model_path = "/home/lei/TensorFlow-Examples-master/examples/4_Utils/model.ckpt"
- # Network Parameters
- n_hidden_1 = 256 # 1st layer number of features
- n_hidden_2 = 256 # 2nd layer number of features
- n_input = 784 # MNIST data input (img shape: 28*28)
- n_classes = 10 # MNIST total classes (0-9 digits)
- # tf Graph input
- x = tf.placeholder("float", [None, n_input])
- y = tf.placeholder("float", [None, n_classes])
- # Create model
- def multilayer_perceptron(x, weights, biases):
- # Hidden layer with RELU activation
- layer_1 = tf.add(tf.matmul(x, weights['h1']), biases['b1'])
- layer_1 = tf.nn.relu(layer_1)
- # Hidden layer with RELU activation
- layer_2 = tf.add(tf.matmul(layer_1, weights['h2']), biases['b2'])
- layer_2 = tf.nn.relu(layer_2)
- # Output layer with linear activation
- out_layer = tf.matmul(layer_2, weights['out']) + biases['out']
- return out_layer
- # Store layers weight & bias
- weights = {
- 'h1': tf.Variable(tf.random_normal([n_input, n_hidden_1])),
- 'h2': tf.Variable(tf.random_normal([n_hidden_1, n_hidden_2])),
- 'out': tf.Variable(tf.random_normal([n_hidden_2, n_classes]))
- }
- biases = {
- 'b1': tf.Variable(tf.random_normal([n_hidden_1])),
- 'b2': tf.Variable(tf.random_normal([n_hidden_2])),
- 'out': tf.Variable(tf.random_normal([n_classes]))
- }
- # Construct model
- pred = multilayer_perceptron(x, weights, biases)
- # Define loss and optimizer
- cost = tf.reduce_mean(tf.nn.softmax_cross_entropy_with_logits(pred, y))
- optimizer = tf.train.AdamOptimizer(learning_rate=learning_rate).minimize(cost)
- # Initializing the variables
- init = tf.initialize_all_variables()
- # 'Saver' op to save and restore all the variables
- saver = tf.train.Saver()
- # Running first session
- print "Starting 1st session..."
- with tf.Session() as sess:
- # Initialize variables
- sess.run(init)
- # Training cycle
- for epoch in range(3):
- avg_cost = 0.
- total_batch = int(mnist.train.num_examples/batch_size)
- # Loop over all batches
- for i in range(total_batch):
- batch_x, batch_y = mnist.train.next_batch(batch_size)
- # Run optimization op (backprop) and cost op (to get loss value)
- _, c = sess.run([optimizer, cost], feed_dict={x: batch_x,
- y: batch_y})
- # Compute average loss
- avg_cost += c / total_batch
- # Display logs per epoch step
- if epoch % display_step == 0:
- print "Epoch:", '%04d' % (epoch+1), "cost=", \
- "{:.9f}".format(avg_cost)
- print "First Optimization Finished!"
- # Test model
- correct_prediction = tf.equal(tf.argmax(pred, 1), tf.argmax(y, 1))
- # Calculate accuracy
- accuracy = tf.reduce_mean(tf.cast(correct_prediction, "float"))
- print "Accuracy:", accuracy.eval({x: mnist.test.images, y: mnist.test.labels})
- # Save model weights to disk
- save_path = saver.save(sess, model_path)
- print "Model saved in file: %s" % save_path
- # Running a new session
- print "Starting 2nd session..."
- with tf.Session() as sess:
- # Initialize variables
- sess.run(init)
- # Restore model weights from previously saved model
- load_path = saver.restore(sess, model_path)
- print "Model restored from file: %s" % save_path
- # Resume training
- for epoch in range(7):
- avg_cost = 0.
- total_batch = int(mnist.train.num_examples / batch_size)
- # Loop over all batches
- for i in range(total_batch):
- batch_x, batch_y = mnist.train.next_batch(batch_size)
- # Run optimization op (backprop) and cost op (to get loss value)
- _, c = sess.run([optimizer, cost], feed_dict={x: batch_x,
- y: batch_y})
- # Compute average loss
- avg_cost += c / total_batch
- # Display logs per epoch step
- if epoch % display_step == 0:
- print "Epoch:", '%04d' % (epoch + 1), "cost=", \
- "{:.9f}".format(avg_cost)
- print "Second Optimization Finished!"
- # Test model
- correct_prediction = tf.equal(tf.argmax(pred, 1), tf.argmax(y, 1))
- # Calculate accuracy
- accuracy = tf.reduce_mean(tf.cast(correct_prediction, "float"))
- print "Accuracy:", accuracy.eval(
- {x: mnist.test.images, y: mnist.test.labels})
参考资料:
https://github.com/aymericdamien/TensorFlow-Examples/blob/master/examples/4_Utils/save_restore_model.py
这篇关于学习TensorFlow,保存学习到的网络结构参数并调用的文章就介绍到这儿,希望我们推荐的文章对编程师们有所帮助!


