本文主要是介绍PopupWindow的使用以及ArrayAdatper.notifyDataSetChanged()无效详解,希望对大家解决编程问题提供一定的参考价值,需要的开发者们随着小编来一起学习吧!
随时随地技术实战干货,充分利用闲暇时间,请关注源代码社区公众号(ydmsq666)和技术交流群。


Android的对话框有两种:PopupWindow和AlertDialog。它们的不同点在于:
AlertDialog的位置固定,而PopupWindow的位置可以随意
AlertDialog是非阻塞线程的,而PopupWindow是阻塞线程的
PopupWindow的位置按照有无偏移分,可以分为偏移和无偏移两种;按照参照物的不同,可以分为相对于某个控件(Anchor锚)和相对于父控件。具体如下
showAsDropDown(View anchor):相对某个控件的位置(正左下方),无偏移
showAsDropDown(View anchor, int xoff, int yoff):相对某个控件的位置,有偏移
showAtLocation(View parent, int gravity, int x, int y):相对于父控件的位置(例如正中央Gravity.CENTER,下方Gravity.BOTTOM等),可以设置偏移或无偏移
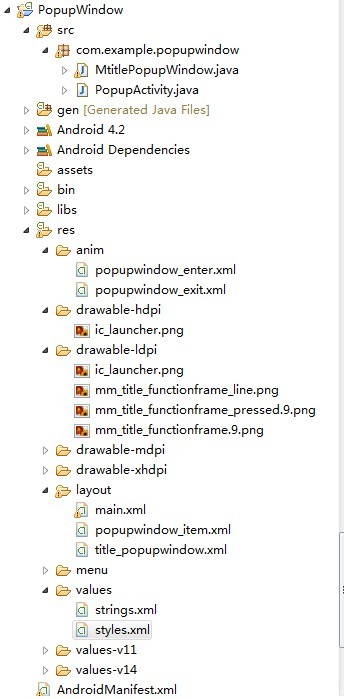
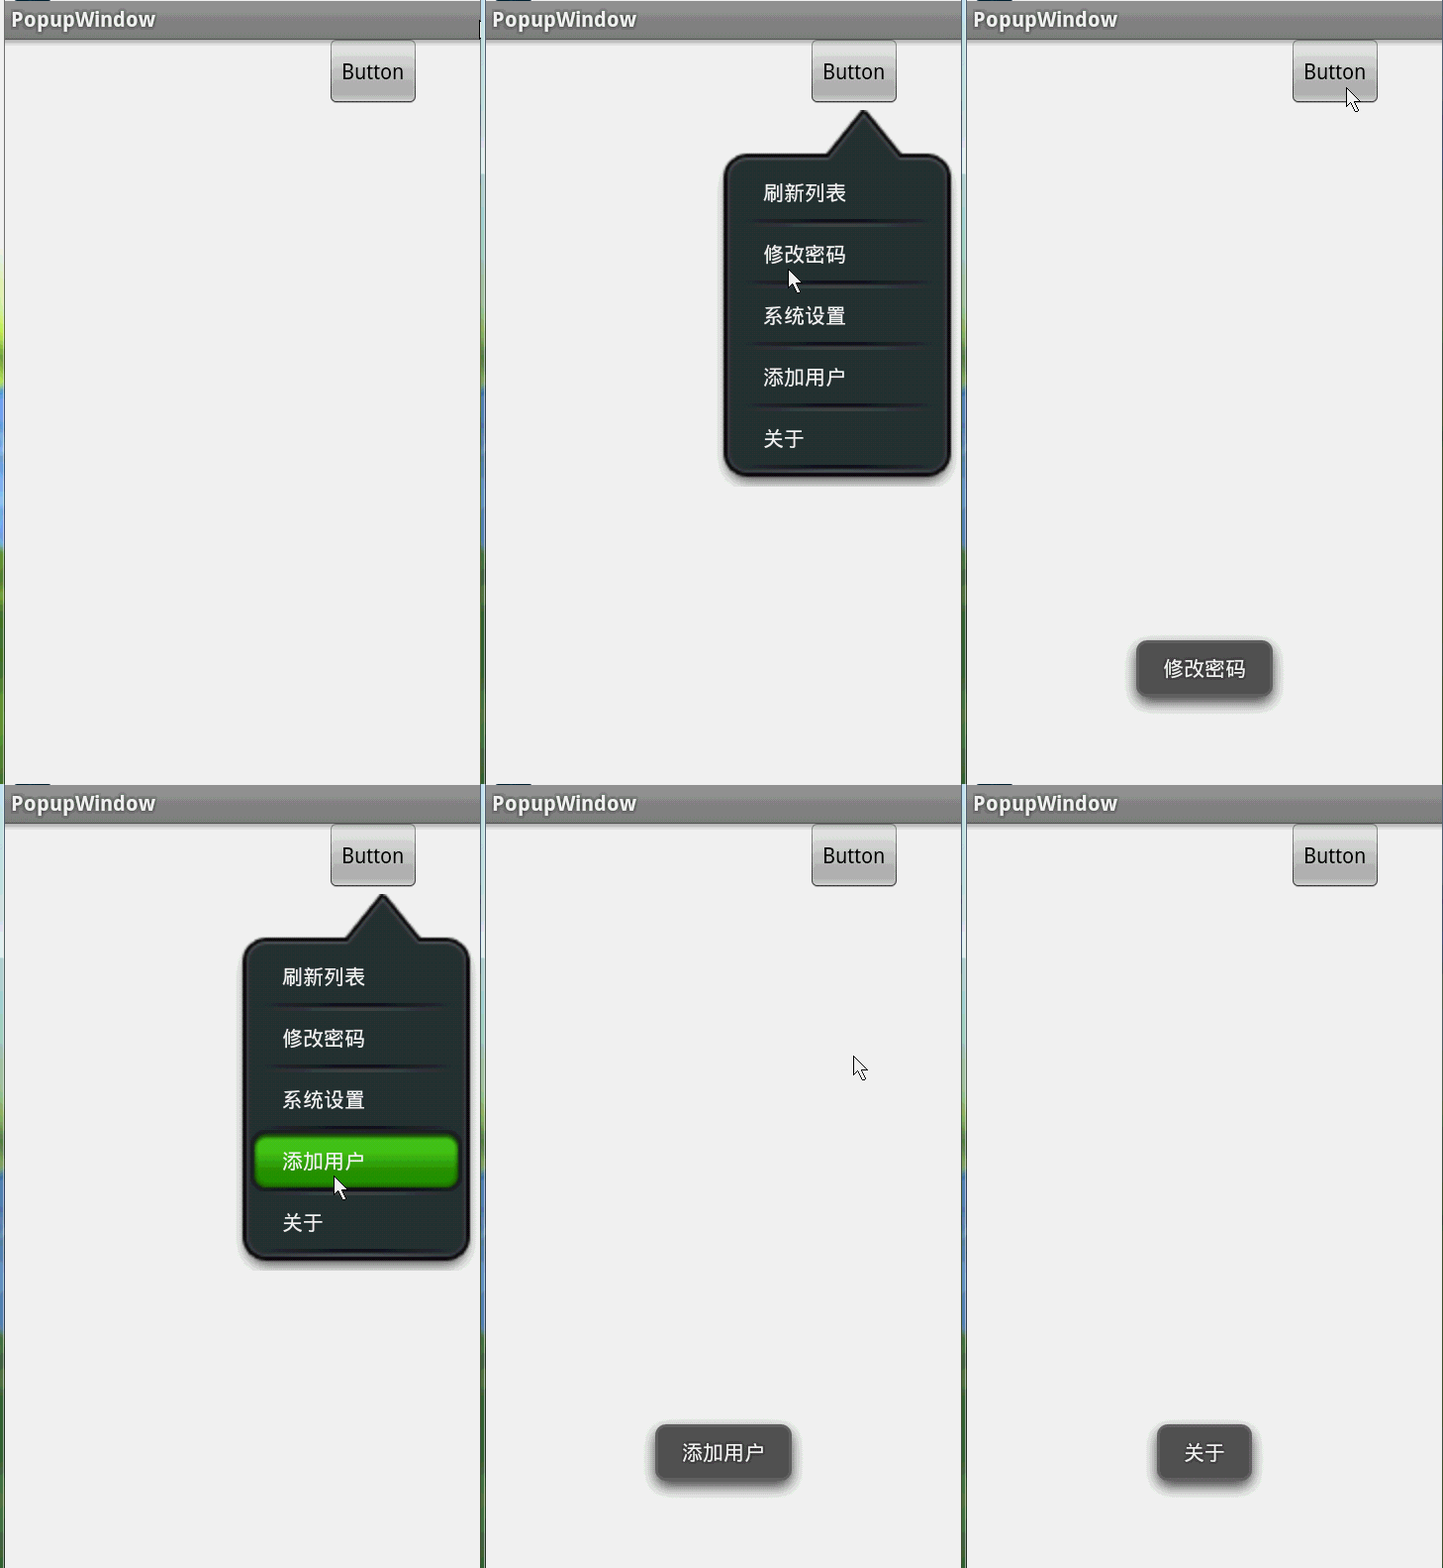
项目目录结构和效果图
1.PopupWindow的布局,里面只有一个ListView
[html] view plain copy ![]()
- <RelativeLayout xmlns:android="http://schemas.android.com/apk/res/android"
- xmlns:tools="http://schemas.android.com/tools"
- android:layout_width="wrap_content"
- android:layout_height="wrap_content">
- <ListView
- android:id="@+id/popupwindow"
- android:background="@drawable/mm_title_functionframe"
- android:layout_width="fill_parent"
- android:layout_height="wrap_content"
- android:divider="@drawable/mm_title_functionframe_line"
- android:listSelector="@drawable/mm_title_functionframe_pressed"
- android:cacheColorHint="@android:color/transparent">
- </ListView>
- </RelativeLayout>
2.PopupWindow item的布局,为了简单起里面只有一个TextView
[html] view plain copy ![]()
- <?xml version="1.0" encoding="utf-8"?>
- <RelativeLayout xmlns:android="http://schemas.android.com/apk/res/android"
- android:layout_width="fill_parent"
- android:layout_height="wrap_content"
- android:padding="8.0dip" >
- <TextView
- android:id="@+id/popup_item"
- android:layout_width="wrap_content"
- android:layout_height="wrap_content"
- android:textStyle="bold"
- android:singleLine="true"
- android:ellipsize="end"
- android:textColor="#ffffffff"/>
- </RelativeLayout>
3.写一个PopupWindow的派生类,这里我直接贴代码,注释还是比较详细,只有用了一个回调接口,不明白回调函数的看这里http://blog.csdn.net/xiaanming/article/details/8703708
[java] view plain copy ![]()
- package com.example.popupwindow;
- import java.util.ArrayList;
- import java.util.List;
- import android.content.Context;
- import android.graphics.drawable.BitmapDrawable;
- import android.view.LayoutInflater;
- import android.view.View;
- import android.view.ViewGroup.LayoutParams;
- import android.widget.AdapterView;
- import android.widget.AdapterView.OnItemClickListener;
- import android.widget.ArrayAdapter;
- import android.widget.ListView;
- import android.widget.PopupWindow;
- /**
- *
- * @author xiaanming
- *
- */
- public class MtitlePopupWindow extends PopupWindow {
- /**
- * 上下文对象
- */
- private Context mContext;
- /**
- * 回调接口对象
- */
- private OnPopupWindowClickListener listener;
- /**
- * ArrayAdapter对象
- */
- private ArrayAdapter adapter;
- /**
- * ListView的数据源
- */
- private List<String> list = new ArrayList<String>();
- /**
- * PopupWindow的宽度
- */
- private int width = 0;
- public MtitlePopupWindow(Context context){
- super(context);
- mContext = context;
- initView();
- }
- private void initView(){
- LayoutInflater inflater = (LayoutInflater) mContext.getSystemService(Context.LAYOUT_INFLATER_SERVICE);
- View popupView = inflater.inflate(R.layout.title_popupwindow, null);
- setContentView(popupView);
- //设置宽度,若没有设置宽度为LayoutParams.WRAP_CONTENT
- setWidth(250);
- setHeight(LayoutParams.WRAP_CONTENT);
- //设置动画,也可以不设置。不设置则是显示默认的
- setAnimationStyle(R.style.popupwindow_animation);
- //这里很重要,不设置这个ListView得不到相应
- this.setFocusable(true);
- this.setBackgroundDrawable(new BitmapDrawable());
- this.setOutsideTouchable(true);
- ListView listView = (ListView) popupView.findViewById(R.id.popupwindow);
- adapter = new ArrayAdapter(mContext, R.layout.popupwindow_item, R.id.popup_item, list);
- listView.setAdapter(adapter);
- //ListView的点击事件
- listView.setOnItemClickListener(new OnItemClickListener() {
- @Override
- public void onItemClick(AdapterView<?> parent, View view,
- int position, long id) {
- MtitlePopupWindow.this.dismiss();
- if(listener != null){
- listener.onPopupWindowItemClick(position);
- }
- }
- });
- }
- /**
- * 为PopupWindow设置回调接口
- * @param listener
- */
- public void setOnPopupWindowClickListener(OnPopupWindowClickListener listener){
- this.listener = listener;
- }
- /**
- * 设置数据的方法,供外部调用
- * @param mList
- */
- public void changeData(List<String> mList) {
- //这里用addAll也很重要,如果用this.list = mList,调用notifyDataSetChanged()无效
- //notifyDataSetChanged()数据源发生改变的时候调用的,this.list = mList,list并没有发生改变
- list.addAll(mList);
- adapter.notifyDataSetChanged();
- }
- /**
- * 回调接口.供外部调用
- * @author xiaanming
- *
- */
- public interface OnPopupWindowClickListener{
- /**
- * 当点击PopupWindow的ListView 的item的时候调用此方法,用回调方法的好处就是降低耦合性
- * @param position 位置
- */
- void onPopupWindowItemClick(int position);
- }
- }
上面还用到了动画,比较简单的动画,不太懂动画请到这里http://blog.csdn.net/xiaanming/article/details/8997260
popupwindow_enter
[html] view plain copy ![]()
- <?xml version="1.0" encoding="UTF-8"?>
- <set xmlns:android="http://schemas.android.com/apk/res/android">
- <translate
- android:fromXDelta="100%p"
- android:toXDelta="0"
- android:duration="500"/>
- </set>
popupwindow_exit
[html] view plain copy ![]()
- <?xml version="1.0" encoding="utf-8"?>
- <set xmlns:android="http://schemas.android.com/apk/res/android">
- <translate
- android:fromXDelta="0"
- android:toXDelta="100%p"
- android:duration="500"/>
- </set>
[html] view plain copy ![]()
- <resources>
- <style name="popupwindow_animation">
- <item name="android:windowEnterAnimation">@anim/popupwindow_enter</item>
- <item name="android:windowExitAnimation">@anim/popupwindow_exit</item>
- </style>
- </resources>
这样子,以后我们遇到类似的popupwindow的就可以复用了,接下来我们看使用吧,使用很简单,布局里面一个Button,点击Button弹出一个PopupWindow,直接看代码吧
[java] view plain copy ![]()
- package com.example.popupwindow;
- import java.util.Arrays;
- import com.example.popupwindow.MtitlePopupWindow.OnPopupWindowClickListener;
- import android.app.Activity;
- import android.os.Bundle;
- import android.view.View;
- import android.view.View.OnClickListener;
- import android.widget.Button;
- import android.widget.Toast;
- public class PopupActivity extends Activity {
- MtitlePopupWindow mtitlePopupWindow;
- String [] items = {"刷新列表", "修改密码", "系统设置", "添加用户", "关于"};
- @Override
- protected void onCreate(Bundle savedInstanceState) {
- super.onCreate(savedInstanceState);
- setContentView(R.layout.main);
- Button mButton = (Button) findViewById(R.id.button1);
- mButton.setOnClickListener(new OnClickListener() {
- @Override
- public void onClick(View v) {
- mtitlePopupWindow.showAsDropDown(v);
- }
- });
- mtitlePopupWindow = new MtitlePopupWindow(this);
- mtitlePopupWindow.changeData(Arrays.asList(items));
- mtitlePopupWindow.setOnPopupWindowClickListener(new OnPopupWindowClickListener() {
- @Override
- public void onPopupWindowItemClick(int position) {
- //你要做的事
- Toast.makeText(getApplication(), items[position], Toast.LENGTH_SHORT).show();
- }
- });
- }
- }
总体来说就是这样子,PopupWindow的使用还是挺简单的,这是小弟的一点拙见,写的不好的地方还请大神指出!
项目下载
这篇关于PopupWindow的使用以及ArrayAdatper.notifyDataSetChanged()无效详解的文章就介绍到这儿,希望我们推荐的文章对编程师们有所帮助!


