本文主要是介绍nginx+Tomcat动静分离,希望对大家解决编程问题提供一定的参考价值,需要的开发者们随着小编来一起学习吧!
本⽂的动静分离主要是通过nginx+tomcat来实现,其中nginx处理图⽚、html等静态的⽂ 件,tomcat处理jsp、do等动态⽂件.

实验环境
192.168.200.133 nginx反向代理
192.168.200.129 static
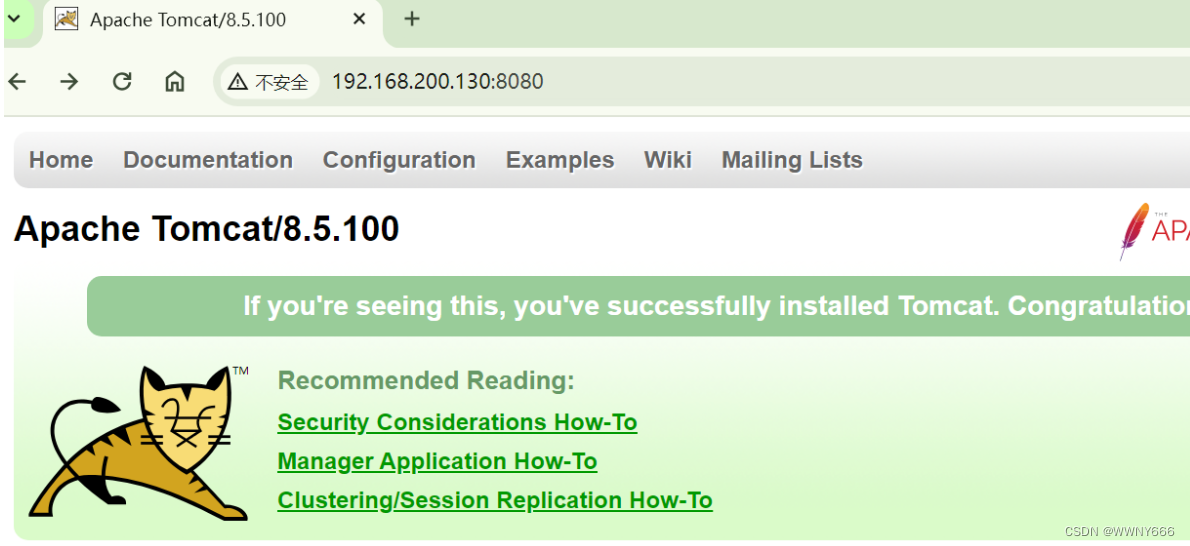
192.168.200.130 dynamic
步骤
修改三台主机名
[root@admin ~]# hostnamectl  hostname  nginx
[root@admin ~]# bash
[root@nginx ~]# [root@AI ~]# hostnamectl hostname static
[root@AI ~]# bash
[root@static ~]# [root@host1 ~]# hostnamectl  hostname dynamic
[root@host1 ~]# bash
[root@dynamic ~]#
两台机器要安装nginx服务,先安装依赖包,dynamic安装tomcat服务
nginx反向代理机器
[root@nginx ~]# yum -y install gcc gcc-c++ automake pcre pcre-devel zlib zlib-devel openssl openssl-devel
正在更新 Subscription Management 软件仓库。
无法读取客户身份本系统尚未在权利服务器中注册。可使用 subscription-manager 进行注册。AppStream                                                                        3.1 MB/s | 3.2 kB     00:00
安装过程省略 。 。 。 。 。 。
[root@nginx ~]# wget https://nginx.org/download/nginx-1.24.0.tar.gz
--2024-04-30 10:19:55--  https://nginx.org/download/nginx-1.24.0.tar.gz
正在解析主机 nginx.org (nginx.org)... 52.58.199.22, 3.125.197.172, 2a05:d014:5c0:2600::6, ...
正在连接 nginx.org (nginx.org)|52.58.199.22|:443... 已连接。
已发出 HTTP 请求,正在等待回应... 200 OK
长度:1112471 (1.1M) [application/octet-stream]
正在保存至: “nginx-1.24.0.tar.gz”nginx-1.24.0.tar.gz          100%[===========================================>]   1.06M   483KB/s  用时 2.3s    2024-04-30 10:19:58 (483 KB/s) - 已保存 “nginx-1.24.0.tar.gz” [1112471/1112471])[root@nginx ~]#
[root@nginx ~]# useradd  -s /sbin/nologin nginx
[root@nginx ~]# mkdir /www
[root@nginx ~]# systemctl  stop firewalld.service
[root@nginx ~]# setenforce  0
[root@nginx ~]# tar xvf nginx-1.24.0.tar.gz
#解压过程省略
[root@nginx ~]# cd nginx-1.24.0/
[root@nginx nginx-1.24.0]# ls
auto  CHANGES  CHANGES.ru  conf  configure  contrib  html  LICENSE  man  README  src
[root@nginx nginx-1.24.0]# ./configure  --prefix=/www/ --user=nginx --group=nginx --with-http_ssl_module  --with-http_v2_module  --with-http_realip_module  --with-http_stub_status_module  --with-http_gzip_static_module --with-pcre  --with-stream  --with-stream_ssl_module  --with-stream_realip_module
#编译过程省略
[root@nginx nginx-1.24.0]# make && make install
[root@nginx nginx-1.24.0]cd
[root@nginx ~]# chown  -R nginx.nginx /www/
[root@nginx ~]# echo "PATH=${PATH}:/www/sbin" >> /etc/bashrc
[root@nginx ~]# source  /etc/bashrc
[root@nginx ~]# cd /www/sbin/
[root@nginx sbin]# nginx
[root@nginx sbin]# ss -anltp | grep 80
LISTEN 0      511          0.0.0.0:80        0.0.0.0:*    users:(("nginx",pid=89712,fd=6),("nginx",pid=89711,fd=6))
[root@nginx sbin]# 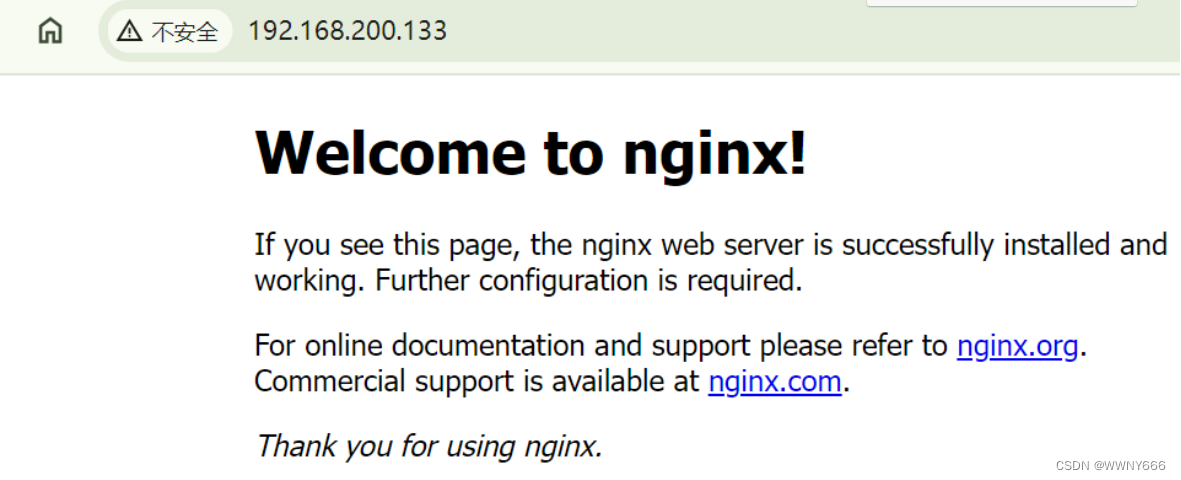
static机器
[root@static ~]#  yum -y install gcc gcc-c++ automake pcre pcre-devel zlib zlib-devel openssl openssl-devel
正在更新 Subscription Management 软件仓库。
无法读取客户身份本系统尚未在权利服务器中注册。可使用 subscription-manager 进行注册。AppStream                                                                        179 MB/s | 6.3 MB     00:00
BaseOS                                                                            88 MB/s | 1.7 MB     00:00
软件包 gcc-11.4.1-2.1.el9.alma.x86_64 已安装。
软件包 gcc-c++-11.4.1-2.1.el9.alma.x86_64 已安装。
软件包 automake-1.16.2-8.el9.noarch 已安装。
软件包 pcre-8.44-3.el9.3.x86_64 已安装。
软件包 pcre-devel-8.44-3.el9.3.x86_64 已安装。
软件包 zlib-1.2.11-40.el9.x86_64 已安装。
软件包 zlib-devel-1.2.11-40.el9.x86_64 已安装。
软件包 openssl-1:3.0.7-24.el9.x86_64 已安装。
软件包 openssl-devel-1:3.0.7-24.el9.x86_64 已安装。
依赖关系解决。
无需任何处理。
完毕!
[root@static ~]# wget https://nginx.org/download/nginx-1.24.0.tar.gz
--2024-04-30 10:44:20--  https://nginx.org/download/nginx-1.24.0.tar.gz
正在解析主机 nginx.org (nginx.org)... 3.125.197.172, 52.58.199.22, 2a05:d014:5c0:2601::6, ...
正在连接 nginx.org (nginx.org)|3.125.197.172|:443... 已连接。
已发出 HTTP 请求,正在等待回应... 200 OK
长度:1112471 (1.1M) [application/octet-stream]
正在保存至: “nginx-1.24.0.tar.gz.2”nginx-1.24.0.tar.gz.2        100%[===========================================>]   1.06M   407KB/s  用时 2.7s    2024-04-30 10:44:24 (407 KB/s) - 已保存 “nginx-1.24.0.tar.gz.2” [1112471/1112471])[root@static ~]# tar xvf nginx-1.24.0.tar.gz
#解压过程省略
[root@static ~]# useradd  -s /sbin/nologin  nginx
[root@static ~]# mkdir   /www
[root@static ~]# systemctl  stop  firewalld.service
[root@static ~]# setenforce  0
setenforce: SELinux is disabled
[root@static ~]# cd nginx-1.24.0/
[root@static nginx-1.24.0]# ls
auto  CHANGES  CHANGES.ru  conf  configure  contrib  html  LICENSE  Makefile  man  objs  README  src
[root@static nginx-1.24.0]# ./configure  --prefix=/www/ --user=nginx --group=nginx --with-http_ssl_module  --with-http_v2_module  --with-http_realip_module  --with-http_stub_status_module  --with-http_gzip_static_module --with-pcre  --with-stream  --with-stream_ssl_module  --with-stream_realip_module
#编译过程省略
[root@static nginx-1.24.0]# make && make install
[root@static nginx-1.24.0]# cd
[root@static ~]# chown  -R nginx.nginx /www/
[root@static ~]# echo "PATH=${PATH}:/www/sbin" >> /etc/bashrc
[root@static ~]# source /etc/bashrc
[root@static ~]# cd /www/sbin/
[root@static sbin]# nginx
[root@static sbin]# ss -anltp | grep 80
LISTEN 0      511          0.0.0.0:80         0.0.0.0:*    users:(("nginx",pid=10358,fd=6),("nginx",pid=10357,fd=6))
[root@static sbin]# 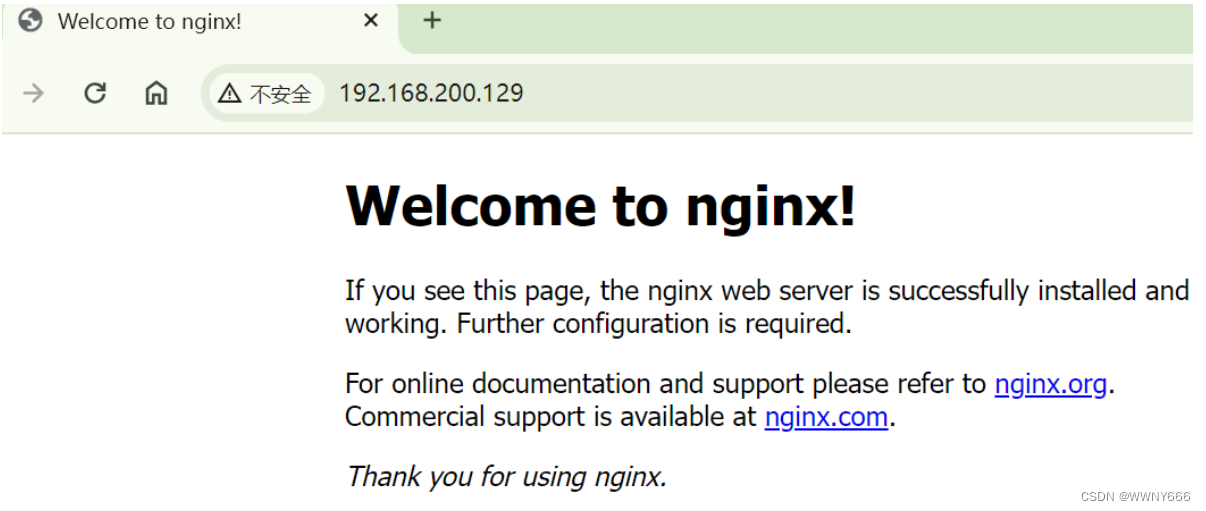
dynamic动态机器,安装tomcat前安装java环境
[root@dynamic ~]# yum -y install java
正在更新 Subscription Management 软件仓库。
无法读取客户身份本系统尚未在权利服务器中注册。可使用 subscription-manager 进行注册。上次元数据过期检查:0:13:45 前,执行于 2024年04月30日 星期二 10时21分02秒。
依赖关系解决。
省略  。 。 。。 。
[root@dynamic ~]# wget -c https://dlcdn.apache.org/tomcat/tomcat-8/v8.5.100/bin/apache-tomcat-8.5.100.tar.gz
--2024-04-30 10:35:52--  https://dlcdn.apache.org/tomcat/tomcat-8/v8.5.100/bin/apache-tomcat-8.5.100.tar.gz
正在解析主机 dlcdn.apache.org (dlcdn.apache.org)... 151.101.2.132, 2a04:4e42::644
正在连接 dlcdn.apache.org (dlcdn.apache.org)|151.101.2.132|:443... 已连接。
已发出 HTTP 请求,正在等待回应... 200 OK
长度:10885192 (10M) [application/x-gzip]
正在保存至: “apache-tomcat-8.5.100.tar.gz”apache-tomcat-8.5.100.tar.gz 100%[===========================================>]  10.38M   134KB/s  用时 56s     2024-04-30 10:36:48 (190 KB/s) - 已保存 “apache-tomcat-8.5.100.tar.gz” [10885192/10885192])[root@dynamic ~]# tar  -zxvf apache-tomcat-8.5.100.tar.gz
#解压过程省略
[root@dynamic ~]# cp apache-tomcat-8.5.100 /usr/local/tomcat -r
[root@dynamic ~]# cd /usr/local/tomcat/
[root@dynamic tomcat]# ls
bin           conf             lib      logs    README.md      RUNNING.txt  webapps
BUILDING.txt  CONTRIBUTING.md  LICENSE  NOTICE  RELEASE-NOTES  temp         work
[root@dynamic tomcat]# cd
[root@dynamic ~]# useradd  -s /sbin/nologin tomcat
[root@dynamic ~]# chown -R tomcat:tomcat /usr/local/tomcat/
[root@dynamic ~]# chmod -R 755  /usr/local/tomcat/
[root@dynamic ~]# /usr/local/tomcat/bin/catalina.sh  start
Using CATALINA_BASE:   /usr/local/tomcat
Using CATALINA_HOME:   /usr/local/tomcat
Using CATALINA_TMPDIR: /usr/local/tomcat/temp
Using JRE_HOME:        /usr
Using CLASSPATH:       /usr/local/tomcat/bin/bootstrap.jar:/usr/local/tomcat/bin/tomcat-juli.jar
Using CATALINA_OPTS:
Tomcat started.
[root@dynamic ~]# ss -antlp
State    Recv-Q   Send-Q          Local Address:Port     Peer Address:Port   Process
LISTEN   0        128                 127.0.0.1:631           0.0.0.0:*       users:(("cupsd",pid=1067,fd=7))
LISTEN   0        128                   0.0.0.0:22            0.0.0.0:*       users:(("sshd",pid=1069,fd=3))
LISTEN   0        128                     [::1]:631              [::]:*       users:(("cupsd",pid=1067,fd=6))
LISTEN   0        1          [::ffff:127.0.0.1]:8005                *:*       users:(("java",pid=35905,fd=50))
LISTEN   0        128                      [::]:22               [::]:*       users:(("sshd",pid=1069,fd=4))
LISTEN   0        100                         *:8080                *:*       users:(("java",pid=35905,fd=40))
[root@dynamic ~]#
[root@dynamic ~]# systemctl  stop firewalld.service
[root@dynamic ~]# setenforce  0
[root@dynamic ~]#
修改tomcat测试页面
[root@dynamic ~]# vim /usr/local/tomcat/webapps/ROOT/index.jsp
<%@ page language="java" contentType="text/html; charset=UTF-8" pageEncoding="UTF-8"%>
<html><head><title>第一个 JSP 程序</title><meta charset="UTF-8"></head><body><%out.println("Hello 这是一个tomcat测试页");%></body>
</html>
配置nginx反向代理分配动静态分离
[root@nginx ~]# vim /www/conf/nginx.conf17 http {18 include mime.types;19 default_type application/octet-stream;20 upstream static {21 server 192.168.200.129;22 }23 upstream dynamic {24 server 192.168.200.130:8080;25 }40 server {41 listen 80;42 server_name localhost;43 44 #charset koi8-r;45 46 #access_log logs/host.access.log main;47 48 location / {49 proxy_pass http://static;50 }51 52 location ~* \.jsp$ { //以jsp结尾的转发到动态服务器上53 proxy_pass http://dynamic;54 proxy_set_header Host $host; //请求头中的Host字段55 proxy_set_header X-Real-IP $remote_addr; //包含了发起请求的客户端的IP地址56 }[root@nginx ~]# /www/sbin/nginx -s reload修改static机器的网页内容以示区分
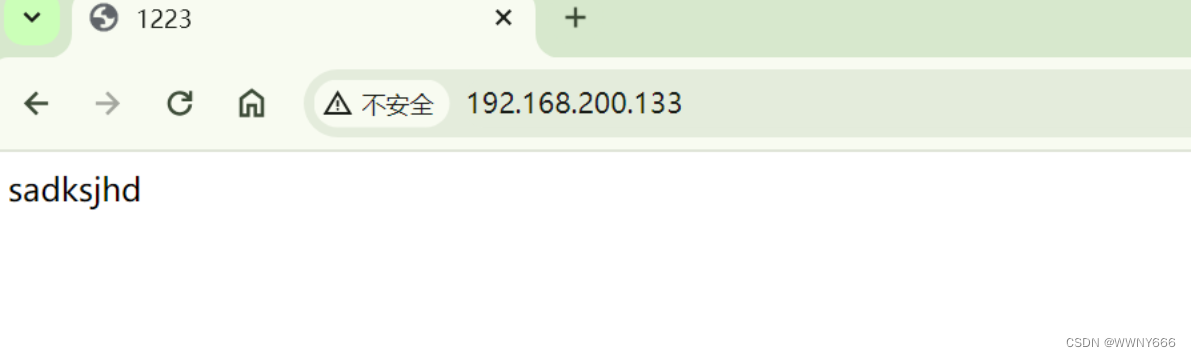
[root@static html]# vim index.html
<html><head><title>1223</title></head><body>sadksjhd </body>
</html>
浏览器访问
#静态
#动态

这篇关于nginx+Tomcat动静分离的文章就介绍到这儿,希望我们推荐的文章对编程师们有所帮助!


