本文主要是介绍Dokcer容器分布式搭建LNMP+wordpress论坛,希望对大家解决编程问题提供一定的参考价值,需要的开发者们随着小编来一起学习吧!
目录
引言
一、架构环境
二、搭建容器
(一)自定义网络
(二)搭建nginx容器
1.文件准备
2.查看与编辑文件
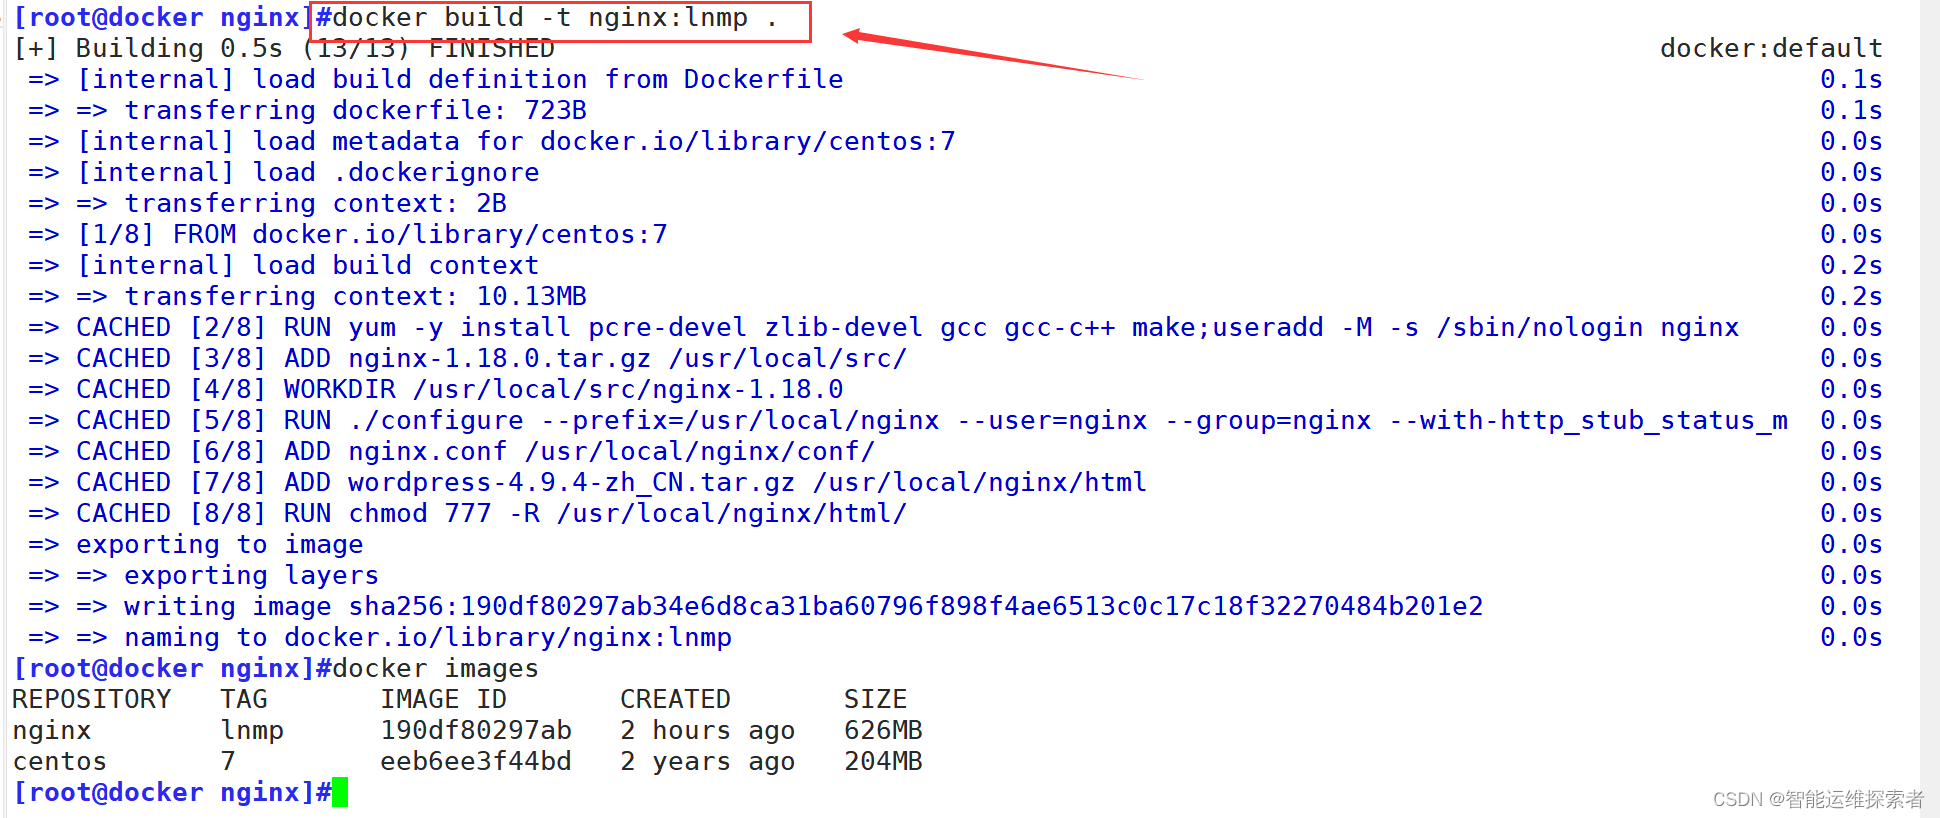
3.生成镜像
4.创建容器
(三)搭建MySQL容器
1.文件准备
2.查看与编辑文件
3.生成镜像
4.创建容器
(四)搭建PHP容器
1.文件准备
2.查看与编辑文件
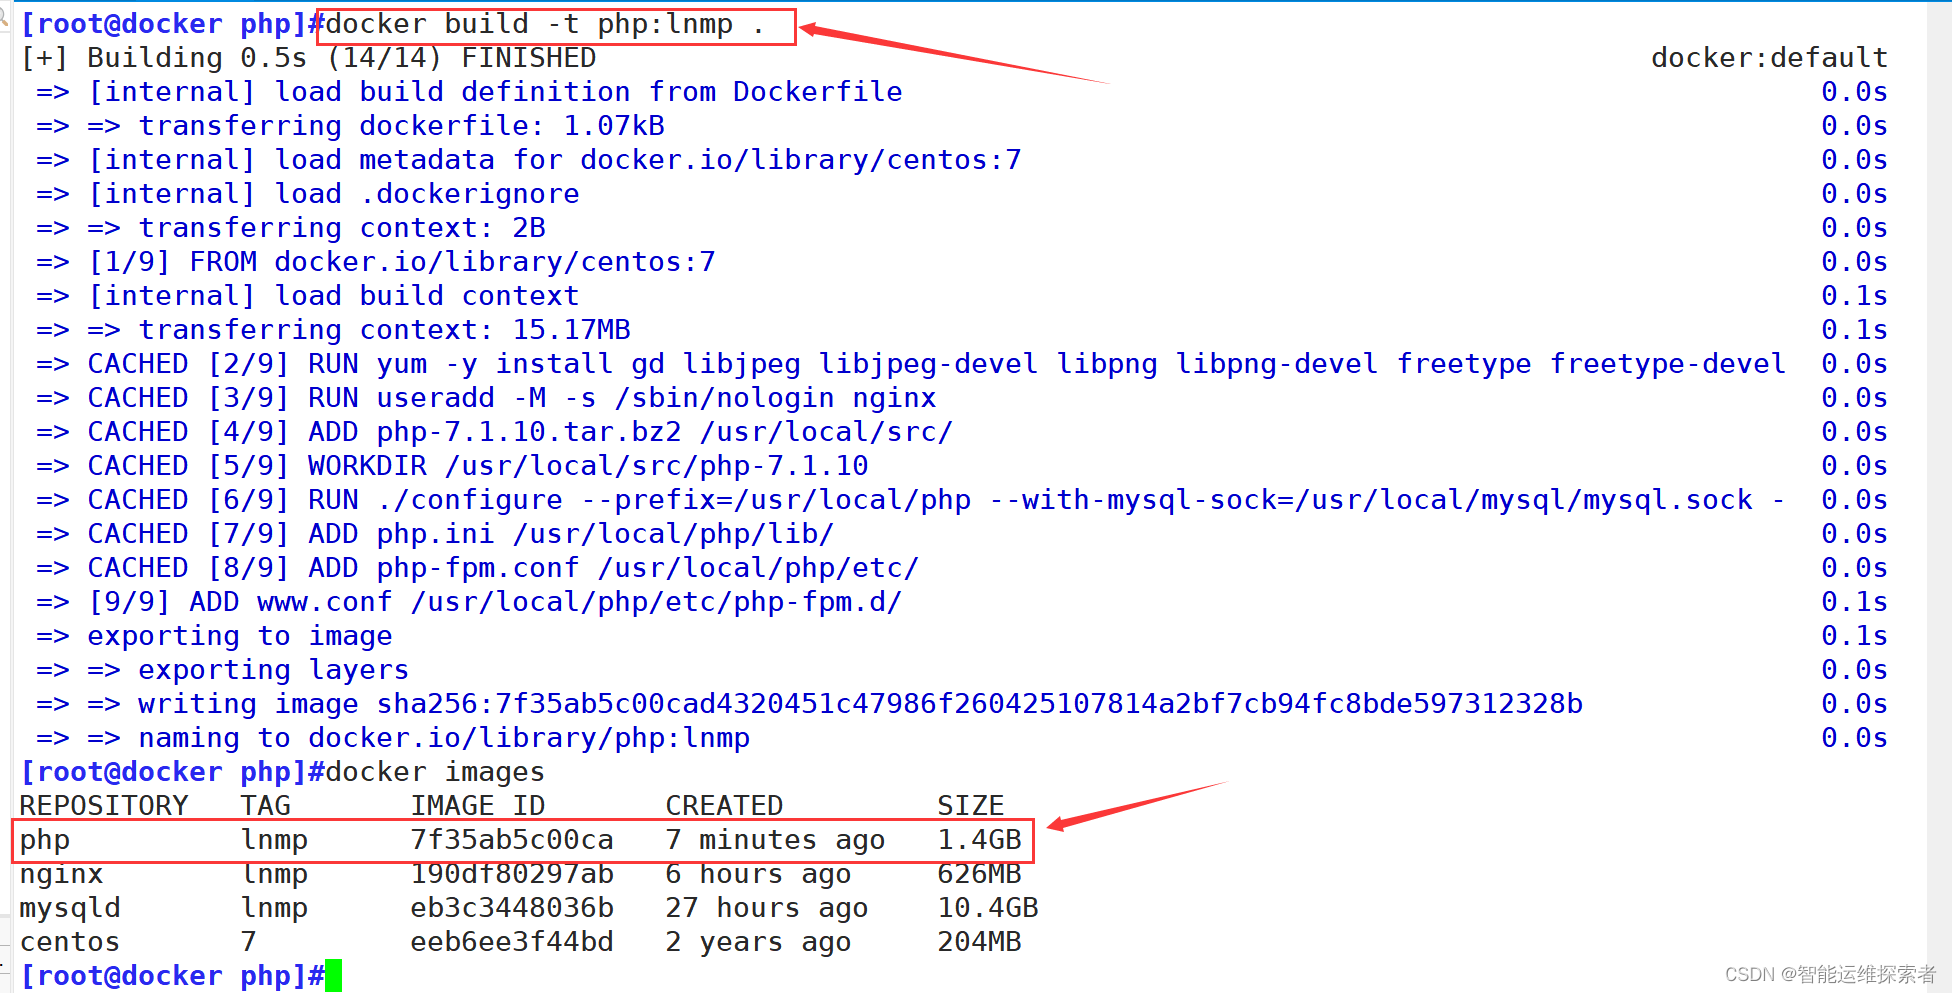
3.生成镜像
4.创建容器
(五)修改配置
1.数据库添加用户
2.添加wp-config.php文件
3.容器文件持久化
引言
本章主要是通过参考LNMP架构,以及自己编写的脚本,来实现在容器中分布式搭建LNMP架构,旨在学习如何通过自定义网络实现容器之间的互相通信,以及文件共享与宿主机持久化保持
一、架构环境
在使用docker容器搭建服务时,最好事先准备好所需的配置文件,使用ADD指令传输,或以挂载的方式,减少Dockerfile文件的指令,从而减小容器的大小,进行优化
| 类型 | IP地址 | 软件包 | 文件 |
| 宿主机 | 192.168.83.30 | centos:7镜像、docker容器 | |
| nginx容器 | 172.20.0.10 | nginx-1.18.0.tar.gz wordpress-4.9.4-zh_CN.tar.gz | nginx.conf、Dockerfile |
| mysql容器 | 172.20.0.20 | mysql-boost-5.7.20.tar.gz | Dockerfile、my.cnf |
| php容器 | 172.20.0.30 | php-7.1.10.tar.bz2 | Dockerfile、php.ini、php-fpm.conf、www.conf |
二、搭建容器
(一)自定义网络
首先需要创建自定义网络,用于实现各容器直接的互相通信以及文件共享
[root@docker nginx]#docker network create --subnet=172.30.0.0/16 --opt "com.docker.network.bridge.name"="docker1" vae
47f04b3e96525e4af3a05ef54e440fe0967ed87a224085c017517e0e2f3a027b
#创建自定义网络名称为vae,网段为172.30.0.0/16
(二)搭建nginx容器
1.文件准备
首先准备好nginx数据包+wordpress数据包、以及Dockerfile文件以及nginx的配置文件

2.查看与编辑文件
nginx配置文件
#添加35行字符集
#添加45行,支持默认访问index.php文件
#修改65-71行,支持php
  1 2 #user  nobody;3 worker_processes  1;4 5 #error_log  logs/error.log;6 #error_log  logs/error.log  notice;7 #error_log  logs/error.log  info;8 9 #pid        logs/nginx.pid;10 11 12 events {13     worker_connections  1024;14 }15 16 17 http {18     include       mime.types;19     default_type  application/octet-stream;20 21     #log_format  main  '$remote_addr - $remote_user [$time_local] "$request" '22     #                  '$status $body_bytes_sent "$http_referer" '23     #                  '"$http_user_agent" "$http_x_forwarded_for"';24 25     #access_log  logs/access.log  main;26 27     sendfile        on;28     #tcp_nopush     on;29 30     #keepalive_timeout  0;31     keepalive_timeout  65;32 33     #gzip  on;34 35     server {36         listen       80;37         server_name  localhost;38 39         charset utf-8;40 41         #access_log  logs/host.access.log  main;42 43         location / {44             root   html;45             index  index.html index.php;46         }47 48         #error_page  404              /404.html;49 50         # redirect server error pages to the static page /50x.html51         #52         error_page   500 502 503 504  /50x.html;53         location = /50x.html {54             root   html;55         }56 57         # proxy the PHP scripts to Apache listening on 127.0.0.1:8058         #59         #location ~ \.php$ {60         #    proxy_pass   http://127.0.0.1;61         #}62 63         # pass the PHP scripts to FastCGI server listening on 127.0.0.1:900064         #65         location ~ \.php$ {66             root           html;67             fastcgi_pass   172.30.0.30:9000;#指向后端php容器的9000端口68             fastcgi_index  index.php;69             fastcgi_param  SCRIPT_FILENAME /usr/local/nginx/html$fastcgi_script_name;70             include        fastcgi_params;71         }72 73         # deny access to .htaccess files, if Apache's document root74         # concurs with nginx's one75         #76         #location ~ /\.ht {77         #    deny  all;78         #}79     }80 81 82     # another virtual host using mix of IP-, name-, and port-based configuration83     #84     #server {85     #    listen       8000;86     #    listen       somename:8080;87     #    server_name  somename  alias  another.alias;88 89     #    location / {90     #        root   html;91     #        index  index.html index.htm;92     #    }93     #}94 95 96     # HTTPS server97     #98     #server {99     #    listen       443 ssl;
100     #    server_name  localhost;
101
102     #    ssl_certificate      cert.pem;
103     #    ssl_certificate_key  cert.key;
104
105     #    ssl_session_cache    shared:SSL:1m;
106     #    ssl_session_timeout  5m;
107
108     #    ssl_ciphers  HIGH:!aNULL:!MD5;
109     #    ssl_prefer_server_ciphers  on;
110
111     #    location / {
112     #        root   html;
113     #        index  index.html index.htm;
114     #    }
115     #}
116
117 }
Dockerfile文件
FROM centos:7
#指定基础镜像为CentOS 7MAINTAINER this is nginx image <lnmp>
#声明镜像作者及联系信息RUN yum -y install pcre-devel zlib-devel gcc gcc-c++ make;useradd -M -s /sbin/nologin nginx
#通过yum包管理器安装编译Nginx所需的依赖包RUN useradd -M -s /sbin/nologin nginx
#创建一个名为nginx的系统用户,并禁止其登录shellADD nginx-1.18.0.tar.gz /usr/local/src/
#将名为nginx-1.18.0.tar.gz的Nginx源代码压缩包解压到容器内的/usr/local目录下WORKDIR /usr/local/src/nginx-1.18.0
#设置工作目录为解压后的Nginx源代码目录。
RUN ./configure \
--prefix=/usr/local/nginx \
--user=nginx \
--group=nginx \
--with-http_stub_status_module;make -j 4 && make install
#在Nginx源代码目录下执行配置、编译和安装操作。编译使用了4个线程(-j 4)以提高速度。ENV PATH /usr/local/nginx/sbin:$PATH
#设置环境变量PATH,将Nginx的sbin目录加入到PATH中,使得在容器内可以直接执行Nginx的命令ADD nginx.conf /usr/local/nginx/conf/ADD wordpress-4.9.4-zh_CN.tar.gz /usr/local/nginx/html
#将名为wordpress-4.9.4-zh_CN.tar.g的论坛源代码压缩包解压到容器内
#的/usr/local/nginx/html目录下
RUN chmod 777 -R /usr/local/nginx/html/
#开放读写以及执行权限EXPOSE 80
#声明容器运行时使用80端口VOLUME [ "/usr/local/nginx/html/" ]
#声明持久化目录,便于数据持久化和容器间的共享CMD [ "/usr/local/nginx/sbin/nginx","-g","daemon off;" ]
#设置容器启动时默认执行的命令,即启动Nginx服务器,并指定运行在前台模式(防止容器启动后立即退出)
#通过-g "daemon off;"参数禁用了Nginx的守护进程模式
#这意味着当启动容器时,Nginx将以非守护进程形式运行,并且容器的生命周期与Nginx服务绑定在一起。
3.生成镜像
[root@docker nginx]#docker build -t nginx:lnmp .
4.创建容器
[root@docker nginx]#docker run -d --name nginx -p 80:80 --net vae --ip 172.30.0.10 -v /lnmp/nginx/nginx.conf:/usr/local/nginx/nginx.conf nginx:lnmpdocker run        #命令用于创建一个新的容器并运行一个命令。
-d                #参数表示以后台模式运行容器(守护进程模式)。
--name nginx      #为新创建的容器指定一个名称,即nginx。
-p 80:80          #映射容器的80端口到主机的80端口,允许外部通过主机的80端口访问容器内的服务。
--net vae         #指定容器加入名为vae的自定义网络。这意味着容器将使用此网络进行网络通信
--ip 172.30.0.10  #为容器在vae网络中指定一个固定的IP地址,即172.30.0.10
nginx:lnmp        #指定使用的镜像名称-v /lnmp/nginx/nginx.conf:/usr/local/nginx/nginx.conf
(三)搭建MySQL容器
1.文件准备

2.查看与编辑文件
查看my.cnf文件
[root@docker mysql]#cat my.cnf
[client]
port = 3306
socket=/usr/local/mysql/mysql.sock[mysqld]
user = mysql
basedir=/usr/local/mysql
datadir=/usr/local/mysql/data
port = 3306
character-set-server=utf8
pid-file = /usr/local/mysql/mysqld.pid
socket=/usr/local/mysql/mysql.sock
bind-address = 0.0.0.0
skip-name-resolve
max_connections=2048
default-storage-engine=INNODB
max_allowed_packet=16M
server-id = 1sql_mode=NO_ENGINE_SUBSTITUTION,STRICT_TRANS_TABLES,NO_AUTO_CREATE_USER,NO_AUTO_VALUE_ON_ZERO,NO_ZERO_IN_DATE,NO_ZERO_DATE,ERROR_FOR_DIVISION_BY_ZERO,PIPES_AS_CONCAT,ANSI_QUOTES
编辑Dockerfile文件
FROM centos:7
#基于CentOS 7镜像创建新的Docker镜像。MAINTAINER this is mysql image <mysqld>
#声明镜像的维护者信息RUN yum -y install ...
#使用yum包管理器安装编译和运行MySQL所需的各种依赖包,并创建一个名为mysql的无家目录用户ADD mysql-boost-5.7.20.tar.gz /usr/local/
#将名为mysql-boost-5.7.20.tar.gz的MySQL源码包解压到容器内的/usr/local/目录下。WORKDIR /usr/local/mysql-5.7.20/
#设置工作目录为解压后的MySQL源码目录。RUN cmake ... make install
#使用cmake配置MySQL编译选项,进行编译和安装。ADD my.cnf /etc/my.cnf
#将当前目录下的my.cnf配置文件添加到容器的/etc目录下,用作MySQL服务器的配置文件。EXPOSE 3306
#声明容器运行时将暴露3306端口,这是MySQL服务的标准端口。RUN chown -R mysql:mysql /usr/local/mysql/;chown mysql:mysql /etc/my.cnf
#更改MySQL安装目录及其配置文件的所有权,使其属于mysql用户和mysql组。WORKDIR /usr/local/mysql/bin/
#切换到MySQL二进制文件目录。RUN ./mysqld ... systemctl enable mysqld
#初始化MySQL数据库目录和数据文件,并设置MySQL服务开机启动。ENV PATH=/usr/local/mysql/bin:/usr/local/mysql/lib:$PATH
#设置环境变量PATH,将其更新为包含MySQL的bin和lib目录。VOLUME [ "/usr/local/mysql" ]
#定义一个数据卷挂载点,这里的 /usr/local/mysql是MySQL的数据目录。
#在容器运行时,可以将宿主机的某个目录映射到此容器内的该目录,使得数据持久化并可在不同容器间共享CMD ["/usr/sbin/init"]
#设置了容器启动时默认执行的命令,这里是/usr/sbin/init
#也可以设置为/usr/local/msyql/bin/mysqld
3.生成镜像
[root@docker mysql]#docker build -t mysqld:lnmp .
4.创建容器
[root@docker mysql]#docker run -d --privileged --name mysqld -p 3306:3306 --net vae --ip 172.30.0.20 mysqld:lnmpdocker run                  #命令用于创建一个新的容器并运行。
-d                          #表示以后台模式运行容器。
--privileged                #给予容器更多权限,包括对设备、网络等的额外访问权限
--name mysqld               #为容器指定名称为mysqld。
-p 3306:3306                #将容器内部的3306端口映射到宿主机的3306端口
--net vae                   #指定容器加入名为vae的自定义网络。
--ip 172.30.0.20            #为容器在vae网络中分配固定的IP地址172.30.0.20。
mysqld:lnmp                 #指定使用的镜像名称

容器创建完毕后,可以进入容器先查看目录是否进行了共享
(四)搭建PHP容器
1.文件准备
这些文件都存放于源码包中,可以现在宿主机上进行解压,然后将配置文件修改完毕后,再放入该目录下

2.查看与编辑文件
查看并修改php.ini文件
[root@docker php]#grep -v "^;" php.ini |grep -v "^$"
#过滤掉非注释行与空行,
#需要将 mysqli.default_socket行添加/usr/local/mysql/mysql.sock
#将 date.timezone 行修改为东八区时间 Asia/Shanghai
[PHP]
engine = On
short_open_tag = Off
precision = 14
output_buffering = 4096
zlib.output_compression = Off
implicit_flush = Off
unserialize_callback_func =
serialize_precision = -1
disable_functions =
disable_classes =
zend.enable_gc = On
expose_php = On
max_execution_time = 30
max_input_time = 60
memory_limit = 128M
error_reporting = E_ALL
display_errors = On
display_startup_errors = On
log_errors = On
log_errors_max_len = 1024
ignore_repeated_errors = Off
ignore_repeated_source = Off
report_memleaks = On
track_errors = On
html_errors = On
variables_order = "GPCS"
request_order = "GP"
register_argc_argv = Off
auto_globals_jit = On
post_max_size = 8M
auto_prepend_file =
auto_append_file =
default_mimetype = "text/html"
default_charset = "UTF-8"
doc_root =
user_dir =
enable_dl = Off
file_uploads = On
upload_max_filesize = 2M
max_file_uploads = 20
allow_url_fopen = On
allow_url_include = Off
default_socket_timeout = 60
[CLI Server]
cli_server.color = On
[Date]
date.timezone = Asia/Shanghai           #修改位置,修改时间为东八区时间
[filter]
[iconv]
[intl]
[sqlite3]
[Pcre]
[Pdo]
[Pdo_mysql]
pdo_mysql.cache_size = 2000
pdo_mysql.default_socket=
[Phar]
[mail function]
SMTP = localhost
smtp_port = 25
mail.add_x_header = On
[SQL]
sql.safe_mode = Off
[ODBC]
odbc.allow_persistent = On
odbc.check_persistent = On
odbc.max_persistent = -1
odbc.max_links = -1
odbc.defaultlrl = 4096
odbc.defaultbinmode = 1
[Interbase]
ibase.allow_persistent = 1
ibase.max_persistent = -1
ibase.max_links = -1
ibase.timestampformat = "%Y-%m-%d %H:%M:%S"
ibase.dateformat = "%Y-%m-%d"
ibase.timeformat = "%H:%M:%S"
[MySQLi]
mysqli.max_persistent = -1
mysqli.allow_persistent = On
mysqli.max_links = -1
mysqli.cache_size = 2000
mysqli.default_port = 3306
mysqli.default_socket = /usr/local/mysql/mysql.sock        #修改位置
#这意味着PHP的mysqli扩展将会尝试通过路径/usr/local/mysql/mysql.sock来
#寻找MySQL服务器的套接字文件来进行连接,此路径有mysql容器的共享目录提供
mysqli.default_host =
mysqli.default_user =
mysqli.default_pw =
mysqli.reconnect = Off
[mysqlnd]
mysqlnd.collect_statistics = On
mysqlnd.collect_memory_statistics = On
[OCI8]
[PostgreSQL]
pgsql.allow_persistent = On
pgsql.auto_reset_persistent = Off
pgsql.max_persistent = -1
pgsql.max_links = -1
pgsql.ignore_notice = 0
pgsql.log_notice = 0
[bcmath]
bcmath.scale = 0
[browscap]
[Session]
session.save_handler = files
session.use_strict_mode = 0
session.use_cookies = 1
session.use_only_cookies = 1
session.name = PHPSESSID
session.auto_start = 0
session.cookie_lifetime = 0
session.cookie_path = /
session.cookie_domain =
session.cookie_httponly =
session.serialize_handler = php
session.gc_probability = 1
session.gc_divisor = 1000
session.gc_maxlifetime = 1440
session.referer_check =
session.cache_limiter = nocache
session.cache_expire = 180
session.use_trans_sid = 0
session.sid_length = 26
session.trans_sid_tags = "a=href,area=href,frame=src,form="
session.sid_bits_per_character = 5
[Assertion]
zend.assertions = 1
[COM]
[mbstring]
[gd]
[exif]
[Tidy]
tidy.clean_output = Off
[soap]
soap.wsdl_cache_enabled=1
soap.wsdl_cache_dir="/tmp"
soap.wsdl_cache_ttl=86400
soap.wsdl_cache_limit = 5
[sysvshm]
[ldap]
ldap.max_links = -1
[mcrypt]
[dba]
[opcache]
[curl]
[openssl]
查看与修改php-fpm.conf文件
[root@docker php]#cat  php-fpm.conf
;;;;;;;;;;;;;;;;;;;;;
; FPM Configuration ;
;;;;;;;;;;;;;;;;;;;;;; All relative paths in this configuration file are relative to PHP's install
; prefix (/usr/local/php). This prefix can be dynamically changed by using the
; '-p' argument from the command line.;;;;;;;;;;;;;;;;;;
; Global Options ;
;;;;;;;;;;;;;;;;;;[global]
; Pid file
; Note: the default prefix is /usr/local/php/var
; Default Value: none
pid = run/php-fpm.pid
#修改位置,取消该行注释,;代表该行注释; Error log file
; If it's set to "syslog", log is sent to syslogd instead of being written
; into a local file.
; Note: the default prefix is /usr/local/php/var
; Default Value: log/php-fpm.log
;error_log = log/php-fpm.log; syslog_facility is used to specify what type of program is logging the
; message. This lets syslogd specify that messages from different facilities
; will be handled differently.
; See syslog(3) for possible values (ex daemon equiv LOG_DAEMON)
; Default Value: daemon
;syslog.facility = daemon; syslog_ident is prepended to every message. If you have multiple FPM
; instances running on the same server, you can change the default value
; which must suit common needs.
; Default Value: php-fpm
;syslog.ident = php-fpm; Log level
; Possible Values: alert, error, warning, notice, debug
; Default Value: notice
;log_level = notice; If this number of child processes exit with SIGSEGV or SIGBUS within the time
; interval set by emergency_restart_interval then FPM will restart. A value
; of '0' means 'Off'.
; Default Value: 0
;emergency_restart_threshold = 0; Interval of time used by emergency_restart_interval to determine when
; a graceful restart will be initiated.  This can be useful to work around
; accidental corruptions in an accelerator's shared memory.
; Available Units: s(econds), m(inutes), h(ours), or d(ays)
; Default Unit: seconds
; Default Value: 0
;emergency_restart_interval = 0; Time limit for child processes to wait for a reaction on signals from master.
; Available units: s(econds), m(inutes), h(ours), or d(ays)
; Default Unit: seconds
; Default Value: 0
;process_control_timeout = 0; The maximum number of processes FPM will fork. This has been designed to control
; the global number of processes when using dynamic PM within a lot of pools.
; Use it with caution.
; Note: A value of 0 indicates no limit
; Default Value: 0
; process.max = 128; Specify the nice(2) priority to apply to the master process (only if set)
; The value can vary from -19 (highest priority) to 20 (lowest priority)
; Note: - It will only work if the FPM master process is launched as root
;       - The pool process will inherit the master process priority
;         unless specified otherwise
; Default Value: no set
; process.priority = -19; Send FPM to background. Set to 'no' to keep FPM in foreground for debugging.
; Default Value: yes
;daemonize = yes; Set open file descriptor rlimit for the master process.
; Default Value: system defined value
;rlimit_files = 1024; Set max core size rlimit for the master process.
; Possible Values: 'unlimited' or an integer greater or equal to 0
; Default Value: system defined value
;rlimit_core = 0; Specify the event mechanism FPM will use. The following is available:
; - select     (any POSIX os)
; - poll       (any POSIX os)
; - epoll      (linux >= 2.5.44)
; - kqueue     (FreeBSD >= 4.1, OpenBSD >= 2.9, NetBSD >= 2.0)
; - /dev/poll  (Solaris >= 7)
; - port       (Solaris >= 10)
; Default Value: not set (auto detection)
;events.mechanism = epoll; When FPM is built with systemd integration, specify the interval,
; in seconds, between health report notification to systemd.
; Set to 0 to disable.
; Available Units: s(econds), m(inutes), h(ours)
; Default Unit: seconds
; Default value: 10
;systemd_interval = 10;;;;;;;;;;;;;;;;;;;;
; Pool Definitions ;
;;;;;;;;;;;;;;;;;;;;; Multiple pools of child processes may be started with different listening
; ports and different management options.  The name of the pool will be
; used in logs and stats. There is no limitation on the number of pools which
; FPM can handle. Your system will tell you anyway :); Include one or more files. If glob(3) exists, it is used to include a bunch of
; files from a glob(3) pattern. This directive can be used everywhere in the
; file.
; Relative path can also be used. They will be prefixed by:
;  - the global prefix if it's been set (-p argument)
;  - /usr/local/php otherwise
include=/usr/local/php/etc/php-fpm.d/*.conf
查看修改www.conf文件

[root@docker php]#sed -n '23,24p;36p;62p;' www.conf
user = nginx
group = nginx
#修改用户与用户组为nginxlisten = 172.30.0.30:9000
#设置监听地址为本机的IP地址的9000端口,或者为127.0.0.1:9000listen.allowed_clients = 127.0.0.1,172.30.0.10
#添加允许通过的客户端IP地址,172.30.0.10为nginx容器的IP地址
编辑Dockerfile
FROM centos:7
##该镜像是基于官方的CentOS 7基础镜像创建的MAINTAINER this is php image <lnmp>
#提供镜像作者信息RUN yum -y install gd \
libjpeg libjpeg-devel \
libpng libpng-devel \
freetype freetype-devel \
libxml2 libxml2-devel \
zlib zlib-devel \
curl curl-devel \
openssl openssl-devel \
gcc gcc-c++ make pcre-devel
#使用yum安装环境RUN useradd -M -s /sbin/nologin nginx
#创建nginx用户ADD php-7.1.10.tar.bz2 /usr/local/src/
将本地名为php-7.1.10.tar.bz2压缩包解压到容器内的/usr/local/目录下WORKDIR /usr/local/src/php-7.1.10
#指定工作目录为/usr/local/src/php-7.1.10,下面的所有操作都在这个路径下进行
#直到下一个WORKDIR出现RUN ./configure \
--prefix=/usr/local/php \
--with-mysql-sock=/usr/local/mysql/mysql.sock \
--with-mysqli \
--with-zlib \
--with-curl \
--with-gd \
--with-jpeg-dir \
--with-png-dir \
--with-freetype-dir \
--with-openssl \
--enable-fpm \
--enable-mbstring \
--enable-xml \
--enable-session \
--enable-ftp \
--enable-pdo \
--enable-tokenizer \
--enable-zip && make -j 4 && make install
#在Nginx源代码目录下执行配置、编译和安装操作。编译使用了4个线程(-j 4)以提高速度ENV PATH /usr/local/php/bin:/usr/local/php/sbin:$PATH
#设置环境变量PATHADD php.ini	/usr/local/php/lib/
ADD php-fpm.conf /usr/local/php/etc/
ADD www.conf /usr/local/php/etc/php-fpm.d/
#将本地当前目录下的文件复制到对应的目录下EXPOSE 9000
#声明对外开放9000端口ENTRYPOINT [ "/usr/local/php/sbin/php-fpm", "-F" ]
#执行启动php服务
3.生成镜像
[root@docker php]#docker build -t php:lnmp .
4.创建容器
[root@docker php]#docker run -d  --name php -p 9000:9000 --volumes-from mysqld --volumes-from nginx --network vae --ip 172.30.0.30 php:lnmpdocker run                    #命令用于创建一个新的容器并运行。
-d                            #表示以后台模式运行容器。
--name php                    #为容器指定名称为php。
-p 9000:9000                  #映射容器的9000端口到宿主机的9000端口
--volumes-from mysqld
#使新的PHP容器从名为mysqld的容器挂载数据卷。也就是在mysql的Dockerfile中VOLUME指定的目录
--volumes-from nginx          #同样,也让这个PHP容器挂载来自名为nginx容器的数据卷
--network vae                 #指定容器加入名为vae的自定义网络
--ip 172.30.0.30              #为这个PHP容器在vae网络中分配固定的IP地址172.30.0.30
php:lnmp                      #指定使用的镜像名称为php:lnmp
从上图中可以看到,三个容器都处在UP状态
(五)修改配置
添加配置信息,使php能够访问到数据库
1.数据库添加用户

create database wordpress;
#创建一个名为wordpress的数据库grant all privileges on wordpress.* to 'wordpress'@'%' identified by '123456';
#为名为wordpress的用户分配了对wordpress数据库的所有权限,用户的密码被设置为123456grant all privileges on *.* to 'root'@'%' identified by 'abc123';
#为数据库的超级用户root分配了对所有数据库(*.*)的所有权限,同样允许从任意IP地址连接
#密码被设置为abc123flush privileges;
#刷新权限
2.添加wp-config.php文件


#添加访问信息,即为在mysql容器中创建的信息
define('DB_NAME', 'wordpress');             #指定访问的数据库
define('DB_USER', 'wordpress');             #指定访问的用户
define('DB_PASSWORD', '123456');            #指定访问密码
define('DB_HOST', '192.168.83.100:3306');   #指定通过宿主机的3306端口,访问数据库
使用浏览器访问宿主机的wordpress/index.php文件

3.容器文件持久化
可以在创建容器时添加-v选项实现文件持久化
比如在创建nginx文件时,将宿主机的nginx.conf文件与容器的nginx.conf做挂载实现持久化

在宿主机中修改nginx.conf文件,就相当于直接在nginx容器里修改nginx的配置文件

这篇关于Dokcer容器分布式搭建LNMP+wordpress论坛的文章就介绍到这儿,希望我们推荐的文章对编程师们有所帮助!


