本文主要是介绍学pyhton的第二十二天,希望对大家解决编程问题提供一定的参考价值,需要的开发者们随着小编来一起学习吧!
原文链接:Python 图形化界面设计(Tkinter) - 简书 (jianshu.com)
相关博客链接
接第十八天Tkinter的内容:
单选按钮(控件:Radiobutton):
除共有属性外,还具有显示文本(text),返回变量(variable),返回值(value),响应函数名(command)等重要属性
示例代码如下:
# 单选按钮:
from tkinter import *def Dx():xx = {0: 'A', 1: 'B', 2: 'C'}p = '你选择了' + xx.get(var.get()) + '项'lab.config(text=p)root = Tk()
root.title('单选按钮')
lab = Label(root)
lab.pack()var = IntVar()
An1 = Radiobutton(root, text='A', variable=var, value=0, command=Dx)
An1.pack()
An2 = Radiobutton(root, text='B', variable=var, value=1, command=Dx)
An2.pack()
An3 = Radiobutton(root, text='C', variable=var, value=2, command=Dx)
An3.pack()root.geometry('250x100')
root.mainloop()
输出结果:

复选框(控件:Checkbutton):
除共有属性外,还具有显示文本(text),返回变量(variable),返回值(value),选中返回值(onvalue),未选中默认返回值(offvalue)
示例代码如下:
# 复选框
from tkinter import *
import tkinterdef Fx():if CV1.get() == 0 and CV2.get() == 0 and CV3.get() == 0 and CV4.get() == 0:q = '你还没选喜欢的类型'else:q1 = '善良' if CV1.get() == 1 else ''q2 = '勇敢' if CV2.get() == 1 else ''q3 = '乐观' if CV3.get() == 1 else ''q4 = '开朗' if CV4.get() == 1 else ''q = '你选择了 %s %s %s %s 的类型' % (q1, q2, q3, q4)lab.config(text=q)root = tkinter.Tk()
root.title('复选框')
lab = Label(root, text='请选择你喜欢的类型')
lab.pack()CV1 = IntVar()
CV2 = IntVar()
CV3 = IntVar()
CV4 = IntVar()Fx1 = Checkbutton(root, text='善良', variable=CV1, onvalue=1, offvalue=0)
Fx1.pack()
Fx2 = Checkbutton(root, text='勇敢', variable=CV2, onvalue=1, offvalue=0)
Fx2.pack()
Fx3 = Checkbutton(root, text='乐观', variable=CV3, onvalue=1, offvalue=0)
Fx3.pack()
Fx4 = Checkbutton(root, text='开朗', variable=CV4, onvalue=1, offvalue=0)
Fx4.pack()ok = Button(root, text='确定', command=Fx)
ok.pack()lab2 = Label(root, text=' ')
lab2.pack()root.geometry('330x200')
root.mainloop()
输出结果:

列表框(Listbox)
在Tkinter中,列表框(Listbox)组件使用到的一些常用方法包括:
-
insert(index, string):在指定的index位置插入一个字符串项目。
tk.END可以被用作index来在列表末尾添加项目。 -
delete(first, last=None):删除从first到last(包括)之间的所有项目。如果只提供了一个索引,则只删除该项目。
-
get(first, last=None):返回从first到last(包括)之间的所有项目的列表。如果只提供了一个索引,则返回该索引处的项目。
-
size():返回列表框中项目的数量。
-
curselection():返回一个包含当前选中项目索引的元组。如果没有选中任何项目,它将返回一个空元组。
-
bind(sequence, func):为列表框绑定一个事件处理函数。例如,你可以绑定
<<ListboxSelect>>事件来在用户选择项目时执行某个函数。 -
xview(*args):用于水平滚动列表框。
-
yview(*args):用于垂直滚动列表框。
-
**config(cnf=None, kw) 或 **configure(cnf=None, kw):用于配置或设置列表框的各种属性,比如
cursor(光标)、font(字体)、fg(前景色)、height(行数)、highlightcolor(焦点高亮颜色)、highlightthickness(焦点高亮的厚度)、relief(边框阴影效果)、selectbackground(所选文本的背景颜色)、selectmode(选择模式)和width(部件宽度)等。
示例代码如下:
from tkinter import *def Csh():box1.delete(0, END)list_music = ['幻听.mp3', '多余的解释.mp3', '断桥残雪.mp3', '有何不可.mp3', '飞蛾.mp3']for music in list_music:box1.insert(END, music)def insert():if entry.get() != '':if box1.curselection() == ():box1.insert(box1.size(), entry.get())else:box1.insert(box1.curselection(), entry.get())def update():if entry.get() != '' and box1.curselection() != ():selected = box1.curselection()[0]box1.delete(selected)box1.insert(selected, entry.get())def delete():if box1.curselection() != ():box1.delete(box1.curselection())def clear():box1.delete(0, END)root = Tk()
root.title('列表框')
root.geometry('400x300')label = Label(root, text='Music', fg='Red', relief=SUNKEN)
label.place(rely=0.0, width=145, height=30)frame1 = Frame(root, relief=RAISED)
frame1.place(relx=0.0, rely=0.1)frame2 = Frame(root, relief=GROOVE)
frame2.place(relx=0.5)box1 = Listbox(frame1)
box1.pack()entry = Entry(frame2)
entry.pack()b1 = Button(frame2, text='初始化', command=Csh)
b1.pack(fill=X)# b2 = Button(frame2, text='添加', command=insert)  # 添加和插入功能一样
# b2.pack(fill=X)b3 = Button(frame2, text='插入', command=insert)
b3.pack(fill=X)b4 = Button(frame2, text='修改', command=update)
b4.pack(fill=X)b5 = Button(frame2, text='删除', command=delete)
b5.pack(fill=X)b6 = Button(frame2, text='清空', command=clear)
b6.pack(fill=X)root.mainloop()
输出结果:
组合框(Combobox)
四则运算示例:
from tkinter.ttk import *
from tkinter import *def Szys(event):a = float(p1.get())b = float(p2.get())dic = {0: a + b, 1: a - b, 2: a * b, 3: a / b}c = dic[comb.current()]lab.config(text=str(c))root = Tk()
root.title('四则运算')
root.geometry('320x240')p1 = Entry(root)
p1.place(x=10, y=20)p2 = Entry(root)
p2.place(x=170, y=20)var = StringVar()comb = Combobox(root, textvariable=var, values=['加', '减', '乘', '除'])
comb.place(relx=0.5, rely=0.5, anchor='center')
comb.bind('<<ComboboxSelected>>', Szys)lab = Label(root, text='结果')
lab.place(relx=0.2, rely=0.9, anchor='center')root.mainloop()
输出:

菜单(menu)
代码示例:
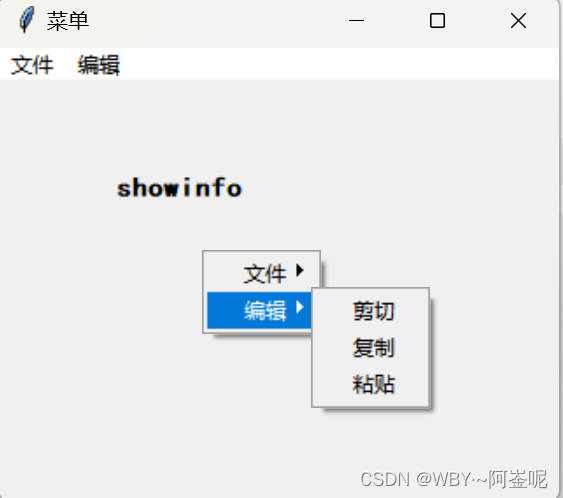
from tkinter import *def new():k = '新建'lab.config(text=k)def ope():k = '打开'lab.config(text=k)def save():k = '保存'lab.config(text=k)def cut():k = '剪切'lab.config(text=k)def cop():k = '复制'lab.config(text=k)def pas():k = '粘贴'lab.config(text=k)def popupmenu(event):  # 创建弹出式菜单mainmenu.post(event.x_root, event.y_root)  # 将菜单与鼠标位置关联起来root = Tk()
root.title('菜单')
root.geometry('320x240')
lab = Label(root, text='显示信息', font=('楷体', 12, 'bold'))   # 创建标签
lab.place(relx=0.2, rely=0.2)mainmenu = Menu(root, tearoff=0)  # tearoff 参数用于控制是否允许用户从主菜单中“撕下”一个子菜单,使其成为一个独立的浮动窗口。
menuFile = Menu(mainmenu, tearoff=0)  # 当 tearoff 设置为 False 或 0 时,这个功能就会被禁用,用户不能从主菜单中撕下子菜单。
mainmenu.add_cascade(label='文件', menu=menuFile)  # 添加文件菜单
menuFile.add_command(label='新建', command=new)
menuFile.add_command(label='打开', command=ope)
menuFile.add_command(label='保存', command=save)
# menuFile.add_separator()  # 分割线
menuFile.add_command(label='退出', command=root.destroy)  # 添加退出菜单menuEdit = Menu(mainmenu, tearoff=0)
mainmenu.add_cascade(label='编辑', menu=menuEdit)  # 添加编辑菜单
menuEdit.add_command(label='剪切', command=cut)
menuEdit.add_command(label='复制', command=cop)
menuEdit.add_command(label='粘贴', command=pas)root.config(menu=mainmenu)  # 将主菜单与窗口关联起来
root.bind("<Button-3>", popupmenu)  # 绑定鼠标右键事件root.mainloop()
输出结果:右图是在窗体任意地方右击鼠标按键可显示选项


未完待续。。。。。。。。。。。
这篇关于学pyhton的第二十二天的文章就介绍到这儿,希望我们推荐的文章对编程师们有所帮助!


