本文主要是介绍VirtualBox7.0.16的蓝屏大坑与ssh登陆ubuntu虚拟机的办法,希望对大家解决编程问题提供一定的参考价值,需要的开发者们随着小编来一起学习吧!
背景:
安装了最新版的VirtualBox,装了ubuntu系统,在win10下通过ssh死活无法与ubuntu进行正常登陆控制。
然后开始了踩坑。
问题1:ssh登陆失败,但是主机能ping通ubuntu,反过来也能ping通,网络模式是默认的。

ssh登陆时候报错:
/home/mobaxterm ssh -v huaqi@10.0.2.15
OpenSSH_9.6p1, OpenSSL 1.1.1v 1 Aug 2023
debug1: Reading configuration data /etc/ssh_config
debug1: /etc/ssh_config line 10: Deprecated option "useroaming"
debug1: Connecting to 10.0.2.15 [10.0.2.15] port 22.
debug1: Connection established.
debug1: identity file /home/mobaxterm/.ssh/id_rsa type -1
debug1: identity file /home/mobaxterm/.ssh/id_rsa-cert type -1
debug1: identity file /home/mobaxterm/.ssh/id_ecdsa type -1
debug1: identity file /home/mobaxterm/.ssh/id_ecdsa-cert type -1
debug1: identity file /home/mobaxterm/.ssh/id_ecdsa_sk type -1
debug1: identity file /home/mobaxterm/.ssh/id_ecdsa_sk-cert type -1
debug1: identity file /home/mobaxterm/.ssh/id_ed25519 type -1
debug1: identity file /home/mobaxterm/.ssh/id_ed25519-cert type -1
debug1: identity file /home/mobaxterm/.ssh/id_ed25519_sk type -1
debug1: identity file /home/mobaxterm/.ssh/id_ed25519_sk-cert type -1
debug1: identity file /home/mobaxterm/.ssh/id_xmss type -1
debug1: identity file /home/mobaxterm/.ssh/id_xmss-cert type -1
debug1: identity file /home/mobaxterm/.ssh/id_dsa type -1
debug1: identity file /home/mobaxterm/.ssh/id_dsa-cert type -1
debug1: Local version string SSH-2.0-OpenSSH_9.6
kex_exchange_identification: read: Software caused connection abort
banner exchange: Connection to 10.0.2.15 port 22: Software caused connection abort
错误就是最后两句,网上各种说法都有,比如:端口被占用了,sshd_config文件配置问题等等了。
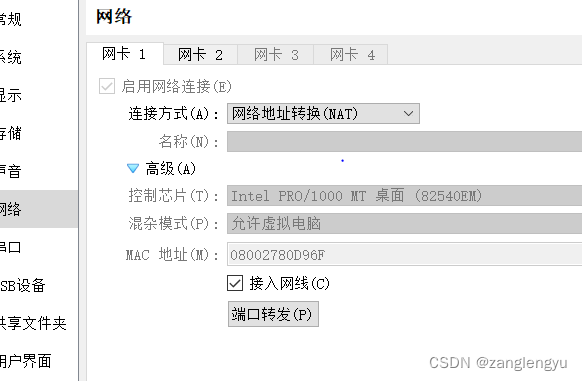
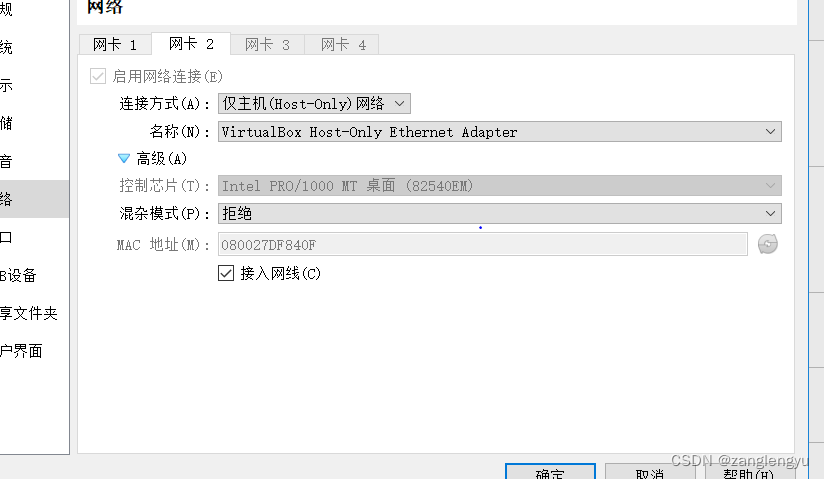
其实都不是,是因为virtualbox的网络连接模式问题,在目前的网络模式下,需要新增加一个

用双网卡,一般来说,网卡1的ip 默认是10.0.2.15。网卡2的ip可能是192.168.56.XXX。正常用网卡二的IP地址去进行连接登陆ssh就行了。
可以将网卡二的IP配置成静态IP,也可以不配置。
总之要用网卡2的ip。
ssh username@192.168.56.105
其实这样就可以了。
问题2:蓝屏问题
结果因为用了最新版的virtualbox,遇到了最新版的蓝屏问题,一登陆就蓝屏。
终止代码:PAGE_FAULT_IN_NONPAGED_AREA
失败的操作:VBoxNetAdp6.sys
这是个官方的bug,真是日了狗。后来下了旧版本的才解决这个问题。
#22045 (VirtualBox 7.0.16 crashing host OS immediately with a BSOD by VBoxNetLwf.sys) – Oracle VM VirtualBox
由于在下旧版本之前我已经安装了增强功能,那就需要卸载原来的增强功能,然后换成7.0.14的增强功能。
结果在换的时候,一直失败,VBoxClient: the VirtualBox kernel service is not running. Exiting.
然后重新安装的时候提示 reload失败什么的:
This system is currently not set up to build kernel modules.
Please install the gcc make perl packages from your distribution.
这时候有点懵逼的,因为我一开始装的是7.0.16,安装增强功能是正常的。后来看了这个贴子
virtualbox安装“安装增强功能...”时报错_virtualbox guest additions: running kernel modules-CSDN博客
我才明白为什么了。
原因是我的gcc版本太低了,为了编译其他Qt4.5.3源码把gcc降到了4.4.7。
重新换回4.8.4再安装就行了
这篇关于VirtualBox7.0.16的蓝屏大坑与ssh登陆ubuntu虚拟机的办法的文章就介绍到这儿,希望我们推荐的文章对编程师们有所帮助!


