本文主要是介绍解决-Oracle 19c RAC 安装时节点连接性问题,希望对大家解决编程问题提供一定的参考价值,需要的开发者们随着小编来一起学习吧!
第二天,联系了服务器管理员在下午得到了修复,虚拟网段的IP失效了,需要重新分配,并且虚拟IP没有网关,所以ping 网关ping 不通。
因为在一节点装了集群软件,所以需要继续清理环境。
准备完成,经过昨天的安装,有些地方容易检查不到,按道理来说,宕机的二节点,出多的地方应该没那么多,上篇提到环境变量ORACLE_HOME基目录、用户、用户组等都出错了,环境变量错了,咱也不知道当时是怎么按上去的,还是当时就故障了没发现。。。。
所以,找了一篇关于 Oracle 环境 检查的脚本,原理很简单,通过echo cat 把需要注意的,在OS参数设置的信息输出到打印台,可以根据自己需求,增加需要检查的项目
检查 OS Oracle 信息脚本
###################################################################################
##   重启操作系统进行修改验证
##      需要人工干预
######################################################################################################################################################################
## 检查修改信息
###################################################################################
echo "###################################################################################"
echo "检查修改信息"
echo
echo "-----------------------------------------------------------------------------------"
echo
echo "/etc/selinux/config"
echo
cat /etc/selinux/config
echo
echo
echo "-----------------------------------------------------------------------------------"
echo
echo "/etc/sysconfig/network"
echo
cat /etc/sysconfig/network
echo
echo
echo "-----------------------------------------------------------------------------------"
echo
echo "/sys/kernel/mm/transparent_hugepage/enabled"
echo
cat  /sys/kernel/mm/transparent_hugepage/enabled
echo
echo
echo "-----------------------------------------------------------------------------------"
echo
echo "/etc/hosts"
echo
cat /etc/hosts
echo
echo
echo "-----------------------------------------------------------------------------------"
echo
echo "/etc/ntp.conf"
echo
cat /etc/ntp.conf
echo
echo
echo "-----------------------------------------------------------------------------------"
echo
echo "/etc/sysctl.conf"
echo
cat /etc/sysctl.conf
echo
echo
echo "-----------------------------------------------------------------------------------"
echo
echo "/etc/security/limits.conf"
echo
cat /etc/security/limits.conf
echo
echo
echo "-----------------------------------------------------------------------------------"
echo
echo "/etc/pam.d/login"
echo
cat /etc/pam.d/login
echo
echo
echo "-----------------------------------------------------------------------------------"
echo
echo "/etc/profile"
echo
cat /etc/profile
echo
echo
echo "-----------------------------------------------------------------------------------"
echo
echo "/home/grid/.bash_profile"
echo
cat /home/grid/.bash_profile
echo
echo
echo "-----------------------------------------------------------------------------------"
echo
echo "/home/oracle/.bash_profile"
echo
cat /home/oracle/.bash_profile
echo
echo
echo "--------------------------------systemctl------------------------------------------"
echo
systemctl status firewalld
echo
systemctl status avahi-daemon
echo
systemctl status nscd
echo
systemctl status ntpd
echo
echo
echo "-----------------------------------------------------------------------------------"
echo
rpm -q --qf '%{NAME}-%{VERSION}-%{RELEASE} (%{ARCH})\n' \
bc  \
binutils  \
compat-libcap1  \
compat-libstdc++  \
elfutils-libelf  \
elfutils-libelf-devel  \
fontconfig-devel  \
glibc  \
glibc-devel  \
ksh  \
libaio  \
libaio-devel  \
libX11  \
libXau  \
libXi  \
libXtst  \
libXrender  \
libXrender-devel  \
libgcc  \
libstdc++  \
libstdc++-devel  \
libxcb  \
make  \
net-tools  \
nfs-utils  \
python  \
python-configshell  \
python-rtslib  \
python-six \
targetcli \
smartmontools \
sysstat \
kmod-oracleasm \
kmod-libs \
echo
echo "################请仔细核对所有文件信息 !!!!!!!################"昨天安装界面是中文的,不是很友好,设置一下临时环境变量export LANG=en_US
继续安装:
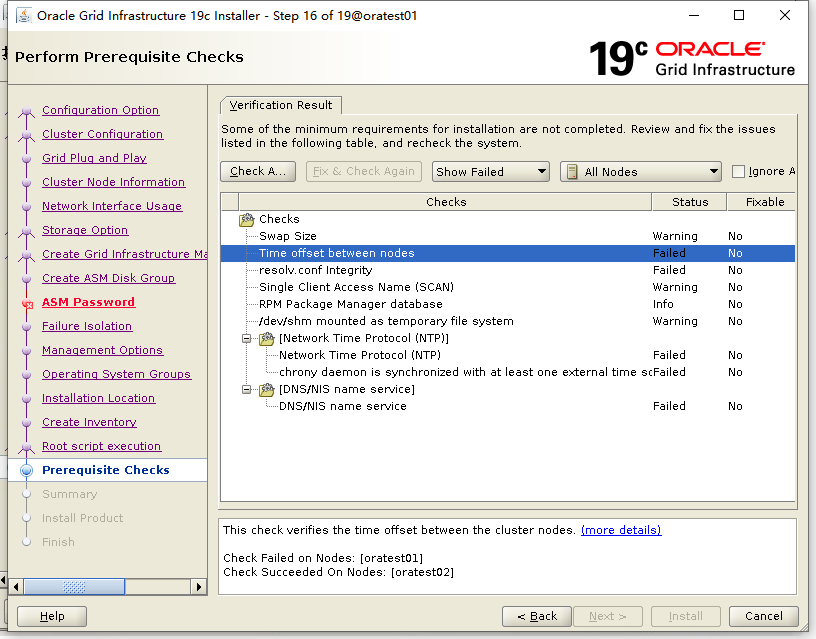
两天服务器时间不一致,date 查看一下偏移了7个小时
date 042416322024 改成一样的
导师说直接改一下就行,我看了一下都是上海时区,就用date直接设置成为当前时间了。
NTP网络时钟协议配置放在文末,这里直接用date了
剩下的都是可以忽略的错误,具体信息查看上一篇文档
在检查的最后报了一个Oracle 集群验证实用程序失败。
[INS-20802] Oracle Cluster Verification Utility failed.

参考:INS-20802 Oracle Cluster Verification Utility failed解释说明 - 绿茶有点甜 - 博客园
ins-20802 oracle cluster verification utility failed-CSDN博客
直接忽略
crsctl stat res -t检查一下资源状态没有问题
asmca创建磁盘组
安装DB

直接忽略,上篇文档有,不懂的可以百度一下

OPatch升级
打补丁
调整参数完毕!!!
NTP服务配置
1. 使用ctss
各节点系统时间校对:
--检验时间和时区确认正确
date --关闭chrony服务,移除chrony配置文件(后续使用ctss)
systemctl list-unit-files|grep chronyd
systemctl status chronydsystemctl disable chronyd
systemctl stop chronydmv /etc/chrony.conf /etc/chrony.conf_bak
mv /etc/ntp.conf /etc/ntp.conf_bak
systemctl list-unit-files|grep -E 'ntp|chrony'
--这里实验环境,选择不使用NTP和chrony,这样Oracle会自动使用自己的ctss服务
2. 使用ntp
1)修改所有节点的/etc/ntp.conf
【命令】vi /etc/ntp.conf
【内容】
restrict 192.168.6.3 nomodify notrap nopeer noquery          //当前节点IP地址
restrict 192.168.6.2 mask 255.255.255.0 nomodify notrap  //集群所在网段的网关(Gateway),子网掩码(Genmask)2)选择一个主节点,修改其/etc/ntp.conf
【命令】vi /etc/ntp.conf
【内容】在server部分添加一下部分,并注释掉server 0 ~ nserver 127.127.1.0
Fudge 127.127.1.0 stratum 103)主节点以外,继续修改/etc/ntp.conf
【命令】vi /etc/ntp.conf
【内容】在server部分添加如下语句,将server指向主节点。
server 192.168.6.3
Fudge 192.168.6.3 stratum 10节点1
echo
systemctl status ntpd
systemctl stop ntpd
systemctl stop chronyd
systemctl disable chronyd
sed -i 's/OPTIONS="-g"/OPTIONS="-g -x"/' /etc/sysconfig/ntpd
vim /etc/ntp.conf
注释server
sed '/^server/s/^/#/' /etc/ntp.conf -i
server 127.127.1.0
Fudge 127.127.1.0 stratum 10
# Hosts on local network are less restricted.
restrict 192.168.245.0 mask 255.255.255.0 nomodify notrap
把网段改为 192.168.245.0,取消注释
# Use public servers from the pool.ntp.org project.
# Please consider joining the pool (http://www.pool.ntp.org/join.html).
#server 0.rhel.pool.ntp.org iburst
#server 1.rhel.pool.ntp.org iburst
#server 2.rhel.pool.ntp.org iburst
#server 3.rhel.pool.ntp.org iburstserver 127.127.1.0
Fudge 127.127.1.0 stratum 10#broadcast 192.168.1.255 autokey        # broadcast server
#broadcastclient                        # broadcast client
#broadcast 224.0.1.1 autokey            # multicast server
#multicastclient 224.0.1.1              # multicast client
#manycastserver 239.255.254.254         # manycast server
#manycastclient 239.255.254.254 autokey # manycast client# Enable public key cryptography.
#cryptoincludefile /etc/ntp/crypto/pw# Key file containing the keys and key identifiers used when operating
# with symmetric key cryptography.
keys /etc/ntp/keys
---
把网段改为 192.168.245.0systemctl start ntpd
systemctl enable ntpd
echo节点2
echo
systemctl stop ntpd
systemctl stop chronyd
systemctl disable chronyd
sed -i 's/OPTIONS="-g"/OPTIONS="-g -x"/' /etc/sysconfig/ntpd
sed -i 's/^server/#server/g' /etc/ntp.conf
sed -i '$a server 192.168.66.141  iburst' /etc/ntp.confsystemctl start ntpd
systemctl enable ntpd
echo
检查ntp配置文件/etc/sysconfig/ntpd,也已经从默认值OPTIONS="-g"修改成OPTIONS="-x -g",但是在使用命令$ cluvfy comp clocksync -n all –verbose检查时为什么会失败呢?
通过MOS文档《Linux:CVU NTP Prerequisite check fails with PRVF-7590, PRVG-1024 and PRVF-5415 (Doc ID2126223.1)》分析可以看出:If var/run/ntpd.pid does not existon the server, the CVU command fails. This is due to unpublished bug 19427746 which has been fixed in Oracle 12.2.(意思是:如果服务器上不存在/var/run/ntpd.pid,则CVU命令失败。这是由于未发布的错误BUG 19427746,该错误已在Oracle 12.2中修复。)3. 使用chony
最小化安装没有安装相关包
需要自行安装 yum -y install chrony
配置文件说明
$ cat /etc/chrony.conf# 使用pool.ntp.org项目中的公共服务器。以server开,理论上你想添加多少时间服务器都可以。
# Please consider joining the pool (http://www.pool.ntp.org/join.html).
server 0.centos.pool.ntp.org iburst
server 1.centos.pool.ntp.org iburst
server 2.centos.pool.ntp.org iburst
server 3.centos.pool.ntp.org iburst# 根据实际时间计算出服务器增减时间的比率,然后记录到一个文件中,在系统重启后为系统做出最佳时间补偿调整。
driftfile /var/lib/chrony/drift
# chronyd根据需求减慢或加速时间调整,
# 在某些情况下系统时钟可能漂移过快,导致时间调整用时过长。
# 该指令强制chronyd调整时期,大于某个阀值时步进调整系统时钟。
# 只有在因chronyd启动时间超过指定的限制时(可使用负值来禁用限制)没有更多时钟更新时才生效。
makestep 1.0 3# 将启用一个内核模式,在该模式中,系统时间每11分钟会拷贝到实时时钟(RTC)。
rtcsync# Enable hardware timestamping on all interfaces that support it.
# 通过使用hwtimestamp指令启用硬件时间戳
#hwtimestamp eth0
#hwtimestamp eth1
#hwtimestamp *# Increase the minimum number of selectable sources required to adjust
# the system clock.
#minsources 2# 指定一台主机、子网,或者网络以允许或拒绝NTP连接到扮演时钟服务器的机器
#allow 192.168.0.0/16
#deny 192.168/16# Serve time even if not synchronized to a time source.
local stratum 10# 指定包含NTP验证密钥的文件。
#keyfile /etc/chrony.keys# 指定日志文件的目录。
logdir /var/log/chrony# Select which information is logged.
#log measurements statistics tracking
RAC1:1 先注释server :
sed '/^server/s/^/#/' /etc/chrony.conf -i
注释server2
# vi /etc/chrony.conf
# Serve time even if not synchronized to a time source.开启该服务,在不与外网同步时间的情况下,依然为下层终端提供同步服务local stratum 10#allow用来标记允许同步的网段或主机,下例是允许192.168.245.0/24这个网段的终端来同步,127/8是本机和自己同步。allow 192.168.245.0/24server 127.0.0.1 iburst  --表示本机同步
allow            #允许所有网段连入
local stratum 103 重新启动 systemctl restart chronyd.serviceRAC2:1 先注释server :
sed '/^server/s/^/#/' /etc/chrony.conf -i
注释server2
# vi /etc/chrony.conf
server 192.168.66.141 iburst  --表示RAC1同步重启时间同步服务:systemctl restart chronyd.servicesystemctl enable chronyd.service查看时间同步源:# chronyc sources -vchronyc sourcestats -v 查看 ntp_servers 是否在线
chronyc activity -v查看 ntp 详细信息
chronyc tracking -v
这篇关于解决-Oracle 19c RAC 安装时节点连接性问题的文章就介绍到这儿,希望我们推荐的文章对编程师们有所帮助!


