本文主要是介绍janus部署,希望对大家解决编程问题提供一定的参考价值,需要的开发者们随着小编来一起学习吧!
配置和运行janus
1. 配置nginx
安装nginx,主要用来提供web访问。
生成证书
mkdir -p ~/cert
cd ~/cert
# CA私钥
openssl genrsa -out key.pem 2048
# 自签名证书
openssl req -new -x509 -key key.pem -out cert.pem -days 1095
安装nginx
#下载nginx 1.15.8版本
wget http://nginx.org/download/nginx-1.15.8.tar.gz
tar xvzf nginx-1.15.8.tar.gz
cd nginx-1.15.8/# 配置,一定要支持https
./configure --with-http_ssl_module # 编译
make#安装
sudo make install
修改nginx配置文件
/usr/local/nginx/conf/nginx.conf
指向janus所在目录/opt/janus/share/janus/demos
# HTTPS serverserver {listen 443 ssl;server_name localhost;# 配置相应的keyssl_certificate /root/cert/cert.pem;ssl_certificate_key /root/cert/key.pem;ssl_session_cache shared:SSL:1m;ssl_session_timeout 5m;ssl_ciphers HIGH:!aNULL:!MD5;ssl_prefer_server_ciphers on;# 指向janus demo所在目录location / {root /opt/janus/share/janus/demos;index index.html index.htm;}}启动nginx
然后通过
https://49.232.250.45
可以访问到界面,但此时还不能正常通话。
安装和启动coturn
sudo apt-get install libssl-dev
sudo apt-get install libevent-dev#git clone https://github.com/coturn/coturn
#cd coturn
# 提供另一种安装方式turnserver是coturn的升级版本
wget http://coturn.net/turnserver/v4.5.0.7/turnserver-4.5.0.7.tar.gz
tar xfz turnserver-4.5.0.7.tar.gz
cd turnserver-4.5.0.7./configure
make && sudo make install
启动
sudo nohup turnserver -L 0.0.0.0 --min-port 50000 --max-port 60000 -a -u hnb:123456 -v -f -r nort.gov &
需要在安全组开放端口:
TCP/UDP 3478
UDP 50000-60000
配置janus相关配置文件
包含janus.jcfg,janus.transport.http.jcfg,janus.transport.websockets.jcfg
注意:如果不需要http支持,则可以不配置janus.transport.http.jcfg
配置janus.jcfg
stun_server = "49.232.250.45"stun_port = 3478nice_debug = falsenat_1_1_mapping = "49.232.250.45"# credentials to authenticate...turn_server = "49.232.250.45"turn_port = 3478turn_type = "udp"turn_user = "hnb"turn_pwd = "123456"
![PXL7L8P8UNYY_E{5LU8SPH.png
![FS(@QWOF%UOC2]8456(UQ@5.png](https://img-blog.csdnimg.cn/img_convert/386a3e5c8877e79c2862dc9bfcbafea2.png)
配置janus.transport.http.jcfg
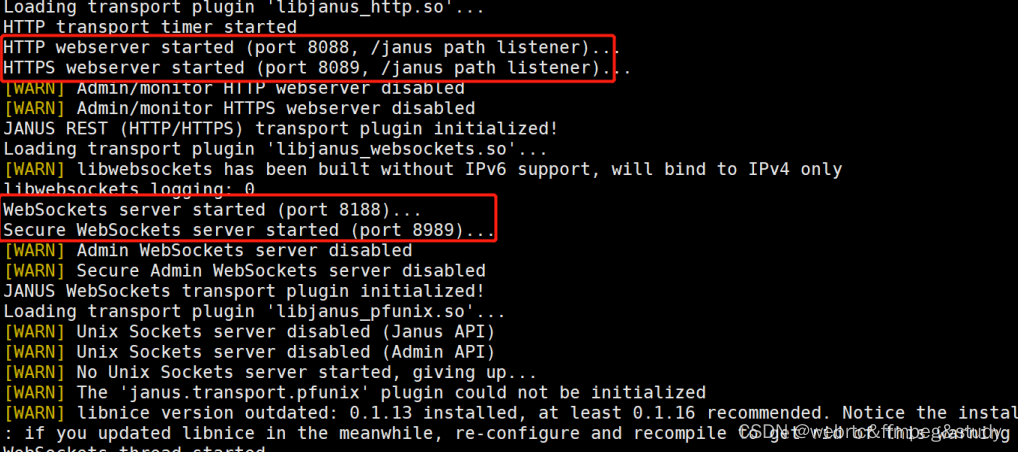
general: {#events = true                                  # Whether to notify event handlers about transport events (default=true)json = "indented"                               # Whether the JSON messages should be indented (default),# plain (no indentation) or compact (no indentation and no spaces)base_path = "/janus"                    # Base path to bind to in the web server (plain HTTP only)threads = "unlimited"                   # unlimited=thread per connection, number=thread poolhttp = true                                             # Whether to enable the plain HTTP interfaceport = 8088                                             # Web server HTTP port#interface = "eth0"                             # Whether we should bind this server to a specific interface only#ip = "192.168.0.1"                             # Whether we should bind this server to a specific IP address (v4 or v6) onlyhttps = true                                    # Whether to enable HTTPS (default=false)secure_port = 8089                              # Web server HTTPS port, if enabled#secure_interface = "eth0"              # Whether we should bind this server to a specific interface only#secure_ip = "192.168.0.1"              # Whether we should bind this server to a specific IP address (v4 or v6) only#acl = "127.,192.168.0."                # Only allow requests coming from this comma separated list of addresses
}certificates: {cert_pem = "/root/cert/cert.pem"cert_key = "/root/cert/key.pem"#cert_pwd = "secretpassphrase"#ciphers = "PFS:-VERS-TLS1.0:-VERS-TLS1.1:-3DES-CBC:-ARCFOUR-128"
}
配置janus.transport.websockets.jcfg
general: {#events = true                                  # Whether to notify event handlers about transport events (default=true)json = "indented"                               # Whether the JSON messages should be indented (default),# plain (no indentation) or compact (no indentation and no spaces)#pingpong_trigger = 30                  # After how many seconds of idle, a PING should be sent#pingpong_timeout = 10                  # After how many seconds of not getting a PONG, a timeout should be detectedws = true                                               # Whether to enable the WebSockets APIws_port = 8188                                  # WebSockets server port#ws_interface = "eth0"                  # Whether we should bind this server to a specific interface only#ws_ip = "192.168.0.1"                  # Whether we should bind this server to a specific IP address onlywss = true                                              # Whether to enable secure WebSocketswss_port = 8989                         # WebSockets server secure port, if enabled#wss_interface = "eth0"                 # Whether we should bind this server to a specific interface only#wss_ip = "192.168.0.1"                 # Whether we should bind this server to a specific IP address only#ws_logging = "err,warn"                # libwebsockets debugging level as a comma separated list of things# to debug, supported values: err, warn, notice, info, debug, parser,# header, ext, client, latency, user, count (plus 'none' and 'all')#ws_acl = "127.,192.168.0."             # Only allow requests coming from this comma separated list of addresses
}certificates: {cert_pem = "/root/cert/cert.pem"cert_key = "/root/cert/key.pem"#cert_pwd = "secretpassphrase"
}
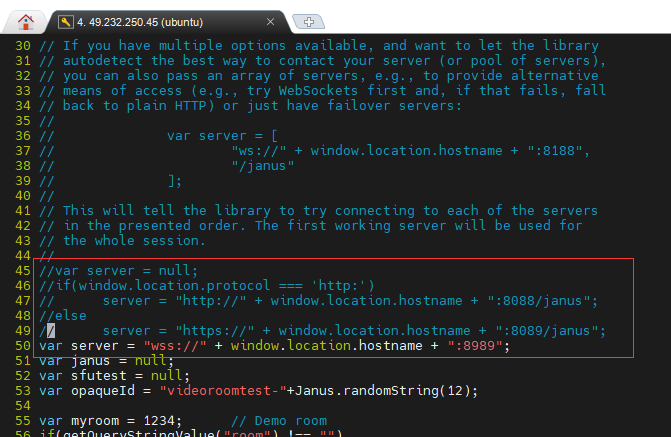
修改网页默认支持的wss协议
修改 /opt/janus/share/janus/demos/videoroomtest.js文件
将默认的https协议改为wss
var server = "wss://" + window.location.hostname + ":8989";
端口开放
tcp:8088,8089,8188,8989,3478,80,443
udp:3478,50000-60000
运⾏ Janus
/opt/janus/bin/janus --debug-level=5 --log-file=$HOME/janus-log
错误问题解决
[ERR] [dtls.c:janus_dtls_srtp_incoming_msg:923] [7071685807055874] Oops, error creating inbound SRTP session for component
先查找libsrtp2.so
ubuntu@VM-0-17-ubuntu:~/webrtc/libsrtp$ sudo locate libsrtp2.so
/home/ubuntu/webrtc/libsrtp/libsrtp2.so
/home/ubuntu/webrtc/libsrtp/libsrtp2.so.1
/usr/lib/libsrtp2.so
/usr/lib/libsrtp2.so.1
/usr/lib/x86_64-linux-gnu/libsrtp2.so
/usr/lib/x86_64-linux-gnu/libsrtp2.so.1
把命令安装的删除
sudo rm -rf /usr/lib/x86_64-linux-gnu/libsrtp2.*
sudo ldconfig
运行 Janus
/opt/janus/bin/janus --debug-level=5 --log-file=$HOME/janus-log
这篇关于janus部署的文章就介绍到这儿,希望我们推荐的文章对编程师们有所帮助!


