本文主要是介绍springboot结合elasticJob,希望对大家解决编程问题提供一定的参考价值,需要的开发者们随着小编来一起学习吧!
先说一说什么是elasticJob。 ElasticJob是一个分布式任务调度的解决方案,它由俩个相互独立的子项目Elastic-job-lite和Elastic- job-cloud组成。
任务调度:是指系统为了自动完成特定任务,在任务的特定时刻去执行任务的过程。
分布式:分布式架构,将单体结构分为若干服务,服务之间通过网络交互来完成用户的业务处理。
因为elasticJob是在特定时刻去执行任务的解决方案,那么我们就需要学会怎么表示特定的时间。
cron表达式:cron表达式可以方便的表示日历调度。该表达式有7部分:1、seconds(秒);2、minutes(分钟);3、hours(时);4、day-of-month(天);5、month(月);6、day-of-week(周);7、year(年) 。
注意:第7个year可写可不写。其中第4个和第6个必须有一个值是“?”,因为不同的月份之间号和星期很可能是冲突的。
例如:“ 0 0 12 ?* WED” 意思是每个星期三的中午12点执行。
字符含义:
* :代表所有可能的值;
- :表示指定范围;
, :表示列出枚举值。minute表达式中 “5,20” 表示第5分钟和第20分钟触发。
/ :被用于指定增量。minute表达式 “0/15 ” 表示从0分钟开始,每15分钟执行一次。
? :用在day-of-month或day-of-week中,指没有确定值。
L :用在day-of-month和day-of-weekz,是last的缩写。在这俩个不同表达式中含义是不同的。 在day-of-month中表示一个月的最后一天。在day-of-week中表示一个星期的最后一天。如果L前有具体内容,就有其他含义了。例如:6L 代表这个月倒数第6天。FRIL 表示这个月最后一个星期五。
W :weekday的缩写。只能用在day-of-month字段。用来描述最接近指定天的工作日(周一到周五)。例如:15W 表示最接近这个月15号的工作日,如果15号是周六,则会在14号周五触发;如果15号是周日,则会在16号周一触发。注意:这个用法只会在当前月份计算,不能跨月份。

App:应用程序,内部包含任务调度业务逻辑和Elastic-job-Lite组件,其中执行任务需要实现ElasticJob接口完成与Elastic-job-Lite组件的集成,并进行任务的相关配置。应用程序可启动多个实例。
Elastic-Job-Lite:定位为轻量级无中心化解方案,使用jar包的形式提供分布式任务的协调服务,此组件负责任务的调度,并产生日志及任务调度记录。
无中心化,是指没有调度中心这一概念,每个运行在集群中的作业都是对等的,各个作业节点是自治的、平等的、节点直接通过注册中心进行分布式协调。
Registry:以zookeeper作为elastic-job的注册中心组件,存储了执行任务的相关信息。
Console:Elastic-job提供了运维平台,它通过读取zookeeper数据展现任务执行任务,或更新zookeeper数据修改全局配置 通过Elastic-job-lite组件产生的数据来查看任务执行历史记录。
应用程序启动时,在其内嵌的elastic-job-lite组件会向zookeeper注册该实例的信息,并触发选举,从众多实例中选举出一个leader,让其执行任务。当应用程序的某一个实例宕机时,zookeeper组件会感知并重新触发leader选举。
zookeeper的作用:
elastic-job依赖zookeeper完成对执行任务信息的存储(如任务名称,任务参与实例,任务执行策略)。
elastic-job依赖zookeeper实现选举机制,在任务执行实例数量变化时,会触发选举机制来决定哪个实例去执行该任务。
zookeeper是一个分布式一致性协调任务,主要用来解决分布式应用中遇到的一些数据管理问题。可以把zookeeper想象为一个特殊的数据库,它维护着一个类似文件系统的树形数据结构,zookeeper的客户端可以对数据进行存取。
zookeeper被称为一致性协调服务的原因:因为zookeeper拥有数据监听通知机制,客户端注册监听它关系的znode(目录节点),当zonde发生变化(如数据改变、被删除、子目录节点增加删除)时,zookeeper会通知所有客户端。简单来说,当分布式系统的若干个服务都关心一个数据时,当这个数据发生变化,这些服务都能够得知,那么这些服务就针对数据达成了一致。
zookeeper实例选举实现过程:
1、任意一个实例启动时首先创建一个/serve的persistent(持久化节点)节点。
2、多个实例同时启动,会同时去尝试创建一个/serve/leader EPHEMERAL子节点(临时非顺序的节点,就是虽然是临时的,但多个实例只会有一个创建成功)。
3、/serve/leader子节点只能创建一个,后面的会创建失败。
4、所有任务实例监听/serve/leader的变化,一旦节点被删除,就重新积极性选举,抢占式创建/serve/leader节点,谁创建成功谁就是leader。
下面让我们开始准备写代码:需要用到springboot、mybatis、mysql、zookeeper。
过程是:从mysql中获取未备份文件,然后对获取的文件进行处理,修改成已备份状态。
首先准备好mysql中要操作的表:
create database elastic_job;
use elastic_job;
create table t_file (
id varchar(11) primary key ,
name varchar(255) not null,
type varchar(255) not null,
content varchar(255) not null,
backedUp varchar(1) not null
);insert into t_file values
(1,'文件1','text','content1',1),
(2,'文件2','text','content2',1),
(3,'文件3','text','content3',1),
(4,'文件4','image','content4',1),
(5,'文件5','image','content5',1),
(6,'文件6','image','content6',1),
(7,'文件7','radio','content7',1),
(8,'文件8','radio','content8',1),
(9,'文件9','radio','content9',1),
(10,'文件10','video','content10',1),
(11,'文件11','video','content11',1);
接下来准备写mybatis来操作数据库:
在application.yml文件中配好端口号和mysql连接数据:
spring:application:name: elastic-job # 服务名称profiles:active: public # 开发环境datasource:driver-class-name: com.mysql.cj.jdbc.Driverurl: jdbc:mysql://localhost:3306/elastic_jobusername: rootpassword: quwenhaologging:level:root: infoserver:port: 8081
pojo包:
package com.example.pojo;import lombok.Data;@Data
public class FileCustom {private int id;private String name;private String type;private String content;private Boolean backedUp=false;public FileCustom(int id, String name, String type, String content) {this.id = id;this.name = name;this.type = type;this.content = content;}
}
dao包:
package com.example.dao;import com.example.pojo.FileCustom;
import org.apache.ibatis.annotations.Param;
import org.apache.ibatis.annotations.Select;
import org.apache.ibatis.annotations.Update;
import org.springframework.stereotype.Repository;import java.util.List;@Repository
public interface FileDao {
//获取未备份文件@Select("select * from t_file where type=#{type} and backedUp=0 limit 0,#{count}")List<FileCustom> fetchBackedUpFiles(@Param("type") String fileType, @Param("count") int count);
//把未备份文件改成已备份文件@Update("update t_file set backedUp=1 where id=#{id}")void backUpFiles(@Param("id") int id);@Update("update t_file set backedUp=0")void clearData();
}
service层:
package com.example.service;import com.example.dao.FileDao;
import com.example.pojo.FileCustom;
import org.springframework.beans.factory.annotation.Autowired;
import org.springframework.stereotype.Service;import java.util.List;@Service
public class FileService {@AutowiredFileDao fileDao;public List<FileCustom> fetchUnBackedUpFiles(String fileType,int count) {List<FileCustom> fileCustoms = fileDao.fetchBackedUpFiles(fileType, count);System.out.println(fileCustoms);return fileCustoms;}public void backedUp(List<FileCustom> fileCustoms){for (FileCustom fileCustom : fileCustoms) {fileDao.backUpFiles(fileCustom.getId());System.out.println(fileCustom.getName()+" "+fileCustom.getType());}}}
对数据库的操作写好了,下面就该配zookeeper的信息了
首先创建一个zookeeper注册中心:
package com.example.config;import com.dangdang.ddframe.job.reg.base.CoordinatorRegistryCenter;
import com.dangdang.ddframe.job.reg.zookeeper.ZookeeperConfiguration;
import com.dangdang.ddframe.job.reg.zookeeper.ZookeeperRegistryCenter;
import org.springframework.context.annotation.Bean;
import org.springframework.context.annotation.Configuration;@Configuration
public class ElasticJobRegistryCenterConfig {//zookeeper链接字符串private String ZOOKEEPER_CONNECTION_STRING = "localhost:2181";//定义任务命名空间private String JOB_NAMESPACE = "elastic-job-example-java";@Bean(initMethod = "init")//注册中心配置public CoordinatorRegistryCenter setUpRegistryCenter() {//注册中心配置ZookeeperConfiguration zookeeperConfiguration = new ZookeeperConfiguration(ZOOKEEPER_CONNECTION_STRING, JOB_NAMESPACE);//减少zookeeper超时时间zookeeperConfiguration.setSessionTimeoutMilliseconds(100);//创建注册中心CoordinatorRegistryCenter registryCenter = new ZookeeperRegistryCenter(zookeeperConfiguration);registryCenter.init();return registryCenter;}
}
下面就该配我们的作业任务调度的内容了:
我写来解释一下什么是分片: 作业分片是指任务的分布式执行,需要将一个任务拆分为多个独立的任务项,然后由分布式的应用实例分别执行某一个或几个分片。
分片项与业务处理解释:
ElasticJob并不直接提供数据处理的功能,框架只会将分片项至各位中的作业服务器,开发者需要自行处理分片项与真实数据的对应关系。为了最大限度利用资源,我们要将分片项设置为大于服务器的数量,最好是大于服务器倍数的位置,作业将会合理的利用分布式资源,动态的分配分片项。
下面开始写任务内容:
package com.example.job;import com.dangdang.ddframe.job.api.ShardingContext;
import com.dangdang.ddframe.job.api.simple.SimpleJob;
import com.dangdang.ddframe.job.lite.api.strategy.JobInstance;
import com.example.pojo.FileCustom;
import com.example.service.FileService;
import org.springframework.beans.factory.annotation.Autowired;
import org.springframework.stereotype.Component;import java.lang.management.ManagementFactory;
import java.text.SimpleDateFormat;
import java.util.ArrayList;
import java.util.Date;
import java.util.List;@Component
public class FileBackUpJobDb implements SimpleJob {@AutowiredFileService service;//每次任务执行要备份文件的数量private int FETCH_SIZE = 1;//文件列表//任务调度执行方法@Overridepublic void execute(ShardingContext shardingContext) {//作业分片信息int shardingItem = shardingContext.getShardingItem();System.out.println("作业分片" + shardingItem);//获取分片参数String shardingParameter = shardingContext.getShardingParameter();System.out.println("分片参数" + shardingParameter);//获取未备份文件List<FileCustom> fileCustoms = fetchUnBackUpFiles(shardingParameter, FETCH_SIZE);//文件备份backUpFiles(fileCustoms);}//获取未备份文件方法public List<FileCustom> fetchUnBackUpFiles(String typeFile,int count) {//要获取的文件列表List<FileCustom> fileCustoms = service.fetchUnBackedUpFiles(typeFile, count);System.out.println("获取到文件"+fileCustoms);return fileCustoms;}//备份文件方法public void backUpFiles(List<FileCustom> files){service.backedUp(files);System.out.println("文件被备份");}
}
下面就是用zookeeper对我们写好的任务进行任务调度:就是对该任务进行时间追踪并配置执行时间
package com.example.config;import com.dangdang.ddframe.job.api.ElasticJob;
import com.dangdang.ddframe.job.config.JobCoreConfiguration;
import com.dangdang.ddframe.job.config.simple.SimpleJobConfiguration;
import com.dangdang.ddframe.job.event.rdb.JobEventRdbConfiguration;
import com.dangdang.ddframe.job.lite.config.LiteJobConfiguration;
import com.dangdang.ddframe.job.lite.spring.api.SpringJobScheduler;
import com.dangdang.ddframe.job.reg.base.CoordinatorRegistryCenter;
import com.example.job.FileBackUpJobDb;
import org.springframework.beans.factory.annotation.Autowired;
import org.springframework.context.annotation.Bean;
import org.springframework.context.annotation.Configuration;
import org.springframework.util.StringUtils;import javax.sql.DataSource;@Configuration
public class ElasticJobConfig {@AutowiredFileBackUpJobDb fileBackUpJob;@AutowiredCoordinatorRegistryCenter registryCenter;//配置任务详细信息 第一个参数为我们前面写好的任务的名称,第二个参数为cron表达式,用于指定执行特定时间。第三个参数为分片数量。private LiteJobConfiguration createLiteConfiguration(Class<? extends ElasticJob> jobClass,String shardingItemParameters) {//定义作业核心配置JobCoreConfiguration.Builder builder = JobCoreConfiguration.newBuilder(jobClass.getName(), "0/3 * * * * ?", 4);//设置shardingItemParametersif (!StringUtils.isEmpty(shardingItemParameters)) {builder.shardingItemParameters(shardingItemParameters);}JobCoreConfiguration jobCoreConfiguration = builder.build();//定义simple类型配置SimpleJobConfiguration JobConfiguration = new SimpleJobConfiguration(jobCoreConfiguration, jobClass.getCanonicalName());//DataflowJobConfiguration JobConfiguration = new DataflowJobConfiguration(jobCoreConfiguration, jobClass.getCanonicalName(), true);//定义Lite作业根配置LiteJobConfiguration liteJobConfiguration = LiteJobConfiguration.newBuilder(JobConfiguration).overwrite(true)//设置dump端口//.monitorPort(9888).build();return liteJobConfiguration;}@Bean(initMethod = "init")public SpringJobScheduler initSimpleElasticJob() {//创建SpringJobSchedulerSpringJobScheduler springJobScheduler = new SpringJobScheduler(fileBackUpJob,//任务内容类registryCenter,//注册中心类createLiteConfiguration(fileBackUpJob.getClass(),"0=text,1=image,2=radio,3=video"));//4个分片,依次的参数。return springJobScheduler;}
}
这下我们的任务调度就写完了,运行我们的启动类就可以了。
当我们开启一个实例运行该任务调度时,这一个实例会一起执行这4个分片。
当我们同时开启俩个实例时,这个4个分片就会随机分配到这2个实例中,这俩个实例同时对数据库进行修改,且数据共享。
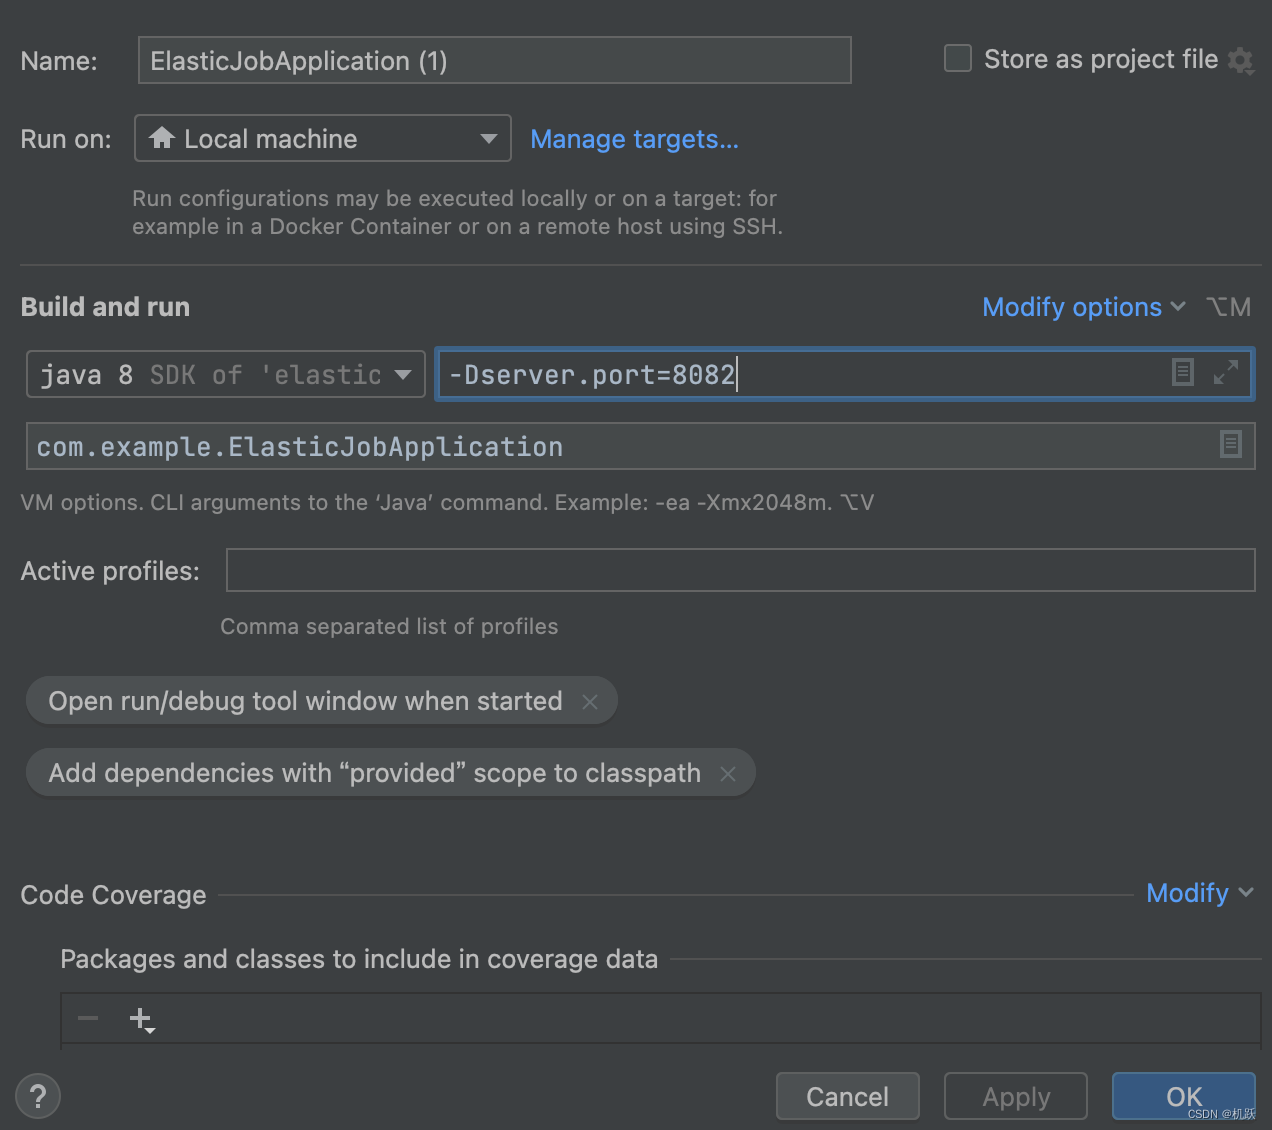
开启多个实例的方法:


写好前缀 -Dserver.port=端口号 然后点ok就好了
这篇关于springboot结合elasticJob的文章就介绍到这儿,希望我们推荐的文章对编程师们有所帮助!


