本文主要是介绍一次Ambari安装记录,希望对大家解决编程问题提供一定的参考价值,需要的开发者们随着小编来一起学习吧!
引言
Ambari是一个开源的Apache项目,它提供了一个直观易用的Web界面,用于管理、监控和配置Apache Hadoop集群。它是一个集群管理工具,可以帮助管理员轻松地部署、管理和监控Hadoop集群的各种组件,如HDFS、YARN、MapReduce、Hive、HBase等。通过Ambari,用户可以在集群中添加或移除节点,监控集群健康状况,执行配置更改,以及查看各种性能指标和日志。Ambari的用户界面直观友好,使得对Hadoop集群的管理变得更加简单和高效。
- 官方安装教程2.7.5
环境
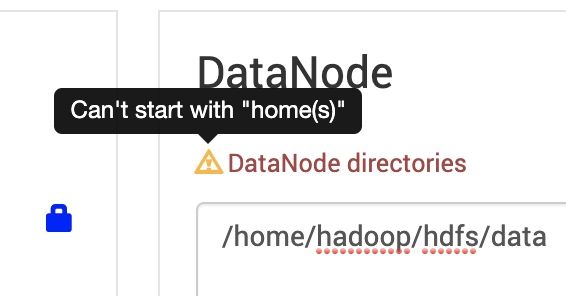
Ambari版本支持界面
Data数据目录

HDFS的路径不支持
/home(s)前缀。
所以,在安装Ambari之前,先要确认好集群机器上的文件系统分区,非 /home 分区下的其他分区是否有足够的空间来存放HDFS和其他应用的数据。若没有的话,重装系统(允许的话)或者通过挂载新磁盘等方法来扩容出新的分区。
而可以的话,建议在安装系统的时候数据分区都设置在 /hadoop 下,这样安装ambari的时候,可以省去修改默认配置的麻烦(因为默认情况下,基本配置都是设置在 /hadoop 之下。)
建议分区
# datanode 存储主要分区
/hadoop
# 不作为DataNode存储目录,有些额外的数据配置需要使用与datanode不同的文件,如HBase Root
/data
题外,若磁盘空间真分配到 /home 的话,又不得不使用的地步的话,其实也可以尝试使用软链接进行hack,参考命令:
mkdir -p /home/hadoop/ && cd / && ln -s /home/hadoop/ /hadoop
但这样的方法不确定是否导致其他运行时的使用上问题。
集群访问设置
设置FQDN
FQDN = 简短的名字 + 域
如: hostname返回的结果是dev-qa001,而域为test.com的话,则fqdn为dev-qa001.test.com
-
设置hostname。
hostnamectl set-hostname <host-name># 例子,dev开发、prd生产 hostnamectl set-hostname bd001.dev.tkhome.bms.ctos7 hostnamectl set-hostname bd002.dev.tkhome.bms.ctos7 hostnamectl set-hostname bd003.dev.tkhome.bms.ctos7 -
修改
/etc/hosts配置好集群服务器的FQDN,以便安装时使用。例如:
192.168.1.91 bd001.dev.tkhome.bms.ctos7.timekey.com.cn bd001.dev.tkhome.bms.ctos7
192.168.1.92 bd002.dev.tkhome.bms.ctos7.timekey.com.cn bd002.dev.tkhome.bms.ctos7
192.168.1.93 bd003.dev.tkhome.bms.ctos7.timekey.com.cn bd003.dev.tkhome.bms.ctos7
或者命令
sudo tee -a /etc/hosts<<-'EOF'
192.168.1.91 bd001.dev.tkhome.bms.ctos7.timekey.com.cn bd001.dev.tkhome.bms.ctos7
192.168.1.92 bd002.dev.tkhome.bms.ctos7.timekey.com.cn bd002.dev.tkhome.bms.ctos7
192.168.1.93 bd003.dev.tkhome.bms.ctos7.timekey.com.cn bd003.dev.tkhome.bms.ctos7
EOF
```
- 设置好之后, 通过
hostname -F /etc/hostname更新主机名. 这时, 通过hostname -f看到的FQDN就应该是: bd001.dev.tkhome.bms.ctos7.timekey.com.cn
查看本机FQDN命令参考
hostname -f
注意:配置时,如果遇到ip对应多个hostname,请务必写到一行之中,并且把期望作为FQDN的hostname放到首位!
编写hosts完成后,同步各台机器上。
设置支持免密登录
ambari-server操作集群时,需要使用 特定账号 登录到每台集群服务器上进行代理操作,所以,设置密钥和免密登录必不可少。
为了方便,目前建议使用root账号
登录安装作为安装 Ambari Server 的服务器,参考如下命令
# 生成密钥
ssh-keygen -t rsa -P ''# 产生公钥与私钥对
cat ~/.ssh/id_rsa.pub >> ~/.ssh/authorized_keys# 设置权限
chmod 0600 ~/.ssh/authorized_keys# 将本机的公钥复制到远程机器的authorized_keys文件中,开启无密码SSH登录
ssh-copy-id user@host例如,(命令后,输入ssh密码)
ssh-copy-id root@bd002.dev.tkhome.bms.ctos7
ssh-copy-id root@bd003.dev.tkhome.bms.ctos7
是否新建ambari服务的账号为可选项。而基于安全和操作规范,一般不使用root作为远程登录甚至操作账号。但若不用root的话,不太确定是否会对ambari-server的操作带来影响(目前实践安装时没使用root)。
关闭防火墙(所有机器)
-
关闭firewalld
systemctl disable --now firewalld -
关闭SELinux
setenforce 0sed -i "s/SELINUX=enforcing/SELINUX=disabled/g" /etc/selinux/config重启后生效
reboot now# 查看SELinux getenforce 或 sestatus -
确认umask值
umask确认是否
0022
文件打开限制(每台服务器)
查看
ulimit -Sn
ulimit -Hn
修改 /etc/security/limits.conf 文件,内容参考:
*       soft    nofile  10000
*       hard    nofile  10000
*       soft    nproc   131072
*       hard    nproc   131072
或者命令
sudo tee -a /etc/security/limits.conf<<-'EOF'
*       soft    nofile  10000
*       hard    nofile  10000
*       soft    nproc   131072
*       hard    nproc   131072
EOF
重新连接访问后生效。
设置本地源(yum)
略,目的就是提高后续安装包的速度。
安装依赖包
On each of your hosts:
- yum and rpm (RHEL/CentOS/Oracle/Amazon Linux)
- zypper and php_curl (SLES)
- apt (Debian/Ubuntu)
- scp, curl, unzip, tar, wget, and gcc*
- OpenSSL (v1.01, build 16 or later)
- Python 2.7.12 (with python-devel*)
*Ambari Metrics Monitor uses a python library (psutil) which requires gcc and python-devel packages.
命令参考:
yum install vim scp curl unzip tar wget gcc* python-devel* psutil libtirpc -y
时间同步
1、安装ntp服务(全部节点)
yum install -y ntp
2、设置NPT Server
由于离线环境下,所以需要指定一台NPT Server作为集群机器之间的时间同步机器。互联网环境下可选。
备份ntpd配置文件
mv /etc/ntp.conf{,.bak}
脚本设置文件配置
sudo tee /etc/ntp.conf<<-'EOF'
driftfile /var/lib/ntp/driftrestrict default nomodify notrap nopeer noquery
restrict 127.0.0.1
restrict ::1
# 这个表示在192.168.1.1/24网段内的服务器就可以通过这台NTP Server进行时间同步了
restrict 192.168.1.1 mask 255.255.255.0 nomodifyserver 0.cn.pool.ntp.org iburst
server 1.cn.pool.ntp.org iburst
server 2.cn.pool.ntp.org iburst
server 3.cn.pool.ntp.org iburstserver 127.0.0.1 # local clock
fudge 127.0.0.1 stratum 10includefile /etc/ntp/crypto/pw
keys /etc/ntp/keysdisable monitor
EOF
开启服务
systemctl start ntpd.service
systemctl enable ntpd
3、NTP子节点机器,配置连接NTP Server
配置子节点机器的ntp.conf
sudo tee /etc/ntp.conf<<-'EOF'
driftfile /var/lib/ntp/driftrestrict default nomodify notrap nopeer noquery
restrict 127.0.0.1
restrict ::1
restrict bd001.dev.tkhome.bms.ctos7 nomodify notrap noqueryserver bd001.dev.tkhome.bms.ctos7server 127.0.0.1 # local clock
fudge 127.0.0.1 stratum 10includefile /etc/ntp/crypto/pw
keys /etc/ntp/keysdisable monitor
EOF
启动服务
systemctl start ntpd.service
# 设置自启动
systemctl enable ntpd
4、确认时间同步
客户端机器
ntpq -p
看到如下信息

在 bd001.dev.tkhome.bms.ctos7 键入,查看日期
date;ssh bd002.dev.tkhome.bms.ctos7.timekey.com.cn date;ssh bd003.dev.tkhome.bms.ctos7.timekey.com.cn date
see also:
- Enable NTP on the Cluster and on the Browser Host
JDK8安装
参见使用 install-server-jre-offline.sh 脚本,安装完成后, JDK根目录为 /opt/jdk
安装外部数据库
需要数据库的服务:
ambari-server: 由于WFM的兼容性问题,所以建议使用默认内置的数据库(PostgreSQL内存型)所以不需要额外依赖。Oozie、Hive等: 默认可使用Derby,但没其他特殊情况的话,除开发阶段,都不建议使用内存型数据库。其他支持PostgreSQL、MySQL等。
所以,至少我们还需要一个外部数据库,建议使用MariaDB。
MariaDB(MySQL)
以MariaDB为例
1、安装MariaDB
sudo yum install mariadb-server
see also: nstalling MariaDB with yum/dnf
# 安装向导
mysql_secure_installation
2、安装完成后,创建Oozie、Hive和druid服务需要的库。
进入控制台,输入以下语句:
create user 'hive'@'%' identified by 'hive';
GRANT ALL PRIVILEGES ON *.* TO 'hive'@'%';
create user 'hive'@'localhost' identified by 'hive';
GRANT ALL PRIVILEGES ON *.* TO 'hive'@'localhost';
FLUSH PRIVILEGES;CREATE DATABASE `hive` DEFAULT CHARACTER SET utf8 COLLATE utf8_general_ci;create user 'oozie'@'%' identified by 'oozie';
GRANT
这篇关于一次Ambari安装记录的文章就介绍到这儿,希望我们推荐的文章对编程师们有所帮助!


