本文主要是介绍Github Actions实现CI/CD(golang项目),希望对大家解决编程问题提供一定的参考价值,需要的开发者们随着小编来一起学习吧!
Github Actions构建CI/CD(golang项目)
1 基础概念
1.1 Actions
GitHub Actions允许构建一个完整的 CI/CD Pipeline,与 GitHub 生态系统深度集成,而无需使用 Travis CI 或者 Circle CI 等第三方服务,对于开源项目都是可以免费使用的。
1.2 workflow(什么时候做什么事情)
为了触发Github工作流,我们需要定义一个yml文件
- workflow主要是为了定义什么时候做什么事情(on:什么时候,action:做什么事)
- 每个 workflow 由一个或多个 Job 组成,我们的 Build Workflow 包含 3 个 Job(Lint、Build 和 Test),而 Release Workflow 只包含一个 Release 的 Job。
- 每个 Job 都由多个 Step 组成,比如,“单元测试”的 Job 就包含获取代码、运行测试和生产代码覆盖率报告的几个步骤。
- Workflow 会被定义在代码仓库根目录下面的.github/workflows目录中的 YAML 文件中,该目录下面的每个文件就代表了不同的工作流。
例如:Build.yml
name: Build and Test
on:push:branches:- masterpull_request:jobs:lint:name: Lintruns-on: ubuntu-lateststeps:- name: Set up Gouses: actions/setup-go@v1with:go-version: 1.12- name: Check out codeuses: actions/checkout@v1- name: Lint Go Coderun: |export PATH=$PATH:$(go env GOPATH)/bin # temporary fix. See https://github.com/actions/setup-go/issues/14go get -u golang.org/x/lint/golint make lint          test:name: Testruns-on: ubuntu-lateststeps:- name: Set up Gouses: actions/setup-go@v1with:go-version: 1.12- name: Check out codeuses: actions/checkout@v1- name: Run Unit tests.run: make test-coverage- name: Upload Coverage report to CodeCovuses: codecov/codecov-action@v1.0.0with:token: ${{secrets.CODECOV_TOKEN}}file: ./coverage.txtbuild:name: Buildruns-on: ubuntu-latestneeds: [lint, test]steps:- name: Set up Gouses: actions/setup-go@v1with:go-version: 1.12- name: Check out codeuses: actions/checkout@v1- name: Buildrun: make build
1 on:触发构建条件(什么时候构建)
# 1 当推送到master或者release分支时触发构建
on:push:branches:- master- release/*# 2 提交pr到master时构建
on:pull_request:branches:- master# 3 定时任务
on:schedule:- cron: 0 2 * * 1-5
其他语法见: https://help.github.com/articles/workflow-syntax-for-github-actions
2 jobs:做什么事
yml中我们可以定义一个或多个job。
- steps包含完成某个job具体的步骤。
- actions 是可重复使用的工作单元,可由任何人在 GitHub 上构建和分发,我们可以在 GitHub marketplace 中找打各种各样的操作,通过指定包含 action 和 想使用的 ref 来进行操作:
# 当有push发生时,触发构建
name: CIon: [push]
# jobs:定义一个或多个job
jobs:# 每个job的构建环境及steps所做操作build:# 该job在什么环境下运行runs-on: ubuntu-latest# 该jobs需要做哪些操作steps:- uses: actions/checkout@v1- name: Run a one-line scriptrun: echo Hello, world!- name: Run a multi-line scriptrun: |echo Add other actions to build,echo test, and deploy your project.
2 实战
下面我将演示通过Github Actions构建两个workflow工作流。
- 推送代码到 master 分支或者创建 PR 的时候将触发 Build 的 workflow
- 当创建了一个新的 tag 的时候,会触发 Release 的 workflow,该工作流会发布一个新的应用版本。
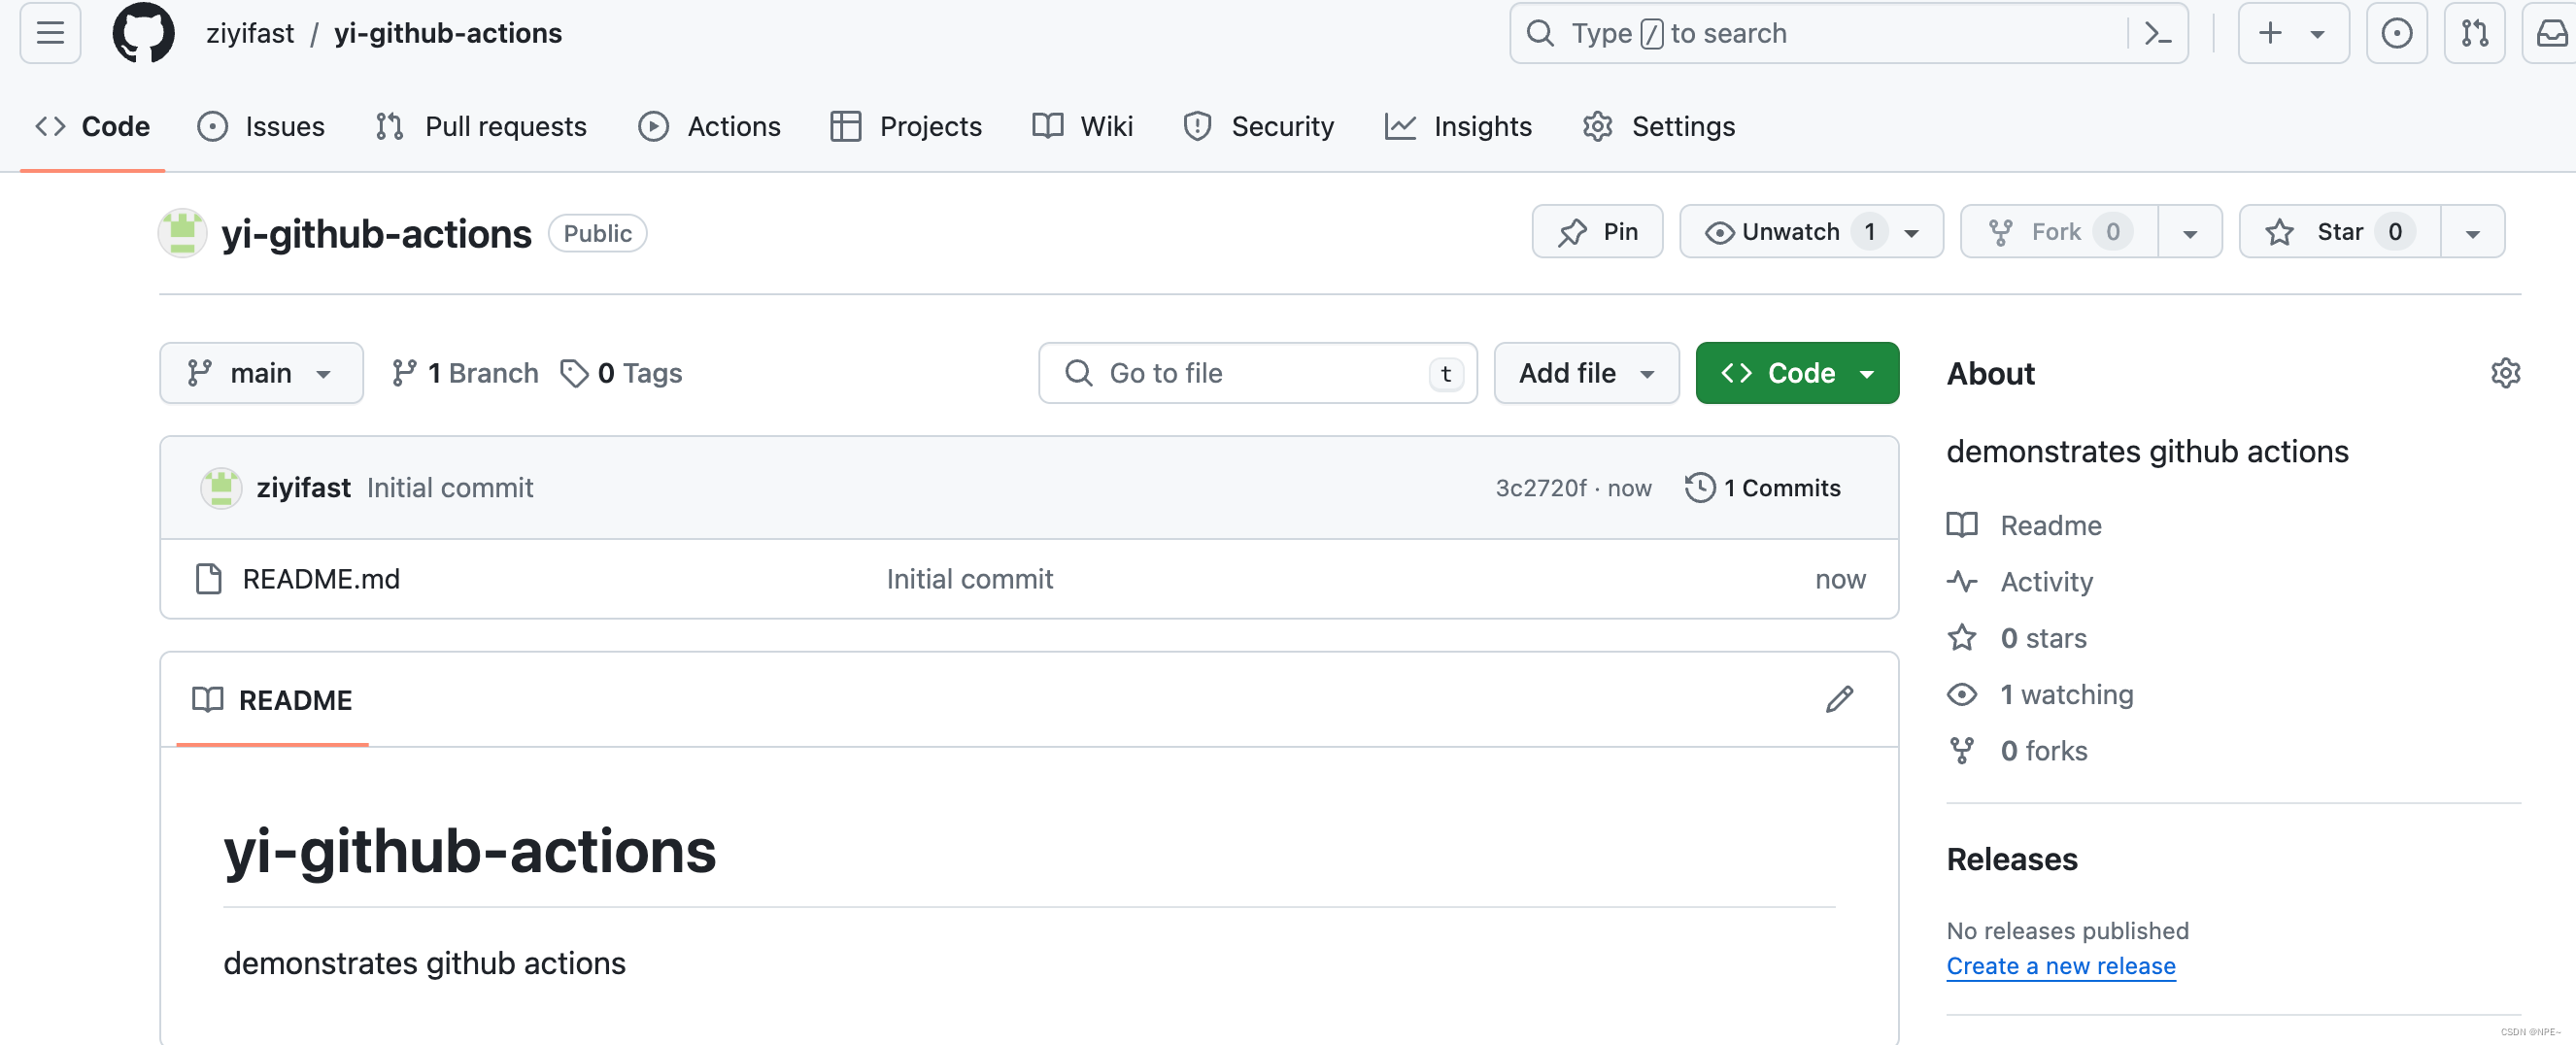
2.1 项目准备
- Github上新建[yi-github-actions]项目
- 本地init一个git仓库,并添加origin
git init
# 添加远程仓库地址
git remote add origin git@github.com:ziyifast/yi-github-actions.git
# 拉取分支
git fetch -p
git merge --ff-only
# 切换到main分支
git checkout main
2.2 Build workflow编写
这里主要讲解:main.yml的编写
Build Workflow 包含 3 个 Job(Lint、Build 和 Test)
- Lint:检测代码格式
- Build:构建代码
- Test:检查测试覆盖率
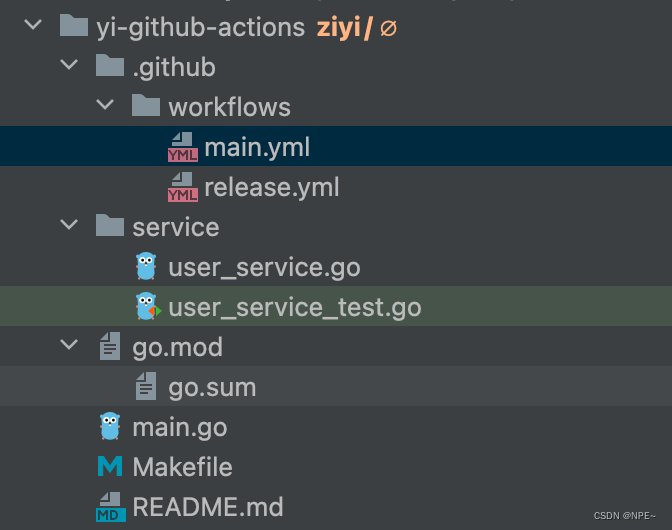
项目结构:
1 workflow名称及触发规则:on
on:push:branches:- masterpull_request:
2 workflow所包含job
整个 workflow 中包含了 3 个 Job:Lint、Test 和 Build,Lint 的 Job 定义如下:
下面我们指定了我们希望这个 Job 任务在 ubuntu 机器上运行(runs-on关键字)。Actions 现在支持 Linux、Mac、Windows 和 Docker 环境,在以后,也可以将自己的机器来作为 runners 运行,类似与 GitLab CI Runner。然后定义了该 Job 任务的执行步骤:
①LintJob
lint:name: Lint# 指定运行环境runs-on: ubuntu-lateststeps:# 安装Go环境,Github已经提供了对应的actions(可以理解为脚本,直接诶执行)- name: Set up Gouses: actions/setup-go@v1with:go-version: 1.19- name: Check out codeuses: actions/checkout@v1# 安装Go lint- name: Lint Go Coderun: |export PATH=$PATH:$(go env GOPATH)/bin # temporary fix. See https://github.com/actions/setup-go/issues/14go get -u golang.org/x/lint/golint make lint
②TestJob
这里的定义唯一不同的是上传代码测试覆盖率使用的 action 是一个第三方的,当然这个 action 也在 marketplace 上面可以找到:
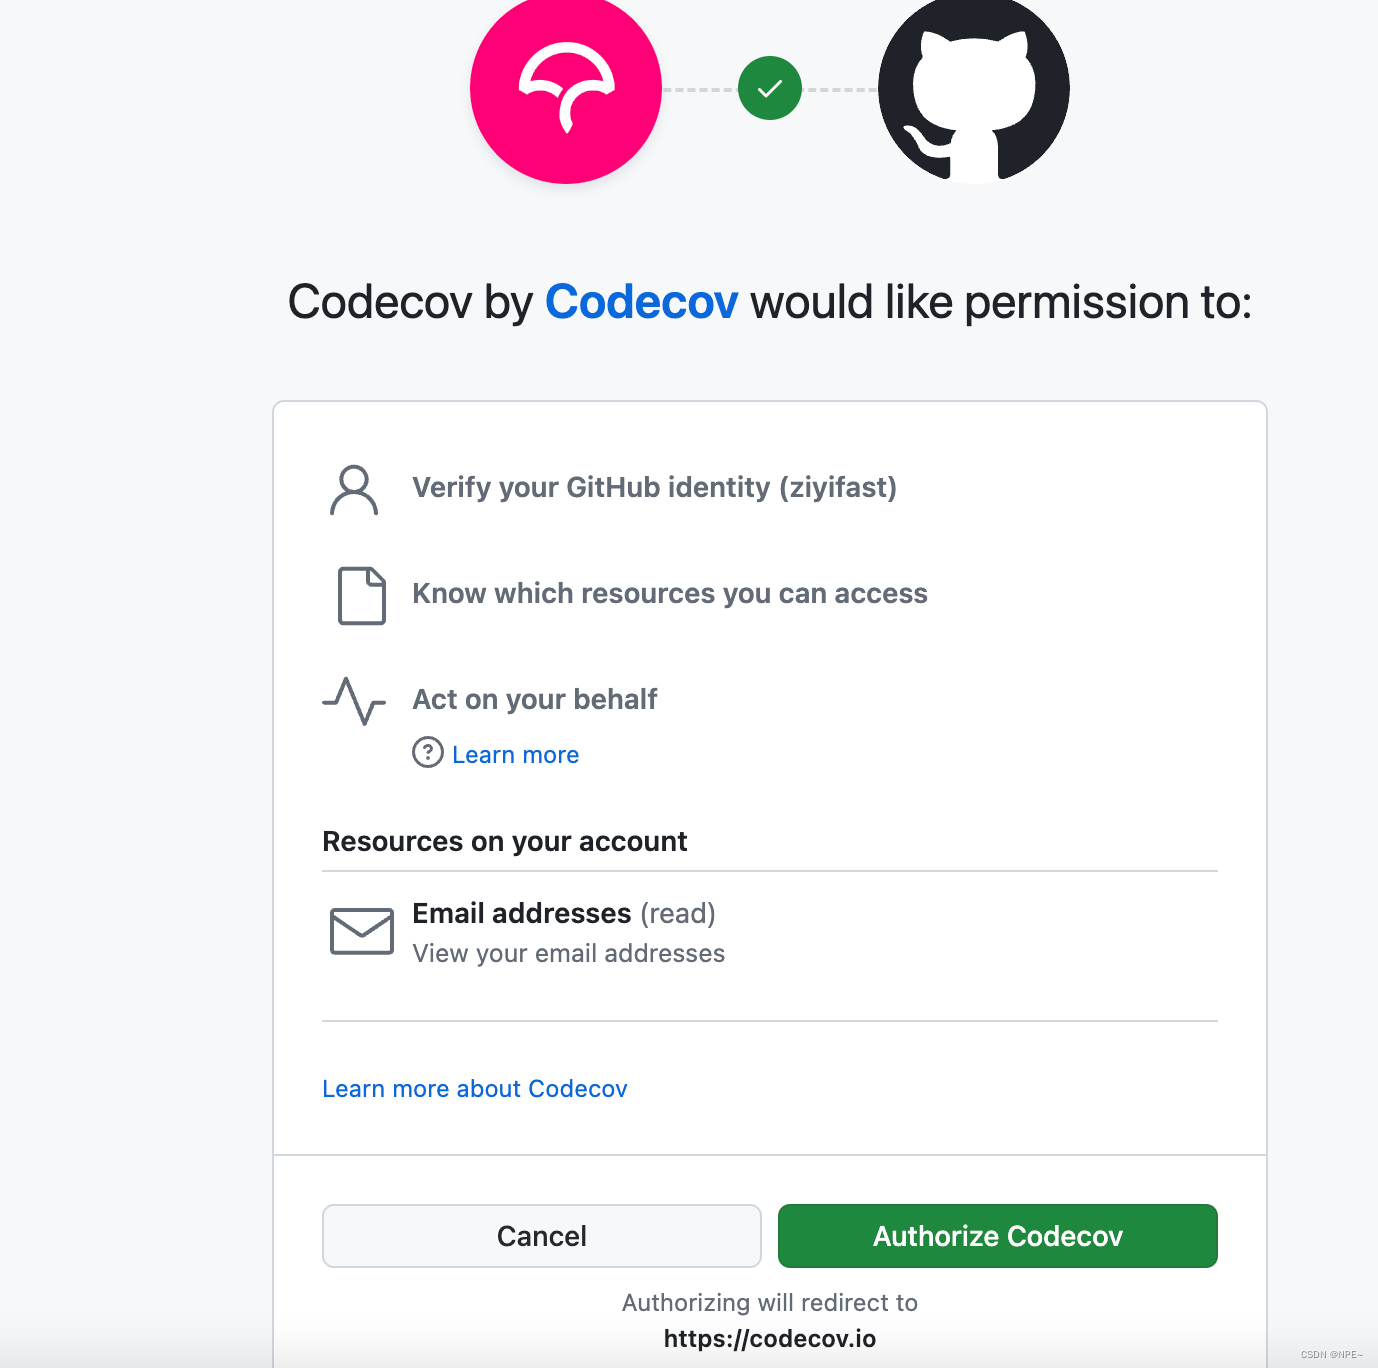
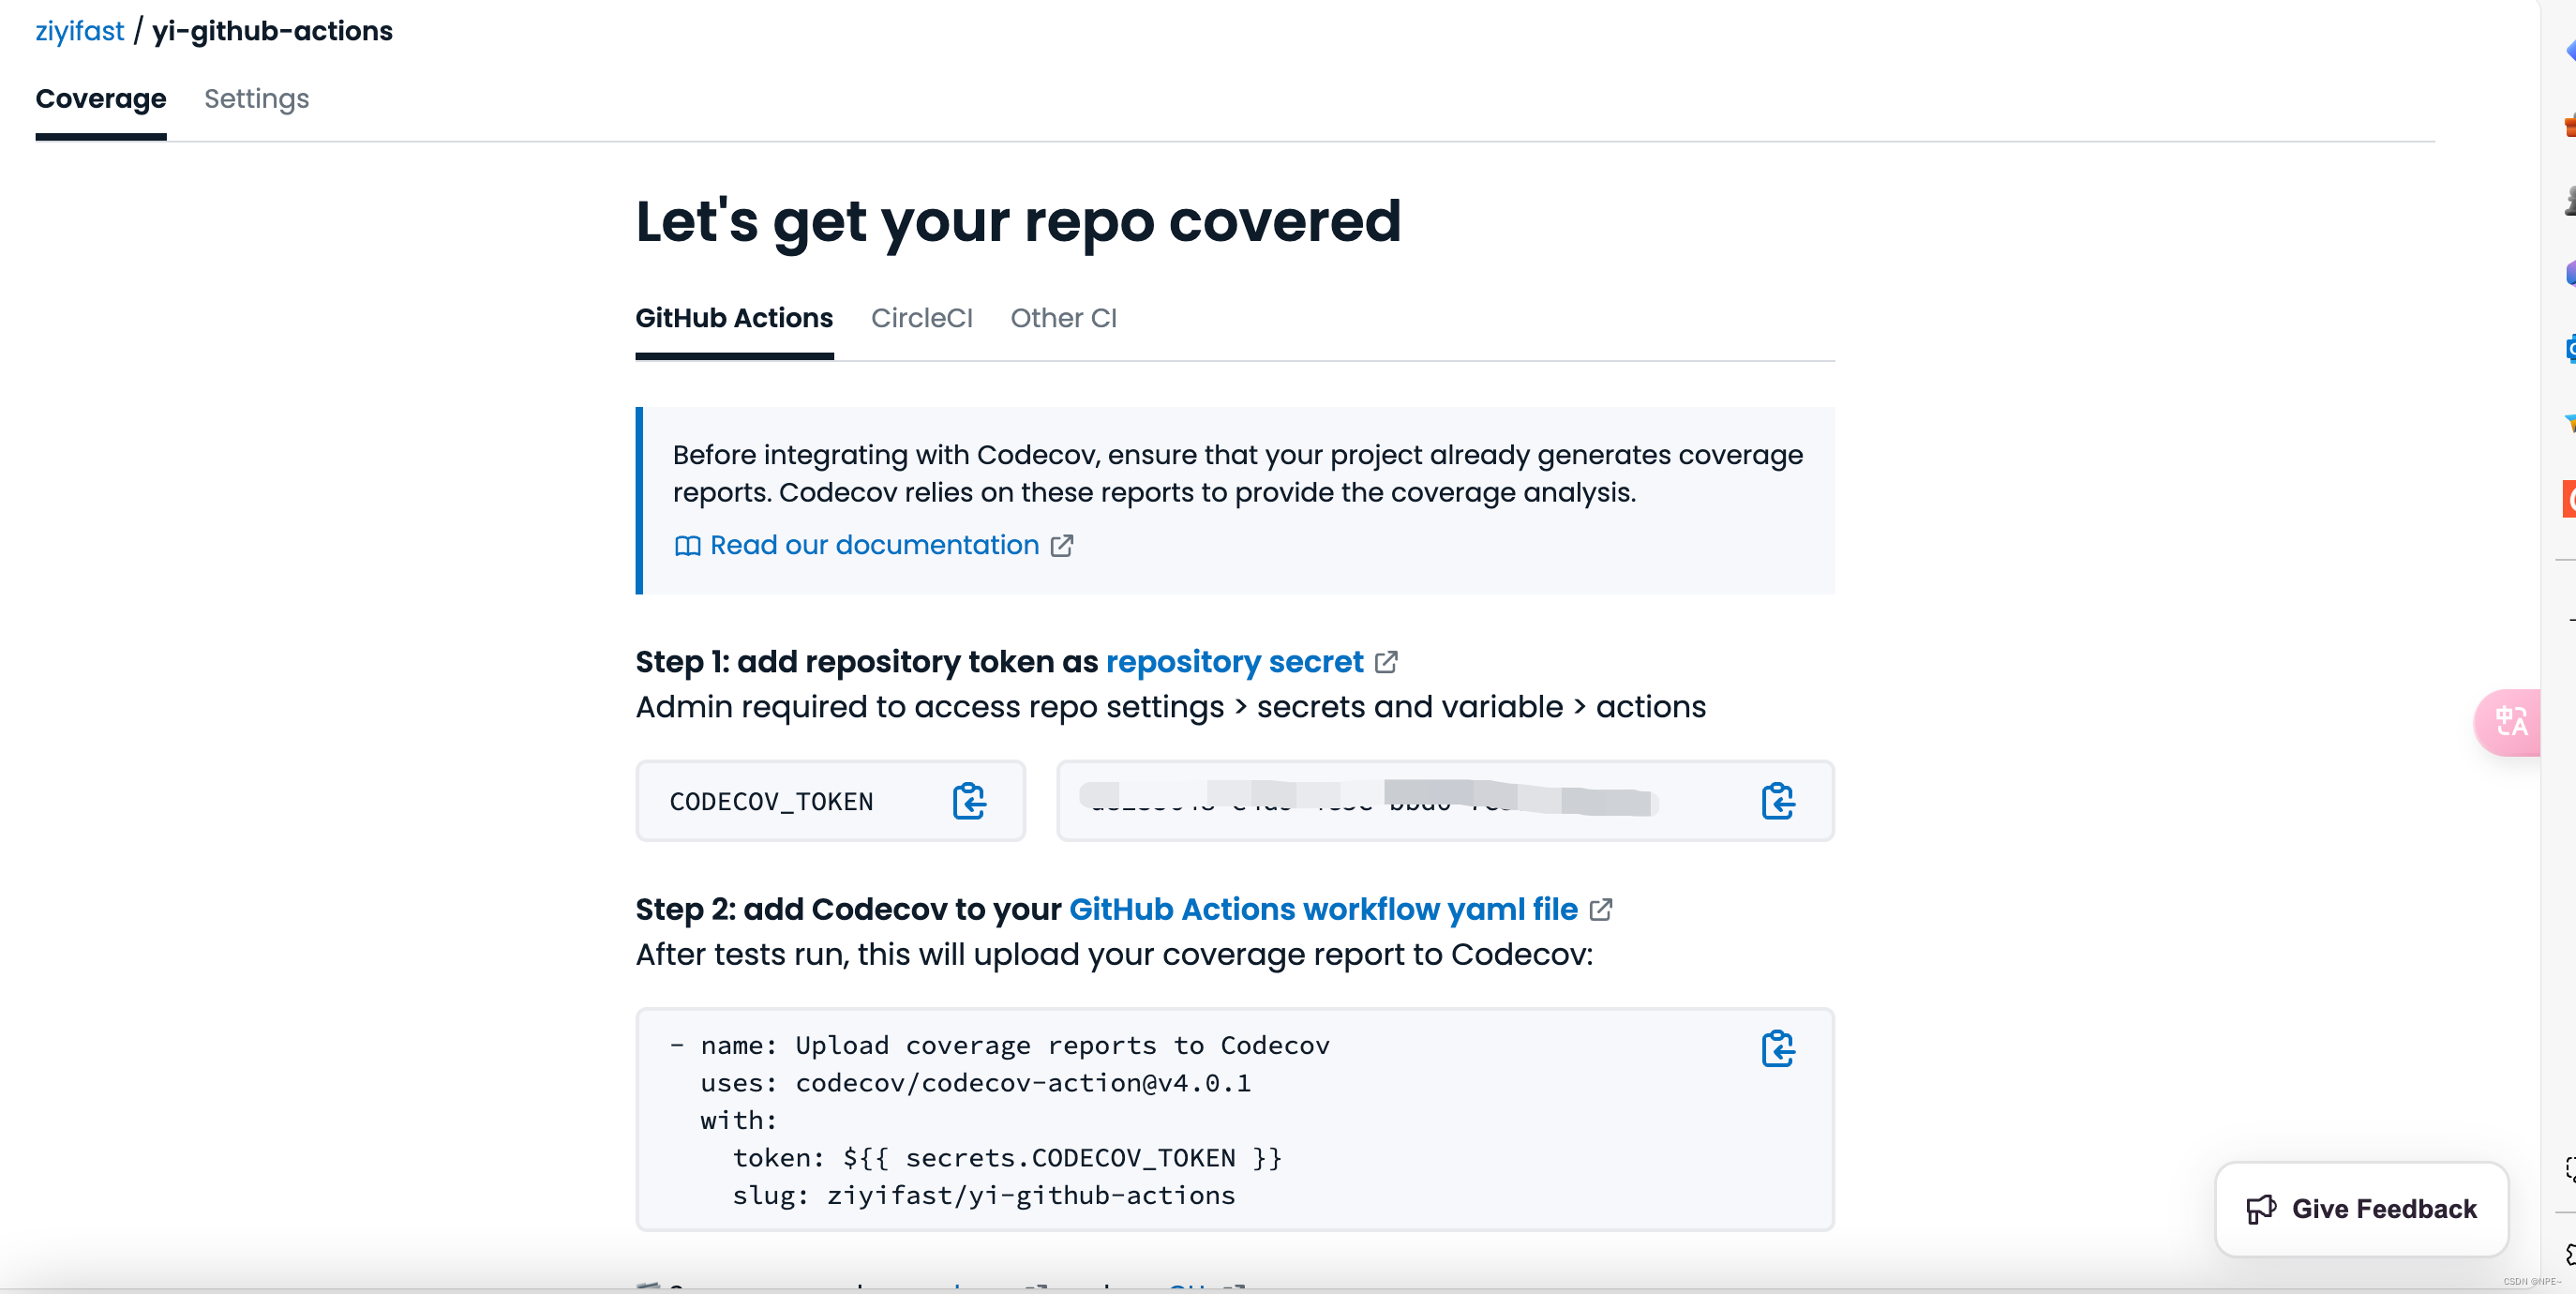
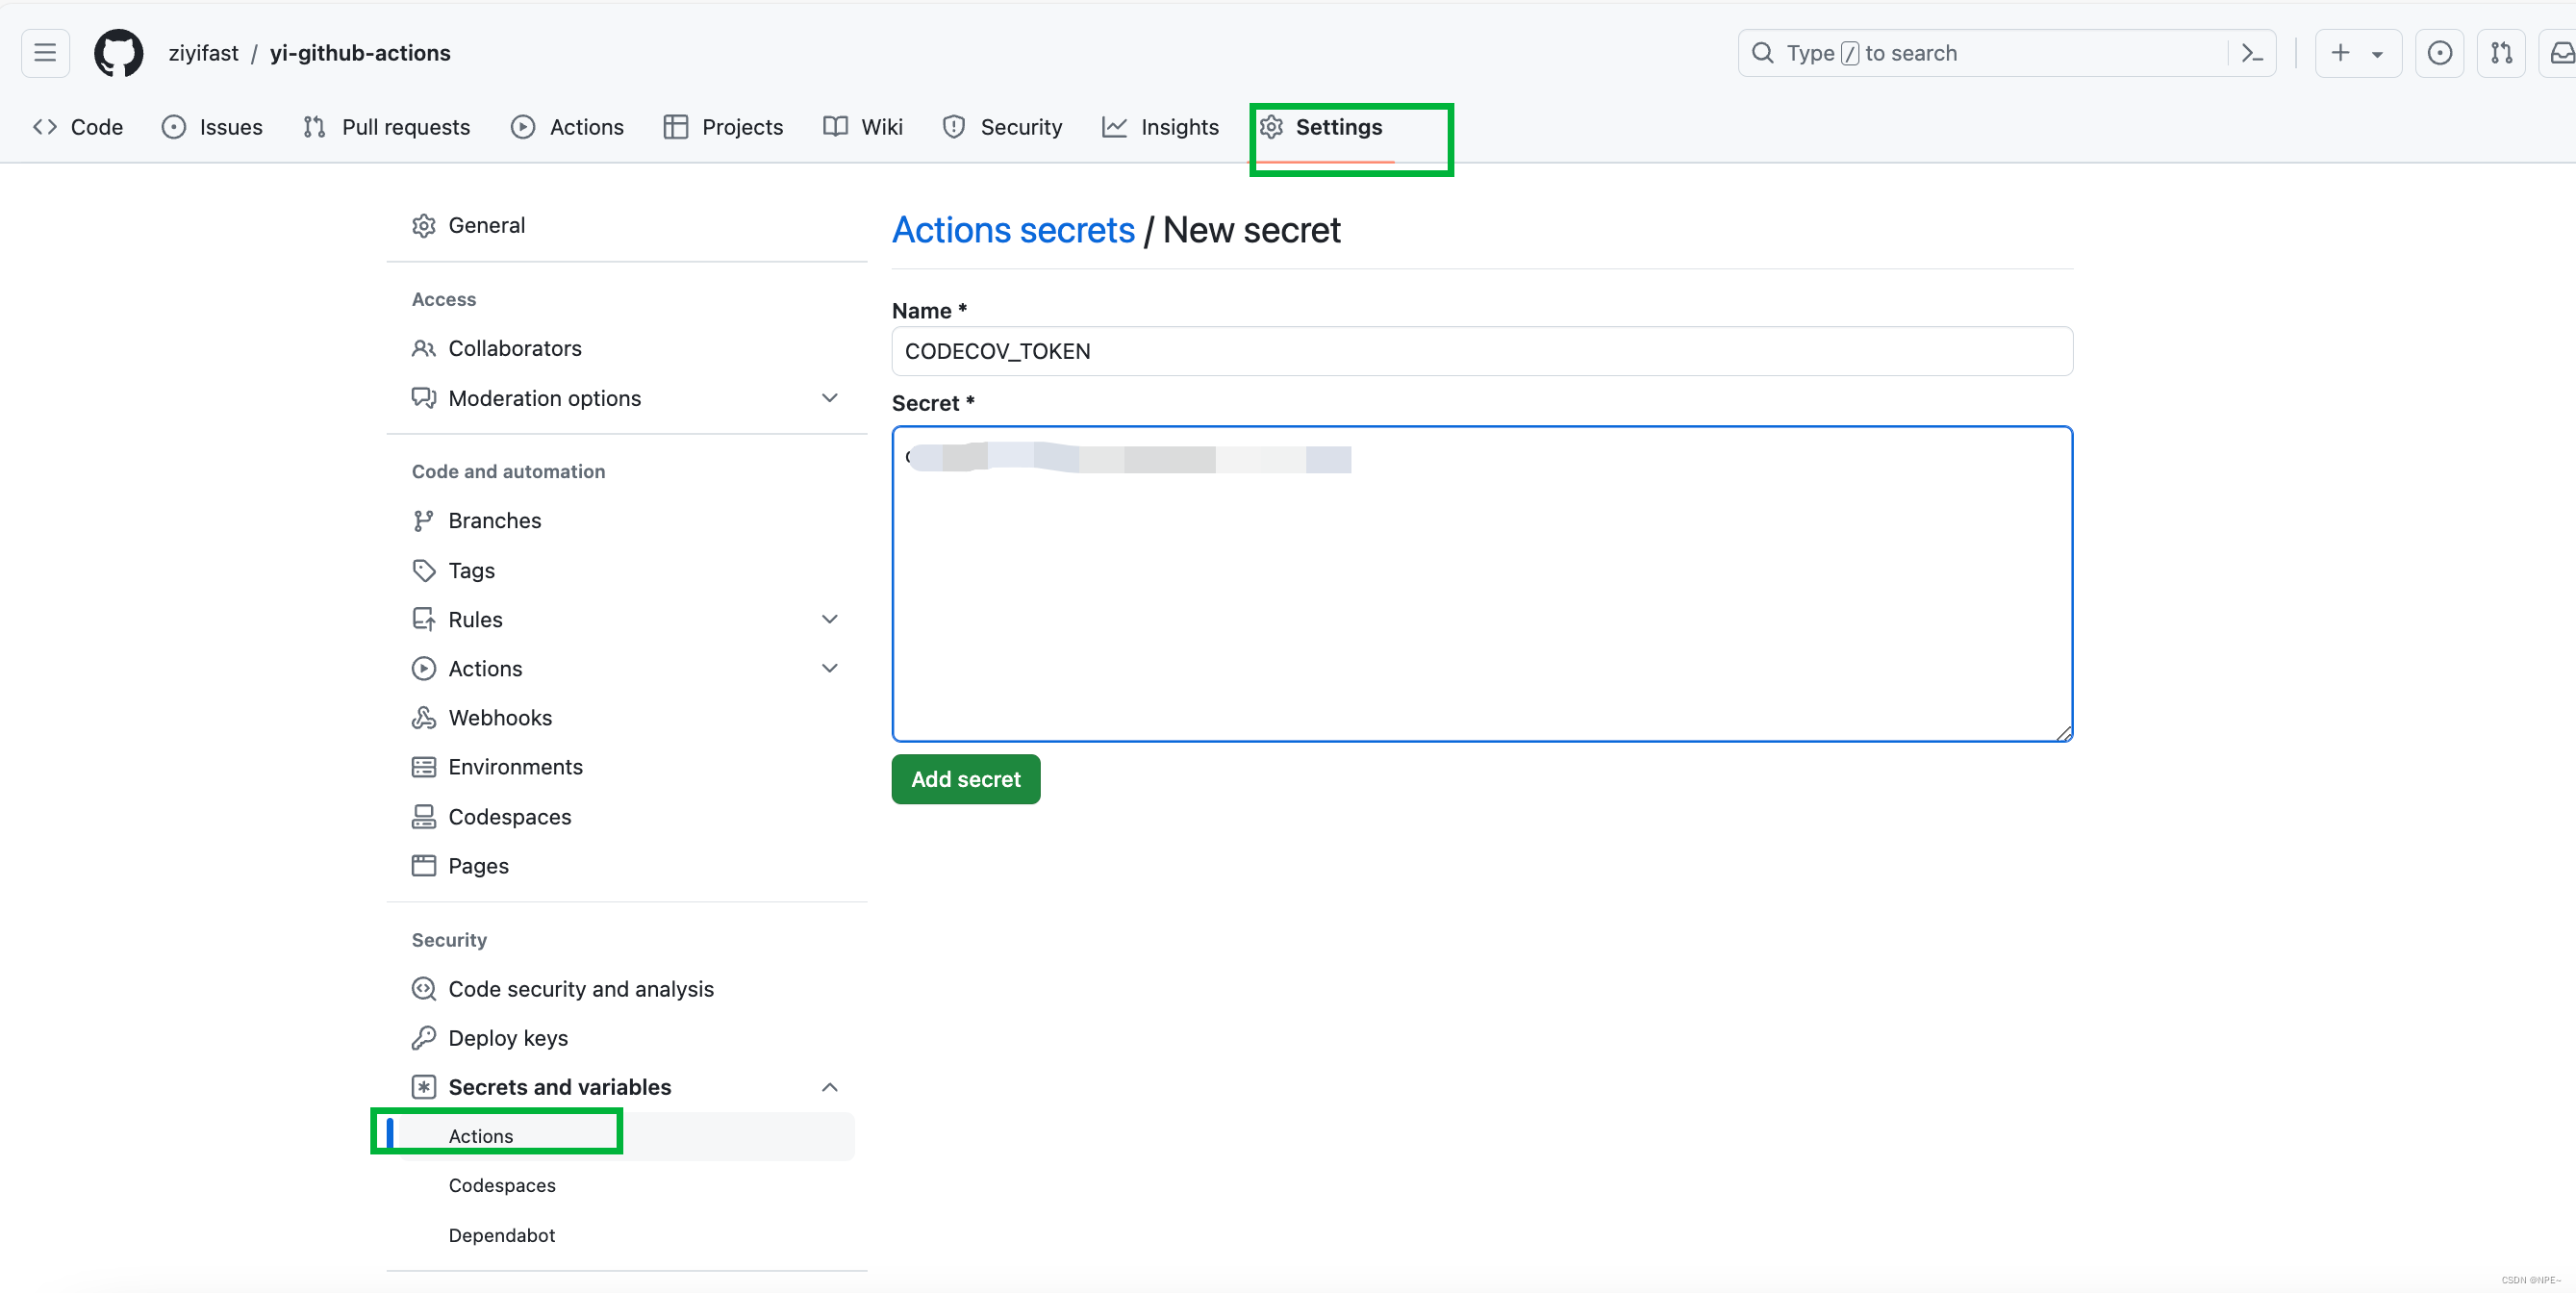
https://github.com/marketplace/actions/codecov,我们会将测试的代码覆盖率上传到 CodeCov。这里我们需要使用 GitHub 的secrets来存储操作 CodeCov 所需要的Codecov Token,在 CodeCov 网站上通过 GitHub 用户授权登录,然后启用上面的[yi-github-actions]项目,就可以获得Codecov Token的值,然后在 GitHub 项目 settings -> Secrets 下面添加,Name 为CODECOV_TOKEN,Value 就是刚刚获取的Codecov Token的值。这样我们就完成了 Test 这个 Job 任务的操作声明。
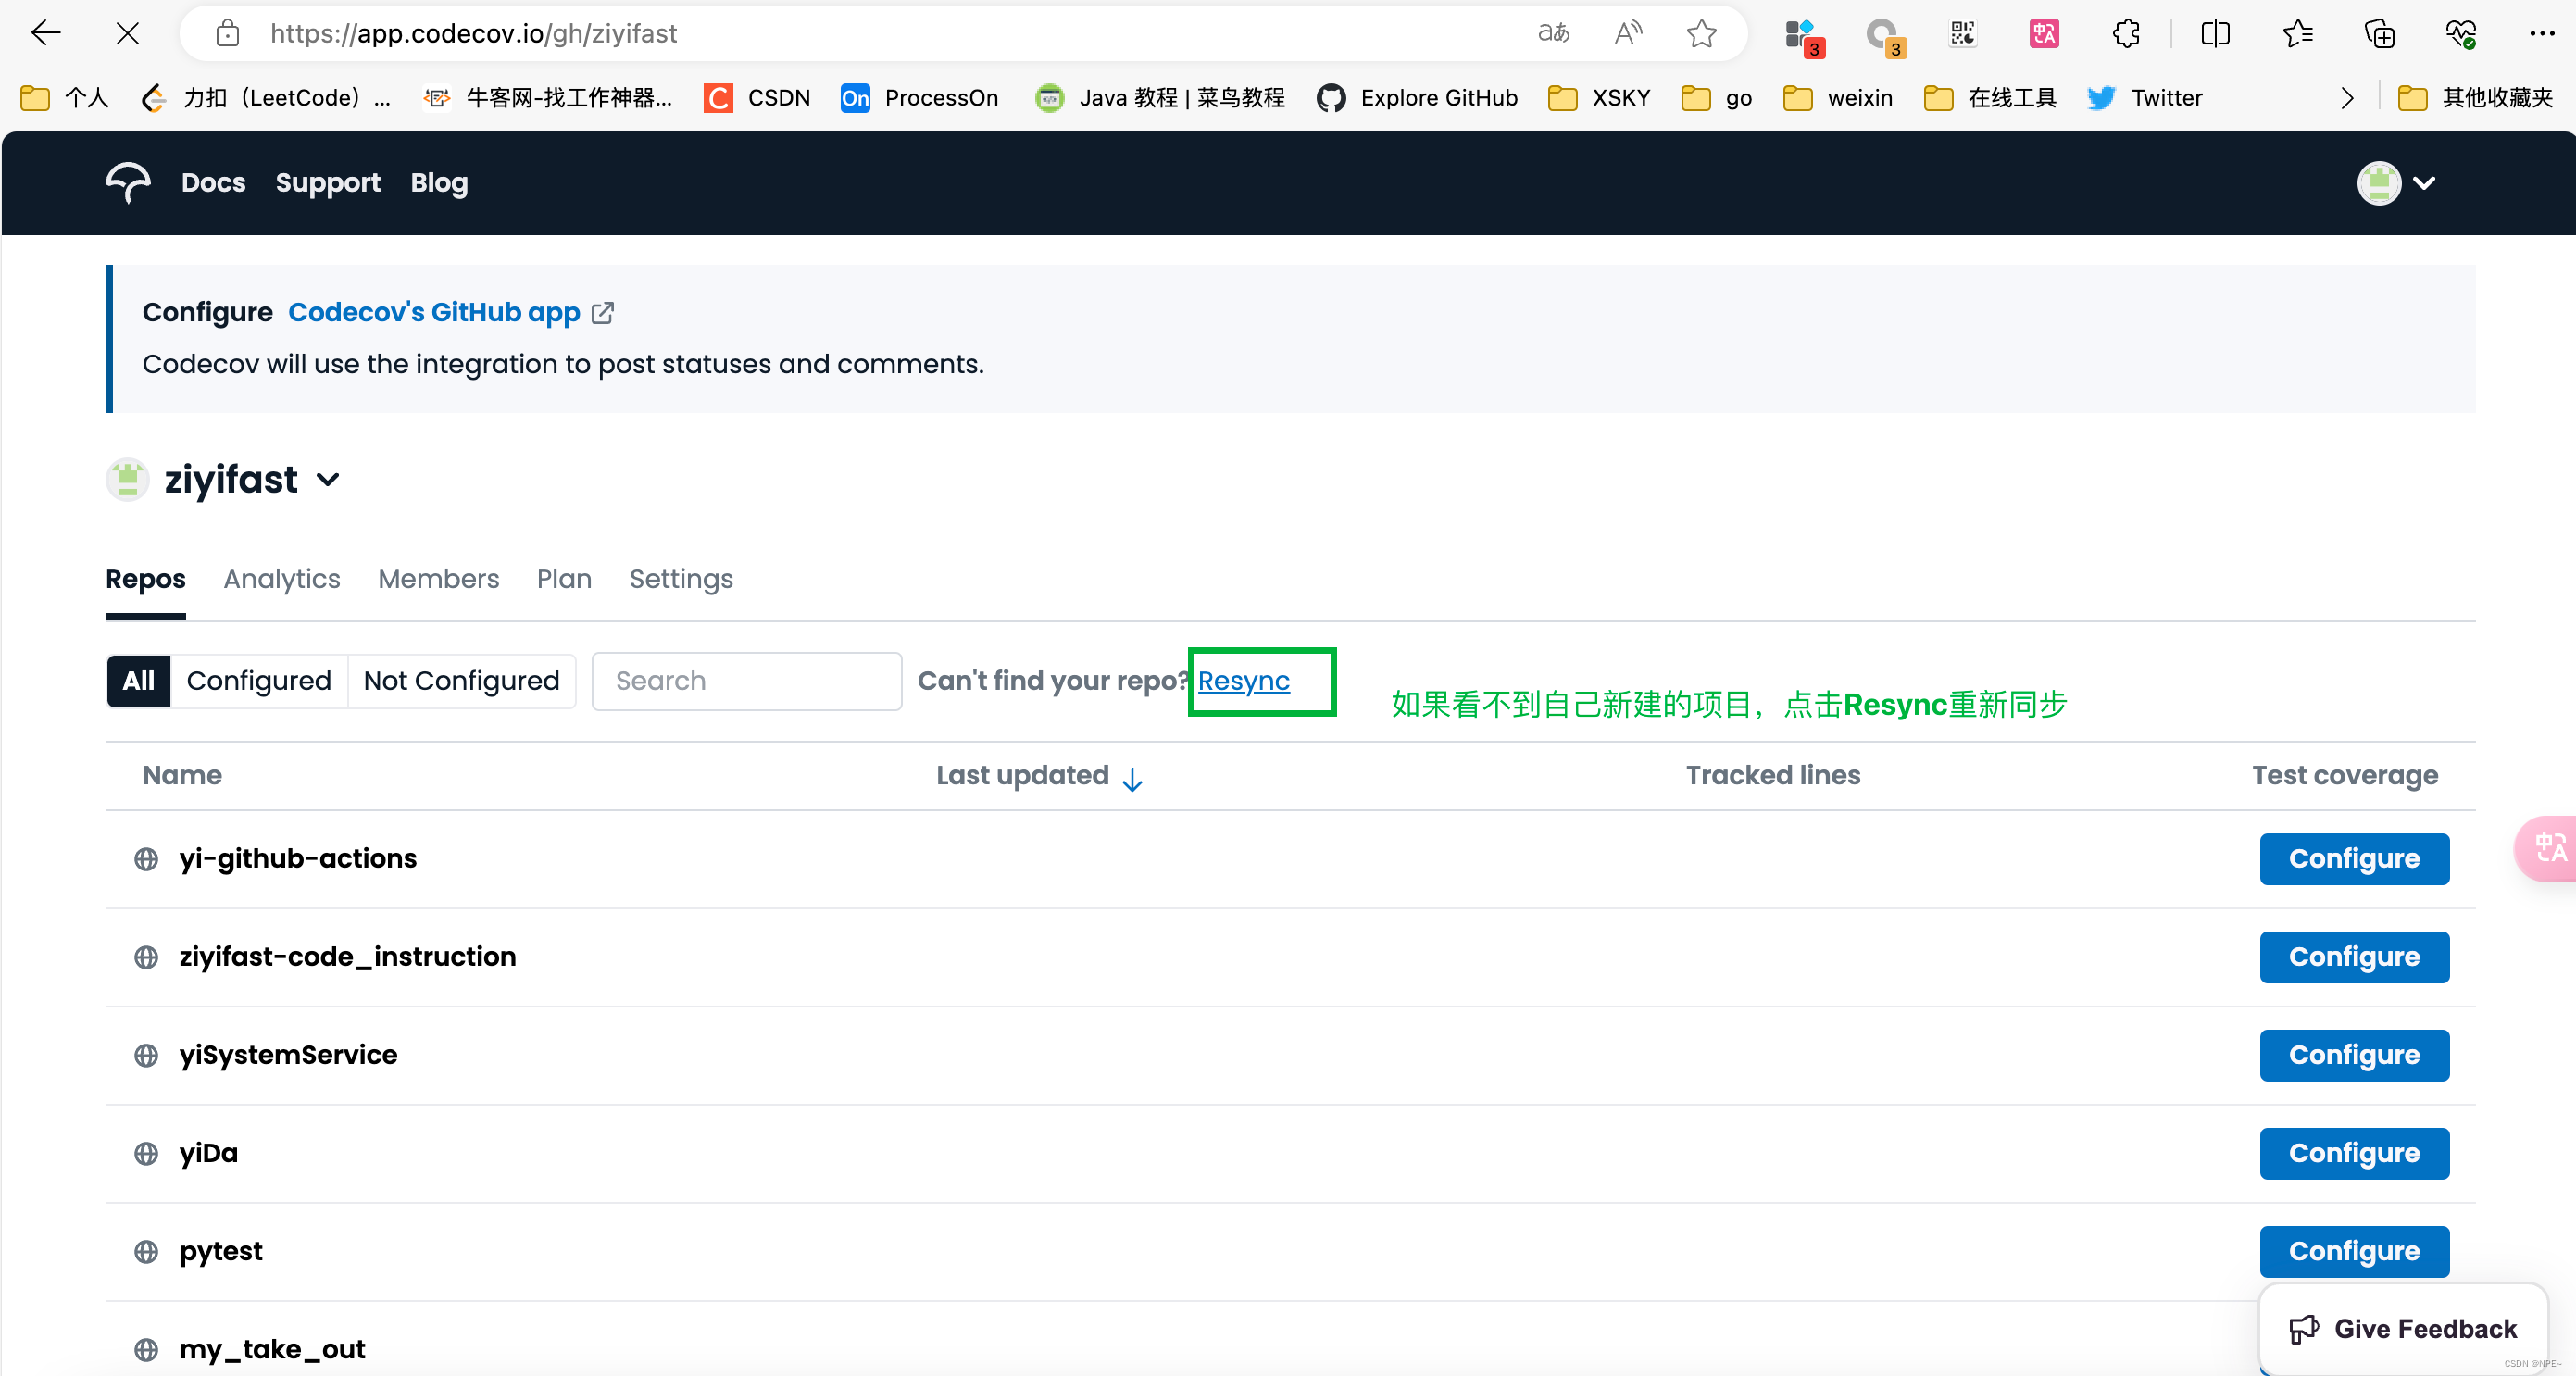
- 以Github账户登录CodeCov官网
- 点击对应项目的Configure,拷贝token信息
- 找到对应项目的settings-Secrets and variable-添加Action Secret。Name 为CODECOV_TOKEN,Value 就是刚刚获取的Codecov Token的值。
拓展:
我们可以使用任何语言创建自己的 actions(只需要包含一个 Dockerfile 文件),如果你喜欢使用 Typescript 的话还可以直接使用官方提供的 action 开发工具包:https://github.com/actions/toolkit。
test:name: Testruns-on: ubuntu-lateststeps:- name: Set up Gouses: actions/setup-go@v1with:go-version: 1.19- name: Check out codeuses: actions/checkout@v1- name: Run Unit tests.run: make test-coverage- name: Upload Coverage report to CodeCovuses: codecov/codecov-action@v1.0.0with:token: ${{secrets.CODECOV_TOKEN}}file: ./coverage.txt
这样我们就完成了第一个 workflow😄,不过需要注意的是我们这里所有的操作都是通过 make 命令执行的,所以我们还需要在项目根目录中添加一个 Makefile 文件,内容如下所示:
PROJECT_NAME := "github.com/ziyifast/yi-github-actions"
PKG := "$(PROJECT_NAME)"
PKG_LIST := $(shell go list ${PKG}/...)
GO_FILES := $(shell find . -name '*.go' | grep -v _test.go).PHONY: all dep lint vet test test-coverage build cleanall: builddep: ## Get the dependencies@go mod downloadlint: ## Lint Golang files@go install golang.org/x/lint/golint@latest@golint -set_exit_status ${PKG_LIST}vet: ## Run go vet@go vet ${PKG_LIST}test: ## Run unittests@go test -short ${PKG_LIST}test-coverage: ## Run tests with coverage@go test -short -coverprofile cover.out -covermode=atomic ${PKG_LIST}@cat cover.out >> coverage.txtbuild: dep ## Build the binary file@go get $(PROJECT_NAME)@go build -i -o build/main $(PKG)clean: ## Remove previous build@rm -f ./buildhelp: ## Display this help screen@grep -h -E '^[a-zA-Z_-]+:.*?## .*$$' $(MAKEFILE_LIST) | awk 'BEGIN {FS = ":.*?## "}; {printf "\033[36m%-30s\033[0m %s\n", $$1, $$2}'
③Build Job
build:name: Buildruns-on: ubuntu-latestneeds: [lint, test]steps:- name: Set up Gouses: actions/setup-go@v1with:go-version: 1.19- name: Check out codeuses: actions/checkout@v1- name: Buildrun: make build
3 main.yml
主要用于构建pr workflow工作流,当有pr提到main上时就会触发
name: Build and Test
on:push:branches:- mainpull_request:jobs:lint:name: Lintruns-on: ubuntu-lateststeps:- name: Set up Gouses: actions/setup-go@v1with:go-version: 1.19- name: Check out codeuses: actions/checkout@v1- name: Lint Go Coderun: |go install golang.org/x/lint/golint@latestexport PATH="$PATH:$HOME/go/bin"make linttest:name: Testruns-on: ubuntu-lateststeps:- name: Set up Gouses: actions/setup-go@v1with:go-version: 1.19- name: Check out codeuses: actions/checkout@v1- name: Run Unit tests.run: make test-coverage- name: Upload Coverage report to CodeCovuses: codecov/codecov-action@v1.0.0with:token: ${{secrets.CODECOV_TOKEN}}file: ./coverage.txtbuild:name: Buildruns-on: ubuntu-latestneeds: [lint, test]steps:- name: Set up Gouses: actions/setup-go@v1with:go-version: 1.19- name: Check out codeuses: actions/checkout@v1- name: Buildrun: make build
2.3 Release workflow编写
有了上面的基础,编写第二个工作流就很简单了。我们要实现给代码打上tag时,就触发release,发布一个release包。
release.yml:
name: Release
on:create:tags:- v*jobs:release:name: Release on GitHubruns-on: ubuntu-lateststeps:- name: Check out codeuses: actions/checkout@v1- name: Validates GO releaser configuses: docker://goreleaser/goreleaser:latestwith:args: check- name: Create release on GitHubuses: docker://goreleaser/goreleaser:latestwith:args: releaseenv:#GITHUB_TOKEN,Github已经帮我们建好了,我们直接使用即可GITHUB_TOKEN: ${{secrets.GITHUB_TOKEN}}
3 全部代码及验证
全部代码:https://github.com/ziyifast/yi-github-actions/actions
3.1 代码
项目结构:

1 yi-github-actions/service/user_service.go
package servicetype userService struct {
}// UserService get user name
var UserService = new(userService)func (u *userService) GetUserName() string {return "tom"
}
2 yi-github-actions/service/user_service_test.go
package serviceimport "testing"func Test_userService_GetUserName(t *testing.T) {tests := []struct {name stringwant string}{{"test", "tom"},}for _, tt := range tests {t.Run(tt.name, func(t *testing.T) {u := &userService{}if got := u.GetUserName(); got != tt.want {t.Errorf("GetUserName() = %v, want %v", got, tt.want)}})}
}
3 yi-github-actions/main.go
package mainimport ("fmt"service "github.com/ziyifast/yi-github-actions/service"
)func main() {fmt.Println("before...")fmt.Println("got a user: ", service.UserService.GetUserName())
}
4 yi-github-actions/Makefile
PROJECT_NAME := "github.com/ziyifast/yi-github-actions"
PKG := "$(PROJECT_NAME)"
PKG_LIST := $(shell go list ${PKG}/...)
GO_FILES := $(shell find . -name '*.go' | grep -v _test.go).PHONY: all dep lint vet test test-coverage build cleanall: builddep: ## Get the dependencies@go mod downloadlint: ## Lint Golang files@go install golang.org/x/lint/golint@latest@golint -set_exit_status ${PKG_LIST}vet: ## Run go vet@go vet ${PKG_LIST}test: ## Run unittests@go test -short ${PKG_LIST}test-coverage: ## Run tests with coverage@go test -short -coverprofile cover.out -covermode=atomic ${PKG_LIST}@cat cover.out >> coverage.txtbuild: dep ## Build the binary file@go get $(PROJECT_NAME)@go build -i -o build/main $(PKG)clean: ## Remove previous build@rm -f ./buildhelp: ## Display this help screen@grep -h -E '^[a-zA-Z_-]+:.*?## .*$$' $(MAKEFILE_LIST) | awk 'BEGIN {FS = ":.*?## "}; {printf "\033[36m%-30s\033[0m %s\n", $$1, $$2}'
5 yi-github-actions/.github/workflows/main.yml
name: Build and Test
on:push:branches:- mainpull_request:jobs:lint:name: Lintruns-on: ubuntu-lateststeps:- name: Set up Gouses: actions/setup-go@v1with:go-version: 1.19- name: Check out codeuses: actions/checkout@v1- name: Lint Go Coderun: |go install golang.org/x/lint/golint@latestexport PATH="$PATH:$HOME/go/bin"make linttest:name: Testruns-on: ubuntu-lateststeps:- name: Set up Gouses: actions/setup-go@v1with:go-version: 1.19- name: Check out codeuses: actions/checkout@v1- name: Run Unit tests.run: make test-coverage- name: Upload Coverage report to CodeCovuses: codecov/codecov-action@v1.0.0with:token: ${{secrets.CODECOV_TOKEN}}file: ./coverage.txtbuild:name: Buildruns-on: ubuntu-latestneeds: [lint, test]steps:- name: Set up Gouses: actions/setup-go@v1with:go-version: 1.19- name: Check out codeuses: actions/checkout@v1- name: Buildrun: make build
6 yi-github-actions/.github/workflows/release.yml
name: Release
on:create:tags:- v*jobs:release:name: Release on GitHubruns-on: ubuntu-lateststeps:- name: Check out codeuses: actions/checkout@v1- name: Validates GO releaser configuses: docker://goreleaser/goreleaser:latestwith:args: check- name: Create release on GitHubuses: docker://goreleaser/goreleaser:latestwith:args: releaseenv:GITHUB_TOKEN: ${{secrets.GITHUB_TOKEN}}
7 yi-github-actions/go.mod
module github.com/ziyifast/yi-github-actionsgo 1.193.2 验证
①pr workflow(main.yml)
触发条件,向main分支提交pr
# 本地新建一个分支,随便修改点文件,然后给远程提交pr
git checkout -b ziyi origin/main
git push origin ziyi
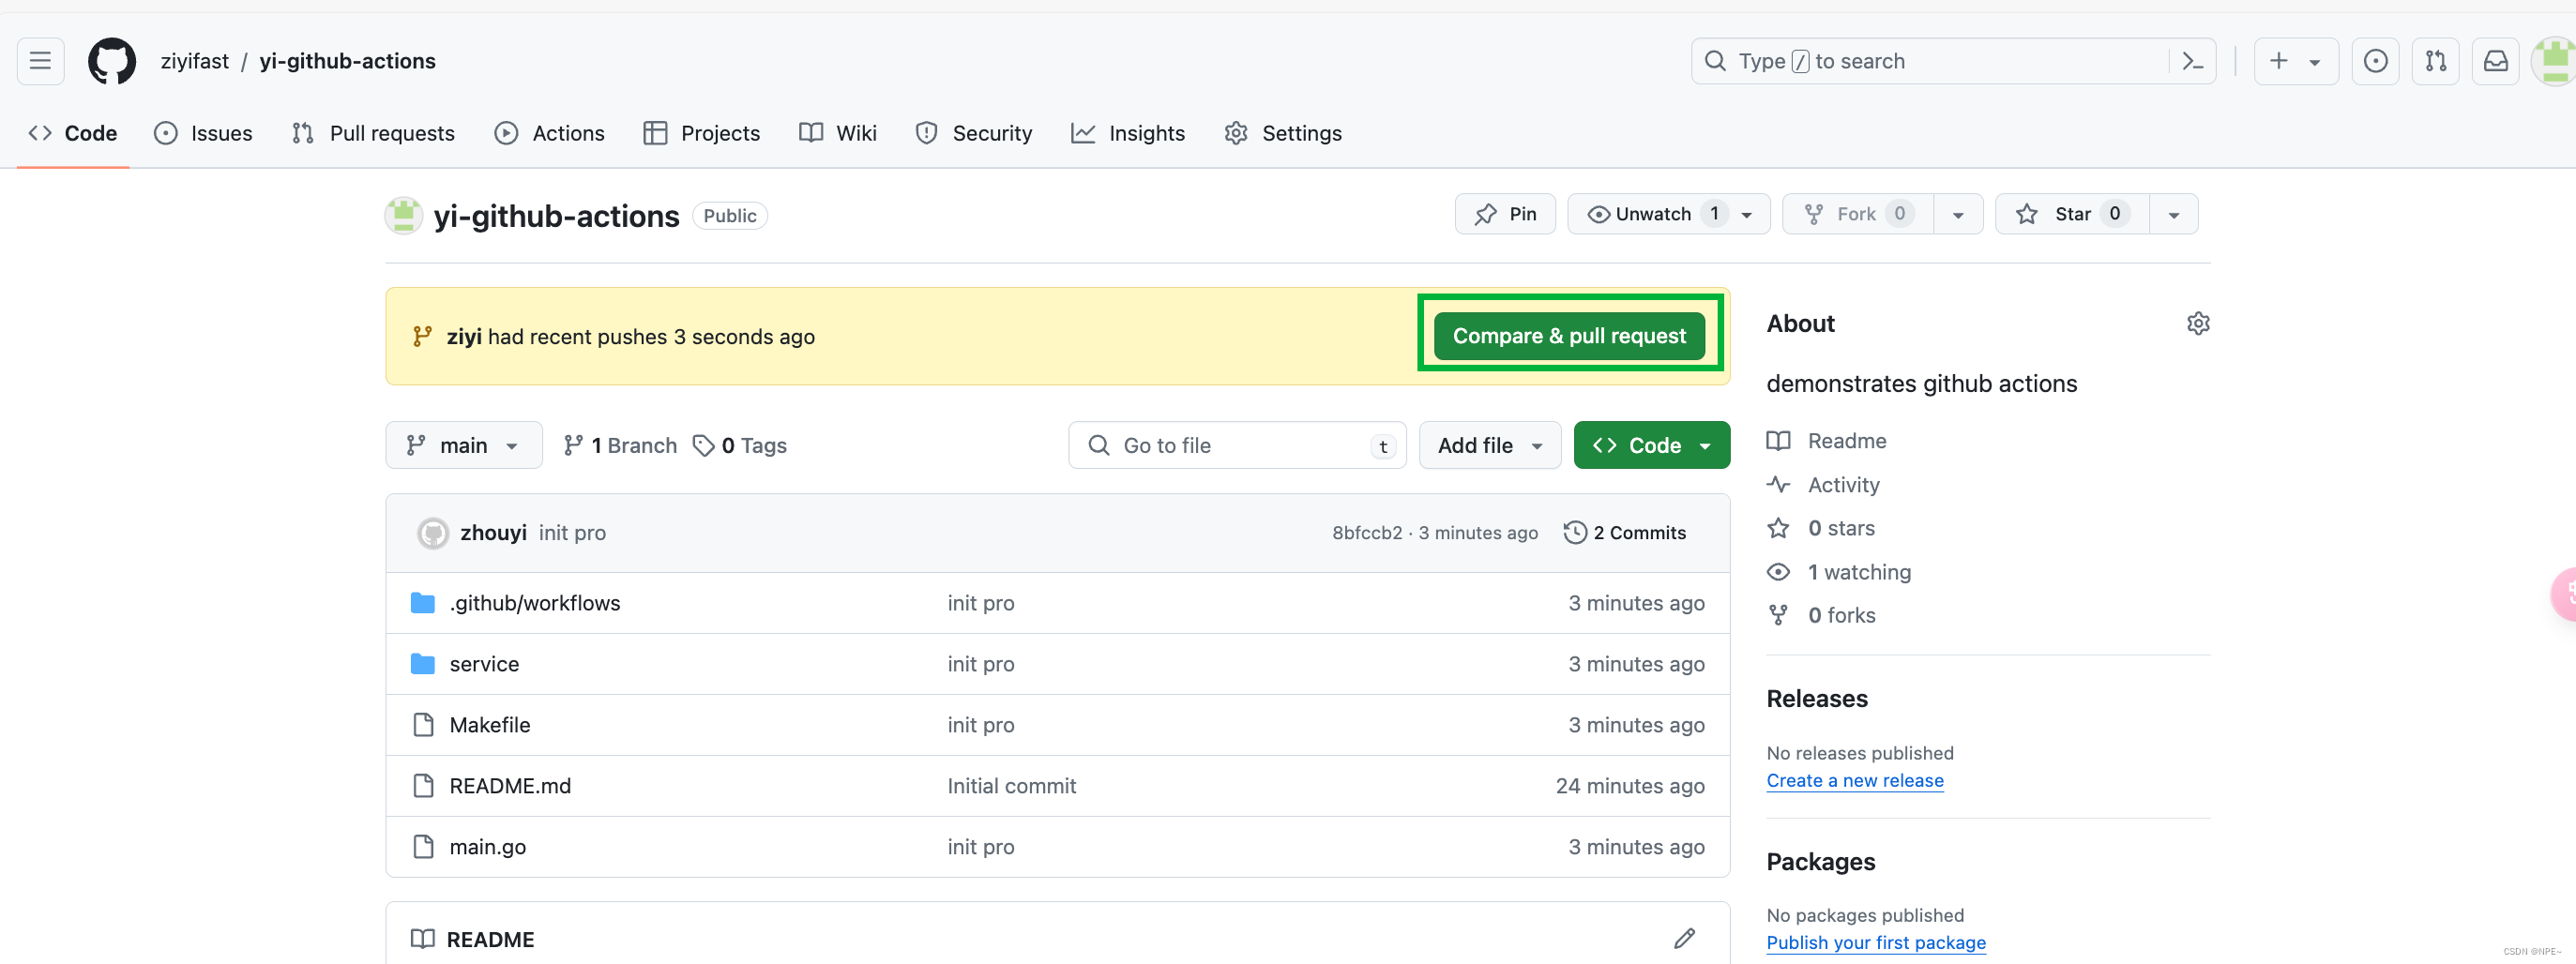
来到Github上提交一个pr,触发构建:

完成之后,可以到cover上查看测试覆盖率:
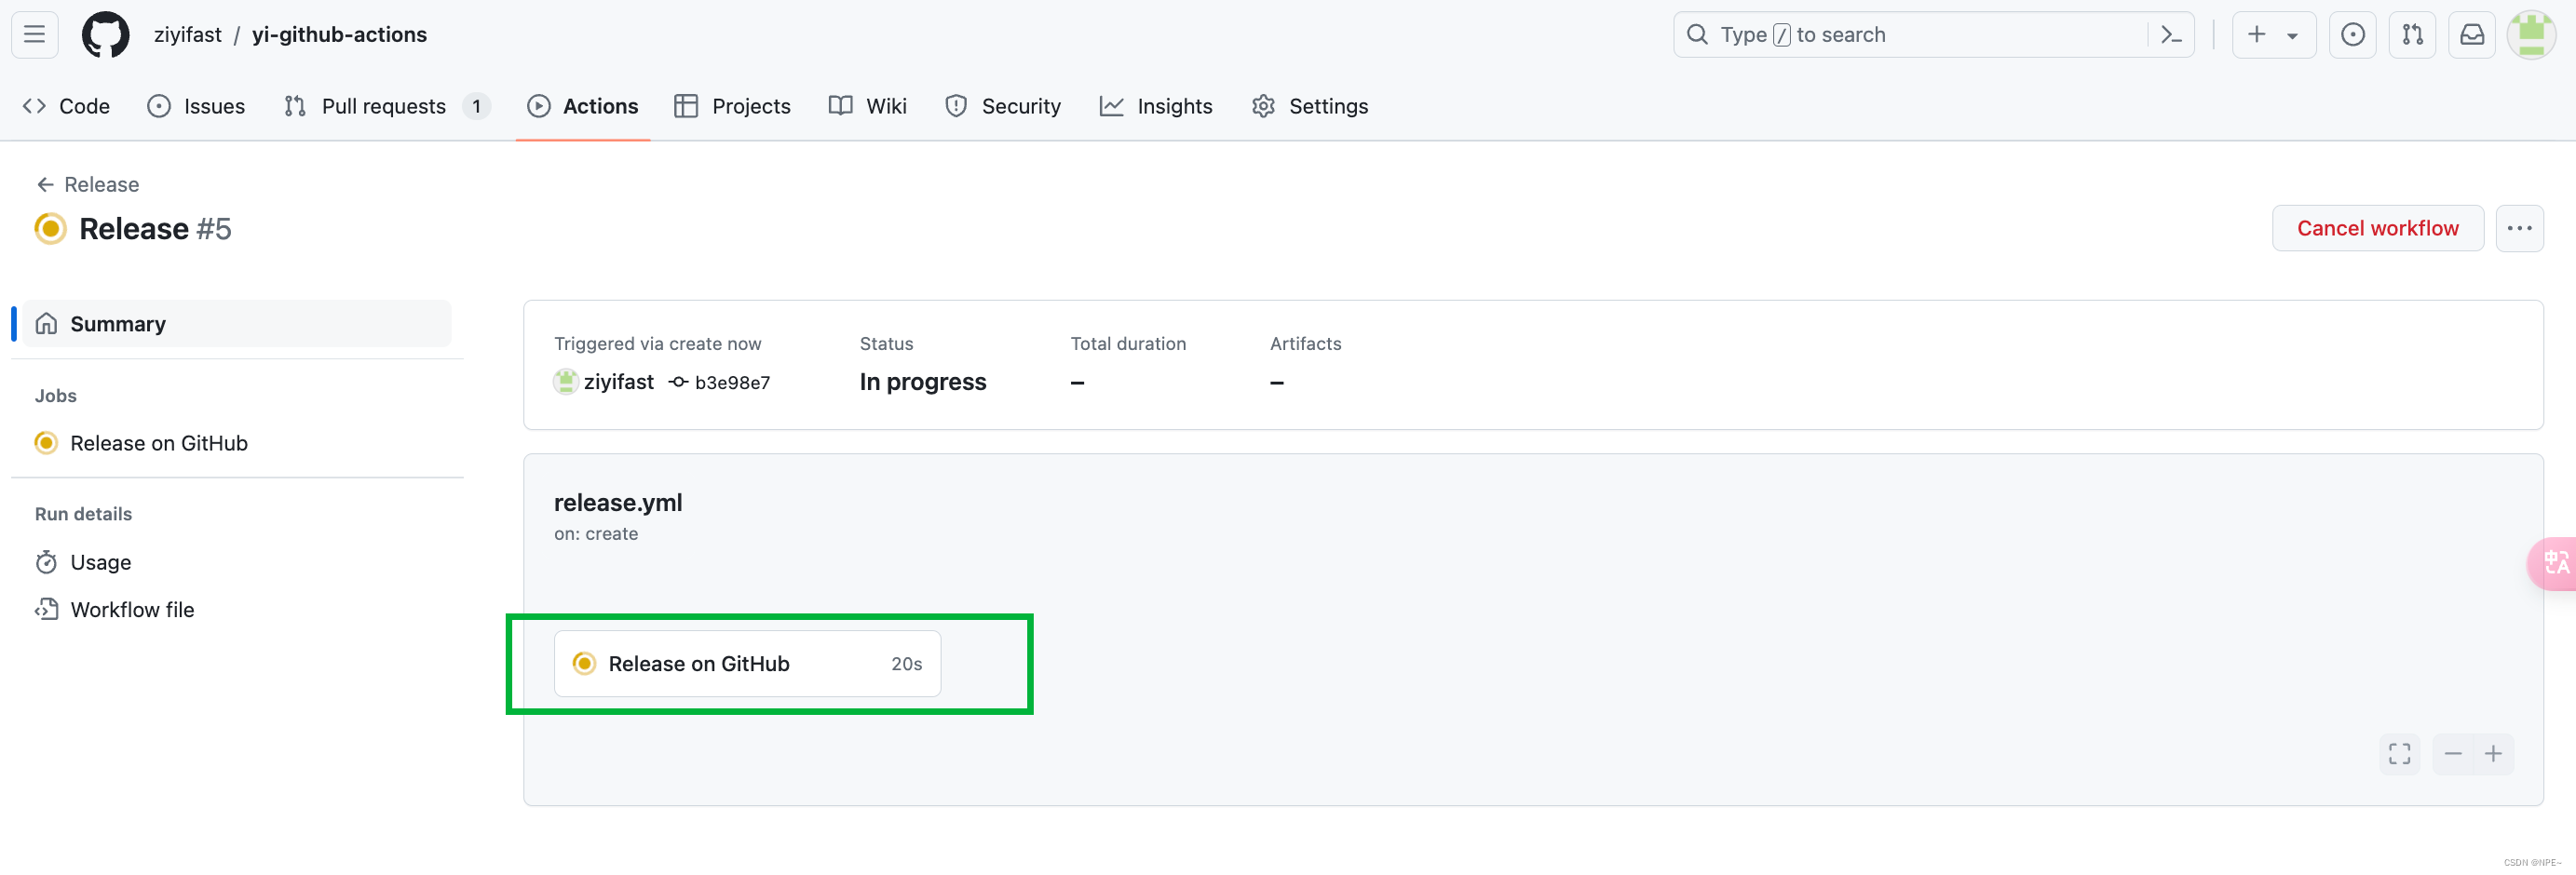
②release workflow(release.yml)
本地打一个tag,然后推送到远程
# 本地打上v1.0.3这个tag
git tag v1.0.3
# 将tag推送到远程
git push origin v1.0.3
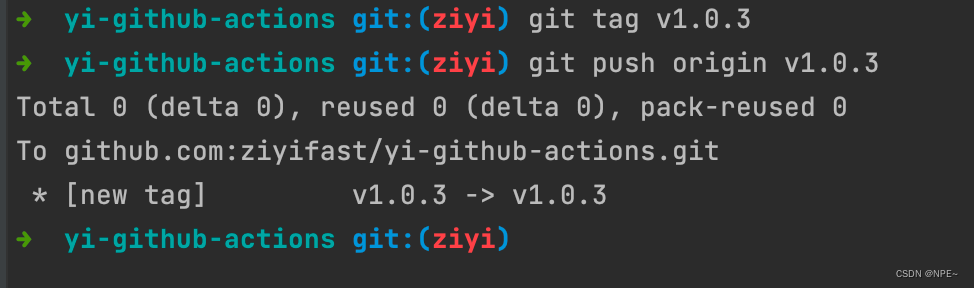
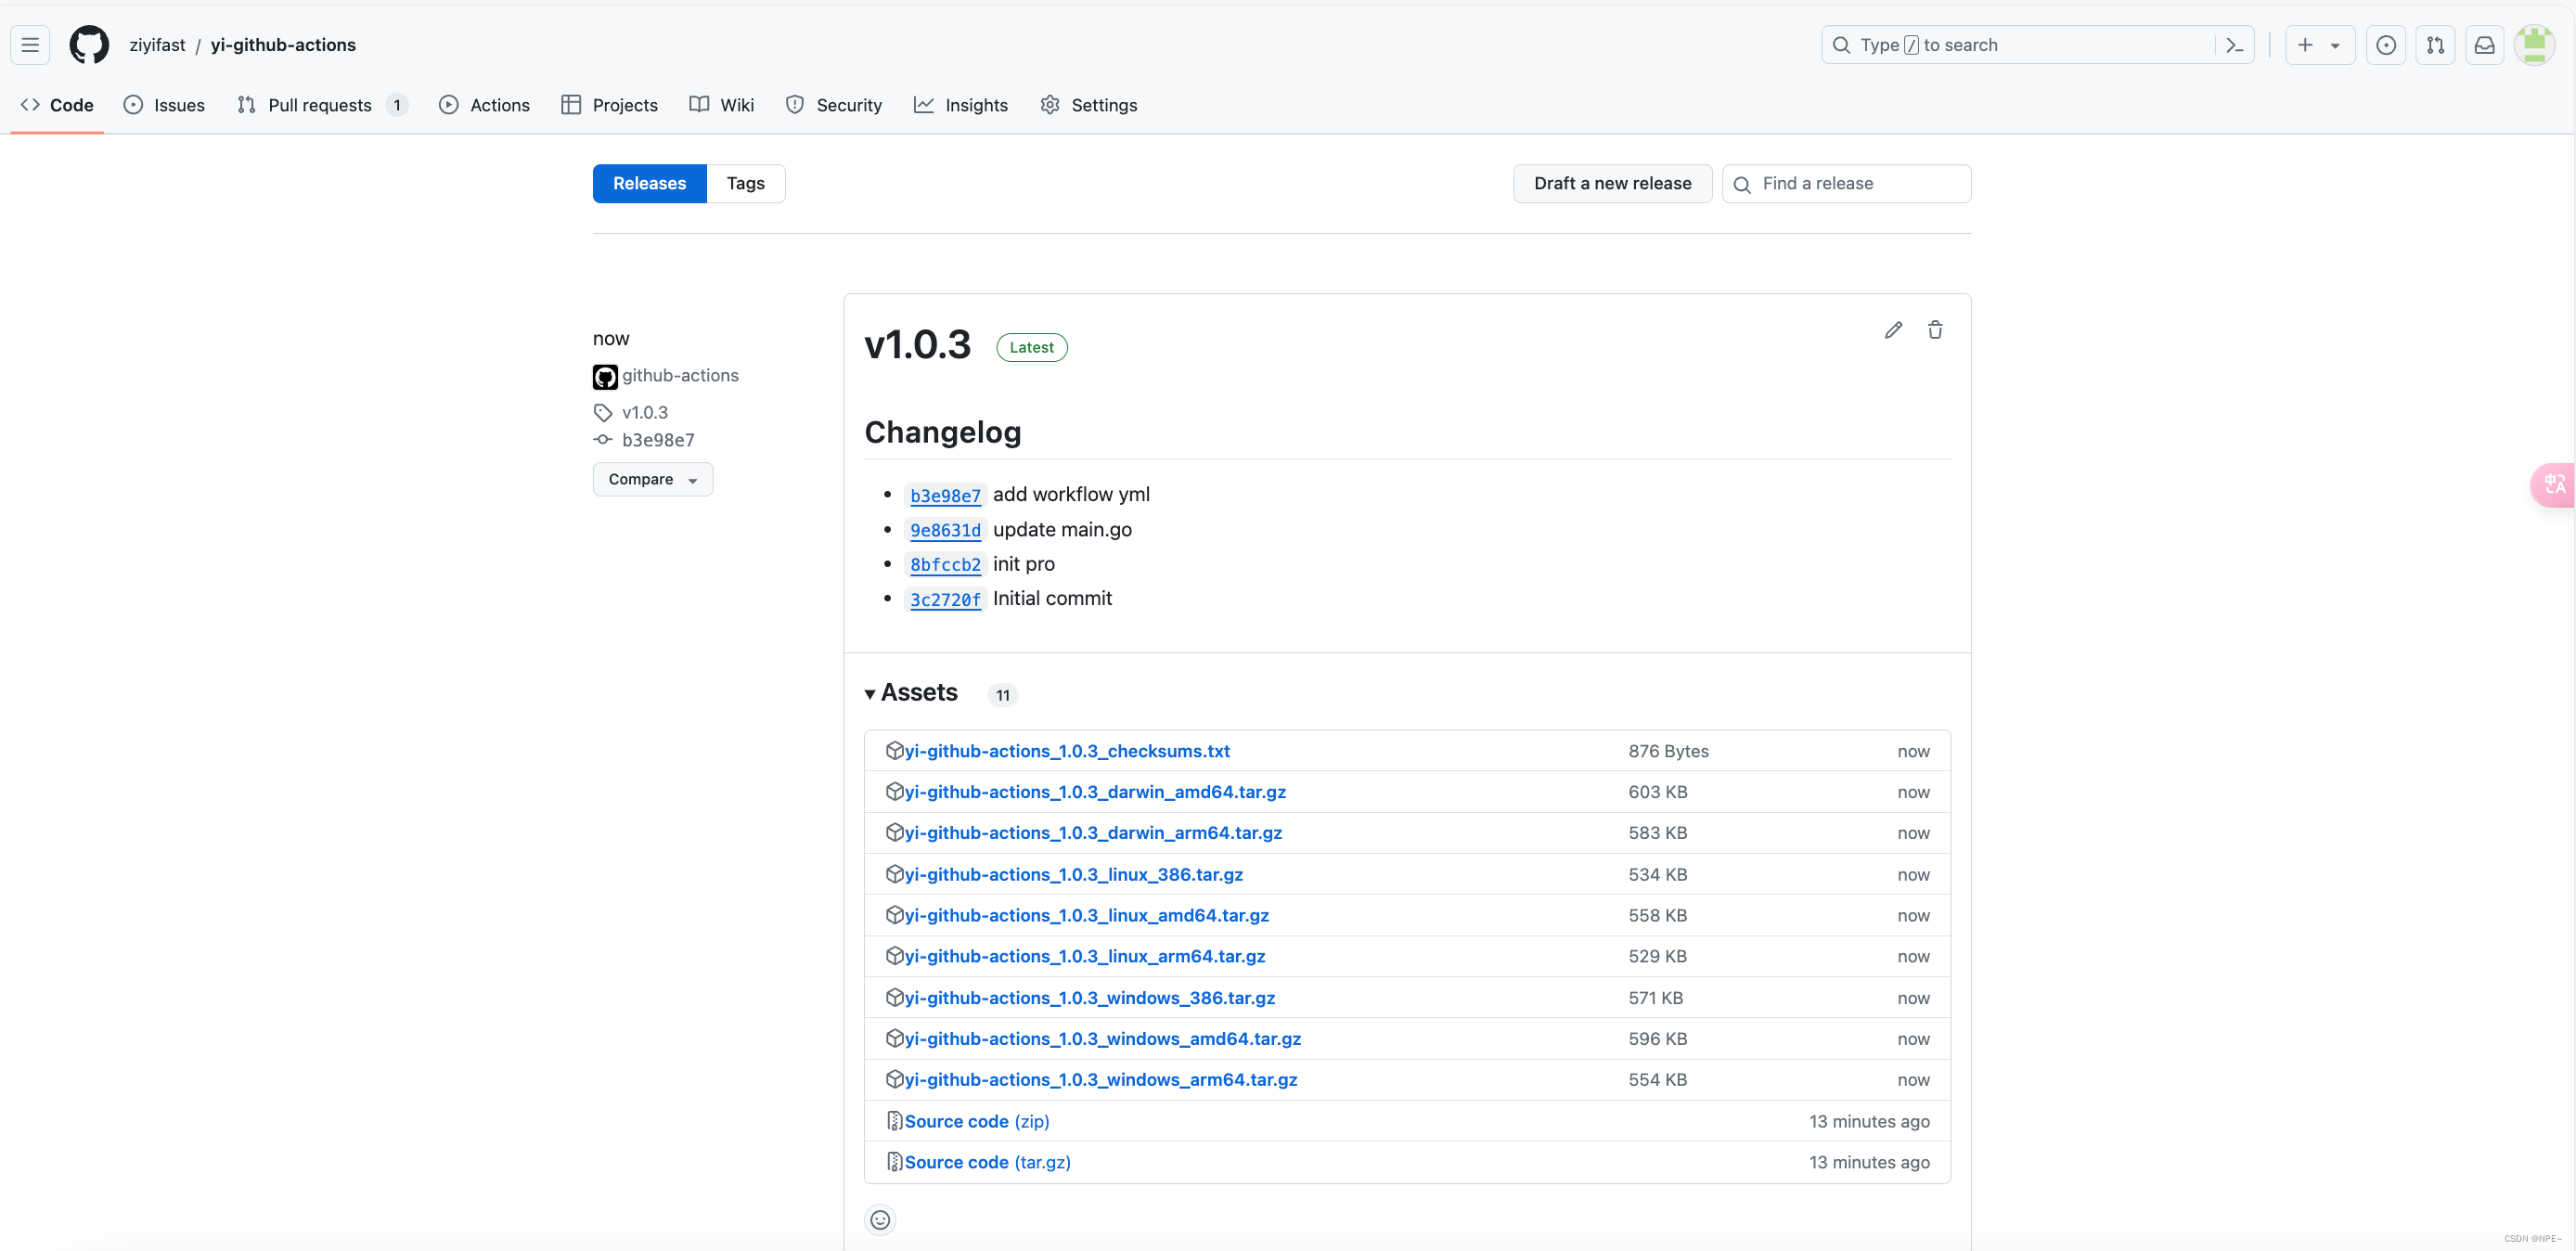
成功触发构建:
同时也生成了对应的assets文件:
点击cover链接,也可以查看单元覆盖率:
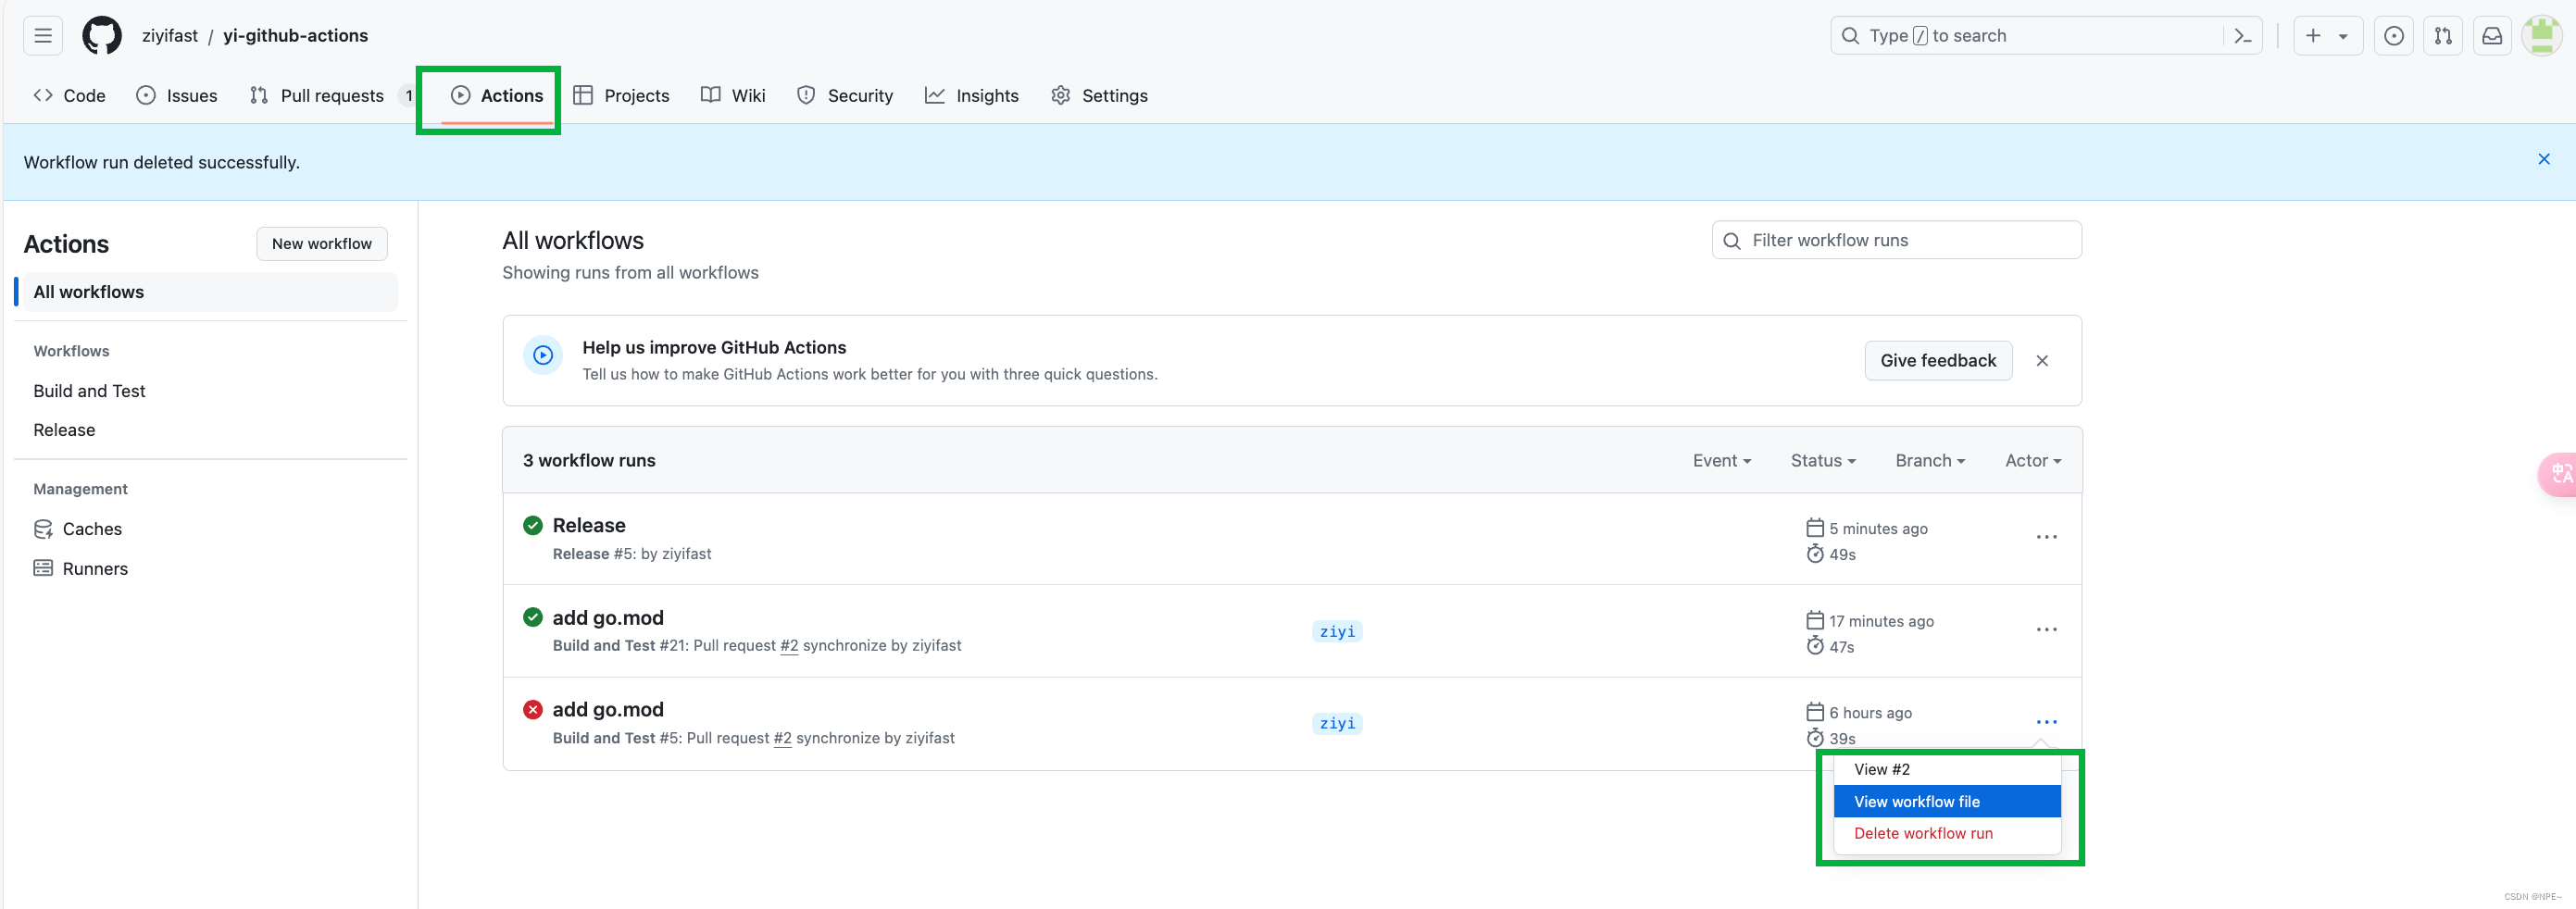
Tips:
- 点击Actions可以查看构建记录,以及错误原因:
- Github Actions可以结合仓库rules使用,比如:如果lint没通过,就不让merge代码
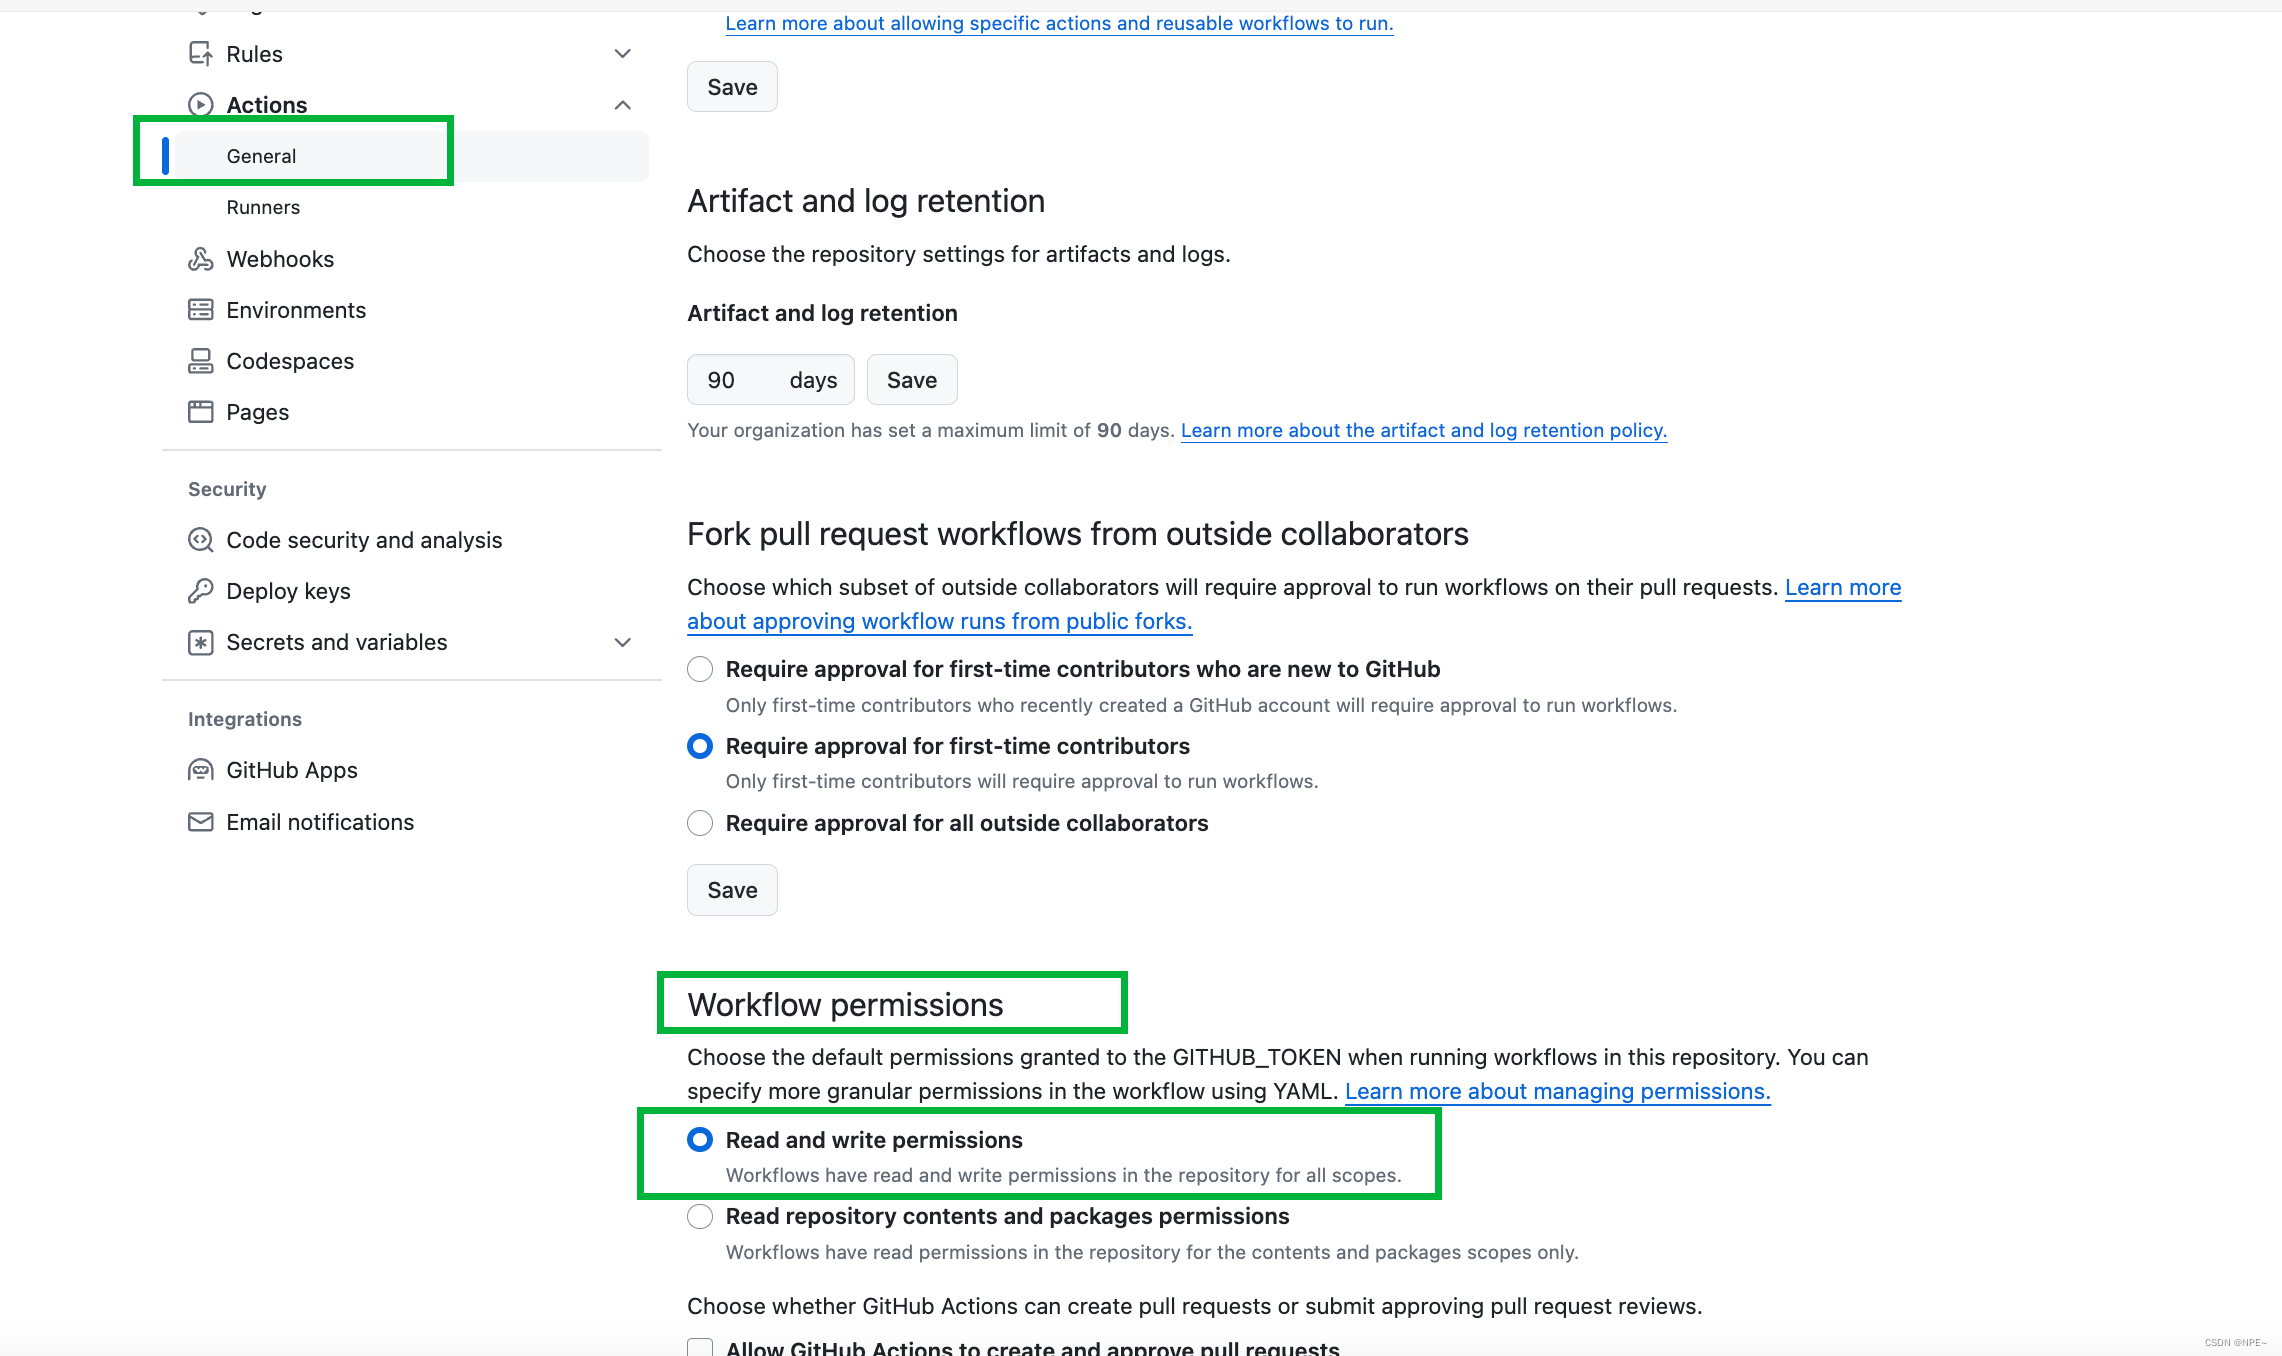
bug:构建报403
如果触发之后报403,则表示权限不足。

仓库-Settings-Actions-General-Actions permissions-Workflow permissions,勾选上Read and Write Permission
4 拓展:actions配合pr check
为了保证我们代码的规范和合法,在提交代码到main之前,我们需要让pr通过一定的检测,比如:lint、test、build等。
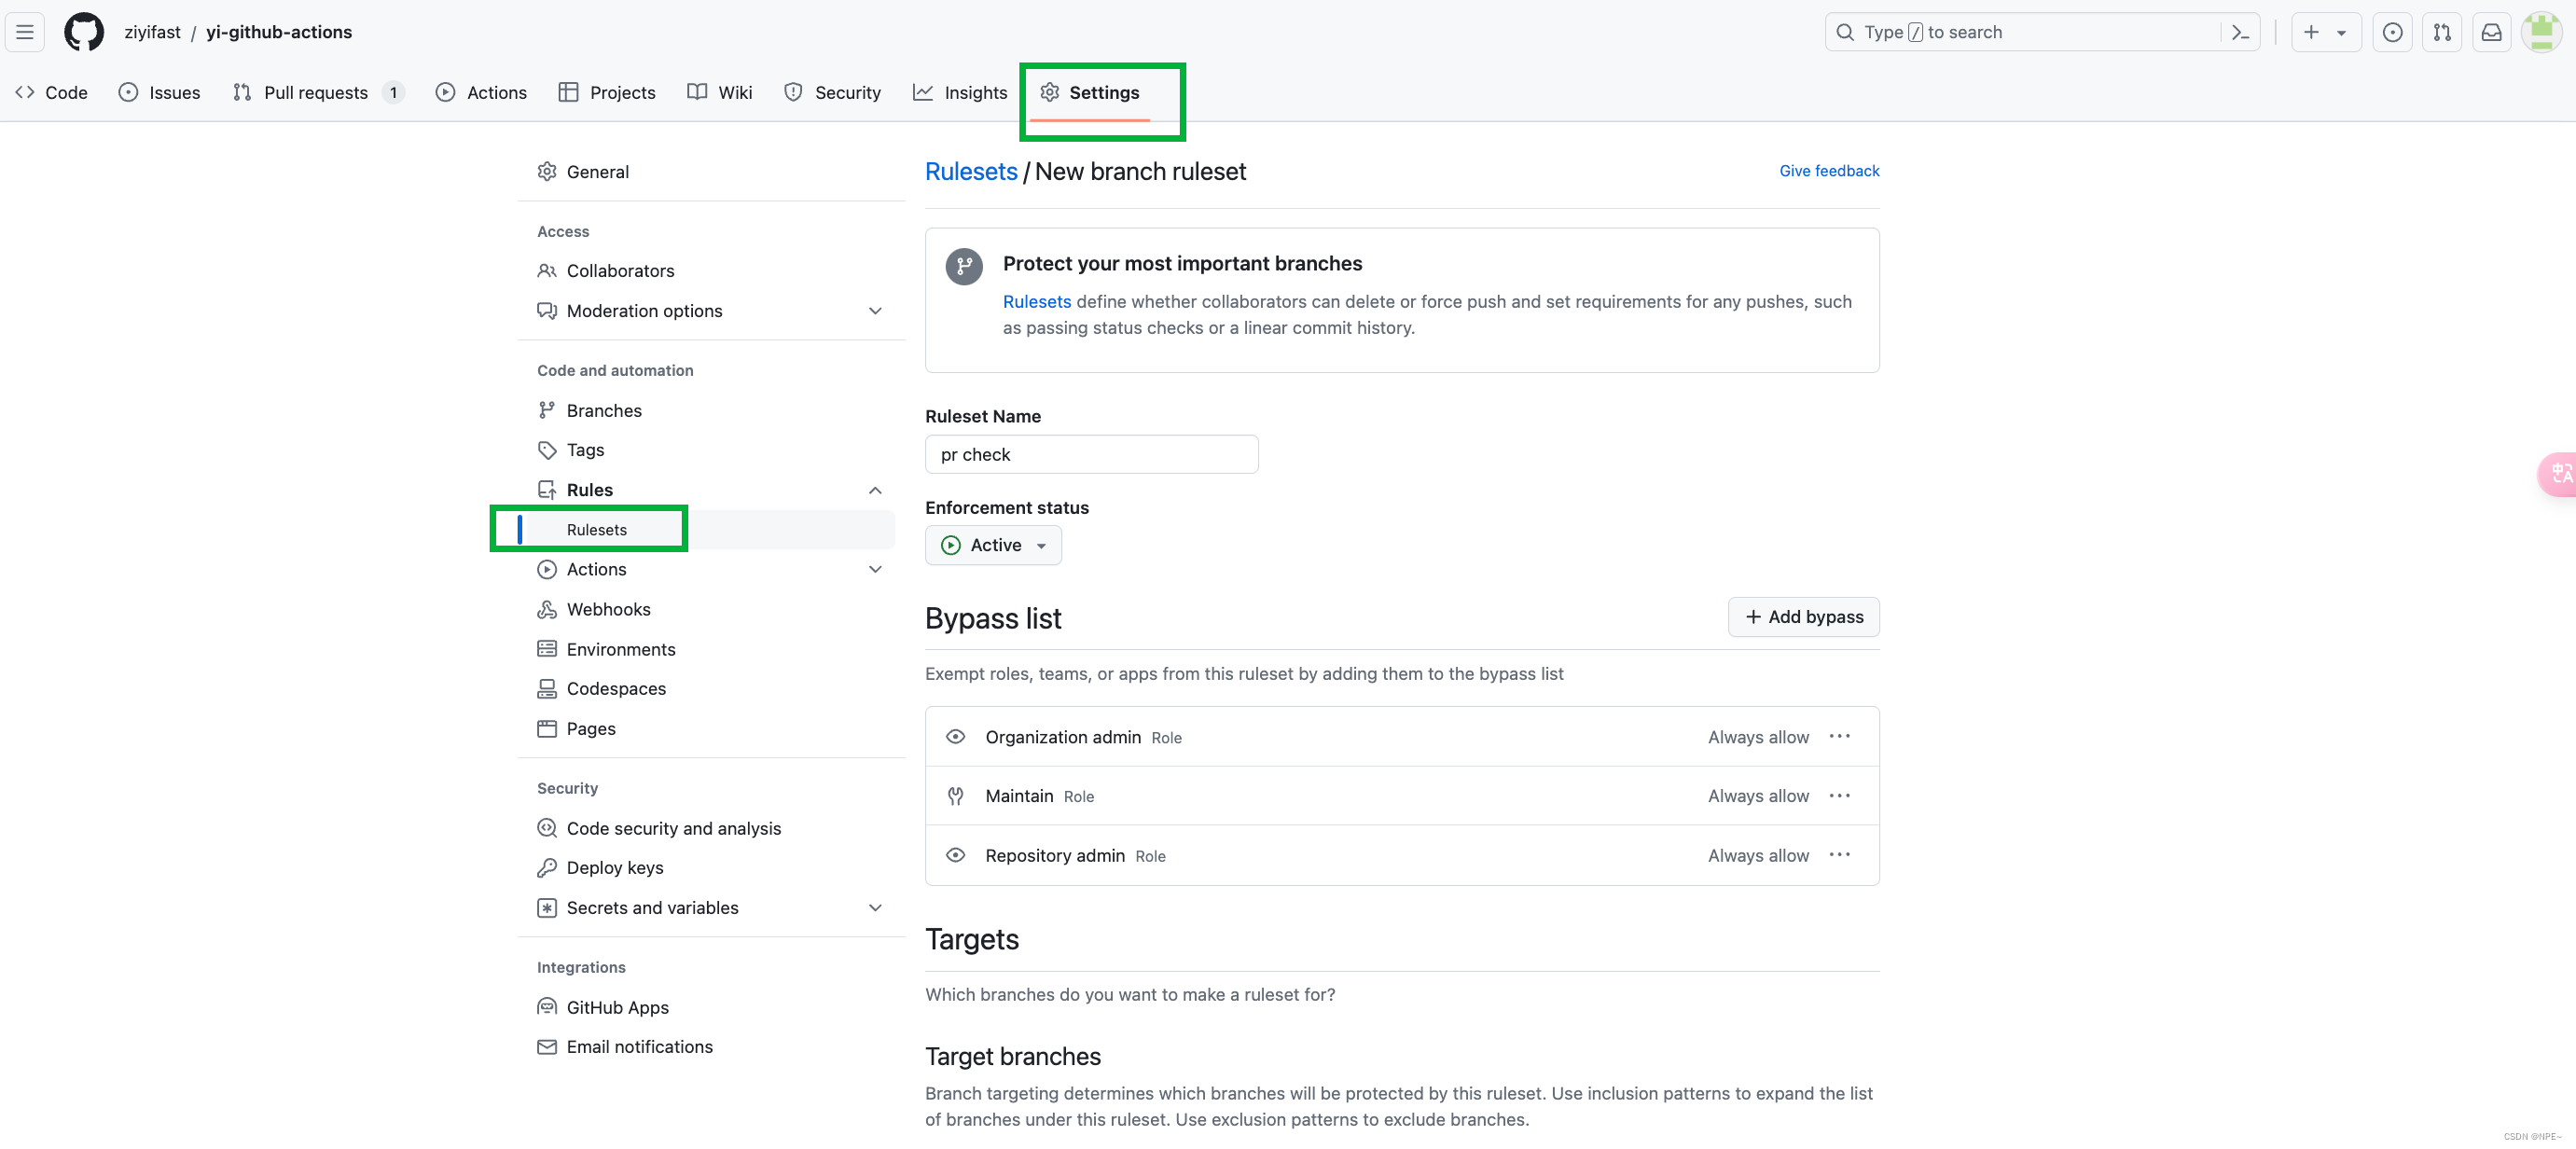
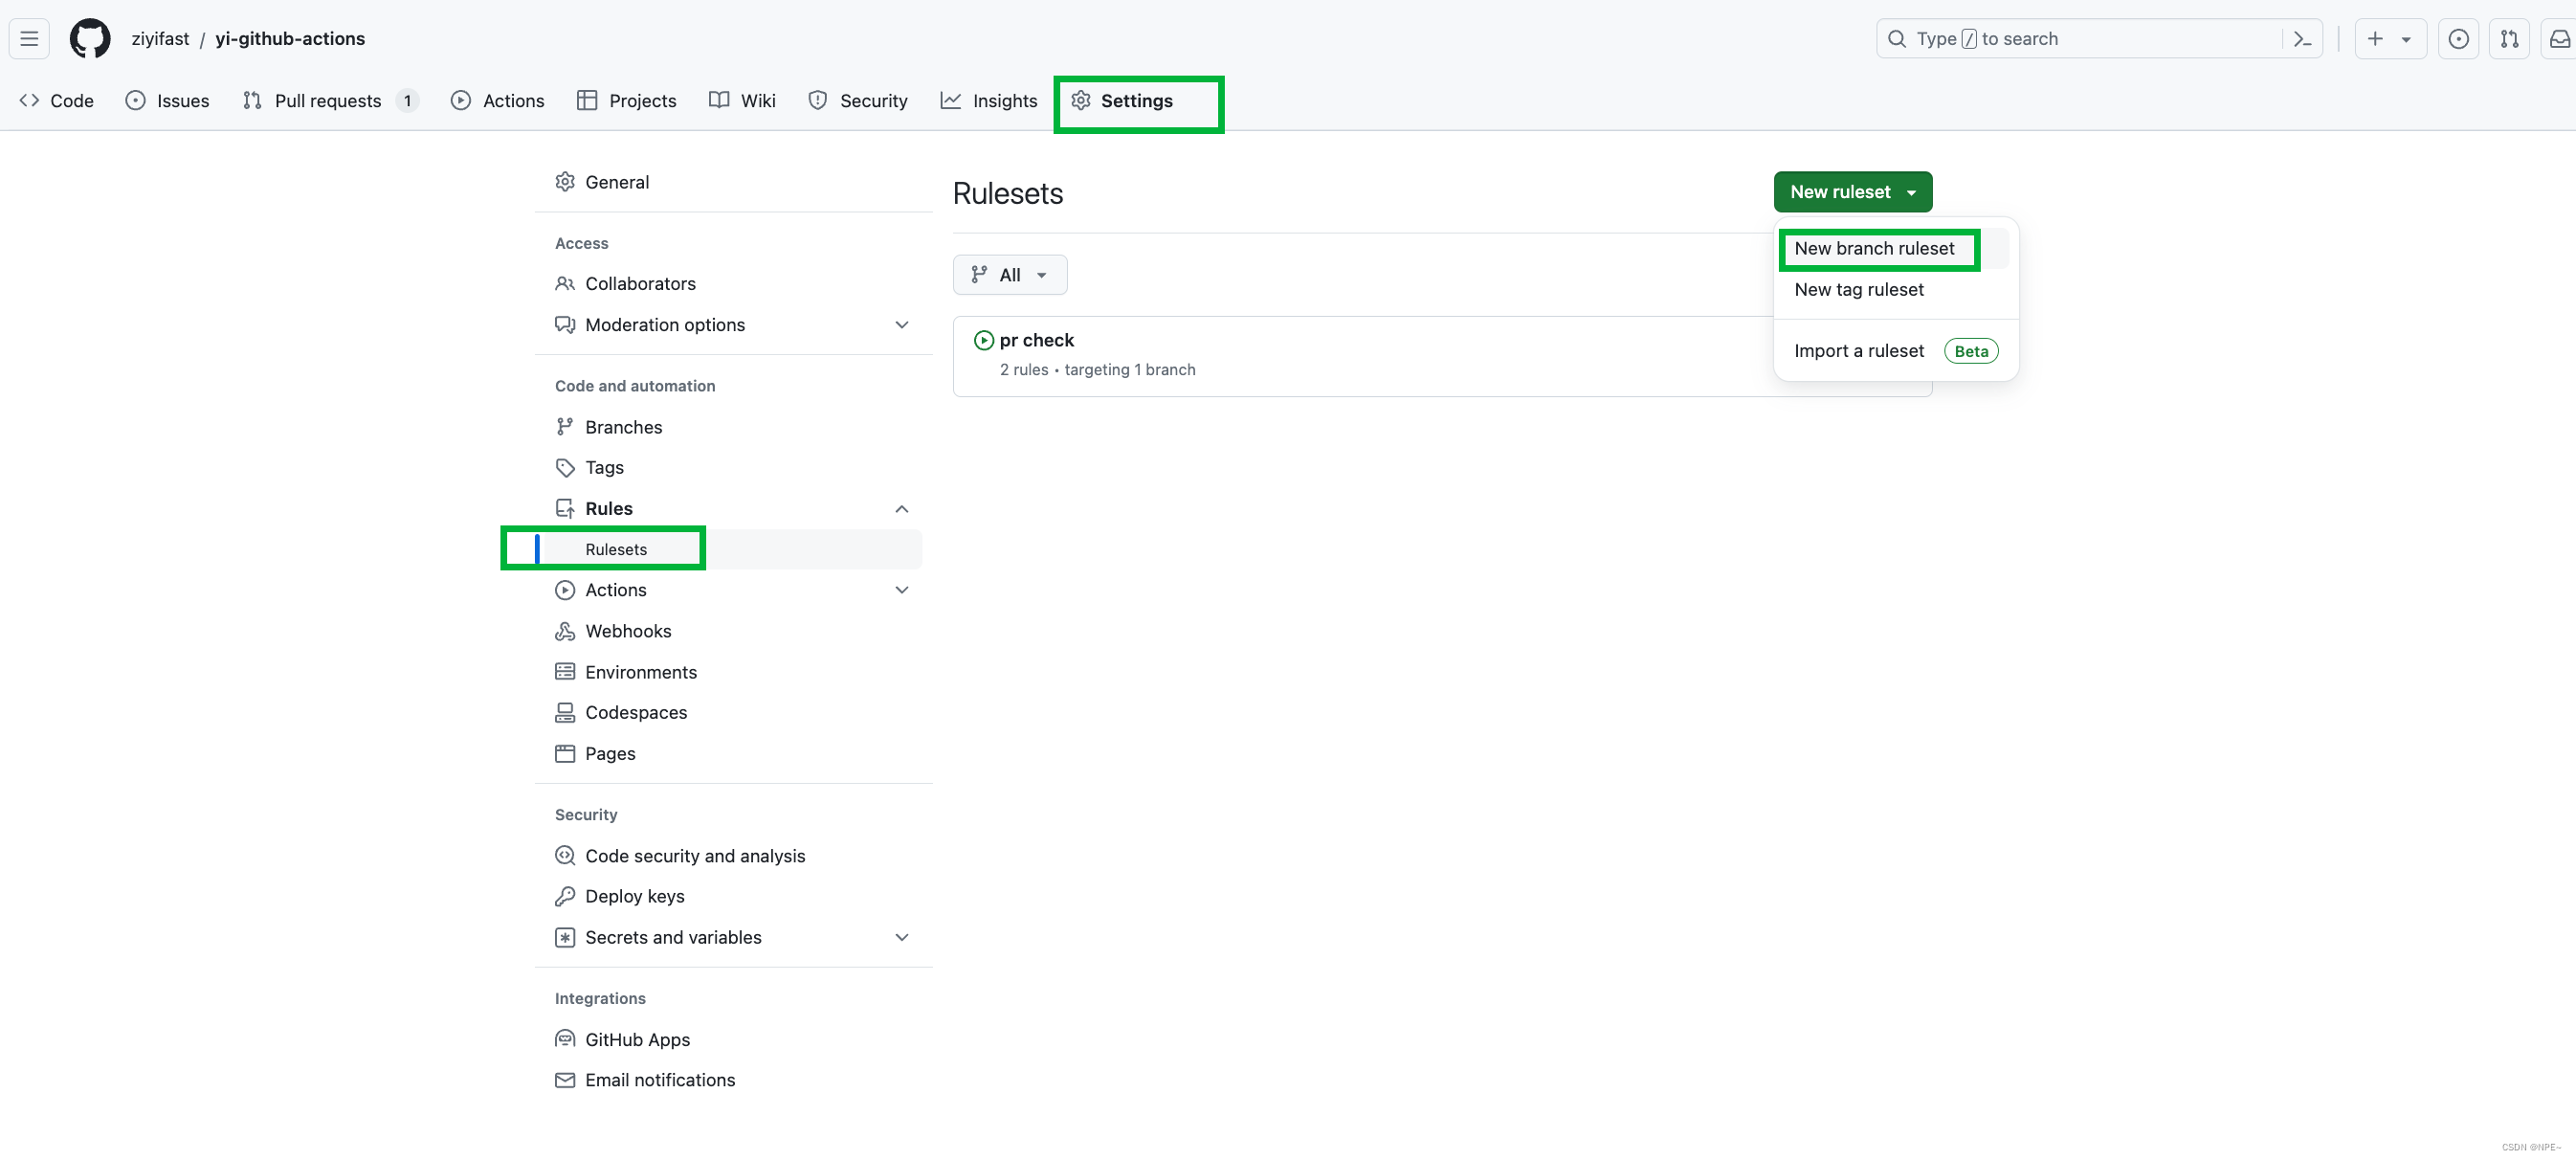
- 创建Rule set
- 仓库 - Settings - Rule - New branch rule set。新建一个branch规则
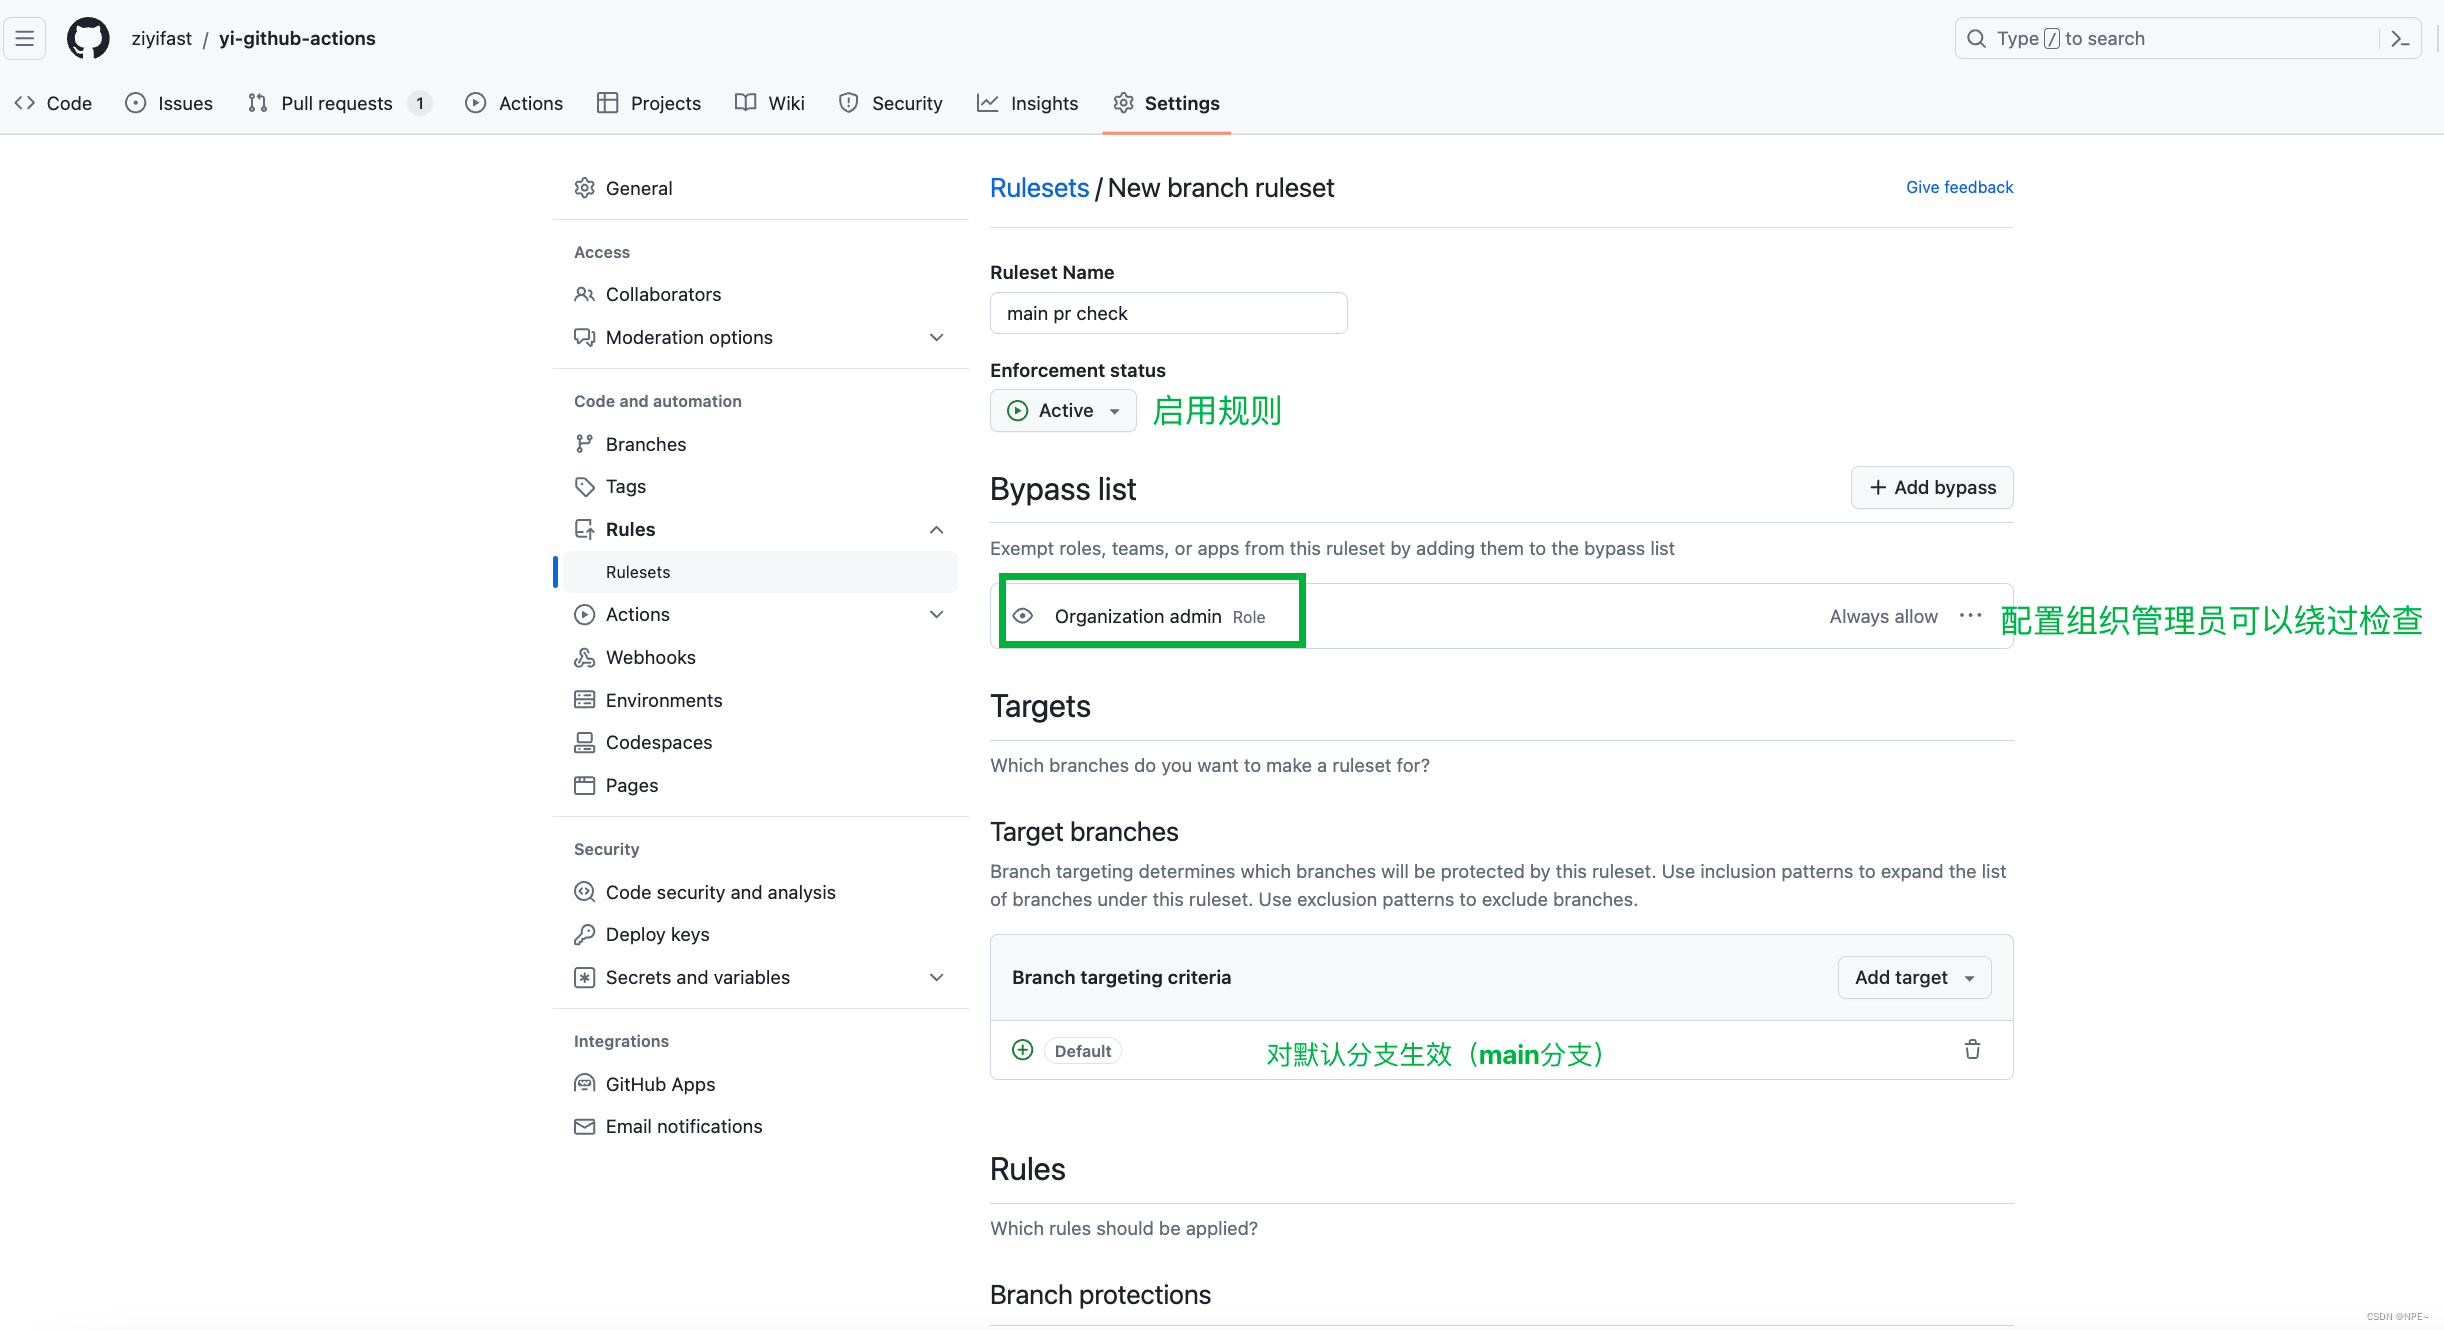
- 配置规则
- Bypass List:配置xxx可以绕过该规则
- Target branches:配置对哪个分支生效
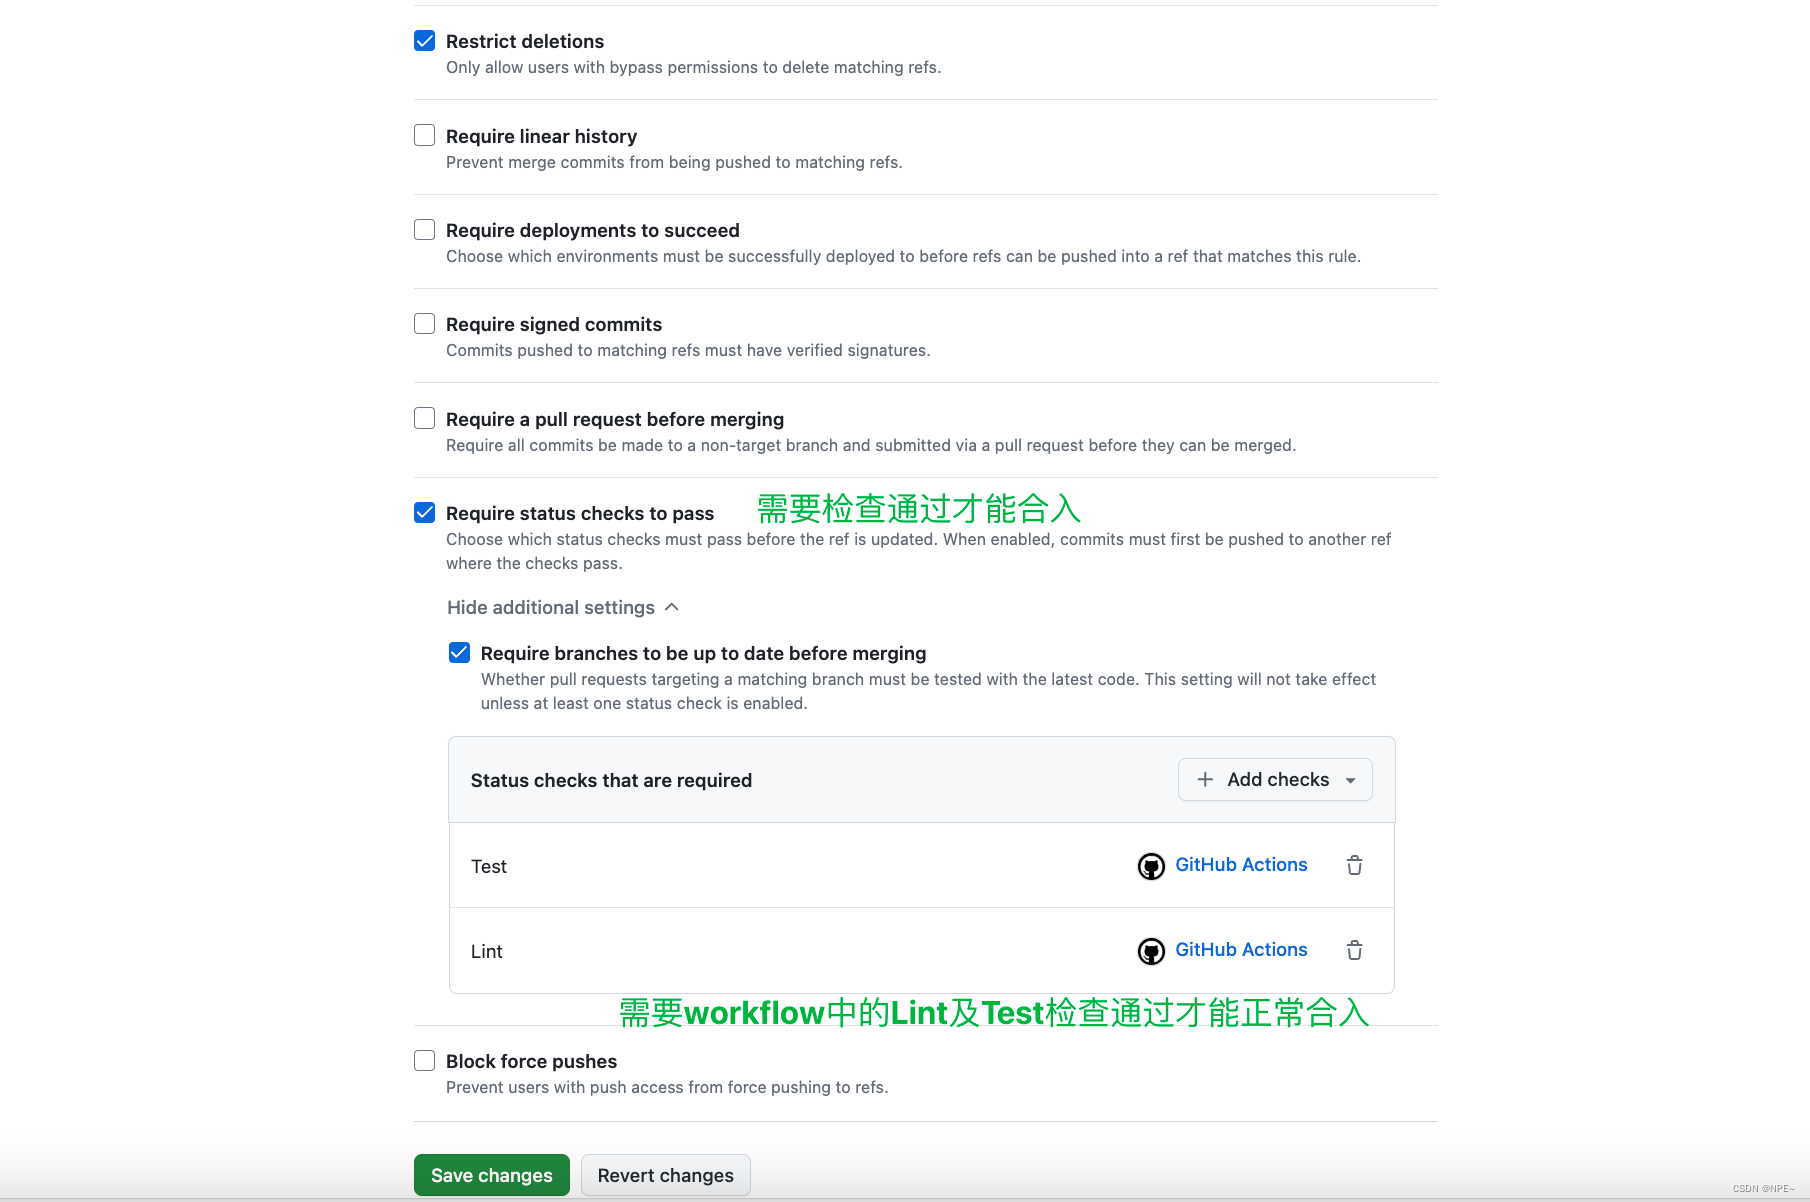
- Require status checks to pass:需要workflow检查通过才能合入
这里的Test与Lint为workflow.yml中的Job名称
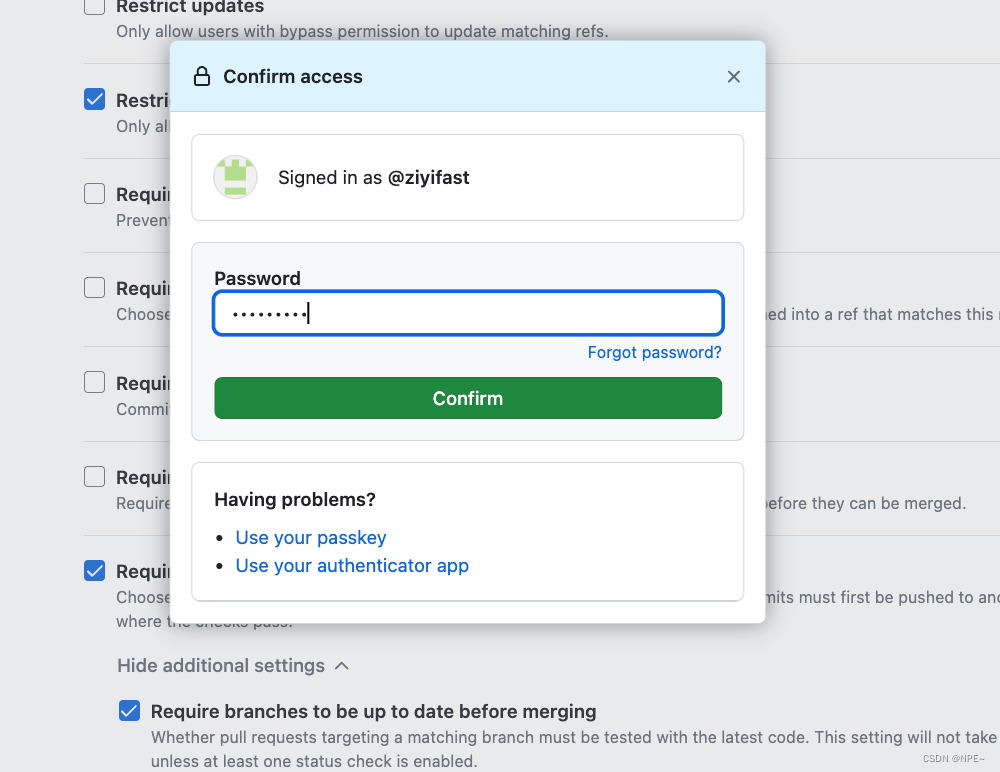
- 点击create,输入密码进行校验
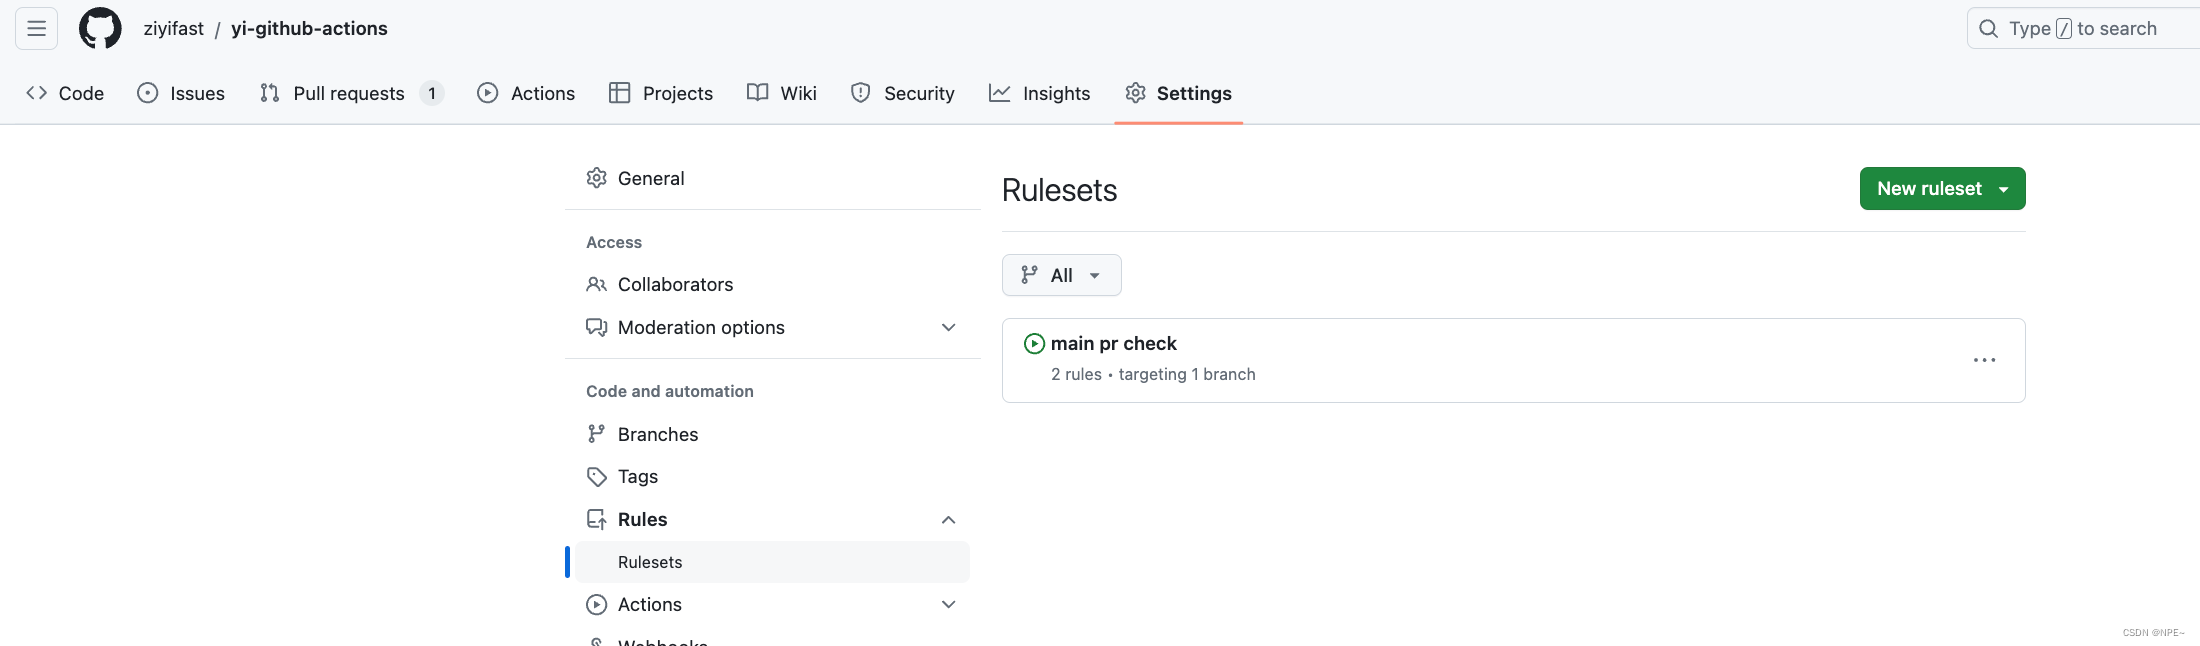
- 可以看到创建成功,并且规则是启用状态
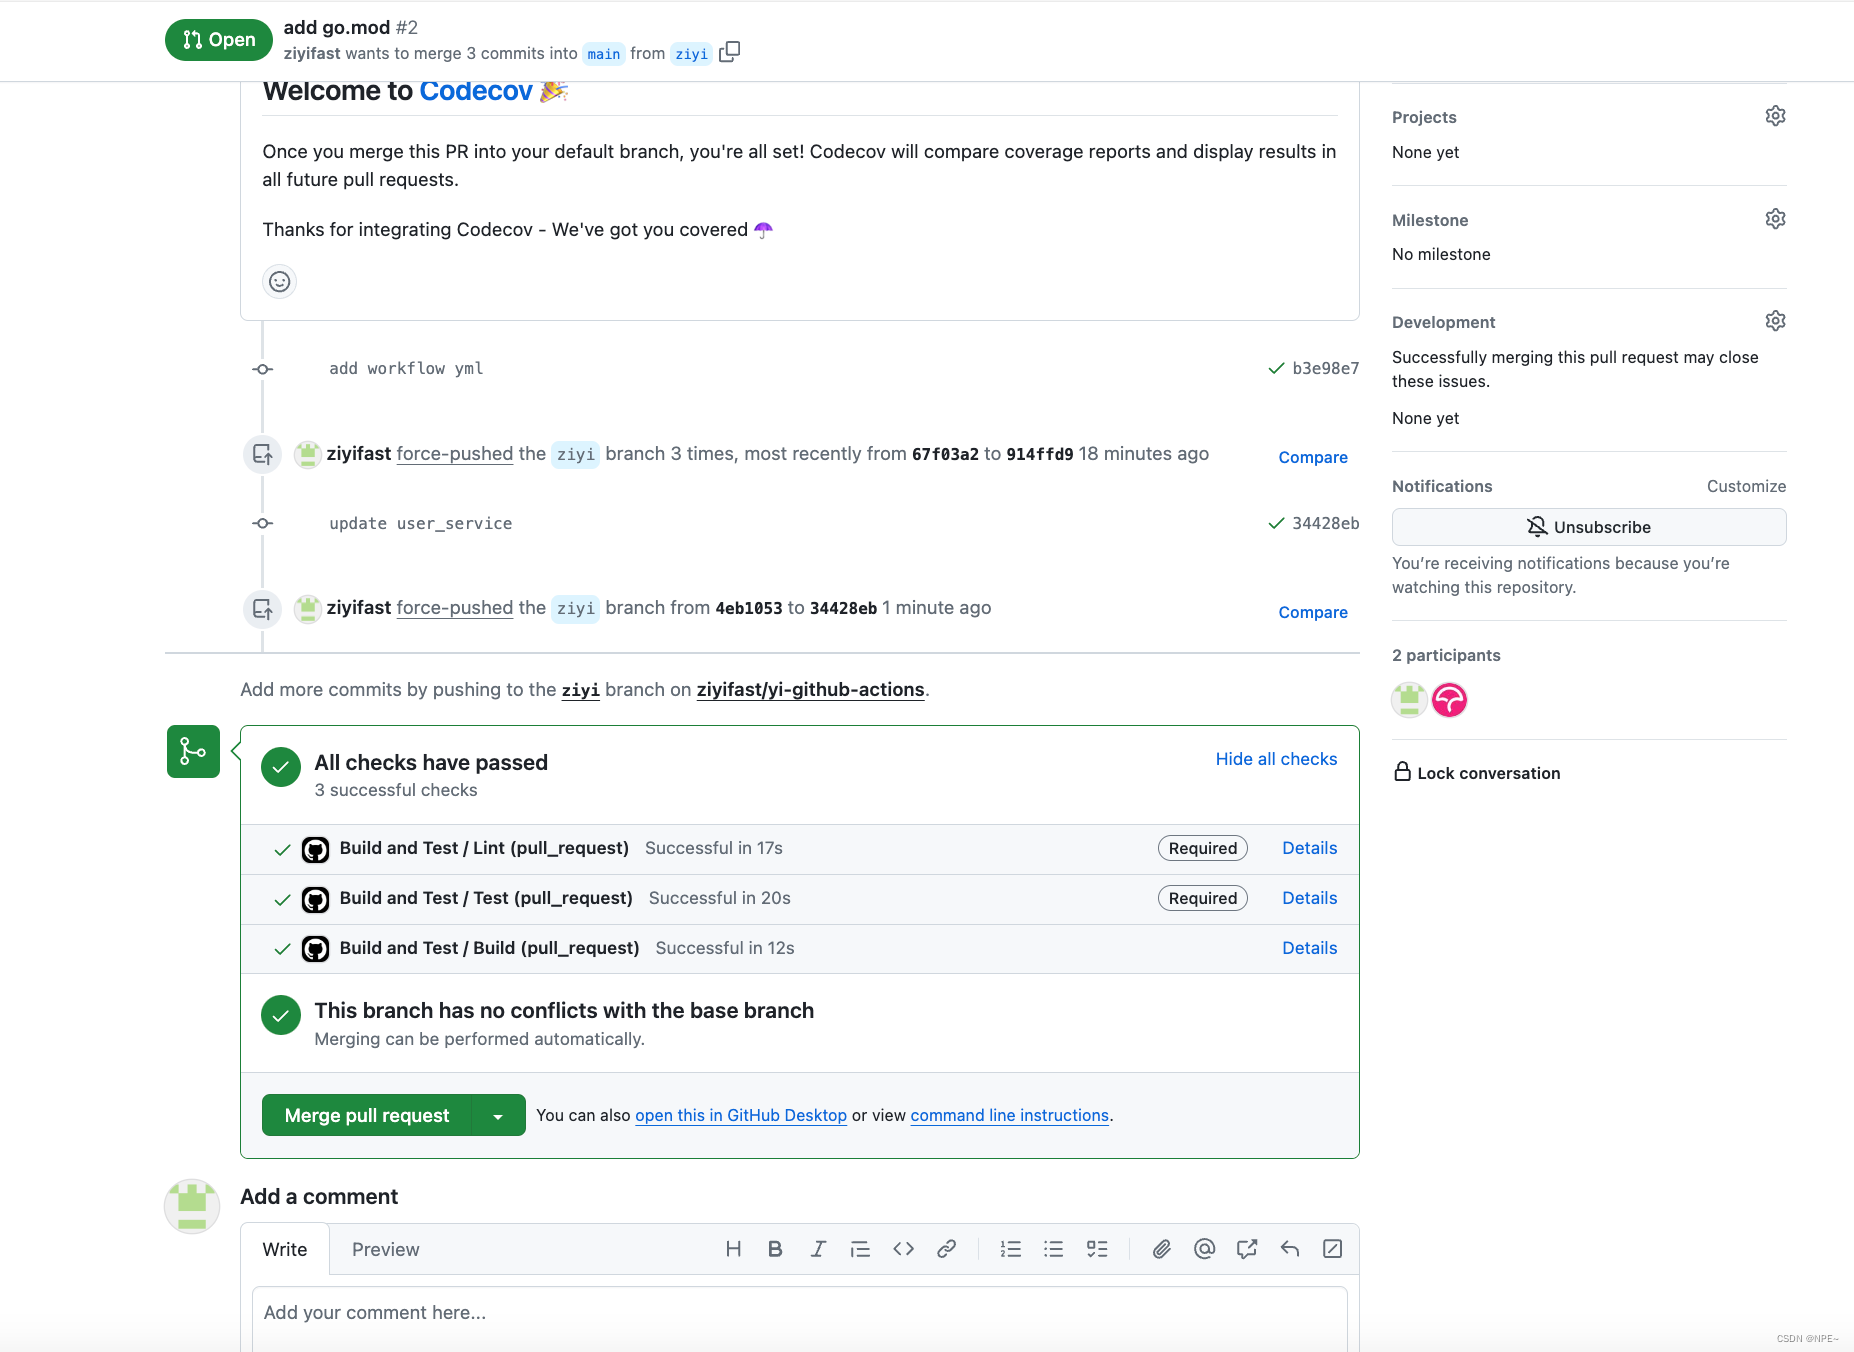
- 修改代码并提交,观察校验通过后是否能正常合入
可以看到检测通过后,普通用户可正常合入
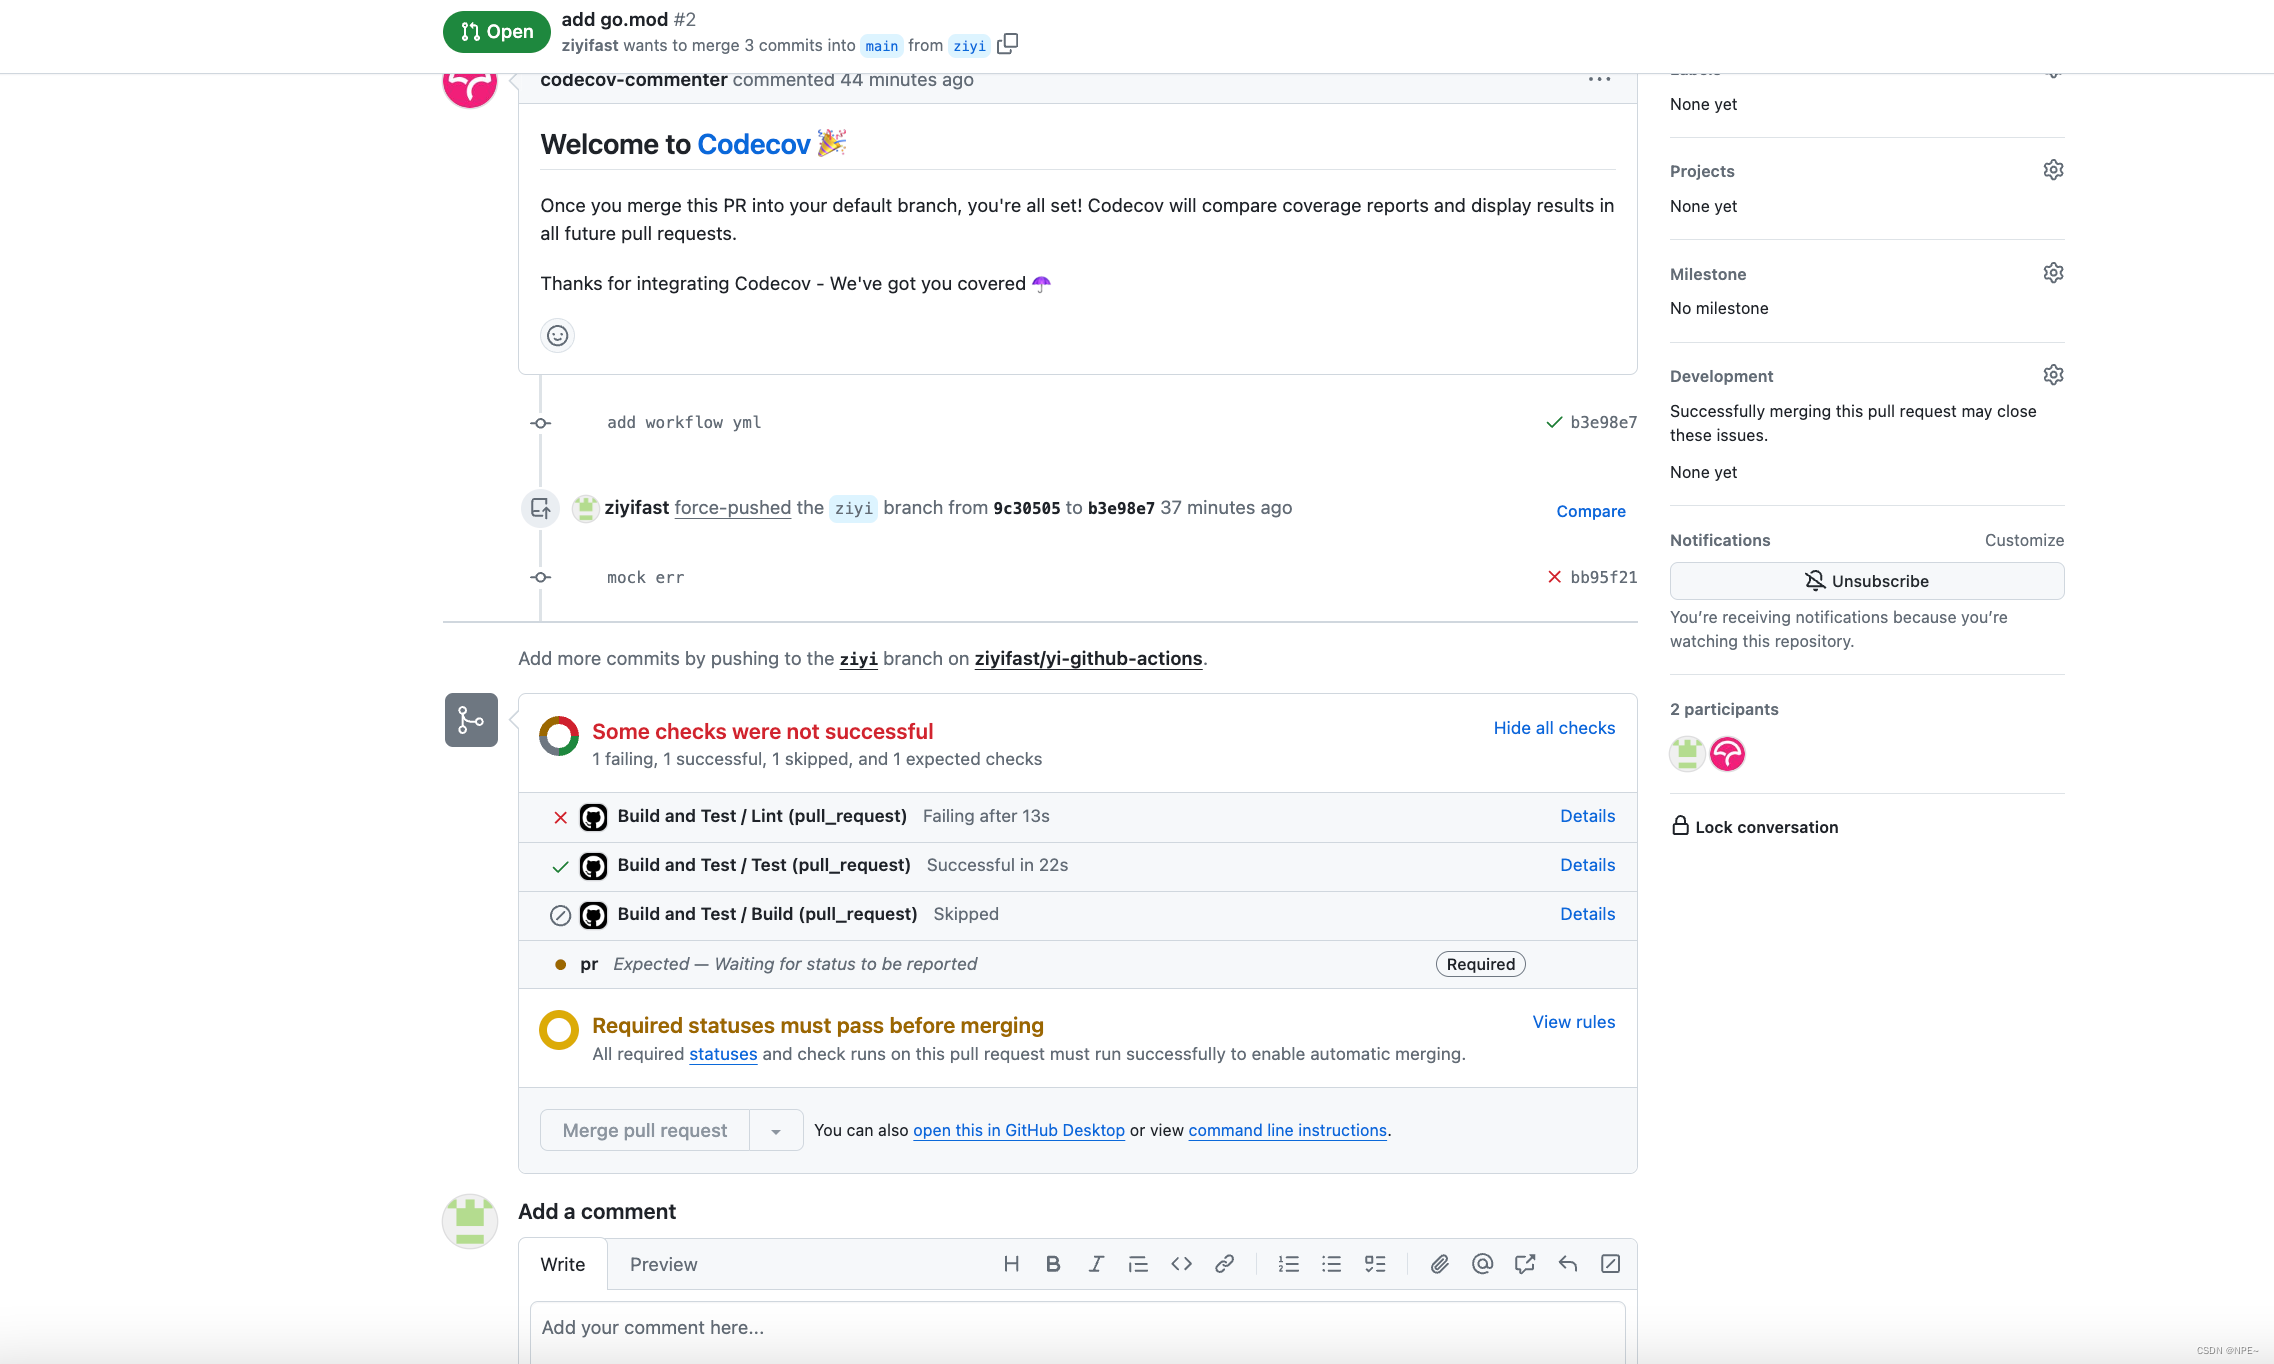
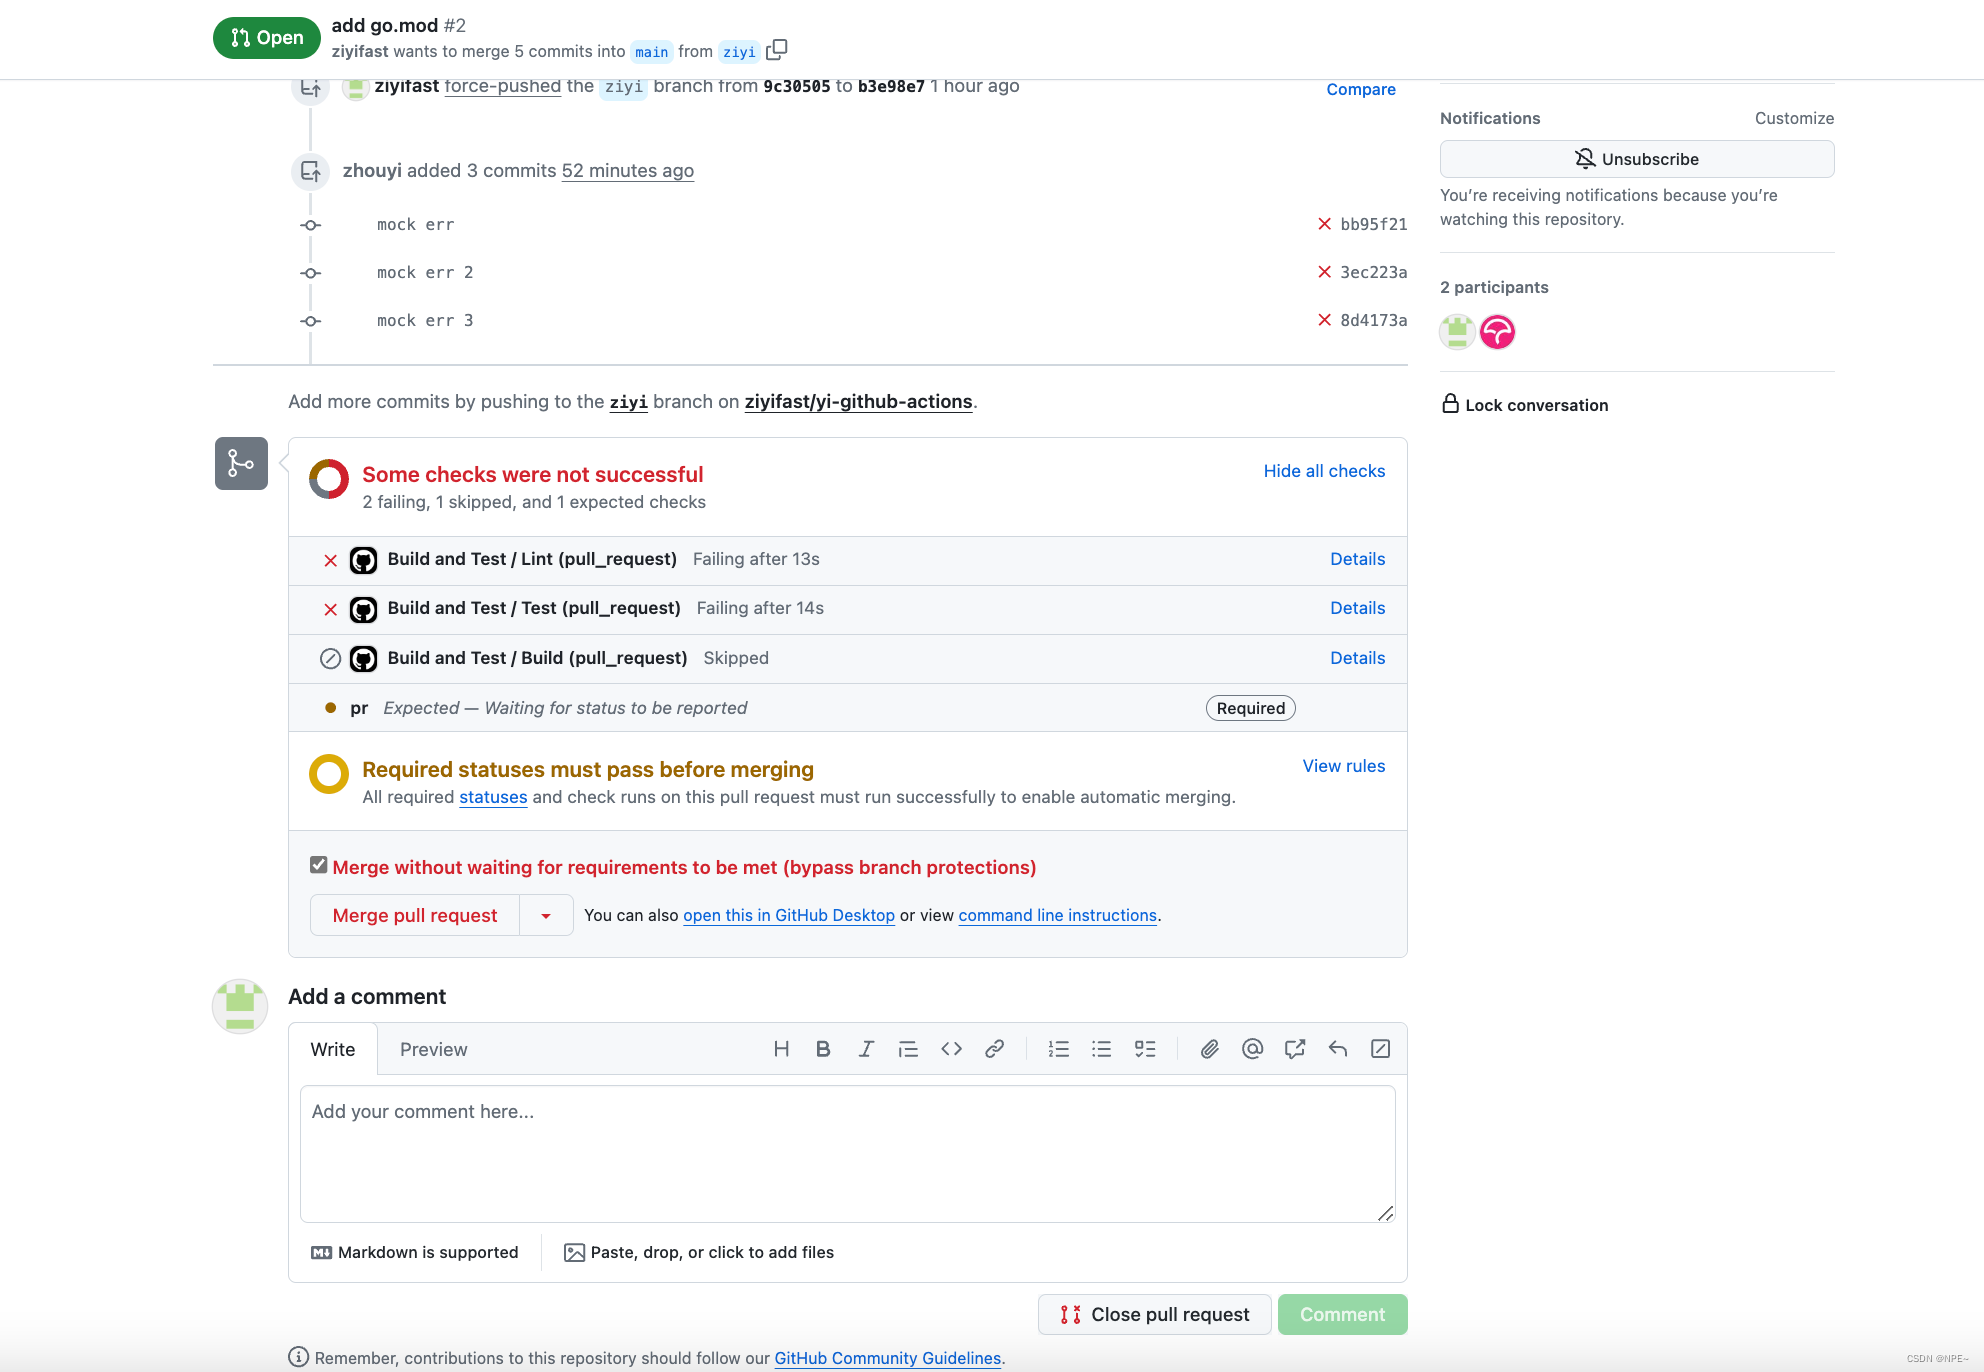
- 修改user_service_test.go,让其单元检测不过
- 可以看到检验不通过,无法merge代码
- 修改规则,将当前用户加入ByPassList,重新提交pr,发现可以绕过规则,强行合入
原文地址:https://dev.to/brpaz/building-a-basic-ci-cd-pipeline-for-a-golang-application-using-github-actions-icj
这篇关于Github Actions实现CI/CD(golang项目)的文章就介绍到这儿,希望我们推荐的文章对编程师们有所帮助!


