本文主要是介绍【黑马头条】-day10热点文章定时计算-xxl-job,希望对大家解决编程问题提供一定的参考价值,需要的开发者们随着小编来一起学习吧!
文章目录
- 1 今日内容
- 1.1 需求分析
- 1.2 解决方案
- 1.3 定时计算
- 1.4 定时任务方案对比
- 2 分布式任务调度
- 3 xxl-job
- 3.1 简介
- 3.2 环境搭建
- 3.2.1 配置maven
- 3.2.2 源码说明
- 3.3 配置部署调度中心
- 3.3.1 运行sql脚本
- 3.3.2 修改配置application.properties
- 3.3.3 启动引导类
- 3.4 docker配置xxl-job调度中心
- 3.4.1 拉取mysql镜像
- 3.4.2 创建mysql容器,初始化xxl-job的SQL脚本
- 3.4.3 连接mysql57
- 3.4.4 运行sql脚本
- 3.4.5 拉取调度中心镜像
- 3.4.6 创建xxl-job容器
- 3.4.7 访问调度中心
- 4 xxl-job入门案例
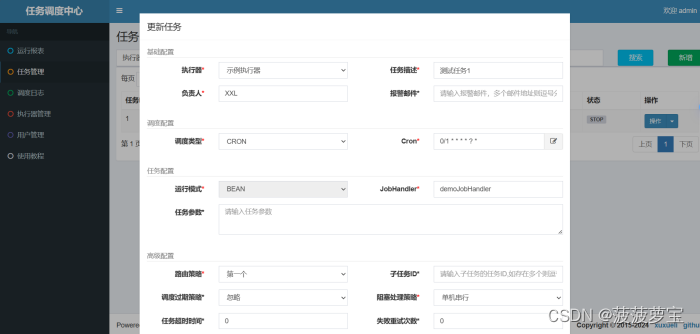
- 4.1 在任务中心中配置任务设置
- 4.2 创建xxl-job-demo
- 4.2.1 导入依赖
- 4.2.2 创建application.yaml
- 4.2.3 新建配置类XxlJobConfig
- 4.2.4 创建任务
- 4.2.5 创建启动类
- 4.2.6 启动启动类和启动任务
- 4.3 任务详解
- 4.3.1 执行器管理
- 4.3.2 任务管理
- 4.3.2.1 基础配置
- 4.3.2.2 调度配置
- 4.3.2.3 任务配置
- 4.3.2.4 高级配置
- 4.4 路由策略案例
- 4.4.1 轮询
- 4.4.2 分片广播
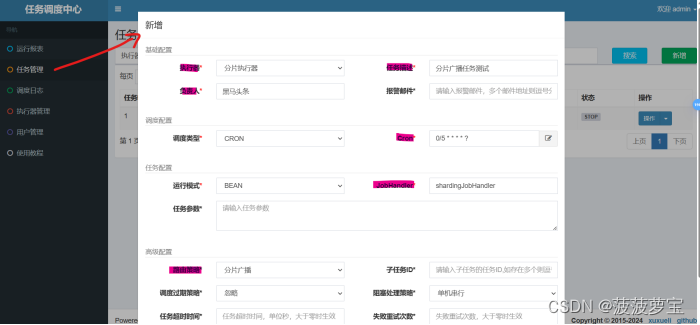
- 4.4.2.1 新增分片执行器
- 4.4.2.2 创建分片任务
- 4.4.2.3 修改application.yaml
- 4.4.2.4 为工作任务添加新的任务
- 4.4.2.5 启动两个实例并执行一次任务
- 5 热点文章定时计算
- 5.1 需求分析
- 5.2 实现思路
- 5.3 热点文章具体实现
- 5.3.1 查询前五天文章
- 5.3.1.1 创建查询前五天文章的mapper
- 5.3.1.2 创建热点文章的Service
- 5.3.2 计算文章分值
- 5.3.2.1 创建HotArticleVo
- 5.3.2.2 创建文章的点赞收藏关注的权重常量
- 5.3.2.3 完善实现类
- 5.3.3 为每个频道缓存30条分值较高的文章
- 5.3.3.1 添加feign远程调用接口
- 5.3.3.2 实现远程接口
- 5.3.3.3 添加feign的注解类扫描
- 5.3.3.4 完善实现类
- 5.3.4 测试
- 5.4 定时计算具体实现
- 5.4.1 创建执行器
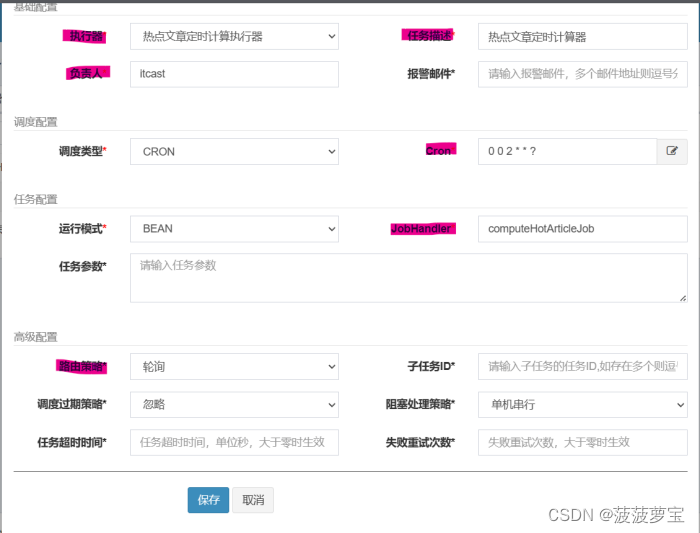
- 5.4.2 创建任务
- 5.4.3 文章微服务集成xxl-job
- 5.4.3.1 导入依赖
- 5.4.3.2 添加配置类
- 5.4.3.3 添加nacos配置
- 5.4.4 创建具体任务
- 5.4.5 测试
- 6 查询文章改造
- 6.1 修改Service
- 6.2 修改controller
- 7 综合测试
1 今日内容
1.1 需求分析

1.2 解决方案

1.3 定时计算
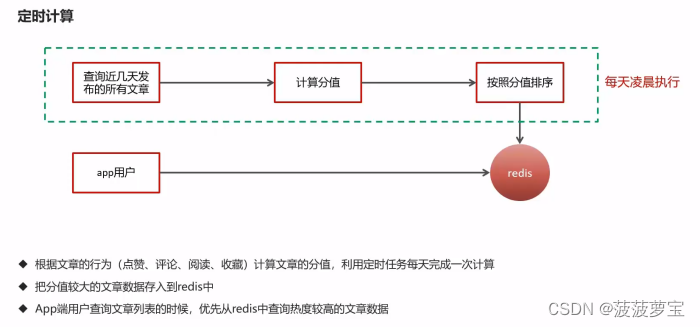
1.4 定时任务方案对比

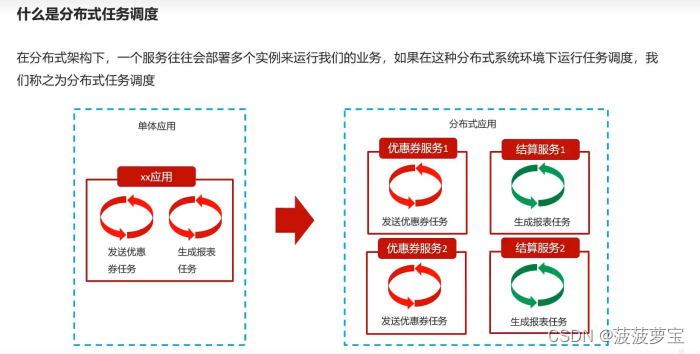
2 分布式任务调度
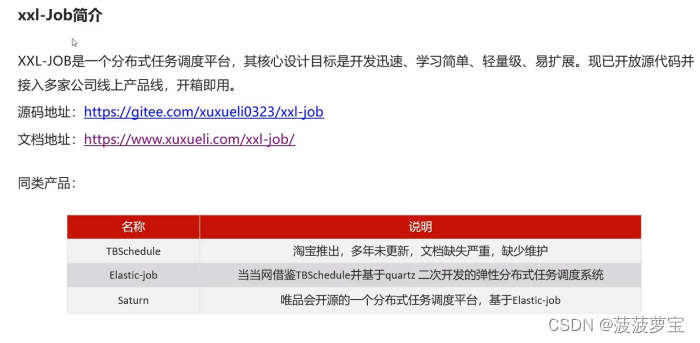
3 xxl-job
3.1 简介
3.2 环境搭建
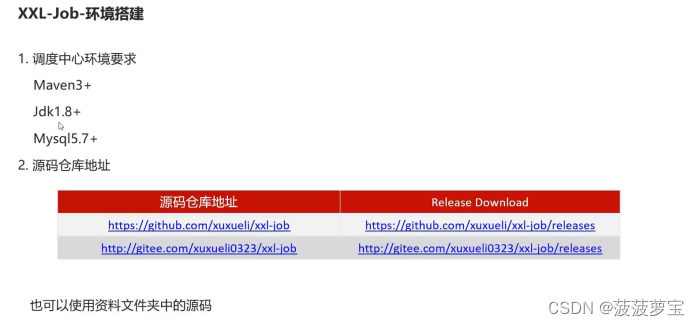
将xxl-job拷贝到与heima-leadnews同级的目录下

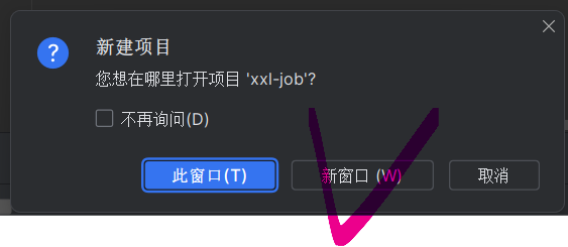
在idea中打开
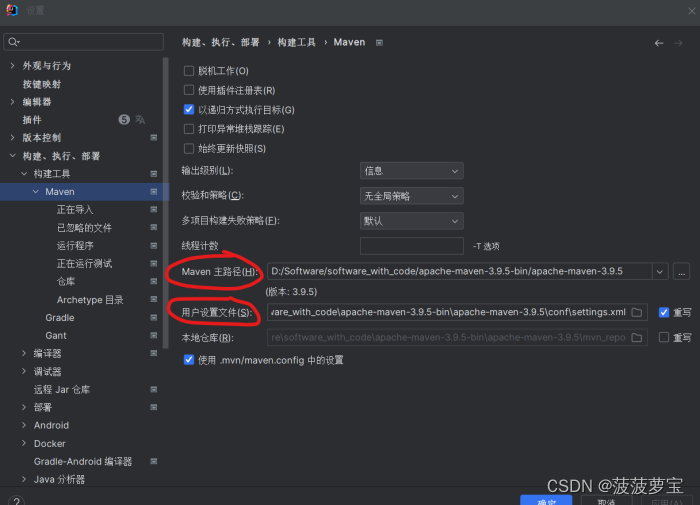
3.2.1 配置maven
根据自己的配置进行修改
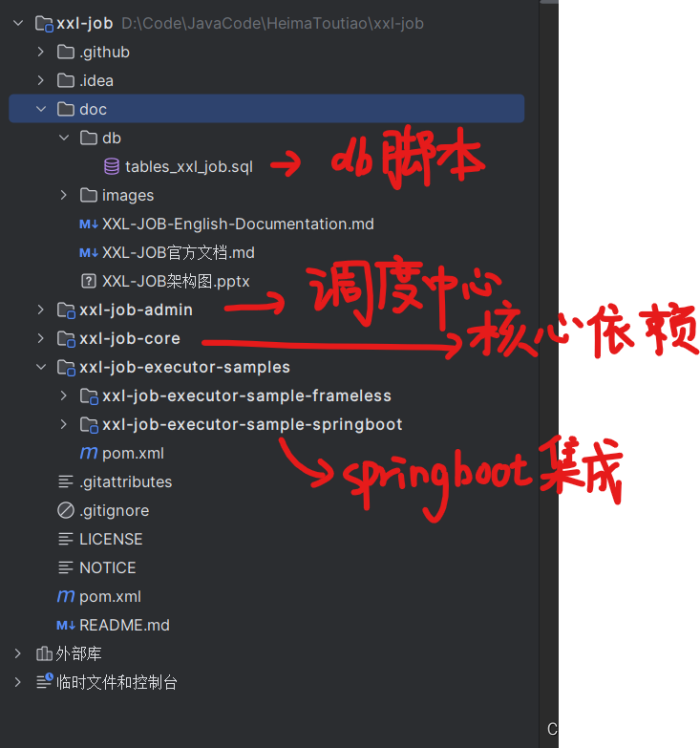
3.2.2 源码说明
3.3 配置部署调度中心
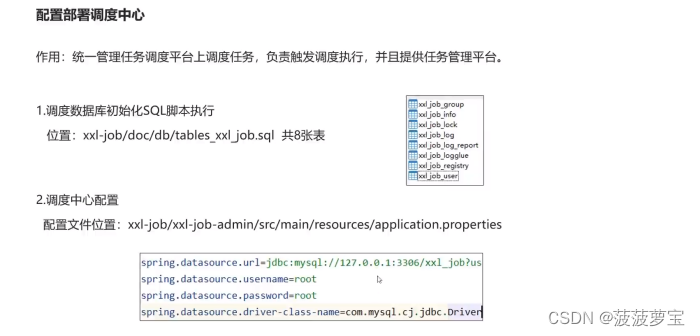
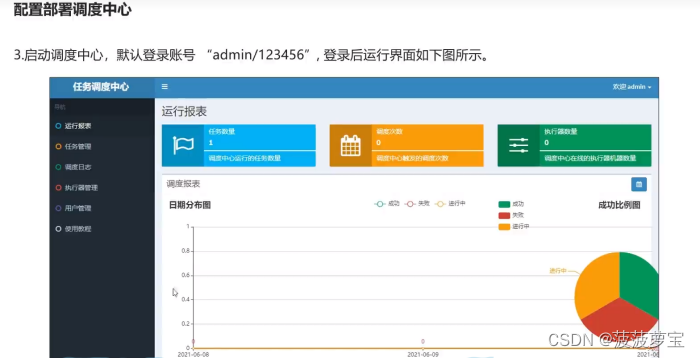
3.3.1 运行sql脚本
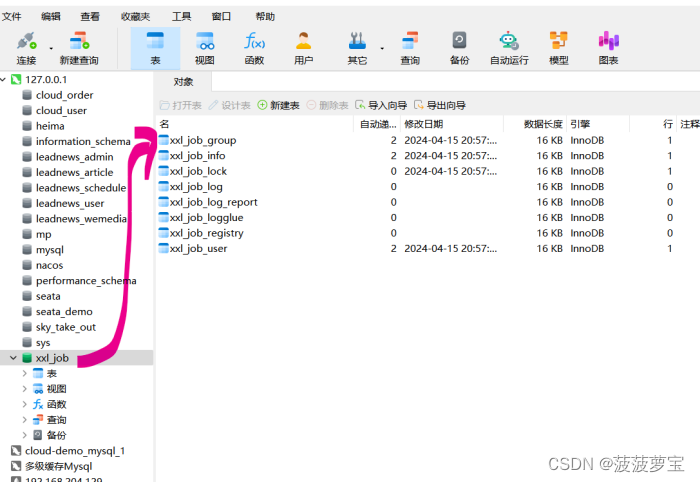
3.3.2 修改配置application.properties
修改src/main/resources/application.properties
### xxl-job, datasource
spring.datasource.url=jdbc:mysql://127.0.0.1:3306/xxl_job?useUnicode=true&characterEncoding=UTF-8&autoReconnect=true&serverTimezone=Asia/Shanghai
spring.datasource.username=root
spring.datasource.password=123sjbsjb
spring.datasource.driver-class-name=com.mysql.cj.jdbc.Driver
3.3.3 启动引导类
启动引导类com.xxl.job.admin.XxlJobAdminApplication类
21:00:58.444 logback [main] INFO o.s.b.w.e.tomcat.TomcatWebServer - Tomcat started on port(s): 8080 (http) with context path '/xxl-job-admin'
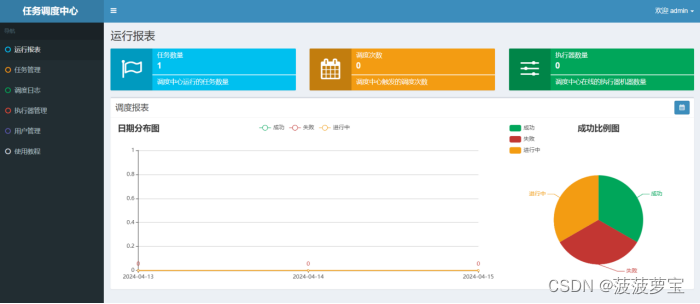
访问端口8080
访问url http://localhost:8080/xxl-job-admin

进入任务调度中心
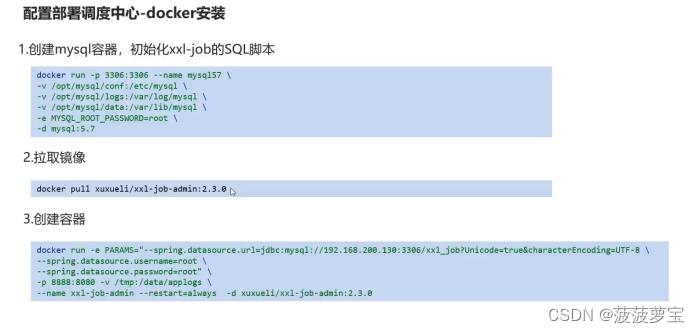
3.4 docker配置xxl-job调度中心
3.4.1 拉取mysql镜像
docker pull mysql:5.7
3.4.2 创建mysql容器,初始化xxl-job的SQL脚本
docker run -p 3306:3306 --name mysql57 \
-v /opt/mysql/conf:/etc/mysql \
-v /opt/mysql/logs:/var/log/mysql \
-v /opt/mysql/data:/var/lib/mysql \
-e MYSQL_ROOT_PASSWORD=root \
-d mysql:5.7
3.4.3 连接mysql57
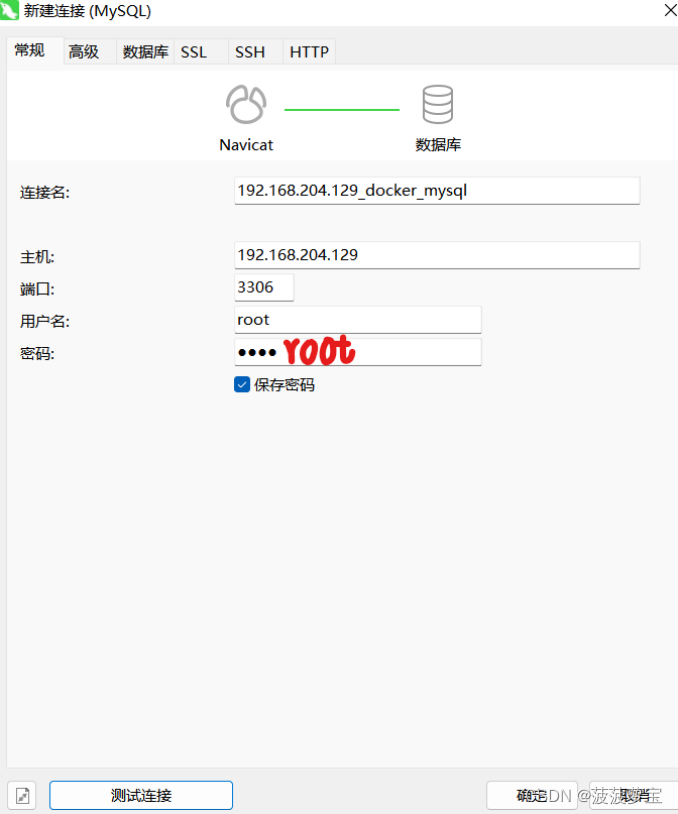
3.4.4 运行sql脚本
运行tables_xxl_job.sql
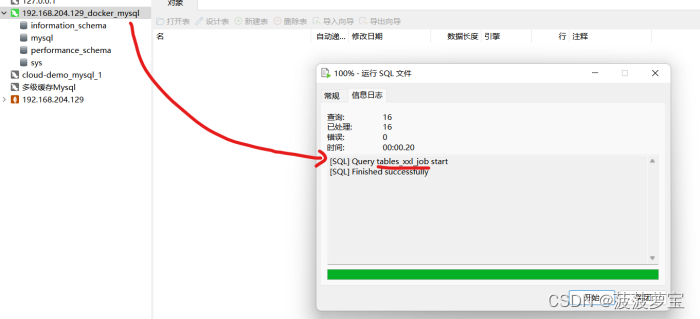
3.4.5 拉取调度中心镜像
docker pull xuxueli/xxl-job-admin:2.3.0
3.4.6 创建xxl-job容器
docker run -e PARAMS="--spring.datasource.url=jdbc:mysql://192.168.204.129:3306/xxl_job?Unicode=true&characterEncoding=UTF-8 \
--spring.datasource.username=root \
--spring.datasource.password=root" \
-p 8888:8080 -v /tmp:/data/applogs \
--name xxl-job-admin --restart=always  -d xuxueli/xxl-job-admin:2.3.0
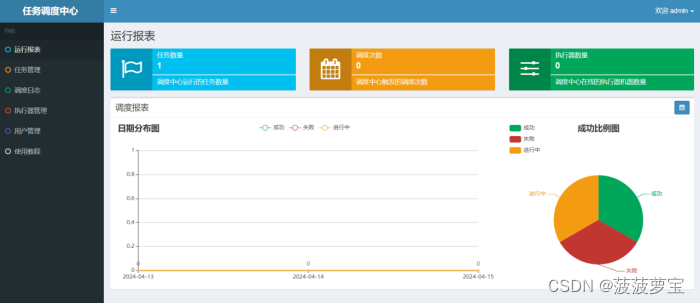
3.4.7 访问调度中心
http://192.168.204.129:8888/xxl-job-admin
账户admin密码123456
4 xxl-job入门案例
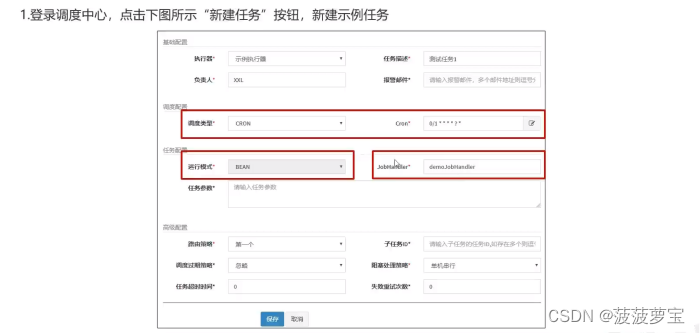
4.1 在任务中心中配置任务设置
4.2 创建xxl-job-demo
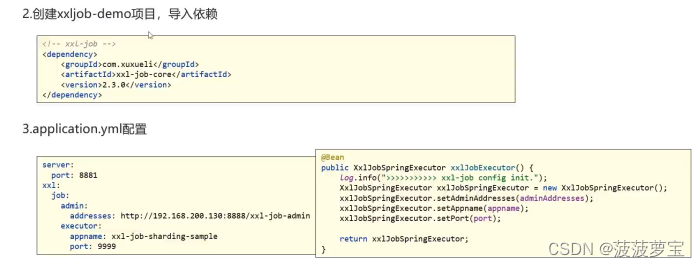
4.2.1 导入依赖
<dependencies><dependency><groupId>org.springframework.boot</groupId><artifactId>spring-boot-starter-web</artifactId></dependency><!--xxl-job--><dependency><groupId>com.xuxueli</groupId><artifactId>xxl-job-core</artifactId><version>2.3.0</version></dependency>
</dependencies>
4.2.2 创建application.yaml
server:port: 8881xxl:job:admin:addresses: http://192.168.204.129:8888/xxl-job-adminexecutor:appname: xxl-job-executor-sampleport: 9999
4.2.3 新建配置类XxlJobConfig
import com.xxl.job.core.executor.impl.XxlJobSpringExecutor;
import org.slf4j.Logger;
import org.slf4j.LoggerFactory;
import org.springframework.beans.factory.annotation.Value;
import org.springframework.context.annotation.Bean;
import org.springframework.context.annotation.Configuration;/*** xxl-job config** @author xuxueli 2017-04-28*/
@Configuration
public class XxlJobConfig {private Logger logger = LoggerFactory.getLogger(XxlJobConfig.class);@Value("${xxl.job.admin.addresses}")private String adminAddresses;@Value("${xxl.job.executor.appname}")private String appname;@Value("${xxl.job.executor.port}")private int port;@Beanpublic XxlJobSpringExecutor xxlJobExecutor() {logger.info(">>>>>>>>>>> xxl-job config init.");XxlJobSpringExecutor xxlJobSpringExecutor = new XxlJobSpringExecutor();xxlJobSpringExecutor.setAdminAddresses(adminAddresses);xxlJobSpringExecutor.setAppname(appname);xxlJobSpringExecutor.setPort(port);return xxlJobSpringExecutor;}
}
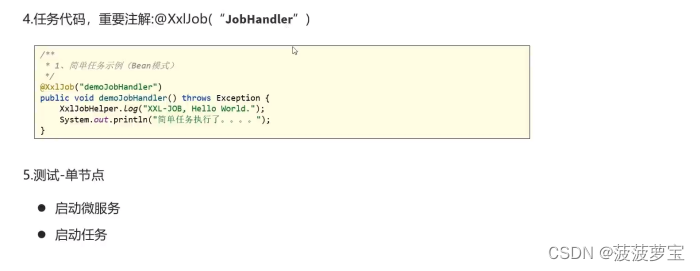
4.2.4 创建任务
创建com.heima.xxljob.job.HelloJob
@Component
public class HelloJob {@XxlJob("demoJobHandler")public void helloJob(){System.out.println("简单任务执行了。。。。");}
}
4.2.5 创建启动类
创建com.heima.xxljob.XxlJobApplication
@SpringBootApplication
public class XxlJobApplication {public static void main(String[] args) {SpringApplication.run(XxlJobApplication.class, args);}
}
4.2.6 启动启动类和启动任务

并没有打印出来我们的简单任务,是因为我们的任务还在STOP阶段

原神,启动!
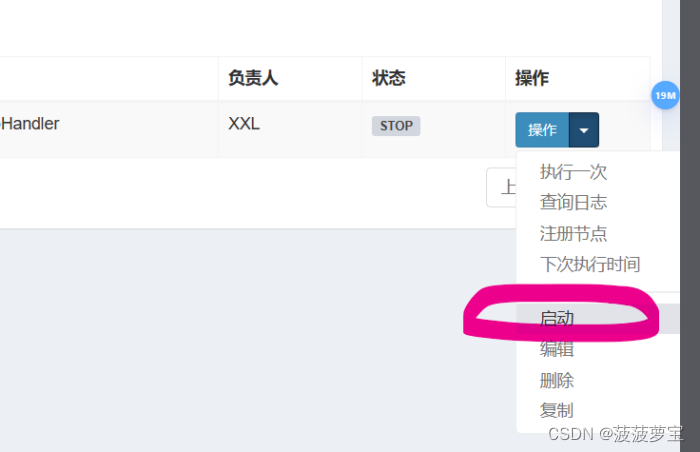
成功打印

4.3 任务详解
4.3.1 执行器管理
- 执行器:
- 任务的绑定的执行器,任务触发调度时将会*自动发现注册成功的执行器, 实现任务自动发现功能;
- 另一方面也可以方便的进行任务分组。每个任务必须绑定一个执行器.
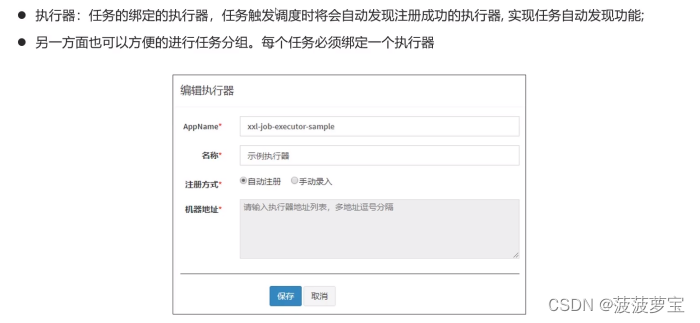
以下是执行器的属性说明:
-
AppName:是每个执行器集群的唯一标示AppName, 执行器会周期性以AppName为对象进行自动注册。可通过该配置自动发现注册成功的执行器, 供任务调度时使用;
-
名称:执行器名称, 因为AppName限制字母数字等组成,可读性不强, 名称为了提高执行器的可读性;如分片广播执行器
-
排序:执行器的排序, 系统中需要执行器的地方,如任务新增, 将会按照该排序读取可用的执行器列表;
-
注册方式:调度中心获取执行器地址的方式;
-
机器地址:注册方式为"手动录入"时有效,支持人工维护执行器的地址信息;
4.3.2 任务管理
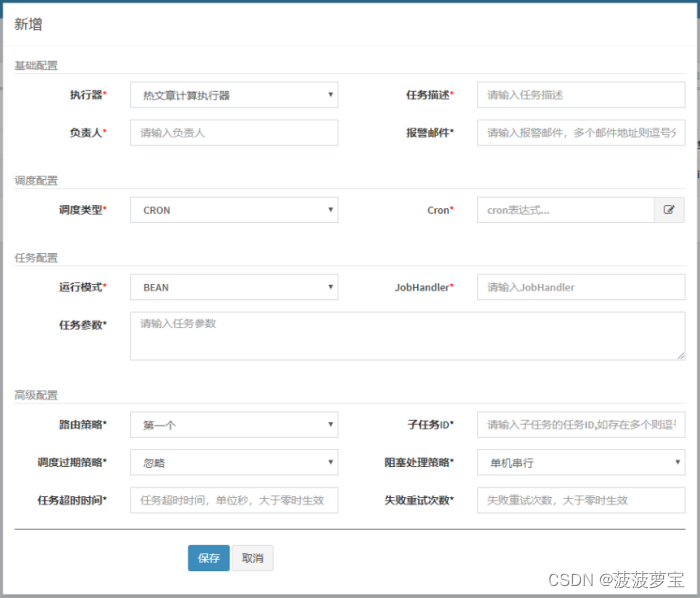
4.3.2.1 基础配置
- 执行器:每个任务必须绑定一个执行器,方便给任务进行分组;
- 任务描述:任务的描述信息,便于任务管理;
- 负责人:任务的负责人;
- 报警邮件:
- 任务调度失败时邮件通知的邮箱地址,支持配置,配置多个邮箱地址时用逗号分割
4.3.2.2 调度配置

调度配置
- 调度类型:
- 无:该类型不会主动触发调度;
- CRON:该类型将会通过CRON,触发任务调度;
- 固定速度:该类型将会以固定速度,触发任务调度;按照固定的间隔时间,周期性触发,比如一秒一次。
4.3.2.3 任务配置

-
运行模式:BEAN模式(Spring管理):任务以JobHandler方式维护在执行器端;需要结合 “JobHandler” 属性匹配执行器中任务;
-
JobHandler:运行模式为 “BEAN模式” 时生效,对应执行器中新开发的JobHandler类“@JobHandler”注解自定义的value值;
-
执行参数:任务执行所需的参数;
4.3.2.4 高级配置

路由策略
当执行器集群部署时,提供丰富的路由策略,包括;
- FIRST(第一个):固定选择第一个机器;
- LAST(最后一个):固定选择最后一个机器;
- ROUND(轮询)
- RANDOM(随机):随机选择在线的机器;
- CONSISTENT_HASH(一致性HASH):每个任务按照Hash算法固定选择某一台机器,且所有任务均匀散列在不同机器上。
- LEAST_FREQUENTLY_USED(最不经常使用):使用频率最低的机器优先被选举;
- LEAST_RECENTLY_USED(最近最久未使用):最久未使用的机器优先被选举;
- FAILOVER(故障转移):按照顺序依次进行心跳检测,第一个心跳检测成功的机器选定为目标执行器并发起调度;
- BUSYOVER(忙碌转移):按照顺序依次进行空闲检测,第一个空闲检测成功的机器选定为目标执行器并发起调度;
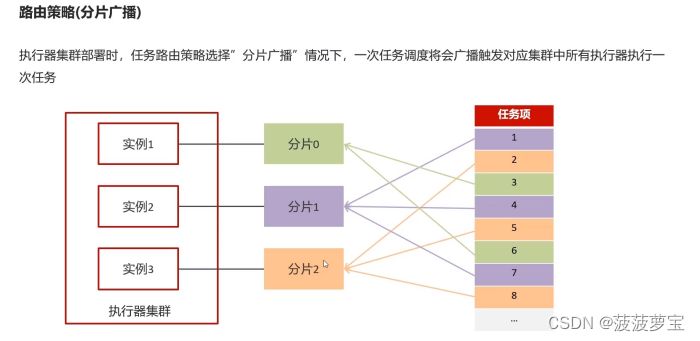
- SHARDING_BROADCAST(分片广播):广播触发对应集群中所有机器执行一次任务,同时系统自动传递分片参数;可根据分片参数开发分片任务;
阻塞处理策略
阻塞处理策略:调度过于密集执行器来不及处理时的处理策略;
-
单机串行(默认):调度请求进入单机执行器后,调度请求进入FIFO(First Input First Output)队列并以串行方式运行;
-
丢弃后续调度:调度请求进入单机执行器后,发现执行器存在运行的调度任务,本次请求将会被丢弃并标记为失败;
-
覆盖之前调度:调度请求进入单机执行器后,发现执行器存在运行的调度任务,将会终止运行中的调度任务并清空队列,然后运行本地调度任务;
4.4 路由策略案例
4.4.1 轮询
将当前任务转为轮询
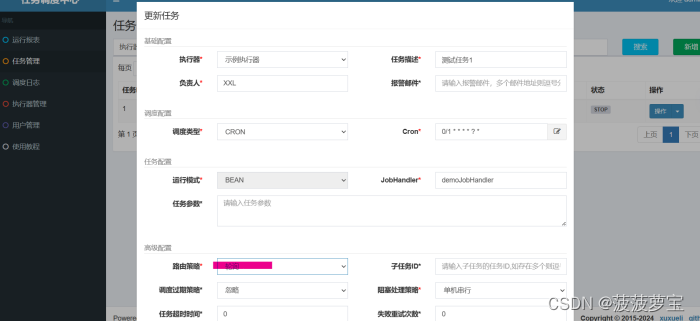
修改application.yaml
server:port: ${port:8881}xxl:job:admin:addresses: http://192.168.204.129:8888/xxl-job-adminexecutor:appname: xxl-job-executor-sampleport: ${executor.port:9999}
设置另外一个实例
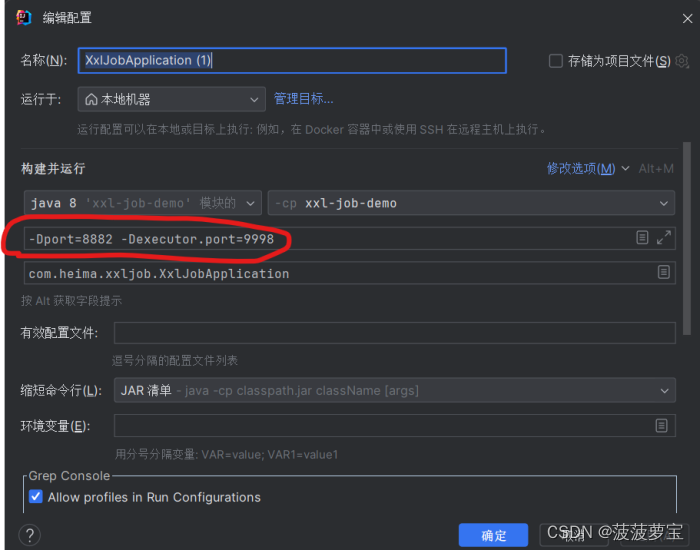
修改工作任务以区分两个实例
@Component
public class HelloJob {@Value("${server.port}")private String port;@XxlJob("demoJobHandler")public void helloJob(){//获取当前时间yy-MM-dd HH:mm:ssDate date = new Date();System.out.println("hello xxl-job,当前时间:"+date+",端口号:"+port);}
}
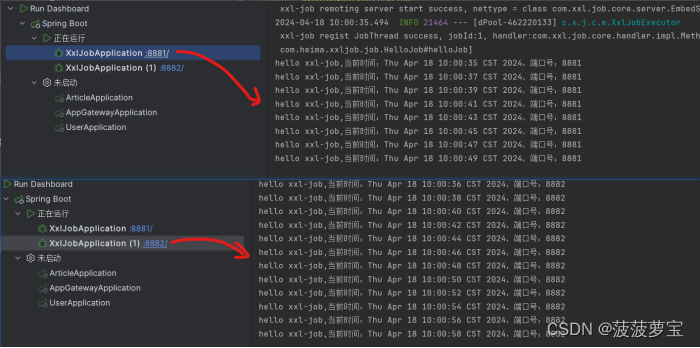
启动两个实例,并启动任务,显示交叉进行轮询访问
4.4.2 分片广播
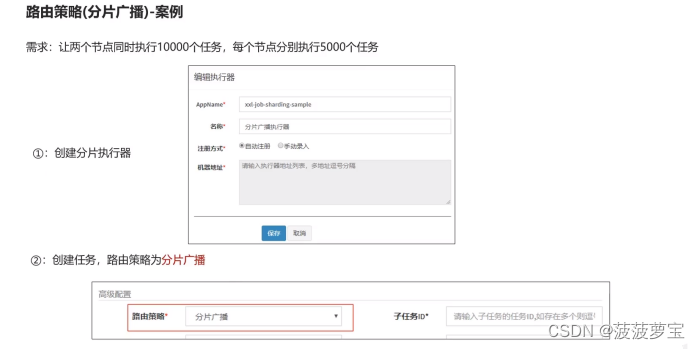
4.4.2.1 新增分片执行器

4.4.2.2 创建分片任务

4.4.2.3 修改application.yaml
server:port: ${port:8881}xxl:job:admin:addresses: http://192.168.204.129:8888/xxl-job-adminexecutor:appname: xxl-job-sharding-executorport: ${executor.port:9999}
4.4.2.4 为工作任务添加新的任务
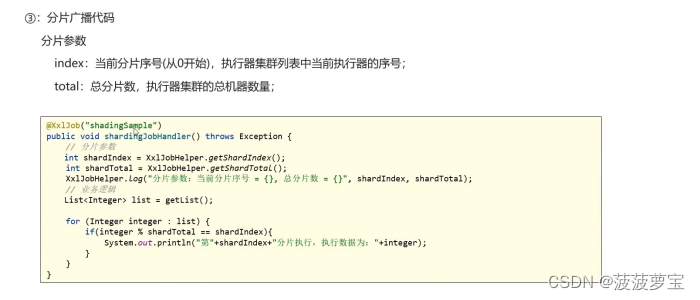
@XxlJob("shardingJobHandler")
public void shardingJobHandler(){//获取分片参数int shardIndex = XxlJobHelper.getShardIndex();int shardTotal = XxlJobHelper.getShardTotal();//业务逻辑List<Integer>list = getList();for(Integer i:list){if(i%shardTotal==shardIndex){System.out.println(new Date()+":当前第"+shardIndex+"分片,总分片数:"+shardTotal+",当前任务项:"+i);}}
}public List<Integer> getList(){List<Integer> list = new ArrayList<>();for(int i=0;i<10000;i++){list.add(i);}return list;
}
4.4.2.5 启动两个实例并执行一次任务
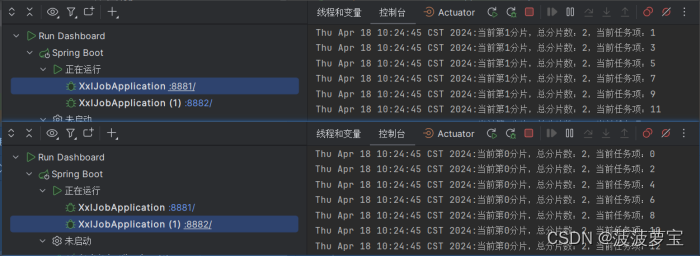
发现基本执行时间一致,有效缓解集群压力
5 热点文章定时计算
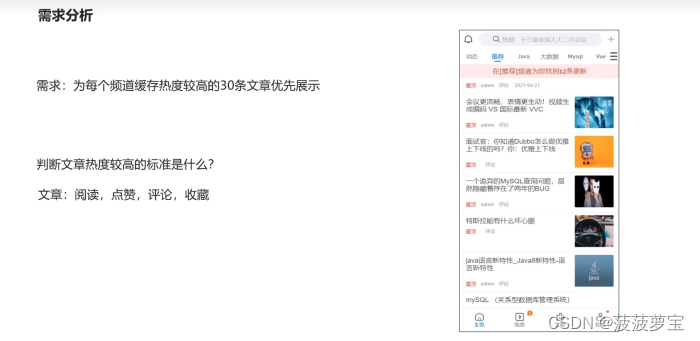
5.1 需求分析
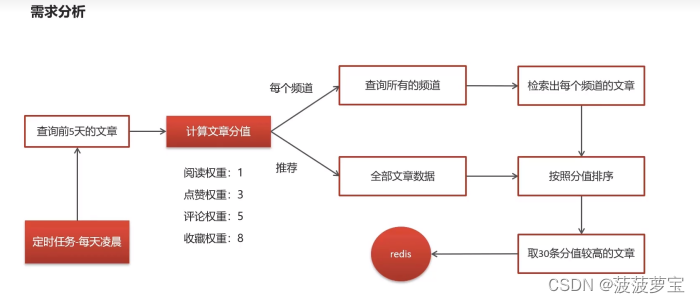
5.2 实现思路
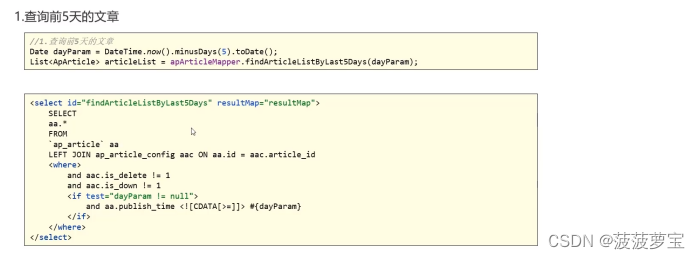

5.3 热点文章具体实现
5.3.1 查询前五天文章
5.3.1.1 创建查询前五天文章的mapper
在com.heima.article.mapper.ApArticleMapper中创建新方法
public List<ApArticle> findArticleListByLast5days(@Param("dayParam") Date dayParam);
转到其sql语句
<select id="findArticleListByLast5days" resultMap="resultMap">SELECTaa.*FROM`ap_article` aaLEFT JOIN ap_article_config aac ON aa.id = aac.article_id<where>and aac.is_delete != 1and aac.is_down != 1<if test="dayParam != null">and aa.publish_time <![CDATA[>=]]> #{dayParam}</if></where>
</select>
5.3.1.2 创建热点文章的Service
在heima-leadnews-article中创建com.heima.article.service.HotArticleService接口
public interface HotArticleService {/*** 计算热点文章*/public void computeHotArticle();
}
创建接口的实现类com.heima.article.service.impl.HotArticleServiceImpl类
@Service
@Slf4j
@Transactional
public class HotArticleServiceImpl implements HotArticleService {@Autowiredprivate ApArticleMapper apArticleMapper;@Overridepublic void computeHotArticle() {//1. 查询前五天的文章数据Date date = DateTime.now().minusDays(5).toDate();List<ApArticle> articleListByLast5days = apArticleMapper.findArticleListByLast5days(date);//2. 计算文章的分值//3. 为每个频道缓存30条分值较高的文章}
}
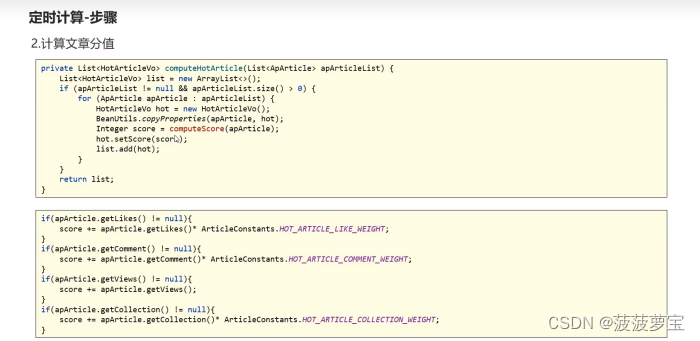
5.3.2 计算文章分值
5.3.2.1 创建HotArticleVo
因为最后计算的文章中并不包含数值字段,因此需要添加一个vo字段
在heima-leadnews-model中创建com.heima.model.article.vos.HotArticleVo类
@Data
public class HotArticleVo extends ApArticle {/*** 文章分值*/private Integer score;
}
5.3.2.2 创建文章的点赞收藏关注的权重常量
在heima-leadnews-common中的com.heima.common.constants.ArticleConstants添加新的常量
public class ArticleConstants {public static final Short LOADTYPE_LOAD_MORE = 1;public static final Short LOADTYPE_LOAD_NEW = 2;public static final String DEFAULT_TAG = "__all__";public static final String ARTICLE_ES_INDEX_TOPIC = "article.es.syn.topic";public static final Integer HOT_ARTICLE_VIEW_WEIGHT = 1;public static final Integer HOT_ARTICLE_LIKE_WEIGHT = 3;public static final Integer HOT_ARTICLE_COMMENT_WEIGHT = 5;public static final Integer HOT_ARTICLE_COLLECTION_WEIGHT = 8;public static final String HOT_ARTICLE_FIRST_PAGE = "hot_article_first_page_";
}
5.3.2.3 完善实现类
@Service
@Slf4j
@Transactional
public class HotArticleServiceImpl implements HotArticleService {@Autowiredprivate ApArticleMapper apArticleMapper;@Overridepublic void computeHotArticle() {//1. 查询前五天的文章数据Date date = DateTime.now().minusDays(5).toDate();List<ApArticle> articleListByLast5days = apArticleMapper.findArticleListByLast5days(date);//2. 计算文章的分值List<HotArticleVo> hotArticleVos = computeHot5dayArticle(articleListByLast5days);//3. 为每个频道缓存30条分值较高的文章}/*** 计算热点文章* @param articleListByLast5days*/private List<HotArticleVo> computeHot5dayArticle(List<ApArticle> articleListByLast5days) {List<HotArticleVo> hotArticleVoList = new ArrayList<>();if (articleListByLast5days != null && articleListByLast5days.size() > 0) {for (ApArticle apArticle : articleListByLast5days) {HotArticleVo hotArticleVo = new HotArticleVo();BeanUtils.copyProperties(apArticle, hotArticleVo);Integer score = computeScore(apArticle);hotArticleVo.setScore(score);hotArticleVoList.add(hotArticleVo);}}return hotArticleVoList;}/*** 计算文章的分值* @param apArticle* @return*/private Integer computeScore(ApArticle apArticle) {Integer score = 0;//1. 文章的阅读数if(apArticle.getViews() != null){score += apArticle.getViews()* ArticleConstants.HOT_ARTICLE_VIEW_WEIGHT;}//2. 文章的点赞数if(apArticle.getLikes() != null){score += apArticle.getLikes()* ArticleConstants.HOT_ARTICLE_LIKE_WEIGHT;}//3. 文章的评论数if(apArticle.getComment() != null){score += apArticle.getComment()* ArticleConstants.HOT_ARTICLE_COMMENT_WEIGHT;}//4. 文章的收藏数if(apArticle.getCollection() != null){score += apArticle.getCollection()* ArticleConstants.HOT_ARTICLE_COLLECTION_WEIGHT;}return score;}
}
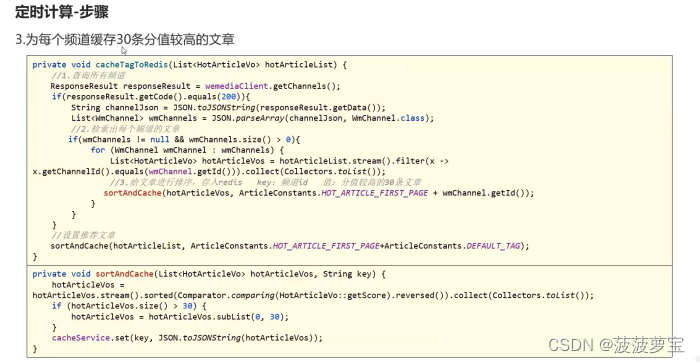
5.3.3 为每个频道缓存30条分值较高的文章
5.3.3.1 添加feign远程调用接口
因为频道信息是在自媒体中,所以需要进行远程调用
在heima-leadnews-apis中创建com.heima.apis.wemedia.IWemediaClient接口
@FeignClient(value = "leadnews-wemedia")
public interface IWemediaClient {@GetMapping("/api/v1/channel/list")public ResponseResult getChannels();
}
5.3.3.2 实现远程接口
在heima-leadnews-wemedia中创建com.heima.wemedia.feign.WemediaClient类
@RestController
public class WemediaClient implements IWemediaClient {@Autowiredprivate WmChannelService wmChannelService;@GetMapping("/api/v1/channel/list")@Overridepublic ResponseResult getChannels() {return wmChannelService.findList();}
}
5.3.3.3 添加feign的注解类扫描
因为文章微服务要调用feign远程接口获取所有频道列表,所以需要添加Feign扫描注解
为文章微服务的启动类添加@EnableFeignClients(basePackages = "com.heima.apis")
@SpringBootApplication
@EnableDiscoveryClient
@MapperScan("com.heima.article.mapper")
@EnableAsync
@EnableFeignClients(basePackages = "com.heima.apis")
public class ArticleApplication {
5.3.3.4 完善实现类
@Service
@Slf4j
@Transactional
public class HotArticleServiceImpl implements HotArticleService {@Autowiredprivate ApArticleMapper apArticleMapper;@Overridepublic void computeHotArticle() {//1. 查询前五天的文章数据Date date = DateTime.now().minusDays(20).toDate();List<ApArticle> articleListByLast5days = apArticleMapper.findArticleListByLast5days(date);//2. 计算文章的分值List<HotArticleVo> hotArticleVos = computeHot5dayArticle(articleListByLast5days);//3. 为每个频道缓存30条分值较高的文章CacheChannelHotArticleToRedis(hotArticleVos);}@Autowiredprivate IWemediaClient iWemediaClient;@Autowiredprivate CacheService cacheService;/*** 为每个频道缓存30条分值较高的文章* @param hotArticleVos*/private void CacheChannelHotArticleToRedis(List<HotArticleVo> hotArticleVos) {//1. 查询所有的频道ResponseResult response = iWemediaClient.getChannels();if(response.getCode().equals(200)){String channelJSON = JSON.toJSONString(response.getData());List<WmChannel> wmChannels = JSON.parseArray(channelJSON, WmChannel.class);//2. 检索出每个频道的文章if(wmChannels != null && wmChannels.size() > 0){for (WmChannel wmChannel : wmChannels) {List<HotArticleVo> sortedArticleOfChannel = hotArticleVos.stream().filter(hotArticleVo -> hotArticleVo.getChannelId().equals(wmChannel.getId())).sorted((a, b) -> b.getScore() - a.getScore()).limit(30).collect(Collectors.toList());//3. 缓存到rediscacheService.set(ArticleConstants.HOT_ARTICLE_FIRST_PAGE+wmChannel.getId(),JSON.toJSONString(sortedArticleOfChannel));}}}//4. 设置推荐文章List<HotArticleVo> hotArticleVoList = hotArticleVos.stream().sorted((a, b) -> b.getScore() - a.getScore()).limit(30).collect(Collectors.toList());cacheService.set(ArticleConstants.HOT_ARTICLE_FIRST_PAGE+ArticleConstants.DEFAULT_TAG,JSON.toJSONString(hotArticleVoList));}/*** 计算热点文章* @param articleListByLast5days*/private List<HotArticleVo> computeHot5dayArticle(List<ApArticle> articleListByLast5days) {List<HotArticleVo> hotArticleVoList = new ArrayList<>();if (articleListByLast5days != null && articleListByLast5days.size() > 0) {for (ApArticle apArticle : articleListByLast5days) {HotArticleVo hotArticleVo = new HotArticleVo();BeanUtils.copyProperties(apArticle, hotArticleVo);Integer score = computeScore(apArticle);hotArticleVo.setScore(score);hotArticleVoList.add(hotArticleVo);}}return hotArticleVoList;}/*** 计算文章的分值* @param apArticle* @return*/private Integer computeScore(ApArticle apArticle) {Integer score = 0;//1. 文章的阅读数if(apArticle.getViews() != null){score += apArticle.getViews()* ArticleConstants.HOT_ARTICLE_VIEW_WEIGHT;}//2. 文章的点赞数if(apArticle.getLikes() != null){score += apArticle.getLikes()* ArticleConstants.HOT_ARTICLE_LIKE_WEIGHT;}//3. 文章的评论数if(apArticle.getComment() != null){score += apArticle.getComment()* ArticleConstants.HOT_ARTICLE_COMMENT_WEIGHT;}//4. 文章的收藏数if(apArticle.getCollection() != null){score += apArticle.getCollection()* ArticleConstants.HOT_ARTICLE_COLLECTION_WEIGHT;}return score;}
}
5.3.4 测试
在HotArticleServiceImpl上alt+enter创建测试类
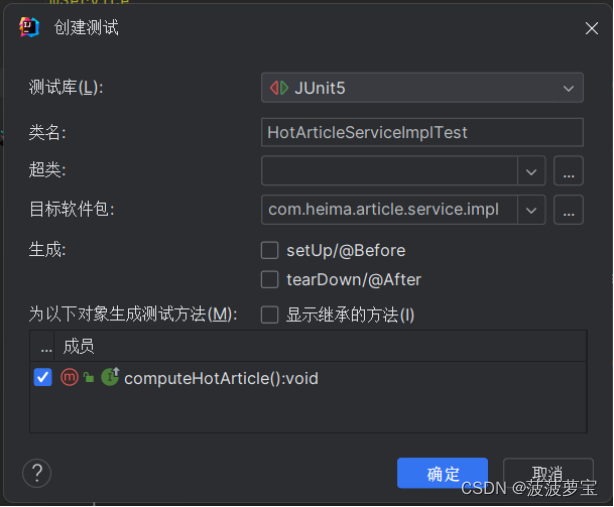
@SpringBootTest(classes = ArticleApplication.class)
@RunWith(SpringRunner.class)
class HotArticleServiceImplTest {@Autowiredprivate HotArticleService hotArticleService;@Testvoid computeHotArticle() {hotArticleService.computeHotArticle();}
}
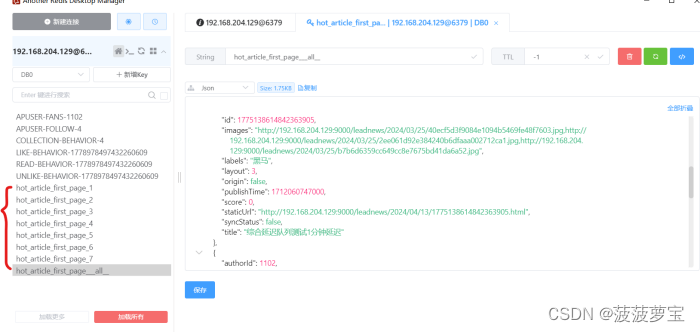
打开redis查看
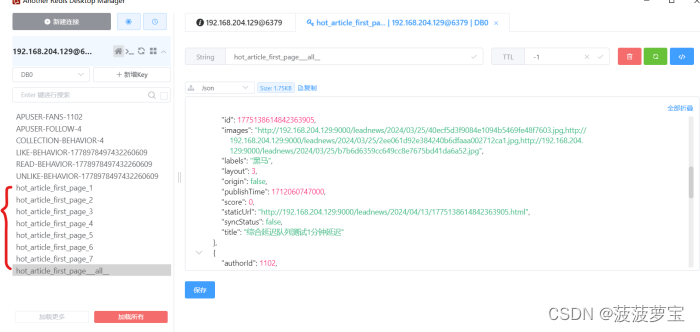
已经有写入redis了
5.4 定时计算具体实现
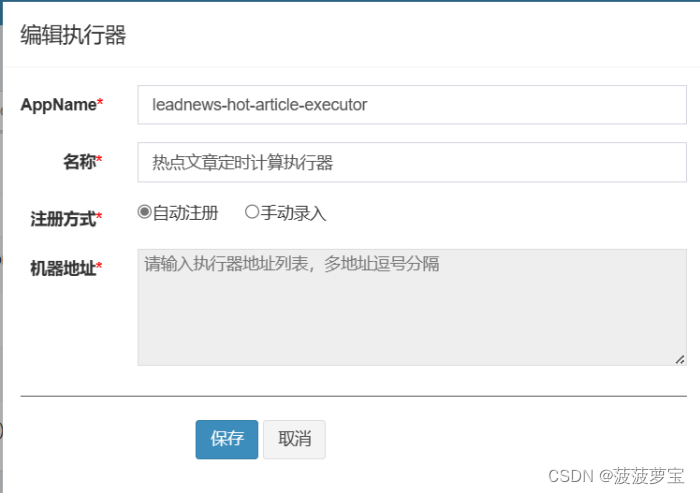
5.4.1 创建执行器
在xxl-job-admin中新建执行器和任务
5.4.2 创建任务
5.4.3 文章微服务集成xxl-job
5.4.3.1 导入依赖
<dependency><groupId>com.xuxueli</groupId><artifactId>xxl-job-core</artifactId><version>2.3.0</version>
</dependency>
5.4.3.2 添加配置类
添加配置类com.heima.article.config.XxlJobConfig
@Configuration
public class XxlJobConfig {private Logger logger = LoggerFactory.getLogger(XxlJobConfig.class);@Value("${xxl.job.admin.addresses}")private String adminAddresses;@Value("${xxl.job.executor.appname}")private String appname;@Value("${xxl.job.executor.port}")private int port;@Beanpublic XxlJobSpringExecutor xxlJobExecutor() {logger.info(">>>>>>>>>>> xxl-job config init.");XxlJobSpringExecutor xxlJobSpringExecutor = new XxlJobSpringExecutor();xxlJobSpringExecutor.setAdminAddresses(adminAddresses);xxlJobSpringExecutor.setAppname(appname);xxlJobSpringExecutor.setPort(port);return xxlJobSpringExecutor;}
}
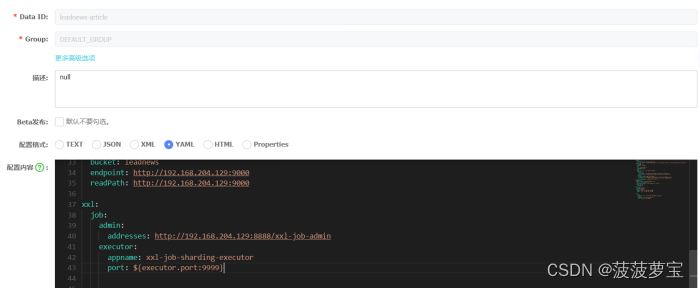
5.4.3.3 添加nacos配置
在nacos中添加leadnews-arcticle的xxl-job的配置
修改执行器名称
xxl:job:admin:addresses: http://192.168.204.129:8888/xxl-job-adminexecutor:appname: leadnews-hot-article-executorport: 9999
5.4.4 创建具体任务
在heima-leadnews-article中创建com.heima.article.job.ComputeHotArticleJob类
@Component
@Slf4j
public class ComputeHotArticleJob {@Autowiredprivate HotArticleService hotArticleService;@XxlJob("computeHotArticleJob")public void handle(){log.info("热文章分值计算调度任务开始执行...");hotArticleService.computeHotArticle();log.info("热文章分值计算调度任务结束...");}
}
@XxlJob中的值要与任务管理中的运行模式的名称一致

5.4.5 测试
启动后执行一次任务。正常显示
2024-04-18 16:46:16.099 [Thread-113] INFO  c.h.article.job.ComputeHotArticleJob - 热文章分值计算调度任务开始执行...
2024-04-18 16:46:16.696 [Thread-113] INFO  c.n.config.ChainedDynamicProperty - Flipping property: leadnews-wemedia.ribbon.ActiveConnectionsLimit to use NEXT property: niws.loadbalancer.availabilityFilteringRule.activeConnectionsLimit = 2147483647
2024-04-18 16:46:16.728 [Thread-113] INFO  c.n.loadbalancer.BaseLoadBalancer - Client: leadnews-wemedia instantiated a LoadBalancer: DynamicServerListLoadBalancer:{NFLoadBalancer:name=leadnews-wemedia,current list of Servers=[],Load balancer stats=Zone stats: {},Server stats: []}ServerList:null
2024-04-18 16:46:16.742 [Thread-113] INFO  c.n.l.DynamicServerListLoadBalancer - Using serverListUpdater PollingServerListUpdater
2024-04-18 16:46:16.751 [Thread-113] INFO  com.alibaba.nacos.client.naming - new ips(1) service: DEFAULT_GROUP@@leadnews-wemedia -> [{"instanceId":"192.168.204.1#51803#DEFAULT#DEFAULT_GROUP@@leadnews-wemedia","ip":"192.168.204.1","port":51803,"weight":1.0,"healthy":true,"enabled":true,"ephemeral":true,"clusterName":"DEFAULT","serviceName":"DEFAULT_GROUP@@leadnews-wemedia","metadata":{"preserved.register.source":"SPRING_CLOUD"},"ipDeleteTimeout":30000,"instanceHeartBeatTimeOut":15000,"instanceHeartBeatInterval":5000}]
2024-04-18 16:46:16.752 [Thread-113] INFO  com.alibaba.nacos.client.naming - current ips:(1) service: DEFAULT_GROUP@@leadnews-wemedia -> [{"instanceId":"192.168.204.1#51803#DEFAULT#DEFAULT_GROUP@@leadnews-wemedia","ip":"192.168.204.1","port":51803,"weight":1.0,"healthy":true,"enabled":true,"ephemeral":true,"clusterName":"DEFAULT","serviceName":"DEFAULT_GROUP@@leadnews-wemedia","metadata":{"preserved.register.source":"SPRING_CLOUD"},"ipDeleteTimeout":30000,"instanceHeartBeatTimeOut":15000,"instanceHeartBeatInterval":5000}]
2024-04-18 16:46:16.777 [Thread-113] INFO  c.n.config.ChainedDynamicProperty - Flipping property: leadnews-wemedia.ribbon.ActiveConnectionsLimit to use NEXT property: niws.loadbalancer.availabilityFilteringRule.activeConnectionsLimit = 2147483647
2024-04-18 16:46:16.779 [Thread-113] INFO  c.n.l.DynamicServerListLoadBalancer - DynamicServerListLoadBalancer for client leadnews-wemedia initialized: DynamicServerListLoadBalancer:{NFLoadBalancer:name=leadnews-wemedia,current list of Servers=[192.168.204.1:51803],Load balancer stats=Zone stats: {unknown=[Zone:unknown;	Instance count:1;	Active connections count: 0;	Circuit breaker tripped count: 0;	Active connections per server: 0.0;]
},Server stats: [[Server:192.168.204.1:51803;	Zone:UNKNOWN;	Total Requests:0;	Successive connection failure:0;	Total blackout seconds:0;	Last connection made:Thu Jan 01 08:00:00 CST 1970;	First connection made: Thu Jan 01 08:00:00 CST 1970;	Active Connections:0;	total failure count in last (1000) msecs:0;	average resp time:0.0;	90 percentile resp time:0.0;	95 percentile resp time:0.0;	min resp time:0.0;	max resp time:0.0;	stddev resp time:0.0]
]}ServerList:com.alibaba.cloud.nacos.ribbon.NacosServerList@249de647
2024-04-18 16:46:17.659 [Thread-113] INFO  c.h.article.job.ComputeHotArticleJob - 热文章分值计算调度任务结束...
6 查询文章改造
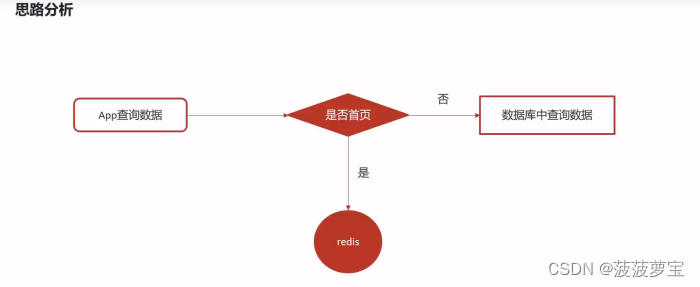
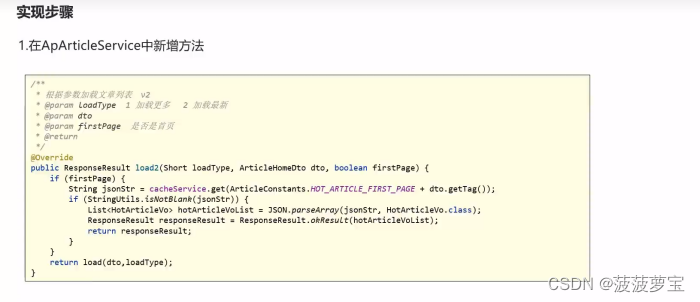

6.1 修改Service
为com.heima.article.service.ApArticleService接口添加新方法
/*** 加载文章列表* @param dto* @param type 1 加载更多 2 加载最新* @param firstPage 是否是首页 false 不是首页* @return*/
public ResponseResult load2(ArticleHomeDto dto, Short type,boolean firstPage);
实现:
@Override
public ResponseResult load2(ArticleHomeDto dto, Short type, boolean firstPage) {if(firstPage){String jsonStr = cacheService.get(ArticleConstants.HOT_ARTICLE_FIRST_PAGE + dto.getTag());if(StringUtils.isNotBlank(jsonStr)){List<HotArticleVo> hotArticleVos = JSON.parseArray(jsonStr, HotArticleVo.class);return ResponseResult.okResult(hotArticleVos);}}return load(dto, type);
}
6.2 修改controller
修改com.heima.article.controller.v1.ArticleHomeController#load方法
/*** 加载首页* @param dto* @return*/
@PostMapping("/load")
public ResponseResult load(@RequestBody(required = false) ArticleHomeDto dto) {//return apArticleService.load(dto,ArticleConstants.LOADTYPE_LOAD_MORE);return apArticleService.load2(dto, ArticleConstants.LOADTYPE_LOAD_MORE,true);
}
7 综合测试
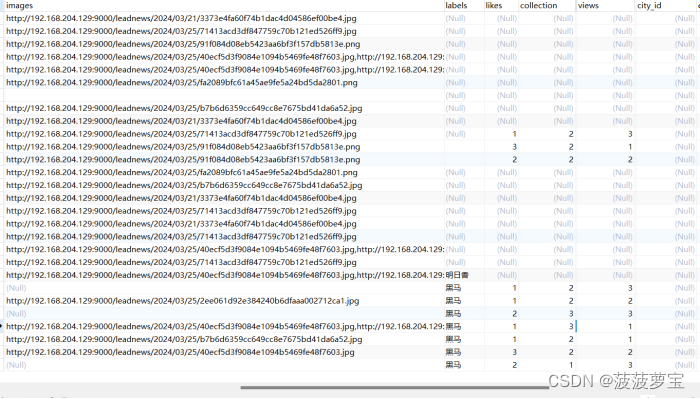
小小的修改一下数据
启动微服务及nginx

查看首页
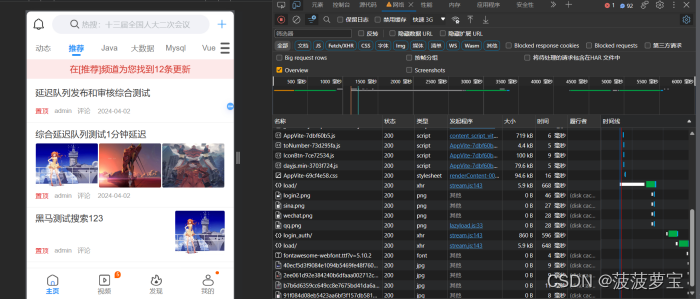
看看redis是否对的上

这篇关于【黑马头条】-day10热点文章定时计算-xxl-job的文章就介绍到这儿,希望我们推荐的文章对编程师们有所帮助!


