本文主要是介绍Android Senor Framework (四)SensorService加载,希望对大家解决编程问题提供一定的参考价值,需要的开发者们随着小编来一起学习吧!
onFirstRef
前个内容介绍了 SystemServer启动SensorService的过程,同时描述了 SensorService有集成它的类间接父类RefBase,SesnorService中重写了onFirstRef方法,该方法在SensorService对象被第一次强引用时自动调用其onFirstRef方法; 下面是Sensor Service的onFirstRef实现:
代码路径:./frameworks/native/services/sensorservice/SensorService.cpp
void SensorService::onFirstRef() {ALOGD("nuSensorService starting...");SensorDevice& dev(SensorDevice::getInstance());//创建 SensorDevice 的实例 //...... if (dev.initCheck() == NO_ERROR) {sensor_t const* list;ssize_t count = dev.getSensorList(&list);if (count > 0) {//......for (ssize_t i=0 ; i<count ; i++) {//......if (useThisSensor) {registerSensor( new HardwareSensor(list[i]) );//调用 Sensor HAL 提供的 get_sensors_list 接口,获取所支持的 Sensor 信息,用registerSensor函数把Sensor保存起来// 每个sensor 对应一个HardwareSensor;}}SensorFusion::getInstance();// SensorFusion功能,传感融合。它的主要作用就是,按照一定的算法计算系统的多个传感器对某一个值的上报的数据,得到更准确的值。if (hasGyro && hasAccel && hasMag) {// 添加 Android virtual sensors 如果HAL中还未有bool needRotationVector = (virtualSensorsNeeds & (1<<SENSOR_TYPE_ROTATION_VECTOR)) != 0;registerSensor(new RotationVectorSensor(), !needRotationVector, true);registerSensor(new OrientationSensor(), !needRotationVector, true);registerSensor(new LinearAccelerationSensor(list, count), !needLinearAcceleration, true);// virtual debugging sensors are not for userregisterSensor( new CorrectedGyroSensor(list, count), true, true);registerSensor( new GyroDriftSensor(), true, true);}if (hasAccel && hasGyro) {registerSensor(new GravitySensor(list, count), !needGravitySensor, true);bool needGameRotationVector = (virtualSensorsNeeds & (1<<SENSOR_TYPE_GAME_ROTATION_VECTOR)) != 0;registerSensor(new GameRotationVectorSensor(), !needGameRotationVector, true);}if (hasAccel && hasMag) {bool needGeoMagRotationVector =(virtualSensorsNeeds & (1<<SENSOR_TYPE_GEOMAGNETIC_ROTATION_VECTOR)) != 0;registerSensor(new GeoMagRotationVectorSensor(), !needGeoMagRotationVector, true);}//创建Looper Looper 用于 enable sensor 后,进行数据的接收;mLooper = new Looper(false);const size_t minBufferSize = SensorEventQueue::MAX_RECEIVE_BUFFER_EVENT_COUNT;mSensorEventBuffer = new sensors_event_t[minBufferSize];mSensorEventScratch = new sensors_event_t[minBufferSize];mMapFlushEventsToConnections = new wp<const SensorEventConnection> [minBufferSize];mCurrentOperatingMode = NORMAL;mNextSensorRegIndex = 0;for (int i = 0; i < SENSOR_REGISTRATIONS_BUF_SIZE; ++i) {mLastNSensorRegistrations.push();}mInitCheck = NO_ERROR;mAckReceiver = new SensorEventAckReceiver(this);//创建 SensorEventAckReceiver 用于在 dispatch wake up sensor event 给上层后,接收上层返回的确认 ACKmAckReceiver->run("SensorEventAckReceiver", PRIORITY_URGENT_DISPLAY);run("SensorService", PRIORITY_URGENT_DISPLAY);enableSchedFifoMode();}}}
从以上内容可知,onFirstRef在最开始的阶段便,创建 SensorDevice 的实例 ,使用SersorDevice 获取SensorList(实际访问了HAL),
registerSensor, 创建了mLooper,mSensorEventBuffer, SensorEventAckReceiver, 调用其run函数;调用SensorService的run函数;
下面分别对这些内容做简要分析:
SensorDevice
代码路径: ./native/services/sensorservice/SensorDevice.cpp
SensorDevice::SensorDevice():  mSensorDevice(0),mSensorModule(0) {status_t err = hw_get_module(SENSORS_HARDWARE_MODULE_ID,(hw_module_t const**)&mSensorModule);//!< 加载Sensor HAL 的动态库 >! NoteBy: yujixuanALOGE_IF(err, "couldn't load %s module (%s)",SENSORS_HARDWARE_MODULE_ID, strerror(-err));if (mSensorModule) {err = sensors_open_1(&mSensorModule->common, &mSensorDevice);//!< 调用其open方法,获取Hal中 的device >! NoteBy: yujixuanALOGE_IF(err, "couldn't open device for module %s (%s)",SENSORS_HARDWARE_MODULE_ID, strerror(-err));sensor_t const* list;ssize_t count = mSensorModule->get_sensors_list(mSensorModule, &list);//!< 获取sensor list >! NoteBy: yujixuanmActivationCount.setCapacity(count);Info model;for (size_t i=0 ; i<size_t(count) ; i++) {mActivationCount.add(list[i].handle, model);mSensorDevice->activate(reinterpret_cast<struct sensors_poll_device_t *>(mSensorDevice),list[i].handle, 0);}}}
}
在SensorDevice的构造函数中可以看得到,在这里是与HAL层交互的实现。 通过hw_get_module 获取HAL hw_module_t 结构体mSensorModule, 通过其注册的open方法,获取到mSensorDevice; 调用get_sernsor_list获取到sensorlist;
通过前面在msm8909平台的SesnorHAL分析,与之对应这里获取的mSensorModule既是:
struct sensors_module_t HAL_MODULE_INFO_SYM = {common: {//......methods: &sensors_module_methods,  },get_sensors_list: sensors__get_sensors_list,
};
sensors_open_1回调:sensors_module_methods的open函数;在open函数,填充获取了 device,也就是当前的mSensorDevice;
open_sensors(const struct hw_module_t* module, const char*,struct hw_device_t** device)
//......dev->device.common.module   = const_cast<hw_module_t*>(module);dev->device.common.close	= poll__close;dev->device.activate		= poll__activate;dev->device.setDelay		= poll__setDelay;dev->device.poll		= poll__poll;dev->device.calibrate		= poll_calibrate;
//......*device = &dev->device.common;
}
HAL层的实现由平台厂商和Sensor ic厂商来完成实现非AOSP标准的框架内的细节,Sensor device 完成了相同过程的访问过程;拥有对Sensor 控制,Sensor数据获取的访问接口;
SensorList
class SensorService{//......SensorList mSensors;const Sensor& registerSensor(SensorInterface* sensor,bool isDebug = false, bool isVirtual = false);    //......
}
前面的分析,通过SensorDevice获取到sensor_t 组成的sensor list; 而在SensorService中, Sensorlist的定义是SensorList类的 mSensors; 在 onFirstRef的过程中,也可以看到,通过sensor device获取了 count和list,根据每一个sensor调用registerSensor (以及其他SensorList中提供的方法)注册到SensorService中;其函数内容如下:
const Sensor& SensorService::registerSensor(SensorInterface* s, bool isDebug, bool isVirtual) {int handle = s->getSensor().getHandle();int type = s->getSensor().getType();if (mSensors.add(handle, s, isDebug, isVirtual)){mRecentEvent.emplace(handle, new RecentEventLogger(type));return s->getSensor();} else {return mSensors.getNonSensor();}
}
主要是调用SensorList的add 方法填充每一个sensor到List中去;
SensorList的存在是维系记录着所有的sensor对象;以下列出SensorList 类的主要内容:
代码路径:frameworks\native\services\sensorservice\SensorList.h
class SensorList : public Dumpable {
public:bool add(int handle, SensorInterface* si, bool isForDebug = false, bool isVirtual = false);bool remove(int handle);inline bool hasAnySensor() const { return mHandleMap.size() > 0;}//helper functionsconst Vector<Sensor> getUserSensors() const;const Vector<Sensor> getUserDebugSensors() const;const Vector<Sensor> getDynamicSensors() const;const Vector<Sensor> getVirtualSensors() const;String8 getName(int handle) const;sp<SensorInterface> getInterface(int handle) const;bool isNewHandle(int handle) const;void forEachSensor(const TF& f) const;const Sensor& getNonSensor() const { return mNonSensor;}// Dumpable interfacevirtual std::string dump() const override;virtual ~SensorList();
private:struct Entry {sp<SensorInterface> si;const bool isForDebug;const bool isVirtual;Entry(SensorInterface* si_, bool debug_, bool virtual_) :si(si_), isForDebug(debug_), isVirtual(virtual_) {}};const static Sensor mNonSensor; //.getName() == "unknown",
//......
}
其中 存放Sensor的对象结构是 const static Sensor mNonSensor; Sensor类:它代表一个sensor,和前面application中提到的Sensor对象一一对应,中间会通过JNI 完成相应的类型转换;
class Sensor : public ASensor, public LightFlattenable<Sensor>
{
public:enum {TYPE_ACCELEROMETER  = ASENSOR_TYPE_ACCELEROMETER,TYPE_MAGNETIC_FIELD = ASENSOR_TYPE_MAGNETIC_FIELD,TYPE_GYROSCOPE      = ASENSOR_TYPE_GYROSCOPE,TYPE_LIGHT          = ASENSOR_TYPE_LIGHT,TYPE_PROXIMITY      = ASENSOR_TYPE_PROXIMITY};struct uuid_t{union {uint8_t b[16];int64_t i64[2];};uuid_t(const uint8_t (&uuid)[16]) { memcpy(b, uuid, sizeof(b));}uuid_t() : b{0} {}};Sensor(const char * name = "");Sensor(struct sensor_t const* hwSensor, int halVersion = 0);Sensor(struct sensor_t const& hwSensor, const uuid_t& uuid, int halVersion = 0);~Sensor();const String8& getName() const;const String8& getVendor() const;int32_t getHandle() const;int32_t getType() const;float getMinValue() const;float getMaxValue() const;float getResolution() const;float getPowerUsage() const;int32_t getMinDelay() const;nsecs_t getMinDelayNs() const;int32_t getVersion() const;uint32_t getFifoReservedEventCount() const;uint32_t getFifoMaxEventCount() const;const String8& getStringType() const;
//......const uuid_t& getUuid() const;int32_t getId() const;
//......
private:String8 mName;String8 mVendor;int32_t mHandle;int32_t mType;float   mMinValue;float   mMaxValue;float   mResolution;float   mPower;int32_t mMinDelay;int32_t mVersion;
//......
};
显然,因为类型不一致的原因,从HAL中获取的Sensor直接注册到SensorService中的,registerSensor接收的对象是 SensorInterface* sensor; 在处理HAL sensor list sensor的for循环中可以看到, 每循环一个registerSensor 注册的是new的HardwareSensor; 以下是 HardwareSensor的实现:
class HardwareSensor : public BaseSensor ```cpp class HardwareSensor : public BaseSensor { public: HardwareSensor(const sensor_t& sensor); HardwareSensor(const sensor_t& sensor, const uint8_t (&uuid)[16]);virtual ~HardwareSensor();virtual bool process(sensors_event_t* outEvent,const sensors_event_t& event);
virtual status_t activate(void* ident, bool enabled) override;
virtual status_t batch(void* ident, int handle, int flags, int64_t samplingPeriodNs,int64_t maxBatchReportLatencyNs) override;
virtual status_t setDelay(void* ident, int handle, int64_t ns) override;
virtual status_t flush(void* ident, int handle) override;
virtual bool isVirtual() const override { return false; }
virtual void autoDisable(void *ident, int handle) override;
};
</details>它继承自BaseSensor,BaseSensor定义如下:<details>
<summary>class BaseSensor : public SensorInterface</summary>```cpp
class BaseSensor : public SensorInterface {
public:BaseSensor(const sensor_t& sensor);BaseSensor(const sensor_t& sensor, const uint8_t (&uuid)[16]);// Not all sensors need to support batching.virtual status_t batch(void* ident, int handle, int, int64_t samplingPeriodNs,int64_t maxBatchReportLatencyNs) override {if (maxBatchReportLatencyNs == 0) {return setDelay(ident, handle, samplingPeriodNs);}return -EINVAL;}virtual status_t flush(void* /*ident*/, int /*handle*/) override {return -EINVAL;}virtual const Sensor& getSensor() const override { return mSensor; }virtual void autoDisable(void* /*ident*/, int /*handle*/) override { }
protected:SensorDevice& mSensorDevice;Sensor mSensor;
};
SensorInterface 继承自SensorInterface , SensorInterface 定义如下:
class SensorInterface : public VirtualLightRefBaseclass SensorInterface : public VirtualLightRefBase {
public:virtual ~SensorInterface() {}virtual bool process(sensors_event_t* outEvent, const sensors_event_t& event) = 0;virtual status_t activate(void* ident, bool enabled) = 0;virtual status_t setDelay(void* ident, int handle, int64_t ns) = 0;virtual status_t batch(void* ident, int handle, int /*flags*/, int64_t samplingPeriodNs,int64_t maxBatchReportLatencyNs) = 0;virtual status_t flush(void* /*ident*/, int /*handle*/) = 0;virtual const Sensor& getSensor() const = 0;virtual bool isVirtual() const = 0;virtual void autoDisable(void* /*ident*/, int /*handle*/) = 0;
};
HardwareSensor集成SensorInterface 做了相应的实现,也是对Sensor数据结构的转换;
SensorEventAckReceiver
最后阶段,SesnorService创建了 SensorEvent 接收器: 其定义如下:
class SensorService::SensorEventAckReceiver : public Thread {sp<SensorService> const mService;
public:virtual bool threadLoop();SensorEventAckReceiver(const sp<SensorService>& service): mService(service) {}
};
主要是实现一个线程,线程内容如下:
bool SensorService::SensorEventAckReceiver::threadLoop() {ALOGD("new thread SensorEventAckReceiver");sp<Looper> looper = mService->getLooper();do {bool wakeLockAcquired = mService->isWakeLockAcquired();int timeout = -1;if (wakeLockAcquired) timeout = 5000;int ret = looper->pollOnce(timeout);if (ret == ALOOPER_POLL_TIMEOUT) {mService->resetAllWakeLockRefCounts();}} while(!Thread::exitPending());return false;
}
定时执行pollOnce;
在onFirstRef中的调用:
mAckReceiver = new SensorEventAckReceiver(this);
mAckReceiver->run("SensorEventAckReceiver", PRIORITY_URGENT_DISPLAY);
SensorService run()
前面分析SensorService类定义时,有看到 他同时继承了threadLoop, 在onFirstRef的最后阶段,也可以看到其重写的run方法被调用;
run("SensorService", PRIORITY_URGENT_DISPLAY);
最后看下 SensorService中 ThreadLoop的实现内容:
bool SensorService::threadLoop() {
//......SensorDevice& device(SensorDevice::getInstance());
//......do {ssize_t count = device.poll(mSensorEventBuffer, numEventMax);SortedVector< sp<SensorEventConnection> > activeConnections;populateActiveConnections(&activeConnections);//......   // handle virtual sensorsif (count && vcount) {sensors_event_t const * const event = mSensorEventBuffer;if (!mActiveVirtualSensors.empty()) {size_t k = 0;SensorFusion& fusion(SensorFusion::getInstance());if (fusion.isEnabled()) {for (size_t i=0 ; i<size_t(count) ; i++) {fusion.process(event[i]);}}for (size_t i=0 ; i<size_t(count) && k<minBufferSize ; i++) {for (int handle : mActiveVirtualSensors) {sensors_event_t out;sp<SensorInterface> si = mSensors.getInterface(handle);}if (si->process(&out, event[i])) {mSensorEventBuffer[count + k] = out;k++;}}}if (k) {// record the last synthesized valuesrecordLastValueLocked(&mSensorEventBuffer[count], k);count += k;// sort the buffer by time-stampssortEventBuffer(mSensorEventBuffer, count);}}}// handle backward compatibility for RotationVector sensorif (halVersion < SENSORS_DEVICE_API_VERSION_1_0) {for (int i = 0; i < count; i++) {if (mSensorEventBuffer[i].type == SENSOR_TYPE_ROTATION_VECTOR) {mSensorEventBuffer[i].data[4] = -1;}}}    //计算......      //......  bool needsWakeLock = false;size_t numConnections = activeConnections.size();for (size_t i=0 ; i < numConnections; ++i) {if (activeConnections[i] != 0) {activeConnections[i]->sendEvents(mSensorEventBuffer, count, mSensorEventScratch,mMapFlushEventsToConnections);needsWakeLock |= activeConnections[i]->needsWakeLock();// If the connection has one-shot sensors, it may be cleaned up after first trigger.// Early check for one-shot sensors.if (activeConnections[i]->hasOneShotSensors()) {cleanupAutoDisabledSensorLocked(activeConnections[i], mSensorEventBuffer,count);}}}
//......} while (!Thread::exitPending());ALOGW("Exiting SensorService::threadLoop => aborting...");abort();return false;}
threadLoop的最开始,取到sensordevice的引用; 在threadLoop循环体内,调用了 device.poll 向hal层取数据;
调用sendEvents上报sensor信息;
总结时序图
对该过程的绘制了简要的uml时序图如下:
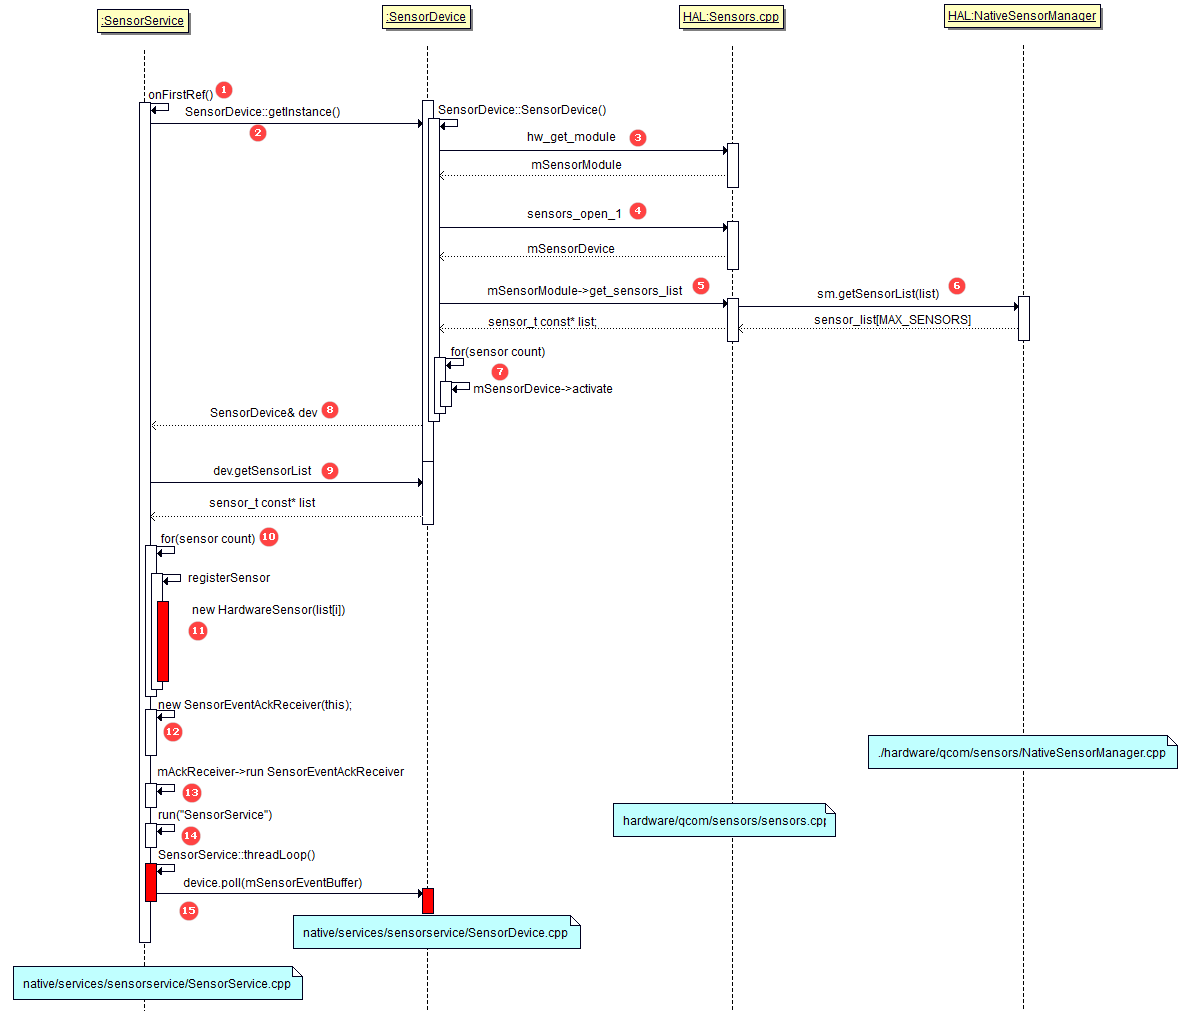
onFirstRef()属于其父类RefBase,该函数在强引用sp新增引用计数时,第一次强引用会自动调用此函数;//参考:深入理解android 之sp和wp获取一个SensorDevice实例对象,SensorDevice& dev(SensorDevice::getInstance());加载HAL库, 查找 hal中对应的 module id 微"sensors"的moudle;
hw_get_module(SENSORS_HARDWARE_MODULE_ID, (hw_module_t const**)&mSensorModule);得到mSensorModule;sensors_open_1:module->methods->open 调用open函数, hw_module_t除了设备信息外提供另外一个结构体hw_module_methods_t, 它只有一个open函数,调用设备注册的open回调;让调用者得到基于hw_device_t的设备结构体,hw_device_t包含了hw_module_t; (标红为HAL的三个关键结构体) HAL的核心内容是获取hw_device_t,向上转型,获得其中的设备数据结构以及函数接口;通过HAL中添加的get_sensors_list获取list;qcom平台上,HAL中的实际管控是有NativeSensorManager来管控,这里也是返回单例NativeSensorManager对象中的sensorlist,及sensor个数根据sensor个数,for循环,执行active;完成SensorDevice的构造,SensorService得到了 实例对象SensorDevice dev;获取sensor list,及sensor num;调用过程与上面相同;根据sensor个数,for循环, 注册Sensor到sensorsercvice注册的过程是创建对应的HardwareSensor;SensorService 创建SensorEeventReceiver,SensorEventAckReceiver : public 集成了Thread ;启动mAckReceiver 重写实现的这个线程,SensorEventAckReceiver,调用run方法,启动这个线程:"SensorEventAckReceiver";SensorService自身也集成了 Thread, 在SensorService中重写threadLoop; 这个地方调用了其run方法,启动线程:"SensorService";通过device poll 管理,sensorEvent
这篇关于Android Senor Framework (四)SensorService加载的文章就介绍到这儿,希望我们推荐的文章对编程师们有所帮助!


