本文主要是介绍【Spring】依赖注入(DI)时常用的注解@Autowired和@Value,希望对大家解决编程问题提供一定的参考价值,需要的开发者们随着小编来一起学习吧!
目录
1、@Autowired 自动装配
1.1、要实现自动装配不是一定要使用@Autowired
1.2、@Autowired的特性
(1)首先会根据类型去spring容器中找(bytype),如果有多个类型,会根据名字再去spring容器中找(byname)
(2)如果根据名字还是匹配不到,解决方案为下面两个:
(3)可以写在方法、构造函数、字段、参数上
2、@Value
(1)方式一:直接把值写在@Value中的属性里
(2)方式二:对外部属性(SpringBoot配置文件)文件的引用
(3)SPEL表达式(Spring Expression Language):@Value("#{}")

依赖注入(DI)是一种软件设计模式,旨在降低模块之间的耦合度。其核心思想是将对象之间的依赖关系外部化,使得代码更加灵活、可维护和可测试。在DI模式中,对象不再负责创建它所依赖的对象,而是由外部的容器(通常是框架或容器)负责将依赖的对象注入到目标对象中。框架如Spring提供了DI功能,通过注解、XML配置文件或Java配置类等方式,开发者可以在需要注入的地方指定相应的注解或配置,框架即可自动完成依赖对象的注入,无需手动创建和管理。
1、@Autowired 自动装配
1.1、要实现自动装配不是一定要使用@Autowired
(1)@Bean 方法的参数会自动注入;
(2)构造函数上的参数会自动注入
1.2、@Autowired的特性
(1)首先会根据类型去spring容器中找(bytype),如果有多个类型,会根据名字再去spring容器中找(byname)

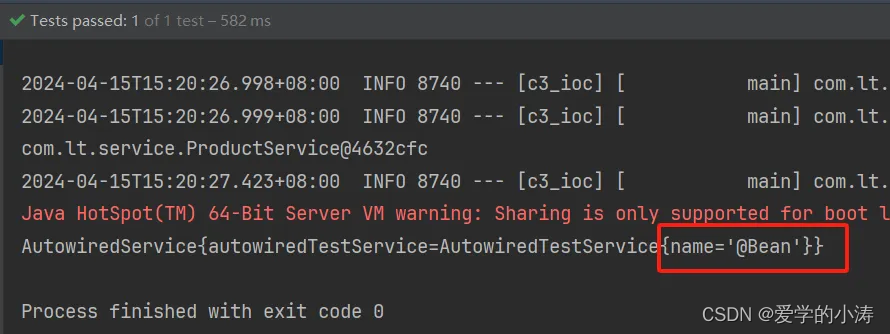
上图中涉及的代码,先看这个代码,后面作为示例会有改动
@Component  //这里配置bean的类型是AutowiredTestService,名字是autowiredTestService
public class AutowiredTestService {
}@Component
public class AutowiredService {//首先会根据类型去spring容器中找(bytype) ,如果有多个类型, 会根据名字再去spring容器中找(byname)//这里会根据类型找到两个bean,一个是通过@Component注解配置的AutowiredTestService类的bean//还有一个是在SpringConfig配置类中通过@Bean注解配置的AutowiredTestService类的bean//然后他再会通过这里注入时的名字:autowiredTestService,//找到通过@Component注解配置的bean(autowiredTestService)@Autowired  //这里注入的类型是AutowiredTestService,名字是autowiredTestServiceAutowiredTestService autowiredTestService;@Overridepublic String toString() {return "AutowiredService{" +"autowiredTestService=" + autowiredTestService +'}';}
}@Configuration
public class SpringConfig {@Bean  //这里配置bean的类型是AutowiredTestService,名字是autowiredTestService2public AutowiredTestService autowiredTestService2(){AutowiredTestService autowiredTestService = new AutowiredTestService();autowiredTestService.setName("@Bean"); //为AutowiredTestService类bean对象中的name属性赋值return  autowiredTestService;}
}@SpringBootTest  //需要加@SpringBootTest注解,否则这里需要自己去获取ioc容器才能从ioc容器中拿bean
public class AutowiredTest {@Autowired  AutowiredService autowiredService;@Testpublic void test01(){System.out.println(autowiredService.toString());}
}
运行结果:因为通过@Component注解配置的AutowiredTestService类bean时,没有为AutowiredTestService类bean对象中的name属性赋值,这里的结果中name等于null,所以这里获取的是通过@Component注解配置的AutowiredTestService类bean

把AutowiredService类中注入的AutowiredTestService的bean名字改为autowiredTestService2
@Component
public class AutowiredService {//首先会根据类型去spring容器中找(bytype) ,如果有多个类型, 会根据名字再去spring容器中找(byname)//这里会根据类型找到两个bean,一个是通过@Component注解配置的bean,名字为autowiredTestService//还有一个是在SpringConfig配置类中通过@Bean注解配置的AutowiredTestService类的bean//然后他再会通过这里注入时的名字:autowiredTestService2,//找到通过@Bean注解配置的bean,并且这个Bean对象中的name属性值为‘@Bean’@Autowired  //这里注入的类型是AutowiredTestService,名字是autowiredTestService2AutowiredTestService autowiredTestService2;@Overridepublic String toString() {return "AutowiredService{" +"autowiredTestService=" + autowiredTestService2 +'}';}
}
运行结果:因为通过@Bean注解配置bean时,为AutowiredTestService类bean对象中的name属性赋值为‘@Bean’,这里的结果中name等于‘@Bean’,所以这里获取的是通过@Bean注解配置的bean
(2)如果根据名字还是匹配不到,解决方案为下面两个:
1)通过@primary设置某一个为主要的,比如:
@Component
@Primary
public class AutowiredTestService {}2)通过@Qualifier("autowiredtestservice2)告诉spring需要的那个bean的名字,比如:
public class AutowiredService {//首先会根据类型去spring容器中找(bytype) ,如果有多个类型, 会根据名字再去spring容器中找(byname)//容器中有两个AutowiredTestService类的bean,一个是通过@Component注解配置的bean(autowiredTestService)//还有一个是在SpringConfig配置文件中通过@Bean注解配置的bean(autowiredTestService2)//但是这里注入时的名字为autowiredTestService3,那他就会报错,因为根据名字autowiredTestService3,//他不知道应该找通过@Component注解配置的bean还是通过@Bean注解配置的bean,//这时候就需要通过@Qualifier("autowiredtestservice2)告诉spring需要的那个bean的名字@Autowired@Qualifier("autowiredTestService2") AutowiredTestService autowiredTestService3; // 虽然通过注入时的名字:autowiredTestService3找不到,// 但是可以通过@Qualifier中的autowiredTestService2找到@Overridepublic String toString() {return "AutowiredService{" +"autowiredTestService=" + autowiredTestService3 +'}';}
}
3)@Autowired注解有一个required属性,当指定required属性为false时,意味着在容器中找相应类型的bean,如果找不到则忽略,而不报错(这一条是@Inject 和 @Resource 两个注解所没有的功能)。如果去容器中一个都没找到就会报错,通过@autowired(required=false)设置required=false,就不会报错了,比如:
@SpringBootTest  //需要加@SpringBootTest注解,否则这里需要自己去获取ioc容器才能从ioc容器中拿bean
public class AutowiredTest {@Autowired(required = false)  //如果去容器中一个都没找到,设置required=false,就不会报错了AutowiredService autowiredService3;public void testConstructor() {System.out.println(autowiredService3);}
}
(3)可以写在方法、构造函数、字段、参数上
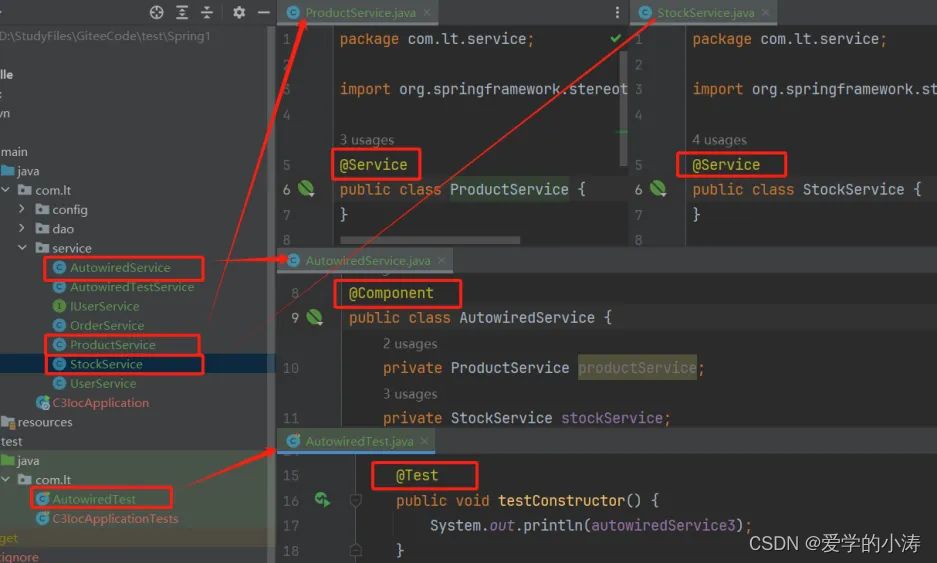
上图中涉及的代码,先看这个代码,后面作为示例会有改动
@Service
public class ProductService {
}@Service
public class StockService {
}@Component
public class AutowiredService {private ProductService productService;private StockService stockService;//当这个构造函数被调用时,ProductService没有加@Autowired注解也会被自动的依赖注入进来public AutowiredService(ProductService productService){System.out.println(productService);this.productService = productService;}}@SpringBootTest  //需要加@SpringBootTest注解,否则这里需要自己去获取ioc容器才能从ioc容器中拿bean
public class AutowiredTest {@AutowiredAutowiredService autowiredService3;@Testpublic void testConstructor() {System.out.println(autowiredService3);}
}
1)构造函数:
如果bean只有一个有参构造函数,就算省略@Autowired,也会自动注入构造函数的参数,比如:
public class AutowiredService {private ProductService productService;private StockService stockService;//当这个构造函数被调用时,ProductService没有加@Autowired注解也会被自动的依赖注入进来public AutowiredService(ProductService productService){System.out.println(productService);this.productService = productService;}}但是如果有多个有参构造函数,并且没有无参构造函数,就会报错,解决方式为使用@Autowired指定某一个构造函数,就是在要指定的那个构造函数上加@Autowired注解,比如:
public class AutowiredService {private ProductService productService;private StockService stockService;@Autowired //在要指定的构造函数上加@Autowired注解,这样就不会报错,因为下面还有一个有参构造函数public AutowiredService(ProductService productService){System.out.println(productService);this.productService = productService;}public AutowiredService(ProductService productService, StockService stockService){this.productService = productService;this.stockService = stockService;}}但是这种构造函数上指定的@Autowired(required=false)会失效
2)参数:
如果想设置构造函数里面的参数为不是必须注入:可以单独去设置,就是在参数那里加@Autowired(required=false),比如:
@Autowired
public AutowiredService(@Autowired(required = false) ProductService productService){System.out.println(productService);this.productService = productService;
}
还可以单独的写在单元测试的方法上
@SpringBootTest  //需要加@SpringBootTest注解,否则这里需要自己去获取ioc容器才能从ioc容器中拿bean
public class AutowiredTest {//    @Autowired(required = false)//    AutowiredService autowiredService3;//@Autowired单独的写在下面的单元测试方法上,这里就不用注入了@Testpublic void testConstructor(@Autowired AutowiredService autowiredService) {System.out.println(autowiredService);}
}
3)方法:
spring会自动调用你的@Autowired的方法并进行自动注入需要的参数
//添加了@Autowired注解后,当Spring实例化完AutowiredService对象后,
@Autowired  //就会调用这个方法ltStockService()来进行自动注入这个方法里面的参数StockService
public void ltStockService(StockService stockService){
this.stockService = stockService;
}//这里用来获取上面调用ltStockService()方法来进行自动注入StockService,并被赋值给stockService后的stockService
public StockService getStockService() {return stockService;
}
2、@Value
注入直接值(基本类型,String、List等)
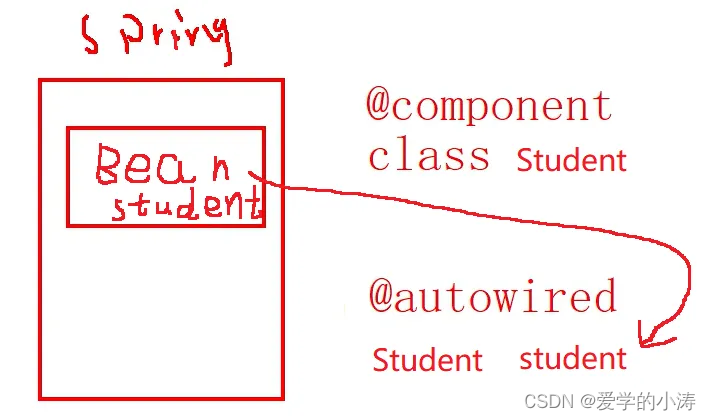
自动装配注解@Autowired、@Inject和@Resource 主要的是注入我们通过@Component等注解配置的类的实例对象,比如通过@Component把Student类配置成了bean,那么在Spring容器中就会有student这样的一bean,然后就可以通过自动装配(@Autowired)来去注入一个Student类型的bean,Spring容器就会把这个Student类型的bean注入进来。
而@Value主要是用于注入一些基本的数据类型,比如Stiring、Integer,还有一些复杂数据类型如Map、Lsit等,因为这些数据类型都是由JDK提供的,不可能说去JDK提供的String这个类上面加一个@Component注解,所以这些数据类型通常用@Value进行注入
(1)方式一:直接把值写在@Value中的属性里
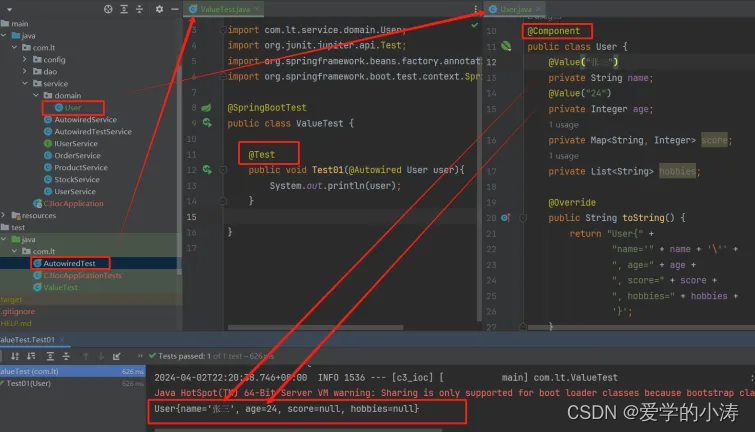
上图中涉及的代码,先看这个代码,后面作为示例会有改动
//自定义类User
@Component  //要使用@Value的话,需要先把当前这个类配置成一个bean
public class User {@Value("张三") //直接把值"张三"写在@Value中的属性里private String name;@Value("24") //直接把值"24"写在@Value中的属性里private Integer age;private Map<String, Integer> score;private List<String> hobbies;@Override //重写了toString()方法public String toString() {return "User{" +"name='" + name + '\'' +", age=" + age +", score=" + score +", hobbies=" + hobbies +'}';}
}//测试类ValueTest
@SpringBootTest
public class ValueTest {@Testpublic void Test01(@Autowired User user){System.out.println(user);}}
运行结果: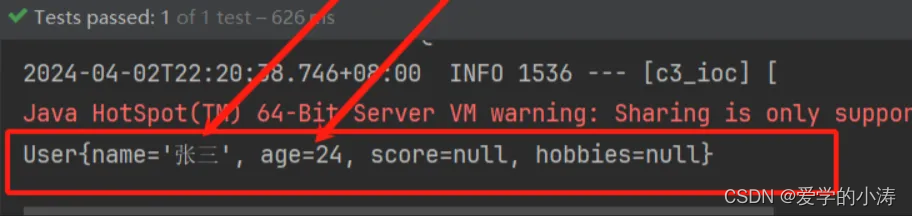
(2)方式二:对外部属性(SpringBoot配置文件)文件的引用
像前面那样把值直接写死在@Value上非常不利于后期的更改和维护,所以可以把这些值都写在一个properties文件中,要获取外部的属性文件需要通过@PropertuSource注解指定文件路径,然后在@Value中引用它,比如:
//zhangsan.properties文件
zhangsan.name = zhangsan
zhangsan.age = 24
示例代码:
@Component  //要使用@Value的话,需要先把当前这个类配置成一个bean
@PropertySource("zhangsan.properties")  //要获取外部的属性文件需要通过@PropertuSource指定文件路径 2.@Value("${zhangsan.name}")
public class User {//@Value("张三")@Value("${zhangsan.name}")private String name;//@Value("24")@Value("${zhangsan.age}")private Integer age;private Map<String, Integer> score;//剩下代码和上面一样.....没变}//测试类ValueTest的代码也没变在SpringBoot中,有一个默认的properties文件:application.properties,这个文件不需要单独的通过@PropertuSource指定文件路径
并且在SpringBoot中,如果@Value("${}")的 {} 里面的属性值不存在,就会报错,因为SpringBoot更严格。在Spring中,如果@Value("${}")的 {} 里面的属性值不存在,会将属性名字注入到值中
默认值机制:例如@Value("${zh.name}"),里面的zh.name不存在的话可以通过冒号设置默认值,更改后为@Value("${zh.name:MoRenZhi}"),zh.name如果不存在就会把 "MoRenZhi"注入到值中
总结:如果是非SpringBoot配置文件,需要额外通过@PropertySource去指定属性文件的类路径,如果是SpringBoot配置文件(application.properties),就无需额外配置@PropertySource
(3)SPEL表达式(Spring Expression Language):@Value("#{}")
用来注入复杂数据类型Map、Lsit等,示例:
@Component  //要使用@Value的话,需要先把当前这个类配置成一个bean
@PropertySource("zhangsan.properties")  //1.要获取外部的属性文件需要通过@PropertuSource指定类路径 2.@Value("${zhangsan.name}")
public class User {//@Value("张三")@Value("${zhangsan.name}")private String name;//@Value("24")@Value("${zhangsan.age}")private Integer age;@Value("#{{'语文':'90','数学':'100'}}")private Map<String, Integer> score;@Value("#{{'唱歌,打球,写代码'}}")private List<String> hobbies;//剩下代码和上面一样.....}

推荐:
【Spring】使用@Bean和@Import注解配置Bean,与Bean的实例化_import和bean-CSDN博客![]() https://blog.csdn.net/m0_65277261/article/details/137257177?spm=1001.2014.3001.5501
https://blog.csdn.net/m0_65277261/article/details/137257177?spm=1001.2014.3001.5501
【Spring】分别基于XML、注解和配置类实现Spring的IOC(控制反转)-CSDN博客![]() https://blog.csdn.net/m0_65277261/article/details/137237805?spm=1001.2014.3001.5501
https://blog.csdn.net/m0_65277261/article/details/137237805?spm=1001.2014.3001.5501
【java多线程】线程池 ThreadPoolExecutor类和Executors工厂类以及线程池的最优大小-CSDN博客![]() https://blog.csdn.net/m0_65277261/article/details/137673188?spm=1001.2014.3001.5501
https://blog.csdn.net/m0_65277261/article/details/137673188?spm=1001.2014.3001.5501
这篇关于【Spring】依赖注入(DI)时常用的注解@Autowired和@Value的文章就介绍到这儿,希望我们推荐的文章对编程师们有所帮助!


