本文主要是介绍使用 ctypes 进行 Python 和 C 的混合编程,希望对大家解决编程问题提供一定的参考价值,需要的开发者们随着小编来一起学习吧!
Python 和 C 的混合编程工具有很多,这里介绍 Python 标准库自带的 ctypes 模块的使用方法。
- 初识
Python 的 ctypes 要使用 C 函数,需要先将 C 编译成动态链接库的形式,即 Windows 下的 .dll 文件,或者 Linux 下的 .so 文件。先来看一下 ctypes 怎么使用 C 标准库。
Windows 系统下的 C 标准库动态链接文件为 msvcrt.dll (一般在目录 C:\Windows\System32 和 C:\Windows\SysWOW64 下分别对应 32-bit 和 64-bit,使用时不用刻意区分,Python 会选择合适的)
Linux 系统下的 C 标准库动态链接文件为 libc.so.6 (以 64-bit Ubuntu 系统为例, 在目录 /lib/x86_64-linux-gnu 下)
例如,以下代码片段导入 C 标准库,并使用 printf 函数打印一条消息,

import platform
from ctypes import *if platform.system() == 'Windows':libc = cdll.LoadLibrary('msvcrt.dll')
elif platform.system() =='Linux':libc = cdll.LoadLibrary('libc.so.6')libc.printf('Hello ctypes!\n')
另外导入dll文件,还有其它方式如下,详细解释请参阅 ctypes module 相关文档,
import platform
from ctypes import *if platform.system() == 'Windows':libc = cdll.LoadLibrary('msvcrt.dll')#libc = windll.LoadLibrary('msvcrt.dll')  # Windows only#libc = oledll.LoadLibrary('msvcrt.dll')  # Windows only#libc = pydll.LoadLibrary('msvcrt.dll')#libc = CDLL('msvcrt.dll')#libc = WinDLL('msvcrt.dll')  # Windows only#libc = OleDLL('msvcrt.dll')  # Windows only#libc = PyDLL('msvcrt.dll')
elif platform.system() =='Linux':libc = cdll.LoadLibrary('libc.so.6')#libc = pydll.LoadLibrary('libc.so.6')#libc = CDLL('libc.so.6')#libc = PyDLL('libc.so.6')

libc.printf('Hello ctypes!\n')
- ctypes 数据类型
ctypes 作为 Python 和 C 联系的桥梁,它定义了专有的数据类型来衔接这两种编程语言。如下表,
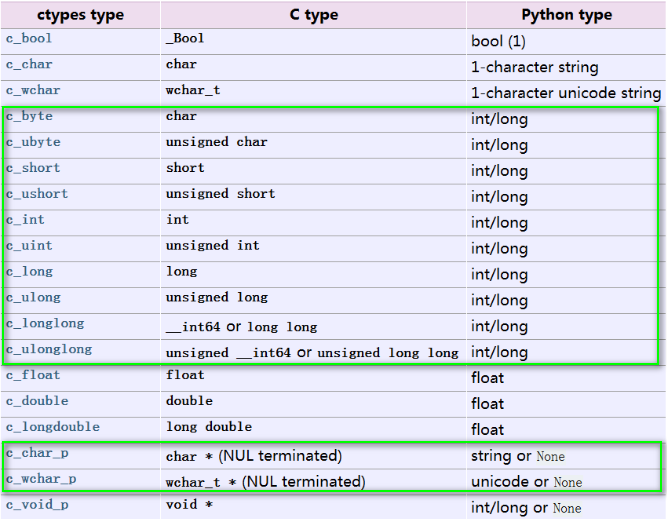
注:Python 中的类型,除了 None,int, long, Byte String,Unicode String 作为 C 函数的参数默认提供转换外,其它类型都必须显式提供转换。
None:对应 C 中的 NULL
int, long: 对应 C 中的 int,具体实现时会根据机器字长自动适配。
Byte String:对应 C 中的一个字符串指针 char * ,指向一块内存区域。
Unicode String :对应 C 中一个宽字符串指针 wchar_t *,指向一块内存区域。
例如,
import platform
from ctypes import *if platform.system() == 'Windows':libc = cdll.LoadLibrary('msvcrt.dll')
elif platform.system() == 'Linux':libc = cdll.LoadLibrary('libc.so.6')libc.printf('%s\n', 'here!')        # here!
libc.printf('%S\n', u'there!')      # there!
libc.printf('%d\n', 42)             # 42
libc.printf('%ld\n', 60000000)      # 60000000#libc.printf('%f\n', 3.14)          #>>> ctypes.ArgumentError
#libc.printf('%f\n', c_float(3.14)) #>>> dont know why 0.000000
libc.printf('%f\n', c_double(3.14)) # 3.140000
- 创建可变的 string buffer
Python 默认的 string 是不可变的,所以不能传递 string 到一个 C 函数去改变它的内容,所以需要使用 create_string_buffer,对应 Unicode 字符串,要使用 create_unicode_buffer,
定义和用法如下,
>>> help(create_string_buffer)
Help on function create_string_buffer in module ctypes:create_string_buffer(init, size=None)create_string_buffer(aString) -> character arraycreate_string_buffer(anInteger) -> character arraycreate_string_buffer(aString, anInteger) -> character array
from ctypes import *p = create_string_buffer(5)
print sizeof(p)     # 5
print repr(p.raw)   # '\x00\x00\x00\x00\x00'
p.raw = 'Hi'
print repr(p.raw)   # 'Hi\x00\x00\x00'
print repr(p.value) # 'Hi'
- 传递自定义参数类型到 C 函数
ctypes 允许你创建自定义参数类型,它会自动去搜索自定义数据的 _as_parameter 属性,将其作为 C 函数的参数,例如,
import platform
from ctypes import *if platform.system() == 'Windows':libc = cdll.LoadLibrary('msvcrt.dll')
elif platform.system() == 'Linux':libc = cdll.LoadLibrary('libc.so.6')class Bottles(object):def __init__(self, number):self._as_parameter_ = number  # here only accept integer, string, unicode string
bottles = Bottles(42)
libc.printf('%d bottles of beer\n', bottles)
输出,
42 bottles of beer
也可以为你的数据定义 _as_parameter 属性,如下,
import platform
from ctypes import *if platform.system() == 'Windows':libc = cdll.LoadLibrary('msvcrt.dll')
elif platform.system() == 'Linux':libc = cdll.LoadLibrary('libc.so.6')class Bottles(object):def __init__(self):self._as_parameter_ = None  # only accept integer, string, unicode string
     @propertydef aspram(self):return self._as_parameter_@aspram.setterdef aspram(self, number):self._as_parameter_ = numberbottles = Bottles()
bottles.aspram = 63
libc.printf('%d bottles of beer\n', bottles)
输出,
63 bottles of beer
- 指定 C 函数的参数类型
可以指定要调用 C 函数的参数类型,如果传入参数不符合指定的类型,则 ctypes 会尝试转换,如果转换不成功,则抛 ArgumentError,例如,
import platform
from ctypes import *if platform.system() == 'Windows':libc = cdll.LoadLibrary('msvcrt.dll')
elif platform.system() == 'Linux':libc = cdll.LoadLibrary('libc.so.6')libc.printf.argtypes = [c_char_p, c_char_p, c_int, c_double]libc.printf('String is "%s", Int is %d, Double is %f\n', 'Hi', 10, 2.2)
libc.printf('%s, %d, %f\n', 'X', 2, 3)
try:libc.printf("%d %d %d", 1, 2, 3)
except ArgumentError, e:print "*** ERROR: %s" % str(e)
输出,
String is "Hi", Int is 10, Double is 2.200000
X, 2, 3.000000
*** ERROR: argument 2: <type 'exceptions.TypeError'>: wrong type
- 指定 C 函数的返回值类型
如果不指定 C 函数的返回值, ctypes 默认返回 int 类型,如果要返回特定类型,需要指定返回类型 restype,
例如,
import platform
from ctypes import *if platform.system() == 'Windows':libc = cdll.LoadLibrary('msvcrt.dll')
elif platform.system() == 'Linux':libc = cdll.LoadLibrary('libc.so.6')print '1->', libc.strchr('abcdefghij', c_char('d'))libc.strchr.restype = c_char_pprint '2->', libc.strchr('abcdefghij', c_char('d'))
print '3->', libc.strchr('abcdefghij', 'd')  # Note, here C function strchr not know what 'd' mean, so rerurn None

libc.strchr.argtypes = [c_char_p, c_char]
print '4->', libc.strchr('abcdefghij', 'd')  # Note, here not use c_char('w')
输出:
1-> 40291315
2-> defghij
3-> None
4-> defghij
- 按引用传递参数
有些情况下,需要 C 函数修改传入的参数,或者参数过大不适合传值,需要按引用传递,ctypes 提供关键字 byref() 处理这种情况,
例如,
import platform
from ctypes import *if platform.system() == 'Windows':libc = cdll.LoadLibrary('msvcrt.dll')
elif platform.system() == 'Linux':libc = cdll.LoadLibrary('libc.so.6')i = c_int()
f = c_float()
s = create_string_buffer('\000' * 32)
print 'i.val =', i.value
print 'f.val =', f.value
print 'repr(s.value) =', repr(s.value)
libc.sscanf('1 3.14 Hello', '%d %f %s', byref(i), byref(f), s)
print 'after, i.val =', i.value
print 'after, f.val =', f.value
print 'after, repr(s.value) =', repr(s.value)
输出,
i.val = 0
f.val = 0.0
repr(s.value) = ''
after, i.val = 1
after, f.val = 3.1400001049
after, repr(s.value) = 'Hello'
- 使用结构体
ctypes 支持结构体的使用,从 Structure 类派生,数据放在 _fields_ 中,
例如,
class Point(Structure):_fields_ = [('x', c_int), ('y', c_int)]point = Point(10, 20)
print 'point.x =', point.x
print 'point.y =', point.ypoint = Point(y=5)
print 'after, point.x =', point.x
print 'after, point.y =', point.y
printclass Rect(Structure):_fields_ = [('upperleft', Point), ('lowerright', Point)]rc = Rect(point)
print 'rc.upperleft.x = %d, rc.upperleft.y = %d' % (rc.upperleft.x, rc.upperleft.y)
print 'rc.lowerright.x = %d, rc.lowerright.y = %d' % (rc.lowerright.x, rc.lowerright.y)r = Rect(Point(1, 2), Point(3, 4))
print 'r.upperleft.x = %d, r.upperleft.y = %d' % (r.upperleft.x, r.upperleft.y)
print 'r.lowerright.x = %d, r.lowerright.y = %d' % (r.lowerright.x, r.lowerright.y)
输出,
point.x = 10
point.y = 20
after, point.x = 0
after, point.y = 5rc.upperleft.x = 0, rc.upperleft.y = 5
rc.lowerright.x = 0, rc.lowerright.y = 0
r.upperleft.x = 1, r.upperleft.y = 2
r.lowerright.x = 3, r.lowerright.y = 4
- 位域
ctypes 提供了对位域的支持,
例如,
class IntBit(Structure):_fields_ = [('x', c_uint, 2), ('y', c_uint, 4)]IB = IntBit(1, 15)
print 'IB.x = %d' % IB.x
print 'IB.y = %d' % IB.yIB2 = IntBit(4, 16)
print '-> IB2.x = %d' % IB2.x
print '-> IB2.y = %d' % IB2.y
输出,
IB.x = 1
IB.y = 15
-> IB2.x = 0
-> IB2.y = 0
- 数组
ctypes 提供了对 Array 的支持,
例如,
TenIntArrayType = c_int * 10
ta = TenIntArrayType(1, 2, 3, 4, 5, 6, 7, 8, 9, 10)
for item in ta:print item,
printclass PointEx(Structure):_fields_ = [('x', c_int), ('y', c_int)]class MyStruct(Structure):_fields_ = [('a', c_int), ('b', c_int), ('pointex_array', PointEx * 4)]ms = MyStruct(4, 5, ((1,1), (2,2), (3,3), (4,4)))
for item in ms.pointex_array:print '(item.x, item.y) = (%d, %d)' % (item.x, item.y)
print
输出,
1 2 3 4 5 6 7 8 9 10
(item.x, item.y) = (1, 1)
(item.x, item.y) = (2, 2)
(item.x, item.y) = (3, 3)
(item.x, item.y) = (4, 4)
- 指针
ctypes 使用关键字 pointer 提供了对指针的支持,注意指针解引用使用 [0],
例如,
i = c_int(42)
print 'before, i.value =', i.value
pi = pointer(i)
pi[0] = 57
print 'after, i.value =', i.value# create NULL pointer, also can use this way, but recommend use 'pointer' not 'POINTER'
null_ptr = POINTER(c_int)()
print 'bool(null_ptr) =', bool(null_ptr)
输出,
before, i.value = 42
after, i.value = 57
bool(null_ptr) = False
- 类型转换
ctypes 提供了类型转换方法 cast(),
例如,
class Bar(Structure):_fields_ = [('count', c_int), ('value', POINTER(c_int))]bar = Bar()
bar.count = 3
bar.value = (c_int * 3)(1, 2, 3)
for idx in range(bar.count):print 'bar.value[%d] = %d' % (idx, bar.value[idx])## use cast to convert
try:bar.value = (c_byte * 4)()
except TypeError, e:print '*** ERROR: %s' % str(e)bar.value = cast((c_byte * 4)(), POINTER(c_int))
for idx in range(4):print 'now, bar.value[%d] = %d' % (idx, bar.value[idx])
print
输出,
bar.value[0] = 1
bar.value[1] = 2
bar.value[2] = 3
*** ERROR: incompatible types, c_byte_Array_4 instance instead of LP_c_long instance
now, bar.value[0] = 0
now, bar.value[1] = 0
now, bar.value[2] = 0
now, bar.value[3] = 0
- 回调函数
ctypes 通过 CFUNCTYPE 支持回调函数,
例如,
import platform
from ctypes import *if platform.system() == 'Windows':libc = cdll.LoadLibrary('msvcrt.dll')
elif platform.system() == 'Linux':libc = cdll.LoadLibrary('libc.so.6')IntArray5 = c_int * 5
ia = IntArray5(5, 1, 7, 33, 99)# CFUNCTYPE(restype, *argtypes, **kw)
CmpFuncType = CFUNCTYPE(c_int, POINTER(c_int), POINTER(c_int))def py_cmp_func(a, b):if a[0] > b[0]:return 1elif a[0] < b[0]:return -1else:return 0cmpfunc = CmpFuncType(py_cmp_func)print 'before sort, the ia list is: ',
for item in ia:print item,# void qsort (void* base, size_t num, size_t size, int (*compar)(const void*,const void*));
libc.qsort(ia, len(ia), sizeof(c_int), cmpfunc)print '\nafter sort, the ia list is: ',
for item in ia:print item,
print
输出,
before sort, the ia list is:  5 1 7 33 99
after sort, the ia list is:  1 5 7 33 99
- Resize Space
ctypes 提供了 resize 变量占用空间的方法 resize(),注意,只能增大,不能小于原始空间,
例如,
short_array = (c_short * 4)(1, 2, 3, 4)
print 'sizeof(short_array) =', sizeof(short_array)  # get 8, means short_array take 8-byte memory
print 'len(short_array) =', len(short_array)
print 'before resize, short_array is: ',
for idx in range(len(short_array)):print short_array[idx],
printtry:resize(short_array, 4)  # resize short_array to 4-byte, raise error, due to cannot resize smaller than original
except ValueError, e:print 'ERROR: %s' % str(e)resize(short_array, 32)
print 'after succeed resize to 32-byte, now sizeof(short_array) =', sizeof(short_array)
print 'after succeed resize to 32-byte, now len(short_array) =', len(short_array)
print 'after reszie, short_array is: ',
for idx in range(len(short_array)):print short_array[idx],
输出,
sizeof(short_array) = 8
len(short_array) = 4
before resize, short_array is:  1 2 3 4
ERROR: minimum size is 8
after succeed resize to 32-byte, now sizeof(short_array) = 32
after succeed resize to 32-byte, now len(short_array) = 4
after reszie, short_array is:  1 2 3 4
- Other
class cell(Structure):pass
cell._fields_ = [('name', c_char_p), ('next', POINTER(cell))]c1 = cell()
c2 = cell()
c1.name = 'foo' c2.name = 'bar' c1.next = pointer(c2) c2.next = pointer(c1) p = c1 for i in range(10): print p.name, p = p.next[0]
输出,
foo bar foo bar foo bar foo bar foo bar
- 坑
ctypes 相对于其它工具,使用起来有点繁琐,而且有很多坑,需要小心谨慎,
例如,
class POINT(Structure):_fields_ = [('x', c_int), ('y', c_int)]class RECT(Structure):_fields_ = [('a', POINT), ('b', POINT)]p1 = POINT(1, 2)
p2 = POINT(3, 4)
rc = RECT(p1, p2)print 'rc.a.x =', rc.a.x
print 'rc.a.y =', rc.a.y
print 'rc.b.x =', rc.b.x
print 'rc.b.y =', rc.b.yrc.a, rc.b = rc.b, rc.aprint 'after swap, bad result due to this is the pointer,'
print 'rc.a.x =', rc.a.x
print 'rc.a.y =', rc.a.y
print 'rc.b.x =', rc.b.x
print 'rc.b.y =', rc.b.y
print
输出,
rc.a.x = 1
rc.a.y = 2
rc.b.x = 3
rc.b.y = 4
after swap, bad result due to this is the pointer,
rc.a.x = 3
rc.a.y = 4
rc.b.x = 3
rc.b.y = 4
- Load 自定义 DLL
以 C 函数文件 needforspeed.c 为例,
//----------------------------------------------------------------------------
// Purpose: this c module is used to speed up the Python program, should be
//          compiled into dll, and then load into Python module with ctypes
//          method.
//
// Compile Methods:
//
//    ======================
//    Windows: use MSVC, x64
//    ======================
//
//    C:\Program Files (x86)\Microsoft Visual Studio 12.0\VC\bin\amd64> cl /LD needforspeed.c /o nfs.dll
//
//    ======
//    Linux:
//    ======
//
//    $ gcc -fPIC -shared needforspeed.c -o nfs.so
//----------------------------------------------------------------------------

#include <stdio.h>// Windows need this compile direction for dll compilation, Linux no need
#ifdef _MSC_VER#define DLL_EXPORT __declspec( dllexport )
#else#define DLL_EXPORT
#endifDLL_EXPORT void hello_world(void) {printf("Hello world!\n");
}DLL_EXPORT int mod(int m, int n) {return m % n;
}DLL_EXPORT int get_array_elem(int arr[], int idx) {return arr[idx];
}DLL_EXPORT int get_array2D_elem(int arr[][3], int row, int col) {return arr[row][col];
}
在 Windows 下编译为 nfs.dll, 在 Linux 下编译为 nfs.so,Python 中调用如下,
import platform
from ctypes import *if platform.system() == 'Windows':mylib = cdll.LoadLibrary('./nfs.dll')
elif platform.system() == 'Linux':mylib = cdll.LoadLibrary('./nfs.so')mylib.hello_world()
printmod_rtv = mylib.mod(c_int(10), c_int(4))
print 'mod_rtv(10 % 4) =', mod_rtv
print#####################
# 1D array get elem #
#####################

IntArray10Type = c_int * 10
intArray = IntArray10Type()
for idx in range(10):intArray[idx] = idx**2for idx in range(10):print 'intArray[%d] = %d' % (idx, mylib.get_array_elem(intArray, idx))
print#####################
# 2D array get elem #
#####################

IntArray3Col = c_int * 3
IntArray3Row3Col = IntArray3Col * 3
arr2d = IntArray3Row3Col(IntArray3Col(1, 2, 3), IntArray3Col(8, 9, 4), IntArray3Col(7, 6, 5))print 'arr2d is:'
for r in range(3):for c in range(3):print '%d ' % mylib.get_array2D_elem(arr2d, r, c),print
输出,
Hello world!mod_rtv(10 % 4) = 2intArray[0] = 0
intArray[1] = 1
intArray[2] = 4
intArray[3] = 9
intArray[4] = 16
intArray[5] = 25
intArray[6] = 36
intArray[7] = 49
intArray[8] = 64
intArray[9] = 81arr2d is:
1  2  3
8  9  4
7  6  5
完。
https://www.cnblogs.com/gaowengang/p/7919219.html
这篇关于使用 ctypes 进行 Python 和 C 的混合编程的文章就介绍到这儿,希望我们推荐的文章对编程师们有所帮助!


