本文主要是介绍数码相框-显示JPG图片,希望对大家解决编程问题提供一定的参考价值,需要的开发者们随着小编来一起学习吧!
LCD控制器会将LCD上的屏幕数据映射在相应的显存位置上。
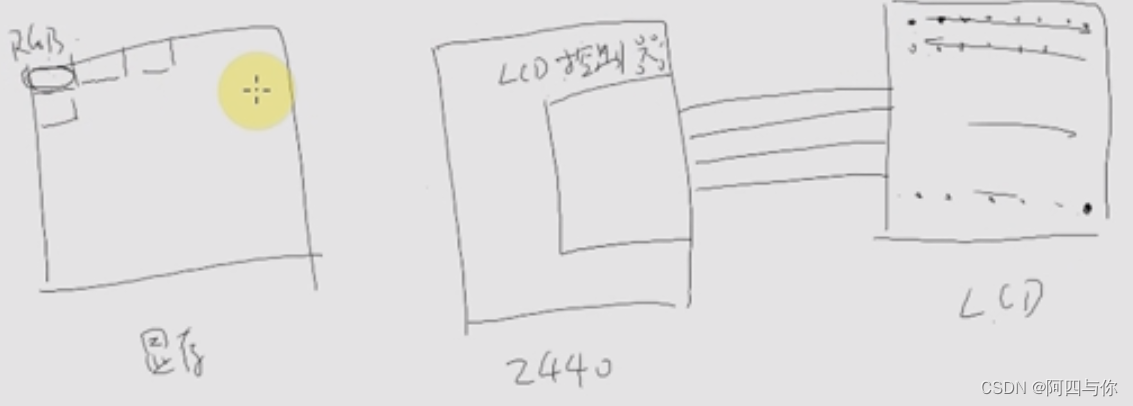
通过libjpeg把jpg图片解压出来RGB原始数据。
libjpeg是使用c语言实现的读写jpeg文件的库。
使用libjpeg的应用程序是以"scanline"为单位进行图像处理的。
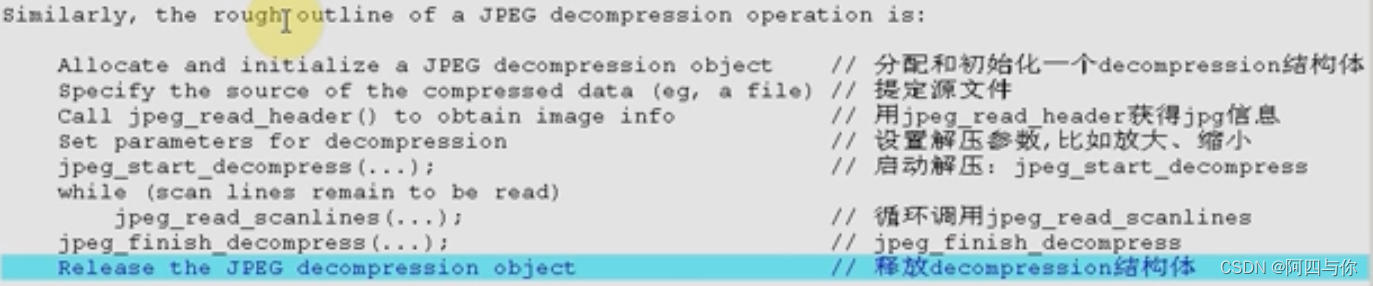
libjpeg解压图片的步骤:
libjpeg的使用
Directory Listing of /files (ijg.org)
bleaaach@bleaaach-virtual-machine:~/linux/IMX6ULL/frame/04_libjpeg$ tar -vxzf jpegsrc.v9f.tar.gz
生成配置文件:
bleaaach@bleaaach-virtual-machine:~/linux/IMX6ULL/frame/04_libjpeg$ ls
jpeg-9f  jpegsrc.v9f.tar.gz
bleaaach@bleaaach-virtual-machine:~/linux/IMX6ULL/frame/04_libjpeg$ cd jpeg-9f/
bleaaach@bleaaach-virtual-machine:~/linux/IMX6ULL/frame/04_libjpeg/jpeg-9f$ mkdir tmp
bleaaach@bleaaach-virtual-machine:~/linux/IMX6ULL/frame/04_libjpeg/jpeg-9f$ ./configure --prefix=/home/bleaaach/linux/IMX6ULL/frame/04_libjpeg/jpeg-9f/tmp/ --host=arm-gnueabihf-linux
bleaaach@bleaaach-virtual-machine:~/linux/IMX6ULL/frame/04_libjpeg/jpeg-9f$ sudo make install
bleaaach@bleaaach-virtual-machine:~/linux/IMX6ULL/frame/04_libjpeg/jpeg-9f$ ls tmp
bin  include  lib  share
今天仔细看了一下arm-linux-gnueabihf的头文件在/usr/local/arm/gcc-linaro-4.9.4-2017.01-x86_64_arm-linux-gnueabihf/arm-linux-gnueabihf/include/:
bleaaach@bleaaach-virtual-machine:/usr/local/include$ ls
freetype2 jconfig.h jerror.h jmorecfg.h jpeglib.h
bleaaach@bleaaach-virtual-machine:~/linux/IMX6ULL/frame/04_libjpeg/jpeg-9f/tmp/lib$ sudo cp * /usr/local/arm/gcc-linaro-4.9.4-2017.01-x86_64_arm-linux-gnueabihf/arm-linux-gnueabihf/lib -rf
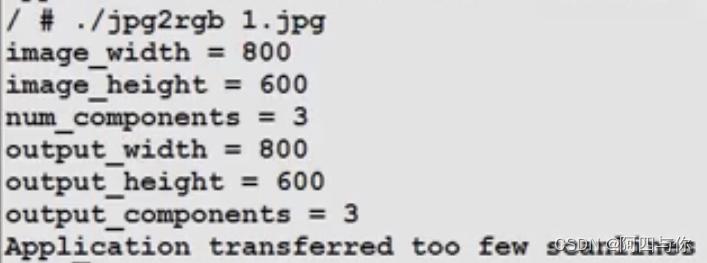
bleaaach@bleaaach-virtual-machine:~/linux/IMX6ULL/frame/04_libjpeg/jpeg-9f/tmp/lib$ sudo cp ../include/* /usr/local/arm/gcc-linaro-4.9.4-2017.01-x86_64_arm-linux-gnueabihf/arm-linux-gnueabihf/include/ -rf输出图像信息
把韦东山老师写的代码拷进来:
编译1th:
#include <stdio.h>
#include "jpeglib.h"
#include <setjmp.h>/*
Allocate and initialize a JPEG decompression object    // 分配和初始化一个decompression结构体
Specify the source of the compressed data (eg, a file) // 指定源文件
Call jpeg_read_header() to obtain image info		   // 用jpeg_read_header获得jpg信息
Set parameters for decompression					   // 设置解压参数,比如放大、缩小
jpeg_start_decompress(...); 						   // 启动解压:jpeg_start_decompress
while (scan lines remain to be read)jpeg_read_scanlines(...);						   // 循环调用jpeg_read_scanlines
jpeg_finish_decompress(...);						   // jpeg_finish_decompress
Release the JPEG decompression object				   // 释放decompression结构体
*//* Uage: jpg2rgb <jpg_file>*/int main(int argc, char **argv)
{struct jpeg_decompress_struct cinfo;struct jpeg_error_mgr jerr;FILE * infile;// 分配和初始化一个decompression结构体cinfo.err = jpeg_std_error(&jerr);jpeg_create_decompress(&cinfo);// 指定源文件if ((infile = fopen(argv[1], "rb")) == NULL) {fprintf(stderr, "can't open %s\n", argv[1]);return -1;}jpeg_stdio_src(&cinfo, infile);// 用jpeg_read_header获得jpg信息jpeg_read_header(&cinfo, TRUE);/* 源信息 */printf("image_width = %d\n", cinfo.image_width);printf("image_height = %d\n", cinfo.image_height);printf("num_components = %d\n", cinfo.num_components);// 设置解压参数,比如放大、缩小// 启动解压:jpeg_start_decompressjpeg_start_decompress(&cinfo);/* 输出的图象的信息 */printf("output_width = %d\n", cinfo.output_width);printf("output_height = %d\n", cinfo.output_height);printf("output_components = %d\n", cinfo.output_components);// 循环调用jpeg_read_scanlines来一行一行地获得解压的数据jpeg_finish_decompress(&cinfo);jpeg_destroy_decompress(&cinfo);return 0;
}
bleaaach@bleaaach-virtual-machine:~/linux/IMX6ULL/frame/04_libjpeg/1th$ arm-linux-gnueabihf-gcc -o jpg2rgb jpg2rgb.c -ljpeg
把文件拷贝到开发板:

在开发板上测试:
调整压缩比
// 设置解压参数,比如放大、缩小
printf("enter M/N:\n");
scanf("%d/%d", &cinfo.scale_num, &cinfo.scale_denom);
printf("scale to : %d/%d\n", cinfo.scale_num, cinfo.scale_denom);

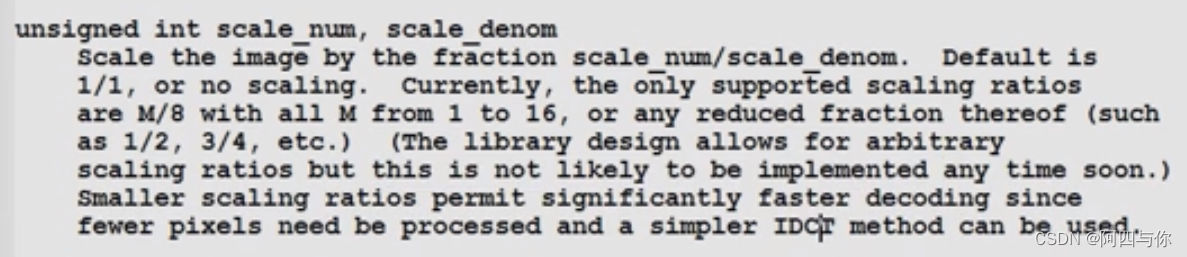
有些缩放比例并没有实现,所以没有效果。
输出JPG图片
#include <stdio.h>
#include "jpeglib.h"
#include <setjmp.h>
#include <sys/types.h>
#include <sys/stat.h>
#include <fcntl.h>
#include <sys/ioctl.h>
#include <sys/mman.h>
#include <linux/fb.h>
#include <string.h>
#include <stdlib.h>#define FB_DEVICE_NAME "/dev/fb0"
#define DBG_PRINTF printfstatic int g_fd;static struct fb_var_screeninfo g_tFBVar;
static struct fb_fix_screeninfo g_tFBFix;
static unsigned char *g_pucFBMem;
static unsigned int g_dwScreenSize;static unsigned int g_dwLineWidth;
static unsigned int g_dwPixelWidth;static int FBDeviceInit(void)
{int ret;g_fd = open(FB_DEVICE_NAME, O_RDWR);if (0 > g_fd){DBG_PRINTF("can't open %s\n", FB_DEVICE_NAME);}ret = ioctl(g_fd, FBIOGET_VSCREENINFO, &g_tFBVar);if (ret < 0){DBG_PRINTF("can't get fb's var\n");return -1;}ret = ioctl(g_fd, FBIOGET_FSCREENINFO, &g_tFBFix);if (ret < 0){DBG_PRINTF("can't get fb's fix\n");return -1;}g_dwScreenSize = g_tFBVar.xres * g_tFBVar.yres * g_tFBVar.bits_per_pixel / 8;g_pucFBMem = (unsigned char *)mmap(NULL , g_dwScreenSize, PROT_READ | PROT_WRITE, MAP_SHARED, g_fd, 0);if (0 > g_pucFBMem){DBG_PRINTF("can't mmap\n");return -1;}g_dwLineWidth = g_tFBVar.xres * g_tFBVar.bits_per_pixel / 8;g_dwPixelWidth = g_tFBVar.bits_per_pixel / 8;return 0;
}static int FBShowPixel(int iX, int iY, unsigned int dwColor)
{unsigned char *pucFB;unsigned short *pwFB16bpp;unsigned int *pdwFB32bpp;unsigned short wColor16bpp; /* 565 */int iRed;int iGreen;int iBlue;if ((iX >= g_tFBVar.xres) || (iY >= g_tFBVar.yres)){DBG_PRINTF("out of region\n");return -1;}pucFB = g_pucFBMem + g_dwLineWidth * iY + g_dwPixelWidth * iX;pwFB16bpp = (unsigned short *)pucFB;pdwFB32bpp = (unsigned int *)pucFB;switch (g_tFBVar.bits_per_pixel){case 8:{*pucFB = (unsigned char)dwColor;break;}case 16:{iRed = (dwColor >> (16+3)) & 0x1f;iGreen = (dwColor >> (8+2)) & 0x3f;iBlue = (dwColor >> 3) & 0x1f;wColor16bpp = (iRed << 11) | (iGreen << 5) | iBlue;*pwFB16bpp = wColor16bpp;break;}case 32:{*pdwFB32bpp = dwColor;break;}default :{DBG_PRINTF("can't support %d bpp\n", g_tFBVar.bits_per_pixel);return -1;}}return 0;
}static int FBCleanScreen(unsigned int dwBackColor)
{unsigned char *pucFB;unsigned short *pwFB16bpp;unsigned int *pdwFB32bpp;unsigned short wColor16bpp; /* 565 */int iRed;int iGreen;int iBlue;int i = 0;pucFB = g_pucFBMem;pwFB16bpp = (unsigned short *)pucFB;pdwFB32bpp = (unsigned int *)pucFB;switch (g_tFBVar.bits_per_pixel){case 8:{memset(g_pucFBMem, dwBackColor, g_dwScreenSize);break;}case 16:{iRed = (dwBackColor >> (16+3)) & 0x1f;iGreen = (dwBackColor >> (8+2)) & 0x3f;iBlue = (dwBackColor >> 3) & 0x1f;wColor16bpp = (iRed << 11) | (iGreen << 5) | iBlue;while (i < g_dwScreenSize){*pwFB16bpp = wColor16bpp;pwFB16bpp++;i += 2;}break;}case 32:{while (i < g_dwScreenSize){*pdwFB32bpp = dwBackColor;pdwFB32bpp++;i += 4;}break;}default :{DBG_PRINTF("can't support %d bpp\n", g_tFBVar.bits_per_pixel);return -1;}}return 0;
}static int FBShowLine(int iXStart, int iXEnd, int iY, unsigned char *pucRGBArray)
{int i = iXStart * 3;int iX;unsigned int dwColor;//边界处理if (iY >= g_tFBVar.yres)return -1;if (iXStart >= g_tFBVar.xres)return -1;if (iXEnd >= g_tFBVar.xres){iXEnd = g_tFBVar.xres;}for (iX = iXStart; iX < iXEnd; iX++){/* 0xRRGGBB */dwColor = (pucRGBArray[i]<<16) + (pucRGBArray[i+1]<<8) + (pucRGBArray[i+2]<<0);i += 3;FBShowPixel(iX, iY, dwColor);}return 0;
}/*
Allocate and initialize a JPEG decompression object // 分配和初始化一个decompression结构体
Specify the source of the compressed data (eg, a file) // 指定源文件
Call jpeg_read_header() to obtain image info // 用jpeg_read_header获得jpg信息
Set parameters for decompression // 设置解压参数,比如放大、缩小
jpeg_start_decompress(...); // 启动解压:jpeg_start_decompress
while (scan lines remain to be read)jpeg_read_scanlines(...); // 循环调用jpeg_read_scanlines
jpeg_finish_decompress(...); // jpeg_finish_decompress
Release the JPEG decompression object // 释放decompression结构体
*//* Uage: jpg2rgb <jpg_file>*/int main(int argc, char **argv)
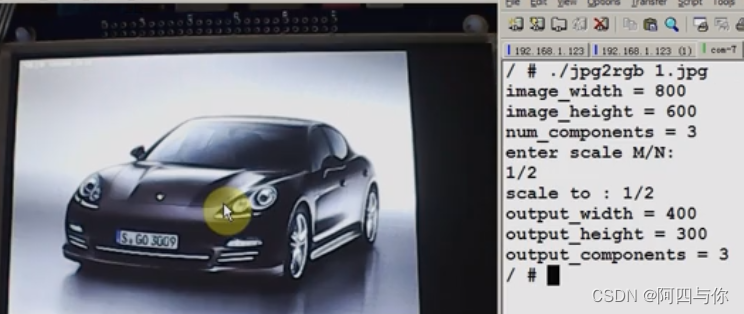
{struct jpeg_decompress_struct cinfo;struct jpeg_error_mgr jerr;FILE * infile;int row_stride;unsigned char *buffer;if (argc != 2){printf("Usage: \n");printf("%s <jpg_file>\n", argv[0]);return -1;}if (FBDeviceInit()){return -1;}FBCleanScreen(0);// 分配和初始化一个decompression结构体cinfo.err = jpeg_std_error(&jerr);jpeg_create_decompress(&cinfo);// 指定源文件if ((infile = fopen(argv[1], "rb")) == NULL) {fprintf(stderr, "can't open %s\n", argv[1]);return -1;}jpeg_stdio_src(&cinfo, infile);// 用jpeg_read_header获得jpg信息jpeg_read_header(&cinfo, TRUE);/* 源信息 */printf("image_width = %d\n", cinfo.image_width);printf("image_height = %d\n", cinfo.image_height);printf("num_components = %d\n", cinfo.num_components);// 设置解压参数,比如放大、缩小printf("enter scale M/N:\n");scanf("%d/%d", &cinfo.scale_num, &cinfo.scale_denom);printf("scale to : %d/%d\n", cinfo.scale_num, cinfo.scale_denom);// 启动解压:jpeg_start_decompressjpeg_start_decompress(&cinfo);/* 输出的图象的信息 */printf("output_width = %d\n", cinfo.output_width);printf("output_height = %d\n", cinfo.output_height);printf("output_components = %d\n", cinfo.output_components);// 一行的数据长度row_stride = cinfo.output_width * cinfo.output_components;buffer = malloc(row_stride);// 循环调用jpeg_read_scanlines来一行一行地获得解压的数据while (cinfo.output_scanline < cinfo.output_height) {(void) jpeg_read_scanlines(&cinfo, &buffer, 1);// 写到LCD去FBShowLine(0, cinfo.output_width, cinfo.output_scanline, buffer);}free(buffer);jpeg_finish_decompress(&cinfo);jpeg_destroy_decompress(&cinfo);return 0;
}这段代码使用libjpeg库将一个JPEG格式的图片文件解码并显示到Linux系统的Framebuffer设备上。以下是详细的代码功能解读:
-
包含头文件与定义常量:
- 引入了
stdio.h、jpeglib.h、setjmp.h等C标准库头文件以及sys/types.h、sys/stat.h、fcntl.h、sys/ioctl.h、sys/mman.h、linux/fb.h等系统相关头文件。 - 定义了Framebuffer设备名
FB_DEVICE_NAME、调试打印宏DBG_PRINTF以及全局变量g_fd、g_tFBVar、g_tFBFix、g_pucFBMem、g_dwScreenSize、g_dwLineWidth、g_dwPixelWidth。
- 引入了
-
Framebuffer设备初始化函数:
FBDeviceInit()函数负责打开Framebuffer设备文件、获取其变量信息(g_tFBVar)和固定信息(g_tFBFix),计算屏幕尺寸、内存映射,并初始化行宽和像素宽度。
-
Framebuffer显示相关函数:
-
FBShowPixel()函数根据给定的颜色值和坐标,在Framebuffer上显示一个像素。 -
FBCleanScreen()函数清除整个Framebuffer,用指定颜色填充。 -
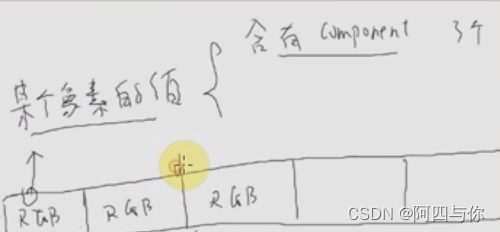
FBShowLine()函数接收一个RGB数据数组,将该数组表示的一行像素数据按照指定坐标写入Framebuffer。int iXStart: 要绘制的线条起点的 x 坐标。int iXEnd: 要绘制的线条终点的 x 坐标。int iY: 线条在屏幕上的固定 y 坐标。unsigned char *pucRGBArray: 指向一个包含 RGB 像素值的字节数组,数组中的每个连续三个字节表示一个像素的 R、G、B 分量(各占 8 位)。
-
-
JPEG解码相关函数:
- 这部分代码未直接定义JPEG解码函数,而是使用
libjpeg库提供的接口。 main()函数中,首先检查命令行参数是否正确(需要提供一个JPEG文件路径),然后调用FBDeviceInit()初始化Framebuffer设备。- 初始化
jpeg_decompress_struct结构体cinfo和错误处理结构体jerr,并关联标准错误处理方法。 - 打开指定的JPEG文件,将其作为解码源设置到
cinfo结构体中。 - 调用
jpeg_read_header()读取JPEG文件头信息,获取原始图像尺寸、颜色组件数等。 - 提示用户输入缩放比例(M/N),并设置到
cinfo结构体中。 - 调用
jpeg_start_decompress()启动解码过程。
- 这部分代码未直接定义JPEG解码函数,而是使用
-
JPEG图像解码与显示:
-
根据解码后输出的图像尺寸分配临时缓冲区
buffer,用于存放一行像素数据。 -
使用循环调用
jpeg_read_scanlines(),每次读取一行像素数据并将其存储在buffer中。buffer是一个指针数组,存储一行数据的起始位置。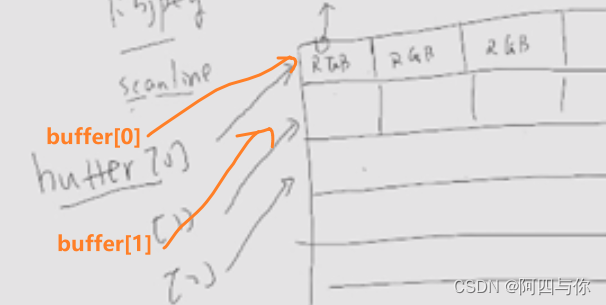
我们要把buffer传入到这个
typedef unsiged char** JSAMPARRAY变量里,buffer[0]实际上是一个unsigned char *地址的指针,是指针的指针。 -
对于每一行解码得到的像素数据,调用
FBShowLine()将其显示到Framebuffer对应行上。 -
解码完成后,释放
buffer,调用jpeg_finish_decompress()和jpeg_destroy_decompress()完成解码过程的清理工作。
综上所述,这段代码的主要目的是将一个JPEG格式的图片文件解码,根据用户指定的缩放比例调整图像尺寸,然后逐行将解码后的像素数据写入Linux系统的Framebuffer设备,最终在连接到该设备的屏幕上显示解码后的图像。
-
测试

这篇关于数码相框-显示JPG图片的文章就介绍到这儿,希望我们推荐的文章对编程师们有所帮助!


