本文主要是介绍前后端开发之——文章分类管理,希望对大家解决编程问题提供一定的参考价值,需要的开发者们随着小编来一起学习吧!
原文地址:前后端开发之——文章分类管理 - Pleasure的博客
下面是正文内容:
前言
上回书说到
文章管理系统之添加文章分类。就是通过点击“新建文章分类”按钮从而在服务端数据库中增加一个文章分类。
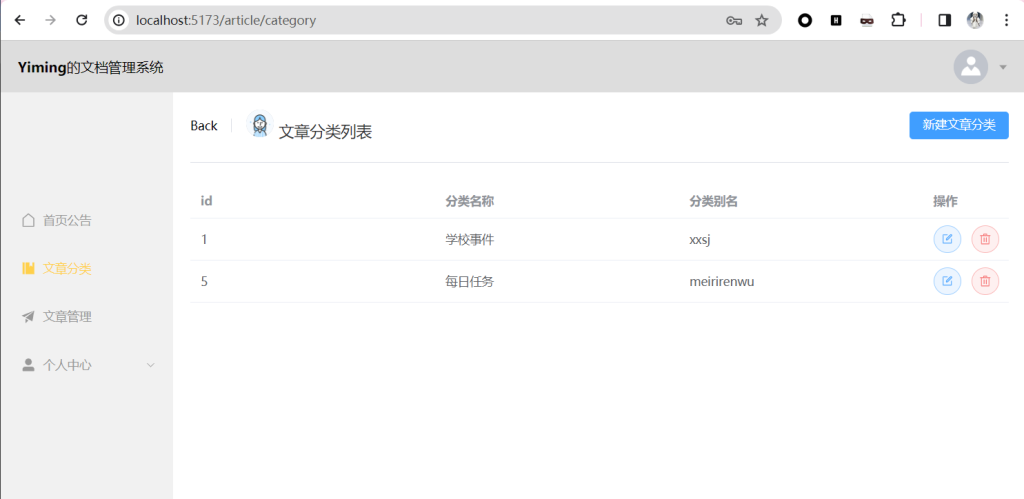
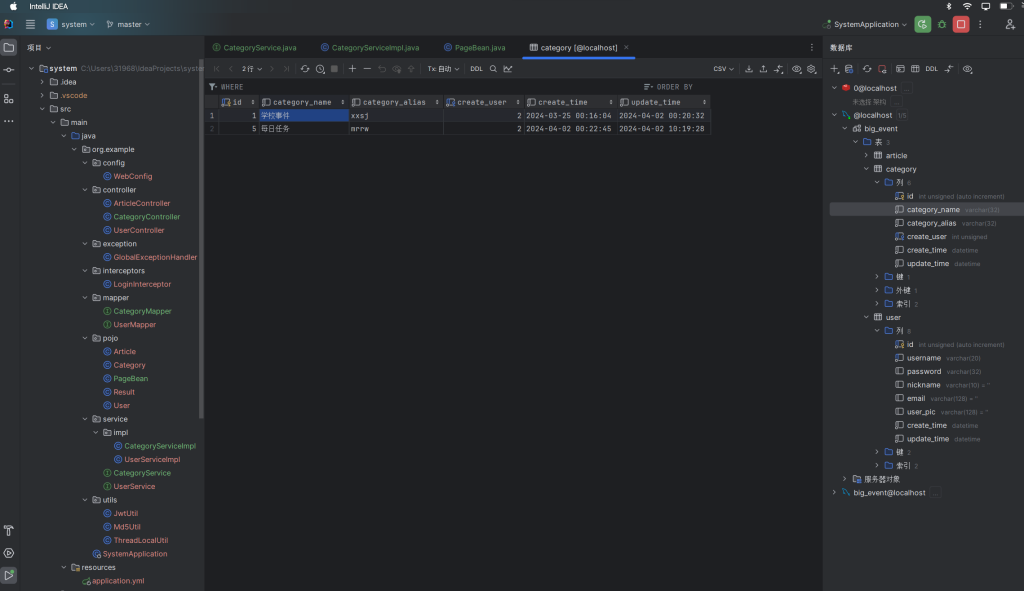
对于文章分类这个对象,增删改查属于配套的基础操作。这篇博文就主要聚焦于“增”之外的“删改查”配套操作。这里的查不是指搜索,而是指查询数据库信息用于前端显示。
前端使用语言:Vue,后端使用语言:SpringBoot
正文
前端思路分析
当用户点击界面上的按钮后跳出之前的弹窗,
修改完相关信息后点击确认触发按钮绑定的updateCategory函数向后端发送表单,
updateCategory函数在开头的script部分进行了声明是调用后端修改文章分类接口的异步函数,
updateCategory函数中的articleCategoryUpdateService服务在api文件夹下的article.js文件中进行了定义,以put的方式向后端“/category”发送id,categoryName,categoryAlias的值用来修改数据库中的记录。
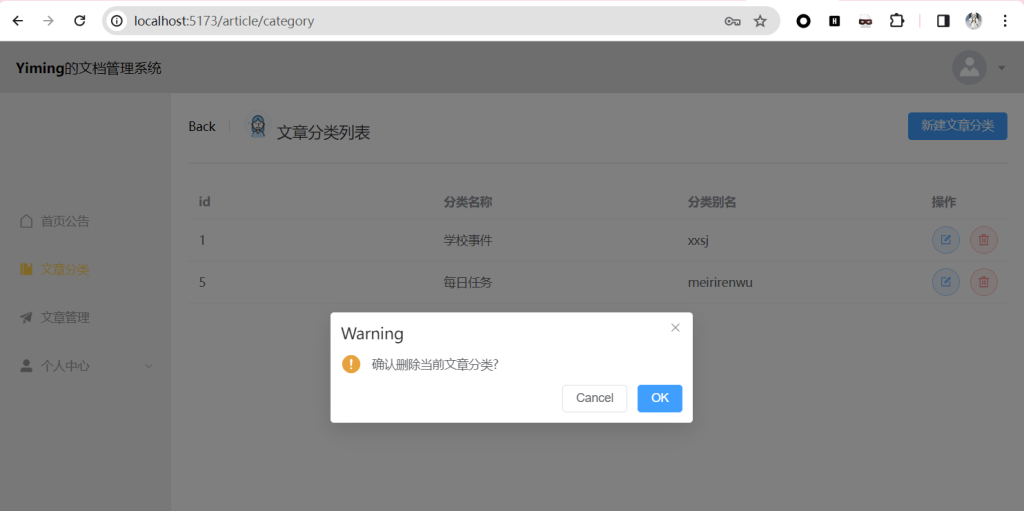
“删”同理,点击按钮触发deleteCategory函数。
函数,弹窗,表单,接口都有自己对应的代码
后端思路分析
后端文件结构需要查看专栏之前的文章,这里就不重复进行申明了
数据访问层CategoryMapper.java,定义CategoryMapper函数用于向数据库添加数据,
服务层CategoryService.java中先声明接口,然后在CategoryServiceImpl.java中定义CategoryService函数通过调用ControllerMapper函数实现添加,(不要忘记在pojo文件夹下声明Category类)
请求层CategoryController.java,调用服务层的函数categoryService.add(category)通过post/get/put等不同的方式实现添加。
需要注意的是:
由于新增文章分类的时候向后端发送的json文件不携带id字段,是由数据库中的id主键自动生成,而更新和删除操作向后端发送的json文件则需要携带,所以在pojo文件夹下声明Category类时需要进行注解分组校验。
页面展示


实现代码
部分项目结构和代码需要参考专栏之前的文章
前端Vue
categorys和categoryModel的声明略
采用了element-plus的UI交互组件,官方参考文档:Overview 组件总览 | Element Plus
根据自己的需要自行拼接
api文件夹下的article.js(接口,删除操作相对于新增需要额外携带id字段作为区别)
import request from '@/utils/request.js'
export const articleCategoryListService = ()=>{return request.get('/category')
}
//文章分类添加
export const articleCategoryAddService = (categoryData)=>{return request.post('/category',categoryData)
}
//文章分类修改
export const articleCategoryUpdateService = (categoryData)=>{return request.put('/category',categoryData)
}
//文章分类删除
export const articleCategoryDeleteService = (id)=>{return request.delete('/category?id='+id)
}
声明要用到的异步函数(放在script部分)
/声明一个异步的函数
import { articleCategoryListService, articleCategoryAddService, articleCategoryUpdateService, articleCategoryDeleteService } from '@/api/article.js'
const articleCategoryList = async () => {let result = await articleCategoryListService();categorys.value = result.data;}
articleCategoryList();
显示文章分类的函数(放在script部分)
//定义变量,控制标题的展示
const title = ref('')const showDialog = (row) => {dialogVisible.value = true; title.value = '编辑分类'//数据拷贝categoryModel.value.categoryName = row.categoryName;categoryModel.value.categoryAlias = row.categoryAlias;//扩展id属性,将来需要传递给后台,完成分类的修改categoryModel.value.id = row.id
}
编辑文章分类的函数(放在script部分)
//编辑分类
const updateCategory = async () => {//调用接口let result = await articleCategoryUpdateService(categoryModel.value);ElMessage.success(result.msg ? result.msg : '编辑成功')//调用获取所有文章分类的函数articleCategoryList();dialogVisible.value = false;
}
删除文章分类的弹窗和函数(放在script部分)
import { ElMessageBox } from 'element-plus'
const deleteCategory = (row) => {ElMessageBox.confirm('确认删除当前文章分类?','Warning',{confirmButtonText: 'OK',cancelButtonText: 'Cancel',type: 'warning',}).then(async () => {//调用接口let result = await articleCategoryDeleteService(row.id);ElMessage({type: 'success',message: 'Delete completed',})articleCategoryList();}).catch(() => {ElMessage({type: 'info',message: 'Delete canceled',})})
}
页面显示部分(即template部分,包括了弹窗和表格)
<template><el-page-header :icon="null"><template #content><div class="flex items-center"><el-avatar :size="32" class="mr-3"src="https://cube.elemecdn.com/0/88/03b0d39583f48206768a7534e55bcpng.png" /><span class="text-large font-600 mr-3"> 文章分类列表</span></div></template><template #extra><el-button type="primary" @click="dialogVisible = true; title = '新建文章分类'; clearData()">新建文章分类</el-button><el-dialog v-model="dialogVisible" :title="title" width="30%"><el-form :model="categoryModel" :rules="rules" label-width="100px" style="padding-right: 30px"><el-form-item label="文章分类名" prop="categoryName"><el-input v-model="categoryModel.categoryName" minlength="1" maxlength="10"></el-input></el-form-item><el-form-item label="备注和说明" prop="categoryAlias"><el-input v-model="categoryModel.categoryAlias" minlength="1" maxlength="15"></el-input></el-form-item></el-form><template #footer><span class="dialog-footer"><el-button @click="dialogVisible = false">取消</el-button><el-button type="primary" @click="title == '新建文章分类' ? addCategory() : updateCategory()"> 确认 </el-button></span></template></el-dialog></template></el-page-header><el-divider></el-divider><el-table :data="categorys" style="width: 100%"><el-table-column label="id" prop="id" /><el-table-column label="分类名称" prop="categoryName"></el-table-column><el-table-column label="分类别名" prop="categoryAlias"></el-table-column><el-table-column label="操作" width="100"><template #default="{ row }"><el-button :icon="Edit" circle plain type="primary" @click="showDialog(row)"></el-button><el-button :icon="Delete" circle plain type="danger" @click="deleteCategory(row)"></el-button></template></el-table-column><template #empty><el-empty description="没有数据" /></template></el-table>
</template>
后端SpringBoot
增删改查的操作上大体相同,所以就合并进行展示了。
实体类(Category.java)
package org.example.pojo;import com.fasterxml.jackson.annotation.JsonFormat;
import jakarta.validation.constraints.NotEmpty;
import jakarta.validation.constraints.NotNull;
import jakarta.validation.groups.Default;
import lombok.Data;
import org.apache.ibatis.annotations.Update;
import java.time.LocalDateTime;@Data
public class Category {@NotNull(groups = Update.class)private Integer id;//主键ID@NotEmpty/*(groups = {Add.class, Update.class})*/private String categoryName;//分类名称@NotEmpty/*(groups = {Add.class, Update.class})*/private String categoryAlias;//分类别名private Integer createUser;//创建人ID@JsonFormat(pattern = "yyyy-MM-dd HH:mm:ss")private LocalDateTime createTime;//创建时间@JsonFormat(pattern = "yyyy-MM-dd HH:mm:ss")private LocalDateTime updateTime;//更新时间public interface Add extends Default {}public interface Update extends Default{}
}
请求层(CategoryController.java)
package org.example.controller;import org.apache.ibatis.annotations.Mapper;
import org.example.pojo.Result;
import org.example.pojo.Category;
import org.example.service.CategoryService;
import org.springframework.beans.factory.annotation.Autowired;
import org.springframework.validation.annotation.Validated;
import org.springframework.web.bind.annotation.*;import java.util.List;@RestController
@RequestMapping("/category")
public class CategoryController {@Autowiredprivate CategoryService categoryService;@PostMappingpublic Result add(@RequestBody @Validated(Category.Add.class) Category category){categoryService.add(category);return Result.success();}@GetMappingpublic Result<List<Category>> list(){List<Category> cs = categoryService.list();return Result.success(cs);}@GetMapping("/detail")public  Result<Category> detail(Integer id){Category c = categoryService.findById(id);return Result.success(c);}@PutMappingpublic Result update(@RequestBody @Validated(Category.Update.class) Category category){categoryService.update(category);return Result.success();}@DeleteMappingpublic Result delete(Integer id){categoryService.deleteById(id);return Result.success();}
}
服务层(CategoryServiceImpl.java,CategoryService.java只需进行声明函数略)
package org.example.service.impl;import org.example.mapper.CategoryMapper;
import org.example.pojo.Category;
import org.example.service.CategoryService;
import org.example.utils.ThreadLocalUtil;
import org.springframework.beans.factory.annotation.Autowired;
import org.springframework.stereotype.Service;
import java.time.LocalDateTime;
import java.util.List;
import java.util.Map;@Service
public class CategoryServiceImpl implements CategoryService {@Autowiredprivate CategoryMapper categoryMapper;@Overridepublic void add(Category category){category.setCreateTime(LocalDateTime.now());category.setUpdateTime(LocalDateTime.now());Map<String,Object> map = ThreadLocalUtil.get();Integer userId = (Integer) map.get("id");category.setCreateUser(userId);categoryMapper.add(category);}@Overridepublic List<Category> list(){Map<String,Object> map = ThreadLocalUtil.get();Integer userId = (Integer) map.get("id");return categoryMapper.list(userId);}@Overridepublic Category findById(Integer id) {Category c = categoryMapper.findById(id);return c;}@Overridepublic void update(Category category){category.setUpdateTime(LocalDateTime.now());categoryMapper.update(category);}@Overridepublic void deleteById(Integer id){categoryMapper.deleteById(id);}
}
数据访问层(CategoryMapper.java)
package org.example.mapper;
import org.apache.ibatis.annotations.*;
import org.example.pojo.Category;
import java.util.List;
@Mapper
public interface CategoryMapper {@Insert("insert into category(category_name,category_alias,create_user,create_time,update_time)" +"values (#{categoryName},#{categoryAlias},#{createUser},#{createTime},#{updateTime})")void add(Category category);@Select("select * from category where create_user = #{userId}")List<Category> list(Integer userId);@Select("select * from category where id = #{id}")Category findById(Integer id);@Update("update category set category_name=#{categoryName},category_alias=#{categoryAlias},update_time=now() where id=#{id}")void update(Category category);@Delete("delete from category where id=#{id}")void deleteById(Integer id);
}
尾声
一周一码,后面就是文章管理的部分了。
这篇关于前后端开发之——文章分类管理的文章就介绍到这儿,希望我们推荐的文章对编程师们有所帮助!


