本文主要是介绍给QGIS开发一个卷帘工具,希望对大家解决编程问题提供一定的参考价值,需要的开发者们随着小编来一起学习吧!
版权声明:未经作者允许不得转载,此插件不得用于商业用途。
目录
开发环境
插件开发
__init__.py
map_swipe_plugin.py
map_swipe_tool.py
active
deactivate
canvasPressEvent
canvasReleaseEvent
canvasMoveEvent
swipe_map.py
实现结果
开发环境
- QGIS 3.2
- python(QGIS自带)
插件开发
关于QGIS中使用python开发插件的方法,自行查看官方文档
__init__.py
from .map_swipe_plugin import MapSwipePlugindef classFactory(iface):return MapSwipePlugin(iface)map_swipe_plugin.py
import osfrom PyQt5.QtGui import QIcon
from PyQt5.QtWidgets import QWidget, QHBoxLayout, QComboBox, QPushButton
from qgis.core import QgsProject
from qgis.gui import QgsMapToolPanfrom .map_swipe_tool import MapSwipeToolplugin_path = os.path.dirname(__file__)class MapSwipePlugin:def __init__(self, iface):self.iface = ifaceself.canvas = iface.mapCanvas()# 图层变化信号QgsProject.instance().layerTreeRoot().layerOrderChanged.connect(self.combobox_add_items)def initGui(self):self.menu = self.title = "卷帘工具"self._create_widget()self.tool = MapSwipeTool(plugin_path, self.combobox, self.iface)self.tool.deactivated.connect(self.tool_deactivated)self.widget_action = self.iface.addToolBarWidget(self.widget)def unload(self):self.canvas.setMapTool(QgsMapToolPan(self.iface.mapCanvas()))self.iface.removeToolBarIcon(self.widget_action)del self.widget_actiondef run(self):if self.canvas.mapTool() != self.tool:self.prevTool = self.canvas.mapTool()self.canvas.setMapTool(self.tool)else:self.canvas.setMapTool(self.prevTool)if self.pushbutton.isChecked() and self.combobox.isHidden():self.combobox.show()self.combobox_add_items()else:self.combobox.hide()def _create_widget(self):icon = QIcon(os.path.join(plugin_path, 'icon.png'))# 新建widgetself.widget = QWidget(self.iface.mainWindow())self.hlayout = QHBoxLayout(self.widget)self.hlayout.setContentsMargins(0, 0, 0, 0)self.pushbutton = QPushButton(icon, '', self.widget)self.pushbutton.setCheckable(True)self.pushbutton.setFlat(True)self.combobox = QComboBox(self.widget)self.hlayout.addWidget(self.pushbutton)self.hlayout.addWidget(self.combobox)self.combobox.hide()self.combobox_add_items()self.pushbutton.clicked.connect(self.run)def combobox_add_items(self):self.combobox.clear()layers = QgsProject.instance().layerTreeRoot().layerOrder()self.combobox.addItems([layer.name() for layer in layers])def tool_deactivated(self):'''tool非激活状态'''self.pushbutton.setChecked(False)self.combobox.hide()
map_swipe_tool.py
import os
from PyQt5.QtCore import Qt, QPoint
from PyQt5.QtGui import QCursor, QPixmap
from qgis.gui import QgsMapTool
from qgis.core import QgsProject, QgsMapSettings, QgsMapRendererParallelJob
from .swipe_map import SwipeMapclass MapSwipeTool(QgsMapTool):def __init__(self, plugin_path, combobox, iface):super(MapSwipeTool, self).__init__(iface.mapCanvas())self.combobox = comboboxself.map_canvas = iface.mapCanvas()self.view = iface.layerTreeView()self.swipe = SwipeMap(self.map_canvas)self.hasSwipe = Noneself.start_point = QPoint()self.cursorSV = QCursor(QPixmap(os.path.join(plugin_path, 'images/split_v.png')))self.cursorSH = QCursor(QPixmap(os.path.join(plugin_path, 'images/split_h.png')))self.cursorUP = QCursor(QPixmap(os.path.join(plugin_path, 'images/up.png')))self.cursorDOWN = QCursor(QPixmap(os.path.join(plugin_path, 'images/down.png')))self.cursorLEFT = QCursor(QPixmap(os.path.join(plugin_path, 'images/left.png')))self.cursorRIGHT = QCursor(QPixmap(os.path.join(plugin_path, 'images/right.png')))def activate(self):self.map_canvas.setCursor(QCursor(Qt.CrossCursor))self._connect()self.hasSwipe = Falseself.setLayersSwipe()def canvasPressEvent(self, e):self.hasSwipe = Truedirection = Nonew, h = self.map_canvas.width(), self.map_canvas.height()if 0.25 * w < e.x() < 0.75 * w and e.y() < 0.5 * h:direction = 0  # '⬇'self.swipe.isVertical = Falseif 0.25 * w < e.x() < 0.75 * w and e.y() > 0.5 * h:direction = 1  # '⬆'self.swipe.isVertical = Falseif e.x() < 0.25 * w:direction = 2  # '➡'self.swipe.isVertical = Trueif e.x() > 0.75 * w:direction = 3  # '⬅'self.swipe.isVertical = Trueself.swipe.set_direction(direction)self.map_canvas.setCursor(self.cursorSH if self.swipe.isVertical else self.cursorSV)self.swipe.set_img_extent(e.x(), e.y())def canvasReleaseEvent(self, e):self.hasSwipe = Falseself.canvasMoveEvent(e)# 鼠标释放后,移除绘制的线self.swipe.set_img_extent(-9999, -9999)def canvasMoveEvent(self, e):if self.hasSwipe:self.swipe.set_img_extent(e.x(), e.y())else:# 设置当前cursorw, h = self.map_canvas.width(), self.map_canvas.height()if e.x() < 0.25 * w:self.canvas().setCursor(self.cursorRIGHT)if e.x() > 0.75 * w:self.canvas().setCursor(self.cursorLEFT)if 0.25 * w < e.x() < 0.75 * w and e.y() < 0.5 * h:self.canvas().setCursor(self.cursorDOWN)if 0.25 * w < e.x() < 0.75 * w and e.y() > 0.5 * h:self.canvas().setCursor(self.cursorUP)def _connect(self, isConnect=True):signal_slot = ({'signal': self.map_canvas.mapCanvasRefreshed, 'slot': self.setMap},{'signal': self.combobox.currentIndexChanged, 'slot': self.setLayersSwipe},{'signal': QgsProject.instance().removeAll, 'slot': self.disable})if isConnect:for item in signal_slot:item['signal'].connect(item['slot'])else:for item in signal_slot:item['signal'].disconnect(item['slot'])def setLayersSwipe(self, ):current_layer = QgsProject.instance().mapLayersByName(self.combobox.currentText())if len(current_layer) == 0:returnlayers = QgsProject.instance().layerTreeRoot().layerOrder()layer_list = []for layer in layers:if layer.id() == current_layer[0].id():continuelayer_list.append(layer)self.swipe.clear()self.swipe.setLayersId(layer_list)self.setMap()def disable(self):self.swipe.clear()self.hasSwipe = Falsedef deactivate(self):self.deactivated.emit()self.swipe.clear()self._connect(False)def setMap(self):def finished():self.swipe.setContent(job.renderedImage(), self.map_canvas.extent())if len(self.swipe.layers) == 0:returnsettings = QgsMapSettings(self.map_canvas.mapSettings())settings.setLayers(self.swipe.layers)job = QgsMapRendererParallelJob(settings)job.start()job.finished.connect(finished)job.waitForFinished()
MapSwipeTool继承了QgsMapTool类,重新实现了activate、deactivate、canvasPressEvent、canvasReleaseEvent、canvasMoveEvent方法,还用到了QgsMapRendererParallelJob类,QgsMapRendererParallelJob是QGIS提供的并行绘图类,不做详解,下面对重新实现的方法详细说明:
active
工具激活后执行此函数
deactivate
工具非激活状态执行此函数
canvasPressEvent
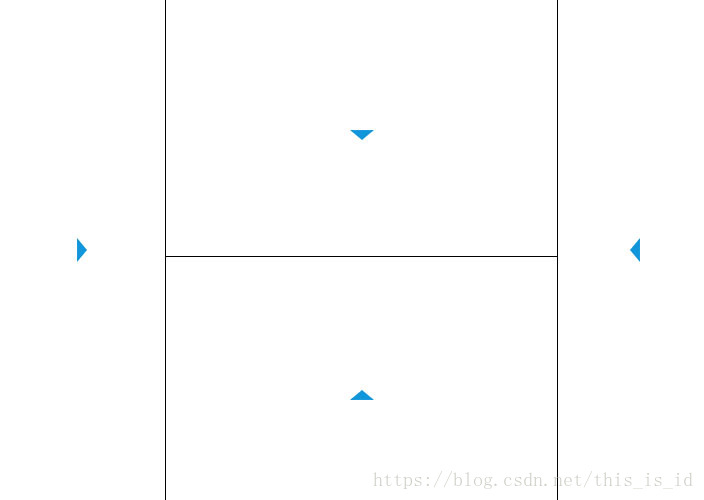
def canvasPressEvent(self, e):self.hasSwipe = Truedirection = Nonew, h = self.map_canvas.width(), self.map_canvas.height()if 0.25 * w < e.x() < 0.75 * w and e.y() < 0.5 * h:direction = 0 # '⬇'self.swipe.isVertical = Falseif 0.25 * w < e.x() < 0.75 * w and e.y() > 0.5 * h:direction = 1 # '⬆'self.swipe.isVertical = Falseif e.x() < 0.25 * w:direction = 2 # '➡'self.swipe.isVertical = Trueif e.x() > 0.75 * w:direction = 3 # '⬅'self.swipe.isVertical = Trueself.swipe.set_direction(direction)self.map_canvas.setCursor(self.cursorSH if self.swipe.isVertical else self.cursorSV)self.swipe.set_img_extent(e.x(), e.y())画布的鼠标按压事件,将画布分为四个部分,获得卷帘的方向,然后设置鼠标光标,具体实现方式自行脑补,原理如下图:
canvasReleaseEvent
def canvasReleaseEvent(self, e):self.hasSwipe = Falseself.canvasMoveEvent(e)# 鼠标释放后,移除绘制的线self.swipe.set_img_extent(-9999, -9999)画布的鼠标释放事件,鼠标释放后要把绘制的线移出画布
self.swipe.set_img_extent(-9999, -9999)canvasMoveEvent
def canvasMoveEvent(self, e):if self.hasSwipe:self.swipe.set_img_extent(e.x(), e.y())else:# 设置当前cursorw, h = self.map_canvas.width(), self.map_canvas.height()if e.x() < 0.25 * w:self.canvas().setCursor(self.cursorRIGHT)if e.x() > 0.75 * w:self.canvas().setCursor(self.cursorLEFT)if 0.25 * w < e.x() < 0.75 * w and e.y() < 0.5 * h:self.canvas().setCursor(self.cursorDOWN)if 0.25 * w < e.x() < 0.75 * w and e.y() > 0.5 * h:self.canvas().setCursor(self.cursorUP)画布的鼠标移动事件,当使用卷帘时,获得鼠标的位置(e.x(),e.y()),当不使用卷帘时,根据鼠标的位置设置鼠标的光标形状,原理与canvasPressEvent相同
swipe_map.py
from PyQt5.QtCore import QRectF, QPointF, Qt
from PyQt5.QtGui import QPen, QColor
from qgis.gui import QgsMapCanvasItemclass SwipeMap(QgsMapCanvasItem):def __init__(self, canvas):super(SwipeMap, self).__init__(canvas)self.length = 0self.isVertical = Trueself.layers = []self.is_paint = Falsedef setContent(self, image, rect):self.copyimage = imageself.setRect(rect)def clear(self):del self.layers[:]self.is_paint = Falsedef setLayersId(self, layers):del self.layers[:]for item in layers:self.layers.append(item)def set_direction(self, direction):# 0:'⬇', 1:'⬆', 2:'➡', 3:'⬅'if direction == 0:self.direction = 0elif direction == 1:self.direction = 1elif direction == 2:self.direction = 2else:self.direction = 3self.startx, self.starty, self.endx, self.endy = 0, 0, self.boundingRect().width(), self.boundingRect().height()def set_img_extent(self, x, y):self.x = xself.y = yif self.direction == 0:  # 0:'⬇'self.endy = yelif self.direction == 1:  # 1:'⬆'self.starty = yelif self.direction == 2:  # 2:'➡'self.endx = xelse:  # 3:'⬅'self.startx = xself.is_paint = Trueself.update()def paint(self, painter, *args):if len(self.layers) == 0 or self.is_paint == False:returnw = self.boundingRect().width()h = self.boundingRect().height()pen = QPen(Qt.DashDotDotLine)pen.setColor(QColor(18, 150, 219))pen.setWidth(4)if self.isVertical:painter.setPen(pen)painter.drawLine(QPointF(self.x, 0), QPointF(self.x, h))else:painter.setPen(pen)painter.drawLine(QPointF(0, self.y), QPointF(w, self.y))image = self.copyimage.copy(self.startx, self.starty, self.endx, self.endy)painter.drawImage(QRectF(self.startx, self.starty, self.endx, self.endy), image)
此模块为绘制地图模块,首先获得绘制地图的范围
self.startx, self.starty, self.endx, self.endy = 0, 0, self.boundingRect().width(), self.boundingRect().height()然后重写绘制函数paint
def paint(self, painter, *args):if len(self.layers) == 0 or self.is_paint == False:returnw = self.boundingRect().width()h = self.boundingRect().height()pen = QPen(Qt.DashDotDotLine)pen.setColor(QColor(18, 150, 219))pen.setWidth(4)if self.isVertical:painter.setPen(pen)painter.drawLine(QPointF(self.x, 0), QPointF(self.x, h))else:painter.setPen(pen)painter.drawLine(QPointF(0, self.y), QPointF(w, self.y))image = self.copyimage.copy(self.startx, self.starty, self.endx, self.endy)painter.drawImage(QRectF(self.startx, self.starty, self.endx, self.endy), image)实现结果
项目地址:MapSwipeTool
这篇关于给QGIS开发一个卷帘工具的文章就介绍到这儿,希望我们推荐的文章对编程师们有所帮助!


