本文主要是介绍Android adb adbd Analyse,希望对大家解决编程问题提供一定的参考价值,需要的开发者们随着小编来一起学习吧!
| Android Adb Analyse |
转自 http://blog.csdn.net/liranke/article/category/605374/1
TABLE OF CONTENTS
1 Introduction
1.1 Purpose
1.2 Definitions, Acronyms, and Abbreviations
2 Architecture
2.1 Module Architecture Diagram
3 Sub Module
3.1 Compile adb/adbd
3.2 Compile dalvikvm and libjavacore
3.3 Adbd
3.3.1 process:
3.3.2 Data Structure
3.4 Adb server
3.5 Adb client
3.6 DDMS
3.6.1 Main sub-module description
3.6.2 Flow chart:
3.7 Logcat and dmsg
4 Adbd and VM
4.1 Adb_main flow chart:
4.2 Data structure
1 Introduction
1.1 Purpose
ADB(Android Debug Bridge) quickview:
(1). Manage the state of an emulator or device
(2). Run shell commands on a device
(3). Manage port forwarding on an emulator or device
(4). Copy files to/from an emulator or device
In android sdk document:
Issuing ADB Commands
Querying for Emulator/Device Instances
Directing Commands to a Specific Emulator/Device Instance
Installing an Application
Forwarding Ports
Copying Files to or from an Emulator/Device Instance
Listing of adb Commands
Issuing Shell Commands
Enabling logcat Logging
Stopping the adb Server
See also
Emulator
Android Debug Bridge (adb) is a versatile tool lets you manage the state of an emulator instance or Android-powered device. It is a client-server program that includes three components:
A client, which runs on your development machine. You can invoke a client from a shell by issuing an adb command. Other Android tools such as the ADT plugin and DDMS also create adb clients.
A server, which runs as a background process on your development machine. The server manages communication between the client and the adb daemon running on an emulator or device.
A daemon, which runs as a background process on each emulator or device instance.
When you start an adb client, the client first checks whether there is an adb server process already running. If there isn't, it starts the server process. When the server starts, it binds to local TCP port 5037 and listens for commands sent from adb clients—all adb clients use port 5037 to communicate with the adb server.
The server then sets up connections to all running emulator/device instances. It locates emulator/device instances by scanning odd-numbered ports in the range 5555 to 5585, the range used by emulators/devices. Where the server finds an adb daemon, it sets up a connection to that port. Note that each emulator/device instance acquires a pair of sequential ports — an even-numbered port for console connections and an odd-numbered port for adb connections. For example:
Emulator 1, console: 5554
Emulator 1, adb: 5555
Emulator 2, console: 5556
Emulator 2, adb: 5557 ...
As shown, the emulator instance connected to adb on port 5555 is the same as the instance whose console listens on port 5554.
Once the server has set up connections to all emulator instances, you can use adb commands to control and access those instances. Because the server manages connections to emulator/device instances and handles commands from multiple adb clients, you can control any emulator/device instance from any client (or from a script).
More information, see to android sdk.
For example, adb server will be start when user open eclipse, if close adb server, the adb server will be start again.
1.2 Definitions, Acronyms, and Abbreviations
DDMS:Dalvik Debug Monitor Service)
Adb: Android Debug Bridge
Adbd: adb daemon
Jdwp: JavaTM Debug Wire Protocol
2 Architecture
2.1 Module Architecture Diagram
1. There are 3 module in android adb solution, adbd, adb server, and adb client, details as below:
| module name | process name | run as |
| adbd | adbd | device/emulator |
| adb server | windows: adb.exe linux: adb | client |
| adb client | such as eclipse, screencast, ddm app... and so on | client |
2. adb diagram:
(1) Simple chart as below:
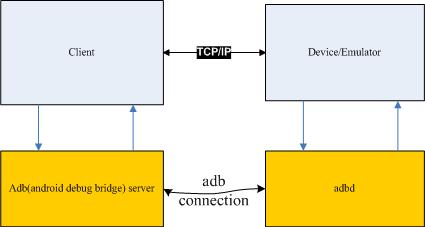
The adb server must connect with adbd, this connect is adbconnect. Then client can communicate with Device/Emulator.
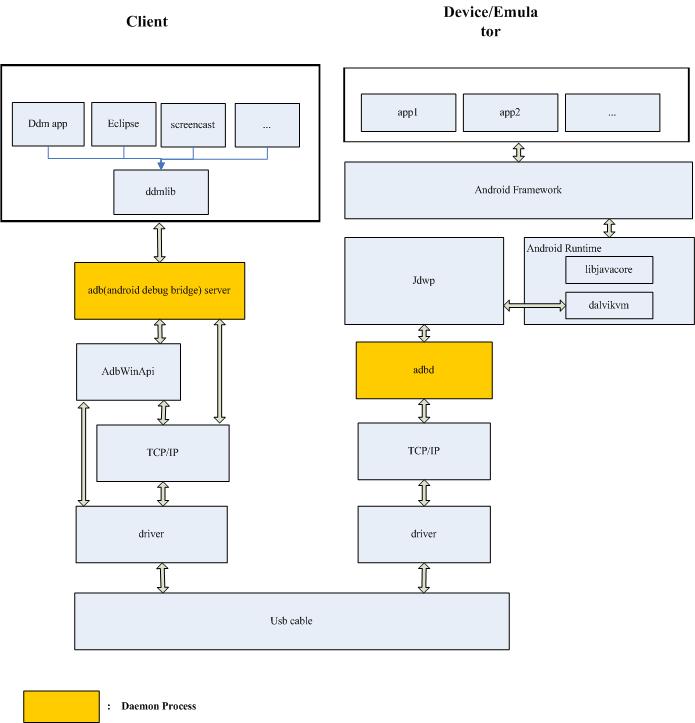
(2) adb diagram:
3 Sub Module
3.1 Compile adb/adbd
Adbd daemon will be compile when ADB_HOST = 0; and if ADB_HOST = 1, adb/adb.exe will be compile.
make file as below:
Android.mk: system/cre/adb/
# Copyright 2005 The Android Open Source Project
#
# Android.mk for adb
#
LOCAL_PATH:= $(call my-dir)
# adb host tool
# =========================================================
ifneq ($(TARGET_SIMULATOR),true) # not 64 bit clean (also unused with the sim)
include $(CLEAR_VARS)
# Default to a virtual (sockets) usb interface
USB_SRCS :=
EXTRA_SRCS :=
ifeq ($(HOST_OS),linux)
USB_SRCS := usb_linux.c
EXTRA_SRCS := get_my_path_linux.c
LOCAL_LDLIBS += -lrt -lncurses -lpthread
endif
ifeq ($(HOST_OS),darwin)
USB_SRCS := usb_osx.c
EXTRA_SRCS := get_my_path_darwin.c
LOCAL_LDLIBS += -lpthread -framework CoreFoundation -framework IOKit -framework Carbon
endif
ifeq ($(HOST_OS),windows)
USB_SRCS := usb_windows.c
EXTRA_SRCS := get_my_path_windows.c
EXTRA_STATIC_LIBS := AdbWinApi
LOCAL_C_INCLUDES += /usr/include/w32api/ddk development/host/windows/usb/api/
ifneq ($(strip $(USE_CYGWIN)),)
LOCAL_LDLIBS += -lpthread
else
LOCAL_LDLIBS += -lws2_32
USE_SYSDEPS_WIN32 := 1
endif
endif
LOCAL_SRC_FILES := /
adb.c /
console.c /
transport.c /
transport_local.c /
transport_usb.c /
commandline.c /
adb_client.c /
sockets.c /
services.c /
file_sync_client.c /
$(EXTRA_SRCS) /
$(USB_SRCS) /
shlist.c /
utils.c /
ifneq ($(USE_SYSDEPS_WIN32),)
LOCAL_SRC_FILES += sysdeps_win32.c
endif
LOCAL_CFLAGS += -O2 -g -DADB_HOST=1 -Wall -Wno-unused-parameter
LOCAL_CFLAGS += -D_XOPEN_SOURCE -D_GNU_SOURCE -DSH_HISTORY
LOCAL_MODULE := adb
LOCAL_STATIC_LIBRARIES := libzipfile libunz $(EXTRA_STATIC_LIBS)
ifeq ($(USE_SYSDEPS_WIN32),)
LOCAL_STATIC_LIBRARIES += libcutils
endif
include $(BUILD_HOST_EXECUTABLE)
$(call dist-for-goals,droid,$(LOCAL_BUILT_MODULE))
ifeq ($(HOST_OS),windows)
$(LOCAL_INSTALLED_MODULE): $(HOST_OUT_EXECUTABLES)/AdbWinApi.dll
endif
endif
# adbd device daemon
# =========================================================
# build adbd in all non-simulator builds
BUILD_ADBD := false
ifneq ($(TARGET_SIMULATOR),true)
BUILD_ADBD := true
endif
# build adbd for the Linux simulator build
# so we can use it to test the adb USB gadget driver on x86
ifeq ($(HOST_OS),linux)
BUILD_ADBD := true
endif
ifeq ($(BUILD_ADBD),true)
include $(CLEAR_VARS)
LOCAL_SRC_FILES := /
adb.c /
transport.c /
transport_local.c /
transport_usb.c /
sockets.c /
services.c /
file_sync_service.c /
jdwp_service.c /
framebuffer_service.c /
remount_service.c /
usb_linux_client.c /
log_service.c /
utils.c /
LOCAL_CFLAGS := -O2 -g -DADB_HOST=0 -Wall -Wno-unused-parameter
LOCAL_CFLAGS += -D_XOPEN_SOURCE -D_GNU_SOURCE
# TODO: This should probably be board specific, whether or not the kernel has
# the gadget driver; rather than relying on the architecture type.
ifeq ($(TARGET_ARCH),arm)
LOCAL_CFLAGS += -DANDROID_GADGET=1
endif
LOCAL_MODULE := adbd
LOCAL_FORCE_STATIC_EXECUTABLE := true
LOCAL_MODULE_PATH := $(TARGET_ROOT_OUT_SBIN)
LOCAL_UNSTRIPPED_PATH := $(TARGET_ROOT_OUT_SBIN_UNSTRIPPED)
ifeq ($(TARGET_SIMULATOR),true)
LOCAL_STATIC_LIBRARIES := libcutils
LOCAL_LDLIBS += -lpthread
include $(BUILD_HOST_EXECUTABLE)
else
LOCAL_STATIC_LIBRARIES := libcutils libc
include $(BUILD_EXECUTABLE)
endif
endif
3.2 Compile dalvikvm and libjavacore
Dalvikvm: dalvik/dalvikvm/Android.mk
libjavacore: dalvik/libcore/Android.mk
3.3 Adbd
Adbd have been implemented by android platform with C language.
Adbd, which runs as a background process on each emulator or device instance. It is why adbd is a daemon.
3.3.1 process:
1. adbd main:
Service adbd of init.rc will start adbd, run main of adb.c, and adb_main(0) function willl be called. As below:
adb.c main:
int main(int argc, char **argv)
{
adb_trace_init();
#if ADB_HOST
adb_sysdeps_init();
return adb_commandline(argc - 1, argv + 1); // remove ”adb”
#else
if((argc > 1) && (!strcmp(argv[1],"recovery"))) {
adb_device_banner = "recovery"; //is Recovery mode?
recovery_mode = 1;
}
#if ADB_DEVICE_LOG
start_device_log();
#endif
return adb_main(0); // adbd entrance , this will be call when execute “service adbd” command.
#endif
}
2. adb_main:
Adbd will create a pair of socket, one for control connections, and another for connecting adb client. And it will init Jdwp for interactive between Adbd and VM, it means adbd can send or receive msg(include event, data, and so on) to(or from) application. Flow chart as below:
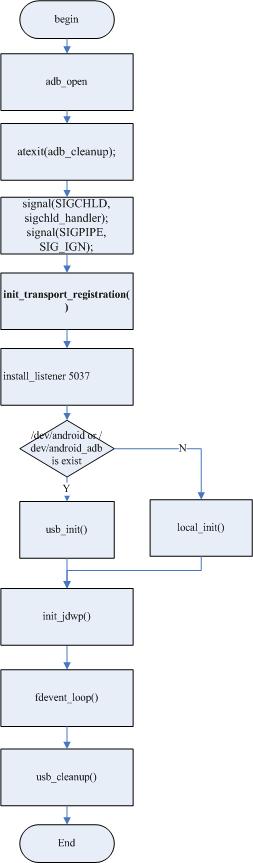
Chart 3.2
In init_transport_registration, adb_socketpair function will be called.
3.3.2 Data Structure
struct fdevent
{
fdevent *next;
fdevent *prev;
int fd;
unsigned short state;
unsigned short events;
fd_func func;
void *arg;
};
3.4 Adb server
Adb server, which runs as a background process on your development machine. The server manages communication between the client and the adb daemon running on an emulator or device.
ADB server is process running on PC, it start can be via “adb fork-server server”, see to launch_server().
Adb server locates emulator/device instances by scanning odd-numbered ports in the range 5555 to 5585, flow as below:
Install_listener function will implement server init.
3.5 Adb client
Adb client can be shell, ddms, eclipse ADT, or other application. And Adb server is daemon, it is adb.exe in window and adb process in linux.
Adb server must be start for communication with adb client.
Adb command is executed on cmd of windows or shell of linux as client.
Adb server and adb client is based on socket communication (port is 5037).
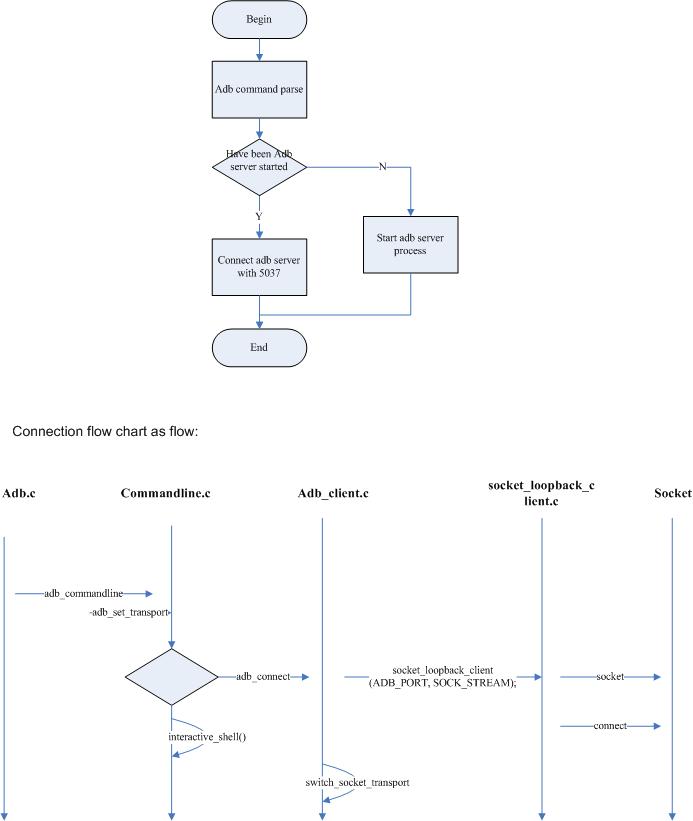
ADB_PORT equals 5037.
Server and client connection chart:
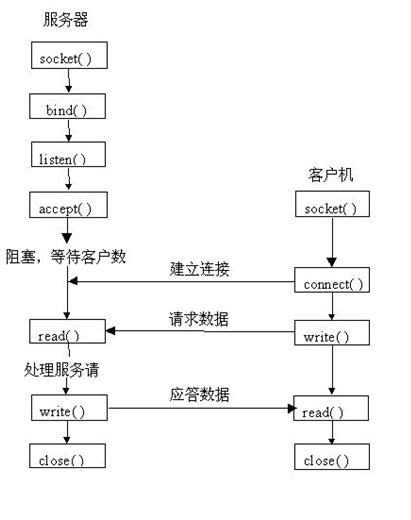
Come from <<linux 编程白皮书>>
3.6 DDMS
Android ships with a debugging tool called the Dalvik Debug Monitor Service (DDMS), which provides port-forwarding services, screen capture on the device, thread and heap information on the device, logcat, process, and radio state information, incoming call and SMS spoofing, location data spoofing, and more. This page provides a modest discussion of DDMS features; it is not an exhaustive exploration of all the features and capabilities.
DDMS ships in the tools/ directory of the SDK. Enter this directory from a terminal/console and type ddms (or ./ddms on Mac/Linux) to run it. DDMS will work with both the emulator and a connected device. If both are connected and running simultaneously, DDMS defaults to the emulator.
How DDMS works
DDMS acts as a middleman to connect the IDE to the applications running on the device. On Android, every application runs in its own process, each of which hosts its own virtual machine (VM). And each process listens for a debugger on a different port.
When it starts, DDMS connects to adb and starts a device monitoring service between the two, which will notify DDMS when a device is connected or disconnected. When a device is connected, a VM monitoring service is created between adb and DDMS, which will notify DDMS when a VM on the device is started or terminated. Once a VM is running, DDMS retrieves the the VM's process ID (pid), via adb, and opens a connection to the VM's debugger, through the adb daemon (adbd) on the device. DDMS can now talk to the VM using a custom wire protocol.
For each VM on the device, DDMS opens a port upon which it will listen for a debugger. For the first VM, DDMS listens for a debugger on port 8600, the next on 8601, and so on. When a debugger connects to one of these ports, all traffic is forwarded between the debugger and the associated VM. Debugging can then process like any remote debugging session.
DDMS also opens another local port, the DDMS "base port" (8700, by default), upon which it also listens for a debugger. When a debugger connects to this base port, all traffic is forwarded to the VM currently selected in DDMS, so this is typically where you debugger should connect.
For more information on port-forwarding with DDMS, read Configuring your IDE to attach to port 8700 for debugging. [from android sdk]
3.6.1 Main sub-module description
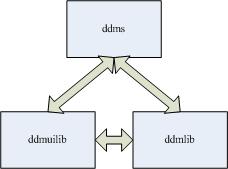
DDMS include 3 module: ddmlib, ddmuilib and ddms.
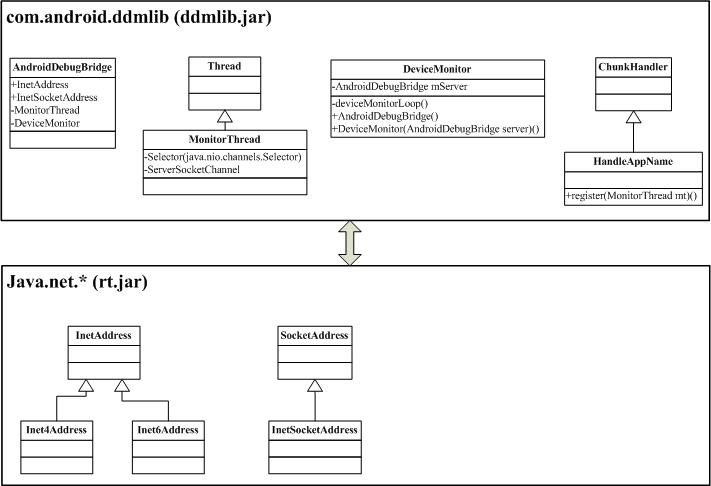
1. ddmlib is jar library of PC side, and is implemented by android platform with java. It define a serial of class what supply for communication between PC app and Phone app.
AndroidDebugBridge class inherit object. AndroidDebugBridge is A connection to the host-side android debug bridge(adb),and this is the central point to communicate with any devices, emulators, or the applications running on them.
Device class implement IDevice interface, and a device can be a physical device or an emulator.
There are other class in ddmlib, more information, see to /development/tools/ddms/libs.
2. ddmuilib supply UI interface for implement UI in PC.
3. ddms is belong application layer, and start the UI and network.
3.6.2 Flow chart:
As example, when user input cmd, phone will parse and process the cmd, flow chart as below:

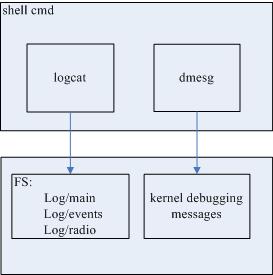
3.7 Logcat and dmsg
[ from android sdk 1.6]
1. The Android logging system provides a mechanism for collecting and viewing system debug output. Logs from various applications and portions of the system are collected in a series of circular buffers, which then can be viewed and filtered by the logcat command.
2. Filtering Log Output
Every Android log message has a tag and a priority associated with it.
The tag of a log message is a short string indicating the system component from which the message originates (for example, "View" for the view system).
The priority is one of the following character values, ordered from lowest to highest priority:
V — Verbose (lowest priority)
D — Debug
I — Info
W — Warning
E — Error
F — Fatal
S — Silent (highest priority, on which nothing is ever printed)
3. Viewing Alternative Log Buffers
The Android logging system keeps multiple circular buffers for log messages, and not all of the log messages are sent to the default circular buffer. To see additional log messages, you can start logcat with the -boption, to request viewing of an alternate circular buffer. You can view any of these alternate buffers:
radio — View the buffer that contains radio/telephony related messages.
events — View the buffer containing events-related messages.
main — View the main log buffer (default)
dmesg: Prints kernel debugging messages to the screen.
4 Adbd and VM
In order to more easily debug, android offers a adbd daemon for interact with java debugging systems.
They will use jdwp protocol. There init jdwp in adb.c via call init_jdwp().
4.1 Adb_main flow chart:
adb_main Flow chart:
init:
1.init_transport_registration
1.1 adb_socketpair(s)
unix_socketpair( AF_UNIX, SOCK_STREAM, 0, sv );
socketpair( d, type, protocol, sv );
close_on_exec( sv[0] );
close_on_exec( sv[1] );
1.2 fdevent_install
1.3 fdevent_set
2.start the usb transport or network transport
usb_init() :
adb_thread_create(&tid, device_poll_thread, NULL))
find_usb_device("/dev/bus/usb", register_device);
register_usb_transport(usb, serial);
init_usb_transport(t, usb);
register_transport(t);
transport_write_action(transport_registration_send
adb_write(fd, p, len);
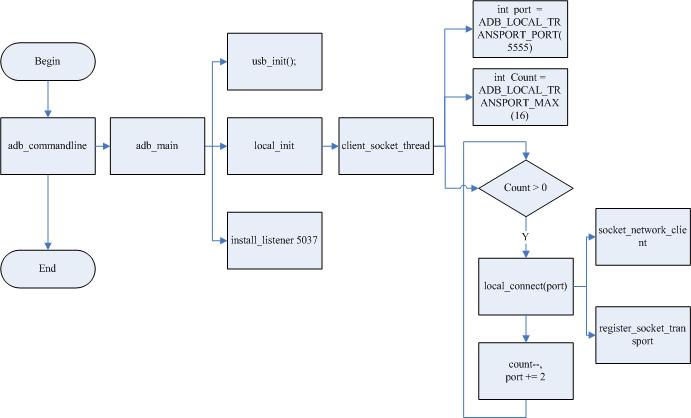
local_init()
2.1 adb_thread_create 会注册server_socket_thread函数
2.1.1 socket_inaddr_any_server(5555,…) //open listen() port on any interface
2.1.1.1 socket
2.1.1.2 setsockopt
2.1.1.3 bind
2.1.1.2 listen
2.1.2 adb_socket_accept
2.1.3 register_socket_transport(fd,"host",5555);
3.init_jdwp(); //注册回调函数.
最终通过下面两个函数进行的:
jdwp_service.c, proc->fde = fdevent_create( socket, jdwp_process_event, proc );
control->fde = fdevent_create(s, jdwp_control_event, control);
4.fdevent_loop();
for(;;) {
fdevent_process();
n = select(select_n, &rfd, &wfd, &efd, 0);
fdevent_plist_enqueue(fde); // 将event放入到list中
while((fde = fdevent_plist_dequeue())) { //将event从list中取出来
unsigned events = fde->events;
fde->events = 0;
fde->state &= (~FDE_PENDING);
dump_fde(fde, "callback");
fde->func(fde->fd, events, fde->arg);
}
5.usb_cleanup();
6.return 0;
4.2 Data structure
Data structure:
typedef struct JdwpProcess ;
struct JdwpProcess {
JdwpProcess* next;
JdwpProcess* prev;
int pid;
int socket;
fdevent* fde;
char in_buff[4]; /* input character to read PID */
int in_len; /* number from JDWP process */
int out_fds[MAX_OUT_FDS]; /* output array of file descriptors */
int out_count; /* to send to the JDWP process */
};
struct fdevent
{
fdevent *next;
fdevent *prev;
int fd;
unsigned short state;
unsigned short events;
fd_func func;
void *arg;
};
这篇关于Android adb adbd Analyse的文章就介绍到这儿,希望我们推荐的文章对编程师们有所帮助!


